Easy Cotton Placemat Knitting Pattern (Perfect For Dining)
THIS ARTICLE CONTAINS AFFILIATE LINKS THAT SUPPORT HANDY LITTLE ME CONTENT AND FREE PATTERNS.Looking to knit something practical and beautiful for your table? This easy cotton placemat knitting pattern is just the thing.
Designed with everyday use in mind, it’s made using soft, durable Pima cotton that’s washable and elegant — perfect for everyday meals, alfresco dining, or hosting guests.
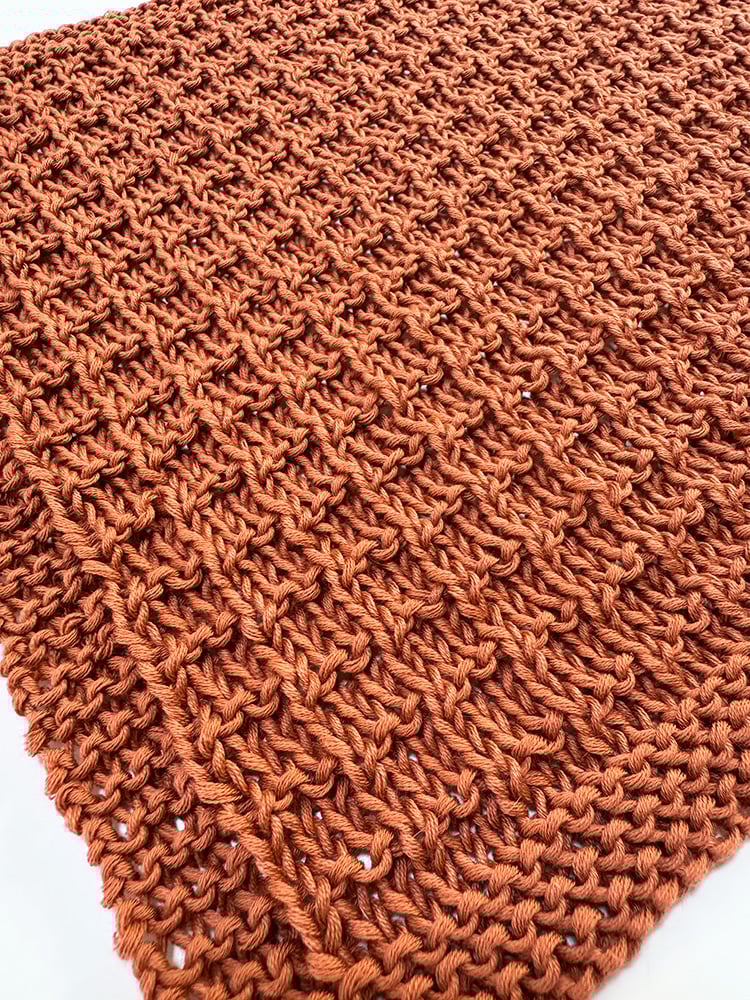
The simple textured design adds a clean, modern look to your table setting, while the garter stitch edges keep everything neat and tidy.
If you’ve already made my decorative knit placemat pattern, you’ll love how this version brings form and function together.
Please scroll down to view the free pattern online or grab the inexpensive, ad-free PDF in my shop here.

Before You Get Started
Here are a few things to keep in mind before casting on:
- This project uses worsted weight Pima cotton, which is breathable and washable — ideal for kitchen use.
- You’ll knit flat using 5mm (US 8) needles.
- Garter stitch borders give the piece a polished edge, while the central pattern adds texture and absorption.
- The finished size is generous enough for plates, cutlery, or layered table settings.
Tools/Materials Needed
- Yarn: 1 ball of The Pima Cotton from We Are Knitters (100% Pima Cotton / 100g / 212m / 232yds)
- Needles: Pair of 5 mm (US 8) straight knitting needles
- Notions:
- Stitch markers
- Yarn needle
- Scissors
- Tape measure
Gauge: 18 sts and 23 rows = 4in/10cm in pattern
Finished Size: 12 inches (31 cm) high × 17 inches (43 cm) wide
Easy Cotton Placemat Knitting Pattern
This cotton placemat is worked flat with a simple repeat that’s easy to memorize — ideal for beginners or a relaxing knit for more advanced makers.
Abbreviations
- Beg – Begin(ning)
- Cont – Continue(ing)
- K – Knit
- P – Purl
- PM – Place marker
- Rem – Remaining
- Rep – Repeat
- RS – Right side
- St(s) – Stitch(es)
- SM – Slip marker
- WS – Wrong side
Pattern Instructions
- Cast on 75 stitches
- Knit 6 rows in garter stitch (knit every row)
- Now begin the stitch pattern:
Row 1 (RS): K4, PM, knit to last 4 sts, PM, K4
Row 2 (WS): K4, SM, purl to last 4 sts, SM, K4
Row 3: K4, PM, knit to last 4 sts, PM, K4
Row 4: K4, SM, *P1, K2* repeat from * to * across to last 4 sts, SM, K4 - Repeat Rows 1–4 until the piece measures 12 inches / 31 cm
- Knit 6 rows in garter stitch
- Cast off
- Weave in all loose ends with a yarn needle
Tip: Block your placemat gently using a steam iron or by pinning it while damp to even out stitches and straighten the edges.
FAQs + Extra Tips
→ Can I use different yarn?
Yes, any worsted weight cotton or cotton blend yarn will work well.
Just check your gauge and aim for durability if you’ll be washing them often.
→ How many placemats can I make from one skein?
You’ll need one ball per placemat, so grab 4–6 skeins if you want a full set.
→ Can I make this wider/narrower?
Absolutely! Just cast on more or fewer stitches in multiples of 3 between the markers, plus the 8 stitches for the garter borders.
→ Can I machine wash this?
If you use 100% cotton yarn like Pima cotton, yes — gentle cycle, lay flat to dry for best results.
Share Your Knitted Placemat
I hope you enjoyed this placemat knitting pattern.
We’d love to see your finished project on social media.
Tag @handylittleme or use #handylittleme on Instagram
Join the Handy Little Me Facebook Group and post your photos
Hello,
I have a question I’m new to knitting and for row 4 you have repeat from *to* but there are no asterisks in directions and it doesn’t come come out even if you do P 1 K 2 because there is 67 stitches between the 4 on each end 67/3 is 22.3333 can you please help me. Thank you for your time
Hello Maggie,
Great catch—that line is missing its asterisks. It should read:
Row 4: K4, *P1, K2* repeat across the center section, you’ll land on P1, then K4.
Since you have 67 stitches between the 4-stitch borders on each side, 67 ÷ 3 = 22 repeats with a remainder of 1—that leftover stitch is the P1 right before the final K4 border.
So the row works out as: K4, (P1, K2) × 22, P1, K4.
You’re doing it right—just follow that repeat unit between the borders and it will come out even. 💛
Thank you! 🥳
I’ve knit many sets of these great placemats.
I knit with the cotton held double so placemat is more substantial.
Also – used Lion Brand, Touch of Linen yarn
Mary