Skinny Scarf Knitting Pattern (Easy Knit Garter Stripe)
THIS ARTICLE CONTAINS AFFILIATE LINKS THAT SUPPORT HANDY LITTLE ME CONTENT AND FREE PATTERNS.Skinny Scarf Knitting Pattern
Grab your inexpensive, ad-free, PDF printable pattern in my shop here.
Notes
Skill Level – Easy (Advanced Beginner)
You should knit a skinny scarf because it’s a quick, beginner-friendly project that adds a versatile and stylish accessory to your wardrobe.
Unlike bulky scarves, a skinny scarf can be worn year-round, layering effortlessly over outfits for both warmth and fashion.
Its simple design makes it easy to customize with colors, textures, or patterns, allowing you to create a unique piece that suits your style.
Whether you’re a seasoned knitter or just starting out, knitting a skinny scarf is a rewarding way to practice your skills and produce something chic and wearable.
Copyright Info
- Please do not copy, sell, redistribute, or republish this knit scarf pattern.
- This knitting pattern is for personal use only.
- Please ask for permission to use it in classes.
- If you wish to share this pattern, please provide a link to the pattern page only.
- Do NOT use copyrighted photos for your product listing.
- For the copyright T&C, please read my Terms of Use.

Materials You’ll Need
To get started on your skinny scarf, you’ll need just a few materials:
Yarn
- 1 x Skein of Fine Yarn 02 (400m/437yds/100g/3.52oz).
- Yarn weight = 4 Ply/Sport/5 Ply
- I used 1 x Juniper Moon Farm/Moonshine Fine Hand Paints/Color 2003/Lot 09557.
- This yarn is 30% baby alpaca, 30% wool, 25% nylon 15% silk.
- Yarn Substitute Idea – Use up balls of your favorite sock yarn or lightweight sport yarn from your yarn stash.
Knitting Needles
- 4 mm needles/US 6 Circular knitting needles with a 16″/40 cm cable.
- You can use straight or circular needles for this project.
- Check your needle size against the gauge.
Notions
- Scissors: To cut your yarn when you’re finished.
- Tapestry Needle: For weaving in the ends of your scarf when it’s complete.
- Measuring tape: To measure the length and the gauge.

Size Information + Gauge
Gauge – 20 sts/38 rows in 4 x 4 inches/10×10 cm in pattern.
Size + Notes
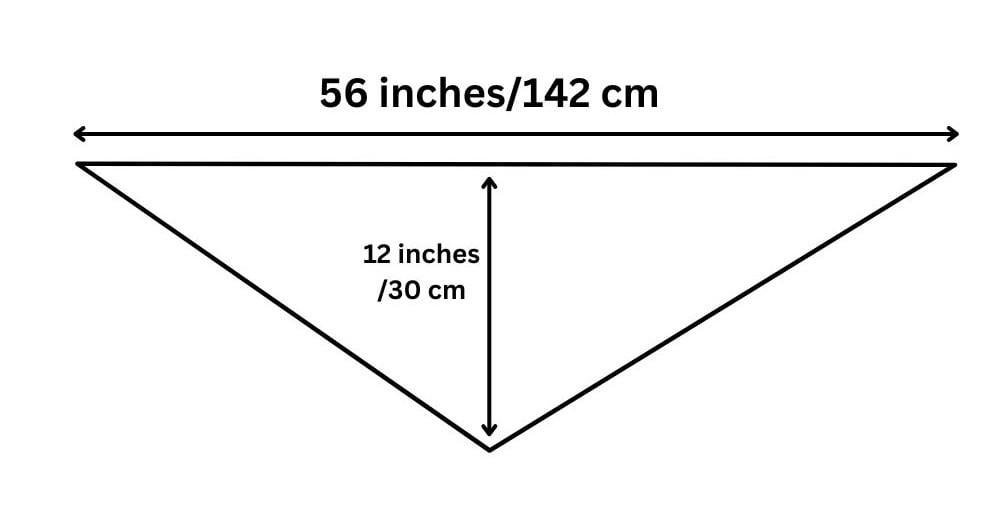
- Length across the top from longest point to point is 56 inches/
- The length from the top to the bottom of the scarf point is 12 inches/
- The size might vary as tension is different from knitter to knitter.
- You can make this triangle scarf larger or smaller as you wish, just knit more or fewer rows.
- The scarf is worked from side to side.
- By increasing as you knit, the scarf will become larger and wider as you make it.

Knitting Abbreviations
- K – Knit
- KFB – Knit into the front and back of the stitch (increase)
- P – Purl
- Rep – Repeat
- SSK – Slip, slip, knit (decrease)
- St(s) – Stitch(es)
- RS – Right side
- WS – Wrong side
Skinny Scarf Pattern Instructions
This pattern is incredibly beginner-friendly, using only basic stitches and straightforward techniques.
Here’s how to knit your own skinny scarf:
- Cast on 3 sts.
- Row 1 (RS): KFB, K to end. (1 st increased)
- Row 2 (WS): P to end.
- Row 3: Knit.
- Row 4: Knit.
- Repeat the last 4 rows until you have 65 sts.
Next, you will decrease as follows…
- Row 1 (RS): K1, SSK, K to end. (1 st decreased)
- Row 2 (WS): P to end.
- Row 3: Knit.
- Row 4: Knit.
- Repeat the last 4 rows until you have 3 sts.
- Work rows 2-4 again.
- Cast off.
- Weave in all loose ends and block the work.
That’s it!
The skinny scarf uses the garter stitch (knit every row), and the purl stitch which gives it a nice texture and is easy for beginners to master.
Video Tutorial
Check out this video tutorial to help you see how this triangle shape is created.

Customizing Your Skinny Scarf
Once you’ve got the hang of the basic pattern, there are plenty of ways to personalize your scarf:
- Change Up the Yarn: Try using a yarn with different textures, like a boucle or a tweed yarn, for a different look.
- Add Some Color: You can add stripes by switching yarn colors every few inches or create a color block scarf by knitting one half in one color and the other half in another.
- Add Fringe: For a bohemian touch, add a fringe to the ends of your scarf. Simply cut yarn into even lengths, fold in half, and loop through the end stitches.

Tips for Styling Your Skinny Scarf
One of the best things about a skinny scarf is how versatile it is.
Here are a few ways to style it:
- Single Wrap: Simply drape it around your neck for an effortless, casual look.
- Double Wrap: Loop it around your neck twice for a cozy, layered effect.
- Knot It: Tie a loose knot in the front for a chic, tailored vibe.
Skinny scarves also make great headbands or belt alternatives when styled creatively!
Related Post: Black And White Scarf Knitting Pattern

Common Mistakes to Avoid
While knitting a skinny scarf is simple, there are a few common pitfalls to watch out for:
- Uneven Edges: Make sure you maintain even tension throughout your knitting to avoid wavy edges.
- Too Tight or Too Loose: Keep your stitches consistent. If your scarf is curling or feels stiff, your tension might be too tight. If it’s floppy, you might be knitting too loosely.
- Running Out of Yarn: Be sure to buy enough yarn at the start! One skein of worsted-weight yarn (about 100g) should be enough for a skinny scarf, but check your yarn label for guidance (and check the amount of yards and meters given in any pattern too!).
Finishing Your Skinny Scarf
Once you’ve knitted the full length of your scarf, it’s time to finish:
- Bind Off: When you’ve reached your desired length, bind off the stitches to secure the end.
- Weave in the Ends: Using your tapestry needle, weave in any loose yarn ends so they’re hidden in the fabric of your scarf.
- Block (Optional): For a professional finish, you can block your scarf. Wet the scarf, gently shape it on a towel, and let it air dry. Blocking helps even out the stitches and makes the scarf look polished.

Final Thoughts
Knitting a skinny scarf is not only fun and easy but also allows you to express your personal style.
Whether you keep it simple or get creative with color and texture, your new long skinny knit scarf will be a chic addition to your wardrobe.
Plus, it’s a great project for practicing your knitting skills while creating something you’ll love to wear!
So, grab your needles and yarn and get started on your very own skinny scarf.
Don’t forget to share your creations in the comments below or on social media using #handylittleme.
Happy knitting!


