How To Knit Herringbone Stitch
THIS ARTICLE CONTAINS AFFILIATE LINKS THAT SUPPORT HANDY LITTLE ME CONTENT AND FREE PATTERNS.In this post, you will see how to knit herringbone stitch.
This stitch pattern gives a beautiful texture to your knitted fabric.
Perfect for many projects, like bags, pillows, blankets, and coasters.

What You Need To Know About Herringbone Stitch
To work this stitch pattern, you need to know how to knit, how to purl, and how to slip stitches.
There is a step-by-step photograph tutorial below and a video tutorial in this post to help you.
Once you have a little practice you will soon get into it!

My Tips
- Use needles with a good point on the end, I tried this with bamboo needles that didn’t have a sharp pointed end and found it difficult.
- Once I switched to other wooden needles with sharper points, it was much easier.
- Use a needle size up – go up a size because the knitting becomes tight.
- Try not to knit tightly – this makes it difficult to work the stitches if you are a tight knitter.
- The fabric becomes dense and very tight – so just be aware of that when choosing your needles and yarn.
Resources and Tutorials That May Help You With This Stitch Pattern:

Coaster Knitting Pattern
Make a set of knitted coasters with this stitch pattern.
Make them in any color with or without the fringe edging!
Get the free pattern here – Coaster knitting pattern.

How To Knit The Herringbone Stitch Instructions
Learn how to knit the herringbone pattern with this step-by-step photograph tutorial and video.
This herringbone stitch pattern is often used in scarves, cowls, and other accessories.
Watch the tutorial on my YouTube channel
Gauge – 10 sts in 18 rows in 4 inches/10cm square.
The supplies you need…
Yarn
- Yarn – scrap yarns to practice with – I used a bulky weight yarn (The Petite Wool from We Are Knitters).
- Approx 10-15g for one square example – 4×4 inches.
- You can use any yarn weight for this tutorial, including worsted weight yarn.
Needles
Knitting Needles – Size 8mm (US 11)
Notions
- Scissors
- Darning needle
- Tape measure
Abbreviations
- K- Knit
- P – Purl
- SL – Slip
- RHN – Right-hand needle
- LHN – Left-hand needle
Time needed: 1 hour and 30 minutes
How To Knit Herringbone Stitch
- Step 1 – Cast on and insert the needle.
Cast on an even number of stitches.
For this sample swatch, I cast on 24 stitches.
We will start on the right side of the work.
Insert your right-hand needle into the back loop of the first two stitches on the left needle and bring the yarn around as if to knit.
- Step 2 – Bring the right-hand needle forward.
Bring your right-hand needle up and under those two stitches.
- Step 3 – Knit the stitches…
Knit the stitches and slip one of the stitches (the first stitch) off onto the right needle, while leaving the second stitch on the left-hand needle.
- Step 4 – Insert right-hand needle…
Then insert your right-hand needle through the loop left on the left-hand needle and the loop next to it, through the back again.
- Step 5 – Bring the yarn around…
Bring your yarn around as if to knit those two stitches.
- Step 6 – Bring the right-hand needle to the front…
Twist and push the right-hand needle through the front to knit.
- Step 7 – Split the two loops…
Split the two loops, slipping one of the knitted loops onto the right-hand needle, and leaving the other on the left-hand needle.
Continue to knit the row in this way – knitting into the back of the loop left on the left-hand needle and the loop next to it, then slipping that first knitted loop over onto the right-hand needle and repeating the process until you get to the end of the row and the last stitch. - Step 8 – Knitting on the wrong side of the work…
Knitting the wrong side. Turn your work and insert your right-hand needle purlwise into the first two stitches on the left-hand needle.
- Step 9 – Wrap your yarn around the needle…
Wrap your yarn over the needle as if to purl those two stitches.
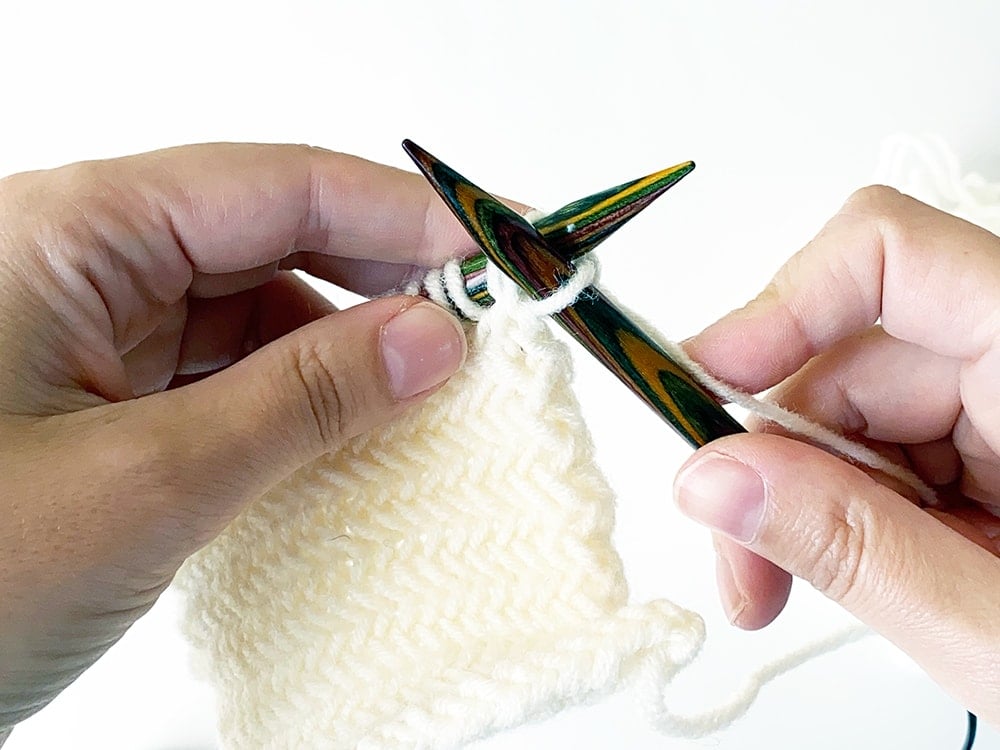
- Step 10 – As if to purl those stitches…
You will see your two purl stitches on the needles like in this image below.
- Step 11 – Slip the first loop…
Slip the first loop onto your right-hand needle, leaving the second loop on the left-hand needle.
- Step 12 – Insert the right hand needle purlwise…
Now insert your right-hand needle purlwise into the loop left on the left-hand needle and the loop next to it.
- Step 13 – Slip the first purled loop…
Slip the first purled loop onto the right-hand needle leaving the second loop on the left-hand needle. Repeat this process to the end of the row.


Share your work with us…
I love seeing your finished projects.
If you enjoyed the tutorial, I’d love to see your herringbone knit stitch sample on Instagram, be sure to tag me @handylittleme.
Happy crafting!
Hi!
Thank you so much for this. Love love love the herringbone stitch!💕 I didn’t realize it was that easy!!! Yay! I always look forward to your emails and you always teach me something in every single one that you do!! They make my day! Thanks !
Carol🌞
Hello Carol, Thank you so much for your kind words, I’m so happy you enjoy the emails, patterns and tutorials!
Happy knitting!
Louise 🙂
As stated, I also didn’t know this stitch was so easy! Thank you for the great video and directions. I appreciate the assistance.
Hello Maria, I’m so happy you found the tutorial easy to follow.
I hope you enjoy knitting the herringbone stitch, it does have a lovely texture!
Happy knitting,
Louise 🙂
does this stitch take extra yarn? I am knitting my grandson an afghan (in strips) and would love to use this stitch as one of the strips…but already have the yarn purchased for the total project. Thank you
Hi there Julie! That sounds like a lovely project for your grandson—he’s going to treasure it! 💛
Yes, the herringbone stitch does tend to use more yarn than standard knit stitches like stockinette or garter.
It creates a dense, textured fabric, which is beautiful but a bit more yarn-hungry.
Since you’ve already purchased the yarn for the whole afghan, you might want to knit a small swatch in herringbone stitch and compare how much yarn it uses versus your other planned stitches.
That way, you can see if it fits within your yarn budget or if you might want to use it for a smaller strip or border.
Hope that helps—and happy knitting! 🧶😊
I’d like permission to share your tutorial for herring bone stitch with our knitting Guild. It would be in our newsletter and on our website for a month.
Erika Hickman
Greater Milwaukee Knittng Guild
Hi Erika,
Yes—thank you for asking, and you have my permission to share the Herringbone Stitch tutorial with the Greater Milwaukee Knitting Guild in your newsletter and on your website for one month.
Please include:
Credit: “Herringbone Stitch Knitting Tutorial by Louise Bollanos, Handy Little Me.”
A direct link back to the tutorial on Handy Little Me (please link to the tutorial page rather than reposting the full text).
You’re welcome to quote short excerpts and use 1–2 images from the post with the same credit; please don’t edit the images.
If you can, send me a link or a copy of the newsletter when it’s live—I’d love to see it!
Warmly,
Louise