How To Knit Short Rows (Wrap and Turn)
THIS ARTICLE CONTAINS AFFILIATE LINKS THAT SUPPORT HANDY LITTLE ME CONTENT AND FREE PATTERNS.In this post, you will learn how to knit short rows using the wrap and turn method.
Short rows are used to create extra fabric in your knitting, which is great for shaping.
The extra rows you create look like triangles or wedges.

How Are Short Rows Created?
A short row is created by knitting so far along your row, then wrapping a stitch, turning the work, wrapping again, and continuing to knit.
When you wrap the yarn around the stitch, it prevents holes from appearing in the short rows, so your extra rows in the shaping flow naturally within the fabric you are creating.
Take a look below at the step-by-step tutorial and watch the video in this post.
You can also watch the video on my YouTube channel here.
View the Outlander capelet pattern here – Brianna’s Capelet Outlander Knitting Pattern

Image Source – Copyright to Starz.com
How To Knit Short Rows – Wrap and Turn
- Knit to where you need to wrap and turn
Keep your yarn at the back of the work.

- Bring the yarn to the front
Bring the working yarn to the front of the work.
- Slip the next stitch purlwise
keeping the yarn in the front, slip the next stitch purlwise from the left-hand needle over onto the right-hand needle.
- You will now have the slipped stitch on the RHN
The slipped stitch will now be on the right-hand needle.
- Take the working yarn over the slipped stitch to the back of the work
Bring the working yarn around the slipped stitch at the front and take it to the back of the work.
- Turn the work
You have to now turn the work so that the back of the piece is facing you. The working yarn will look like this in the image below.
- Slip the stitch
Now you will need to slip that stitch back onto the right-hand needle purlwise.
- The slipped stitch and the yarn
The slipped stitch will now be on the right-hand needle.
- Move the yarn to the back of the loop
Take the working yarn around the slipped stitch so that it is at the back of the work.
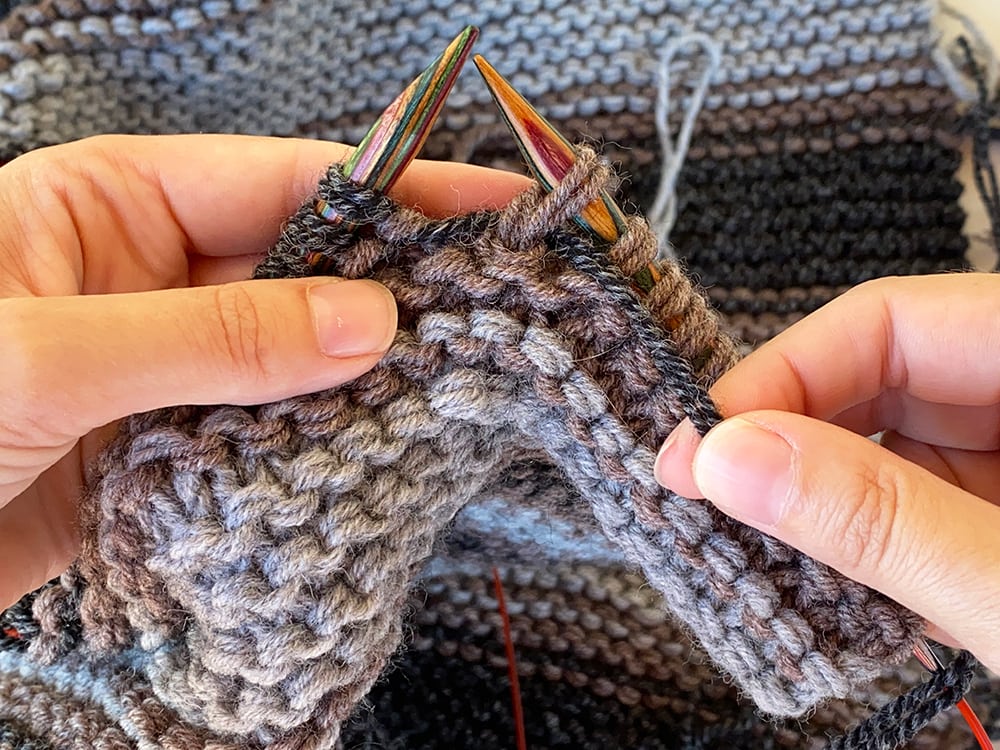
- Knit the next stitch
Once your yarn is at the back of the work, go ahead and knit the next stitch. Then you can continue to work that row. You can see the stitch in the photo below where the yarn has been wrapped.


Short Row FAQs
When you knit short rows this means that you are not working a full row, you are going to wrap and turn – turning the work to continue to kit, thus creating a shorter row. This is for shaping.
You can view the step-by-step photo tutorial above or watch the video on my YouTube channel here.
You knit a short row without any holes by wrapping and turning. This means that you will wrap the yarn over the stitch you slipped and then turn to continue to knit. This will mean the row will have no holes in it.
Short rows are an excellent technique to use in patterns that require shaping.
For example, we will probably find short rows in sock patterns (in the heels of socks).
In garment patterns like t-shirts, and sweaters require shaping like shoulder lines, a hemline, an oval neckline, a high-low hem, and bust darts, shaping around the bust area.
In shawls or capelets (shawl collar).
Yes! Absolutely you can create short rows knitting flat with straight needles or knitting in the round with circular needles.
How Many Short-Row Methods Are There?
In this tutorial, we learned the wrap-and-turn method but there are many short-row techniques you can learn and use.
The Japanese short-row method
The Japanese short row method, also known as the “wrap and turn” method, is a technique used in knitting to create short rows.
Short rows are rows that are not knitted all the way across but are turned partway through in order to create shaping, such as for creating curves in a garment.
The Japanese short-row method involves wrapping the working yarn around the stitch to be turned, then turning the work and continuing in the opposite direction.
When the wrapped stitch is reached again on the next row, the wrap is lifted up onto the needle and knitted together with the stitch to create a smooth transition without any holes or gaps.
This method can be used for various knitting projects, including socks, hats, shawls, and garments.
It is popular among knitters because it creates a seamless finish without any visible gaps or holes, and it is easy to learn with a bit of practice.
If you want to learn this method check out this youtube tutorial from VeryPink Knits.
The German short-row method
The German short row method, also known as the “double stitch” method, is another technique used in knitting to create short rows and shaping.
Similar to the Japanese method, it involves turning the work before reaching the end of the row to create partial rows.
However, the German short-row method involves wrapping the yarn around the stitch in a different way than the Japanese method.
Instead of wrapping the yarn around the stitch, the working yarn is brought to the front of the work, then pulled over the top of the right needle to create a double stitch.
When the short row is completed and the work is turned, the double stitch is treated as a single stitch, with the two legs of the double stitch knitted together as one.
This creates a smooth transition without any gaps or holes.
The German short row method is also popular among knitters, and some prefer it over the Japanese method because it can be easier to see the double stitch and it is easier to count the rows.
However, it can also create a slightly different look and texture in the finished work compared to the Japanese method.
If you want to learn this method check out this youtube tutorial by Brooklyn Tweed.
The yarnover short row method
The yarnover short row method is another technique used in knitting to create short rows and shaping.
It involves creating a yarnover (abbreviated as “yo”) at the point where the work is turned to create a gap, which is later closed when the work is picked up again.
This creates a decorative hole in the fabric, which can be a desirable feature for certain knitting projects.
To use this method, the knitter simply knits or purls to the point where the work needs to be turned, then creates a yarnover by bringing the yarn to the front of the work (if knitting) or to the back (if purling) and then over the top of the needle to the back (or front).
The work is then turned and the next row is worked until the next gap needs to be created.
When the work is picked up again, the yarnover is treated as a regular stitch and is knitted or purled together with the stitch next to it, closing the gap and creating a smooth transition in the fabric.
This method can be used for various knitting projects, including shawls, scarves, and garments.
Overall, the yarnover short row method can create a beautiful effect in the fabric and can be a great choice for creating decorative holes or shaping in a project.
However, it may not be the best choice for projects where gaps or holes are not desired.
If you want to learn the yarnover method check out this youtube tutorial by Knit Purl Hunter.
The wrapless short row method
The wrapless short row method, also known as the “shadow wrap” or “knit below” method, is a technique used in knitting to create short rows and shaping without the use of wraps.
It creates a clean, seamless look without any visible gaps or holes in the fabric.
To use this method, the knitter simply works to the point where the work needs to be turned, then slips the next stitch purlwise from the left needle to the right needle without working it.
The working yarn is then brought to the front of the work (if knitting) or to the back (if purling) and the next stitch is then worked by knitting or purling into the stitch below the slipped stitch.
This creates a “shadow” stitch below the slipped stitch, which replaces the need for a wrap.
When the work is picked up again, the shadow stitch is worked together with the stitch next to it, closing the gap and creating a smooth transition in the fabric.
The wrapless short-row method can be used for various knitting projects, including socks, shawls, and garments.
It can be a great choice for knitters who prefer a seamless look and want to avoid the bulk of wraps.
However, it may require a bit more attention to detail and careful counting to ensure that the shadow stitches are worked correctly.
If you want to learn the wrapless method check out this blog post by Ysolda.
The shadow wraps short row method
The shadow wraps short row method is another technique used in knitting to create short rows and shaping without the use of wraps.
It is also known as the “Japanese shadow” or “Japanese double stitch” method.
To use this method, the knitter works to the point where the work needs to be turned, then slips the next stitch purlwise from the left needle to the right needle without working it.
The working yarn is then brought to the front of the work (if knitting) or to the back (if purling) and the next stitch is worked by inserting the right needle from back to front under both legs of the slipped stitch, creating a “shadow” stitch.
When the work is picked up again, the shadow stitch is worked together with the stitch next to it, closing the gap and creating a smooth transition in the fabric.
The shadow wraps method can be used for various knitting projects, including socks, shawls, and garments.
It can be a great choice for knitters who prefer a seamless look and want to avoid the bulk of wraps.
However, it may require a bit more attention to detail and careful counting to ensure that the shadow stitches are worked correctly.
This method is similar to the wrapless short row method but creates a slightly different look in the fabric.
If you want to learn this method check out this youtube tutorial by Lee Meredith.
Which Short Row Method Is Better For New Knitters?
While short row methods are not the most beginner-friendly techniques and it’s unlikely you will meet them at any basic/easy pattern instructions, the wrapless method would be the easier one to try.
Although it doesn’t create the smoothest fabric.
My favorite technique is the wrap-and-turn method, along with the German method.
Knitting Lessons
You may also be interested in the following posts:
- Knitting Lessons
- Yarn Types Explained: A Guide To Different Fibers
- How To Knit – A Complete Beginner’s Guide
- Best Knitting Needles For Beginners
- How To Knit The Stockinette Stitch (For Beginners)
- How To Knit The Purl Stitch (For Beginners + A Video Tutorial)
- How To Knit Garter Stitch
- What Is TBL In Knitting? (Knit Through The Back Loop)