Rustic Farmhouse Crochet Pumpkin Pattern (Free Printable)
THIS ARTICLE CONTAINS AFFILIATE LINKS THAT SUPPORT HANDY LITTLE ME CONTENT AND FREE PATTERNS.Bring rustic farmhouse charm into your home this fall with these chunky crochet ribbed pumpkins.
Perfect for cozy fall decor, they’re quick to make, easy to customize, and use simple crochet stitches like sc, hdc, and sl st.
This free crochet pumpkin pattern includes three different ribbing techniques, plus video tutorials to guide you through every step.
Whether you’re a beginner or an advanced crocheter, these pumpkins are a satisfying project that will add handmade texture and warmth to your seasonal display.

Before You Get Started
Here are a few things to know before you begin:
- Gauge isn’t important — your pumpkins will look great even with slight size differences.
- This project uses super bulky yarn weight (around 50–70g per pumpkin).
- You’ll practice ribbing with back loop only (BLO) stitches.
- Each pumpkin is made as a rectangle, then shaped with seaming, stuffing, and a cinnamon stick stem.
- Tutorials are available on my YouTube channel for visual learners.
Tools/Materials NeededYarn
- Any super bulky / 14-ply yarn (around 50–70g per pumpkin).
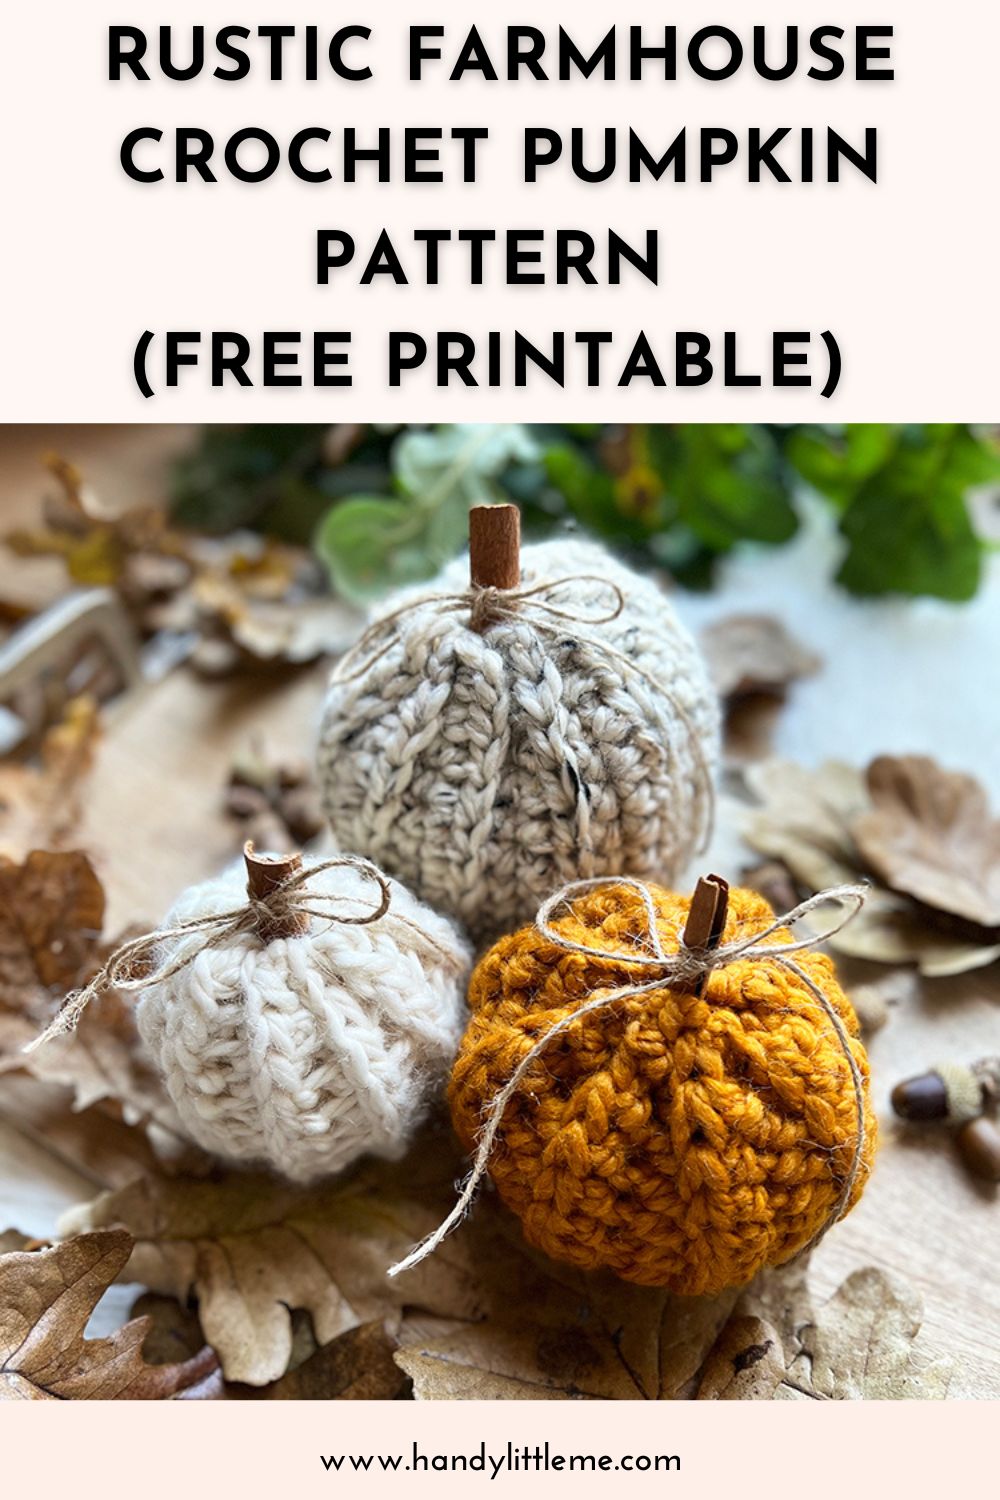
- I used Lion Brand Wool-Ease Thick and Quick yarn in Fisherman, Mustard, and Wheat.
Crochet Hook
Other Supplies
- Tapestry needle/yarn needle
- Scissors
- Tape measure
- Fiberfill/Poly-fil stuffing
- Cinnamon sticks (for stems)
- Twine or ribbon (for bows)
- Glue gun
Abbreviations
Written in US terms.
- BLO – Back loop only
- CH – Chain
- HDC – Half double crochet
- SC – Single crochet
- SL ST / sl st – Slip stitch
- St(s) – Stitch(es)
- Rep – Repeat
- Cont – Continue
- Rem – Remaining
Need help with crochet abbreviations? Grab my free Crochet Abbreviations + Terms PDF.

Size + Gauge Info
- Pumpkin 1 (Small): Rectangle = 5.5″ H x 10″ W → Pumpkin = 12″ circumference x 5.5″ H
- Pumpkin 2 (Medium): Rectangle = 6.5″ H x 12″ W → Pumpkin = 14″ circumference x 6.5″ H
- Pumpkin 3 (Large): Rectangle = 8″ H x 14″ W → Pumpkin = 16″ circumference x 8″ H
Gauge: 6.6 sts / 8 rows in 4″ x 4″ (10 x 10 cm) in single crochet.
(But don’t worry — gauge is not critical for this project.)

Rustic Crochet Pumpkin Patterns
Each pumpkin uses a different ribbing technique for added texture.
Small Pumpkin – Half Double Crochet in the 3rd Loop
- Row 1: CH 12, 1 HDC in 2nd CH from hook and across. Turn.
- Row 2: CH 1, 1 HDC in BLO (3rd loop) across. Turn.
- Repeat Row 2 until the rectangle measures 10″ long.
- Fasten off with a long tail for seaming.
- Video Tutorial.
- Made with Fisherman yarn

Medium Pumpkin – Half Double Crochet Ribbing
- Row 1: CH 14, 1 HDC in 2nd CH from hook and across. Turn.
- Row 2: CH 1, 1 HDC in BLO across. Turn.
- Repeat Row 2 until the rectangle measures 12″ long.
- Fasten off with a long tail.
- Video Tutorial.
- Made with Mustard yarn

Large Pumpkin – SC + HDC Ribbing
- Row 1: CH 16, 1 SC in 2nd CH from hook and across. Turn.
- Row 2: CH 1, 1 HDC in each st. Turn.
- Row 3: CH 1, 1 SC in BLO across. Turn.
- Repeat Rows 2–3 until the rectangle measures 14″ long.
- Fasten off with a long tail.
- Video Tutorial.
- Made with Wheat yarn

Finishing + Assembly
Follow these steps for all pumpkin sizes:
- Seaming: Fold the rectangle in half (short ends together). Using a tapestry needle and the long tail, seam into a tube with mattress stitch.
- Gather Bottom: Work a running stitch along the bottom edge. Pull tight to close. Secure with a knot.
- Stuffing: Fill the inside with poly-fil stuffing until firm and round.
- Close Top: Work another running stitch along the top edge. Pull tight, close hole, secure thread, and weave in ends.
- Shape the Pumpkin: Cut a long length of yarn (about 12–18 inches) and thread it through your tapestry needle. Insert the needle from the top hole through to the bottom and pull snug. Wrap the yarn around the outside of the pumpkin and push the needle back through from bottom to top. Repeat this several times around the pumpkin, dividing it into equal sections (like slices of a pie) until it takes on a plump pumpkin shape. Secure and weave in the yarn end.
- Stem: Hot glue a cinnamon stick into the center.
- Finish: Tie a bow around the stem with twine or ribbon. Add a crocheted leaf if desired.
FAQs & Extra Tips
→ What yarn weight works best?
Super bulky yarn makes the chunkiest pumpkins, but worsted weight yarn also works for smaller versions.
→ Can I use a magic circle instead of sewing?
Yes! Some crocheters prefer working in a spiral with a magic circle, but rectangles + seaming give a beautiful ribbed texture.
→ What if I don’t have a cinnamon stick?
You can use a small branch, wooden dowel, or crochet a stem using sc and sl st.
→ Do I need a stitch marker?
Optional — but a stitch marker helps keep track of rows.
→ How many rows for the crochet pumpkin?
It depends on the size!
The small pumpkin has around 20–24 rows, the medium about 26–30 rows, and the large around 32–36 rows.
The key is reaching the correct width measurement given in the pattern.
→ Is it hard to crochet a pumpkin?
Not at all! These pumpkins are an easy-level project, perfect for beginners who know chain (ch), single crochet (sc), and half double crochet (hdc) stitches.
The shaping is simple with stuffing and a quick seam.
Free Printable
Want to keep this tutorial handy while you crochet? Grab the free printable version of the pattern below!
Whether you’re curled up on the couch or crafting on the go, this easy-to-follow card makes it simple to work through each round at your own pace.
Please scroll down to print your free pattern or support my work and grab the ad-free printable PDF from my shop here.
Or, grab the crochet pumpkin pattern bundle here (5 designs in one set).
Rustic Farmhouse Crochet Pumpkin Pattern

Learn how to crochet chunky ribbed pumpkins in 3 sizes with simple stitches like sc and hdc.
This step-by-step guide shows you how to crochet a rectangle, seam it, stuff it, and shape it into a pumpkin with a cinnamon stick stem.
Perfect for fall decor, Halloween, and Thanksgiving.
Materials
- Any super bulky / 14-ply yarn (around 50–70g per pumpkin).
- I used Lion Brand Wool-Ease Thick and Quick yarn in Fisherman, Mustard, and Wheat.
Tools
- 9 mm crochet hook (US M/N 13)
- Tapestry needle/yarn needle
- Scissors
- Tape measure
- Fiberfill/Poly-fil stuffing
- Cinnamon sticks (for stems)
- Twine or ribbon (for bows)
- Glue gun
Instructions
Small Pumpkin – Half Double Crochet in the 3rd Loop
- Row 1: CH 12, 1 HDC in 2nd CH from hook and across. Turn.
- Row 2: CH 1, 1 HDC in BLO (3rd loop) across. Turn.
- Repeat Row 2 until the rectangle measures 10" long.
- Fasten off with a long tail for seaming.
- Video Tutorial.
- Made with Fisherman yarn
Medium Pumpkin – Half Double Crochet Ribbing
- Row 1: CH 14, 1 HDC in 2nd CH from hook and across. Turn.
- Row 2: CH 1, 1 HDC in BLO across. Turn.
- Repeat Row 2 until the rectangle measures 12" long.
- Fasten off with a long tail.
- Video Tutorial.
- Made with Mustard yarn
Large Pumpkin – SC + HDC Ribbing
- Row 1: CH 16, 1 SC in 2nd CH from hook and across. Turn.
- Row 2: CH 1, 1 HDC in each st. Turn.
- Row 3: CH 1, 1 SC in BLO across. Turn.
- Repeat Rows 2–3 until the rectangle measures 14" long.
- Fasten off with a long tail.
- Video Tutorial.
- Made with Wheat yarn
Finishing + Assembly
Follow these steps for all pumpkin sizes:
- Seaming: Fold the rectangle in half (short ends together). Using a tapestry needle and the long tail, seam into a tube with mattress stitch.
- Gather Bottom: Work a running stitch along the bottom edge. Pull tight to close. Secure with a knot.
- Stuffing: Fill the inside with poly-fil stuffing until firm and round.
- Close Top: Work another running stitch along the top edge. Pull tight, close hole, secure thread, and weave in ends.
- Shape the Pumpkin: Cut a long length of yarn (about 12–18 inches) and thread it through your tapestry needle. Insert the needle from the top hole through to the bottom and pull snug. Wrap the yarn around the outside of the pumpkin and push the needle back through from bottom to top. Repeat this several times around the pumpkin, dividing it into equal sections (like slices of a pie) until it takes on a plump pumpkin shape. Secure and weave in the yarn end.
- Stem: Hot glue a cinnamon stick into the center.
- Finish: Tie a bow around the stem with twine or ribbon. Add a crocheted leaf if desired.
- Video tutorial.
Notes
Abbreviations
Written in US terms.
- BLO – Back loop only
- CH – Chain
- HDC – Half double crochet
- SC – Single crochet
- SL ST / sl st – Slip stitch
- St(s) – Stitch(es)
- Rep – Repeat
- Cont – Continue
- Rem – Remainining
Size + Gauge Info
- Pumpkin 1 (Small): Rectangle = 5.5" H x 10" W → Pumpkin = 12" circumference x 5.5" H
- Pumpkin 2 (Medium): Rectangle = 6.5" H x 12" W → Pumpkin = 14" circumference x 6.5" H
- Pumpkin 3 (Large): Rectangle = 8" H x 14" W → Pumpkin = 16" circumference x 8" H
Gauge: 6.6 sts / 8 rows in 4" x 4" (10 x 10 cm) in single crochet.
(But don’t worry — gauge is not critical for this project.)
Recommended Products
As an Amazon Associate and member of other affiliate programs, I earn from qualifying purchases.
Share Your Work
I’d love to see your finished farmhouse crochet pumpkins!
Tag me on Instagram @handylittleme or use #handylittleme to show off your makes.
Join the Handy Little Me Facebook Group to share photos, ask questions, and connect with other makers.
Want More Free Crochet Patterns?