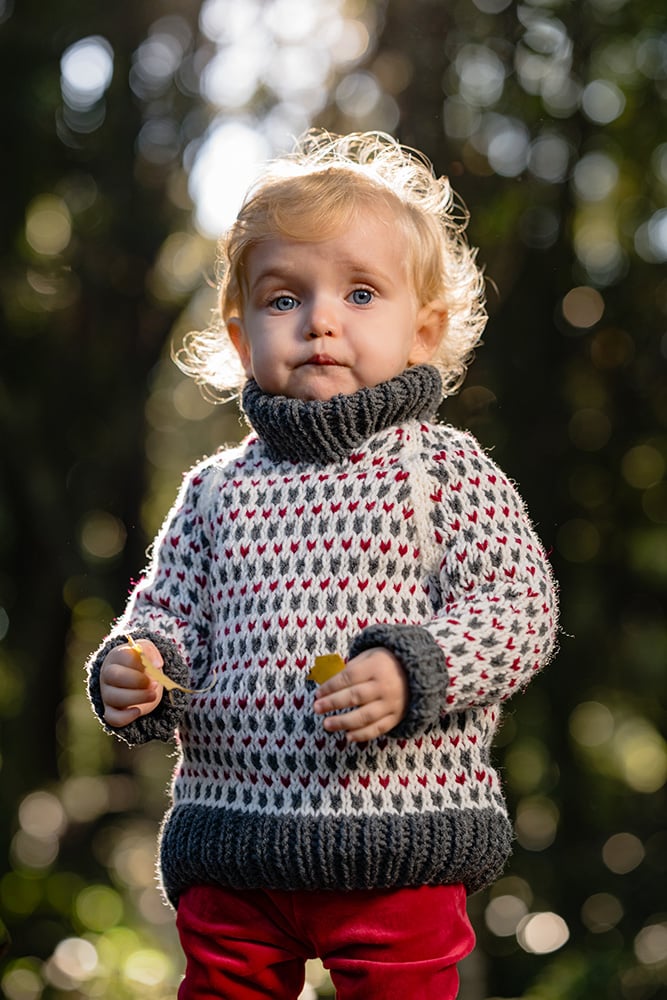
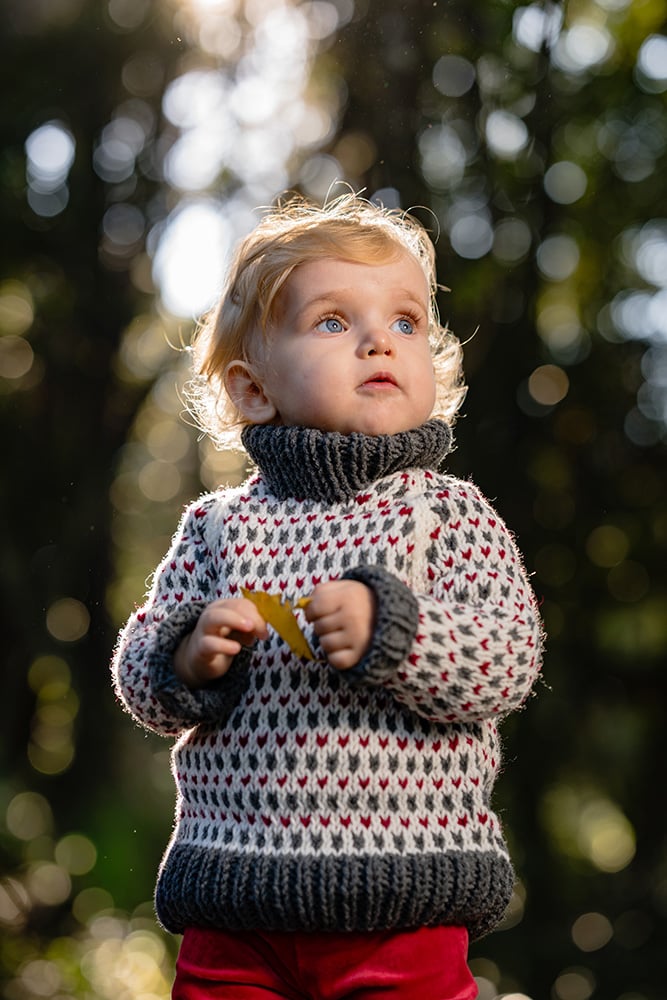
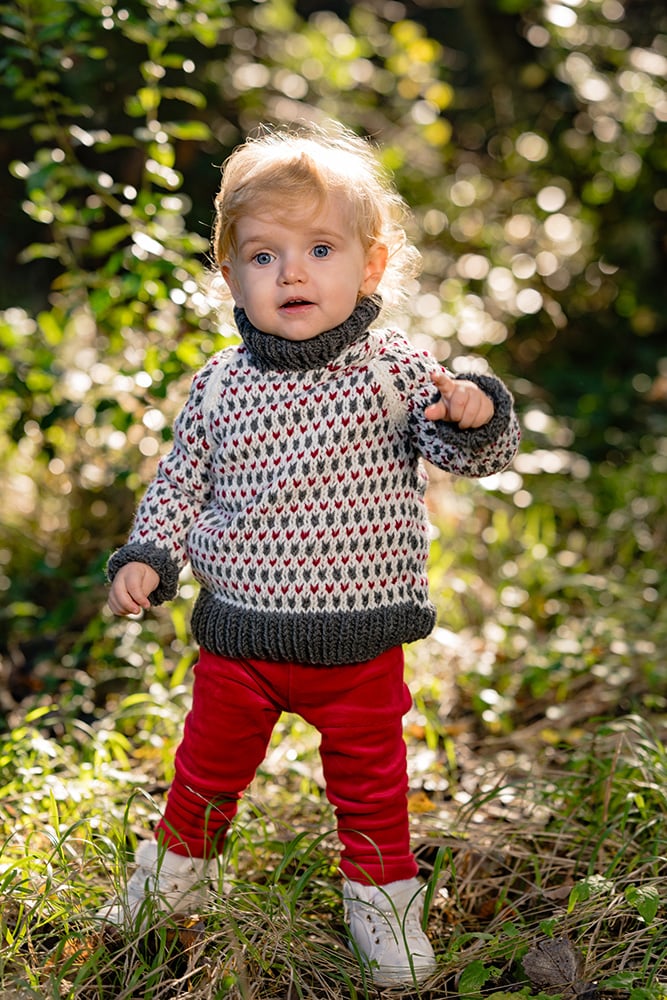
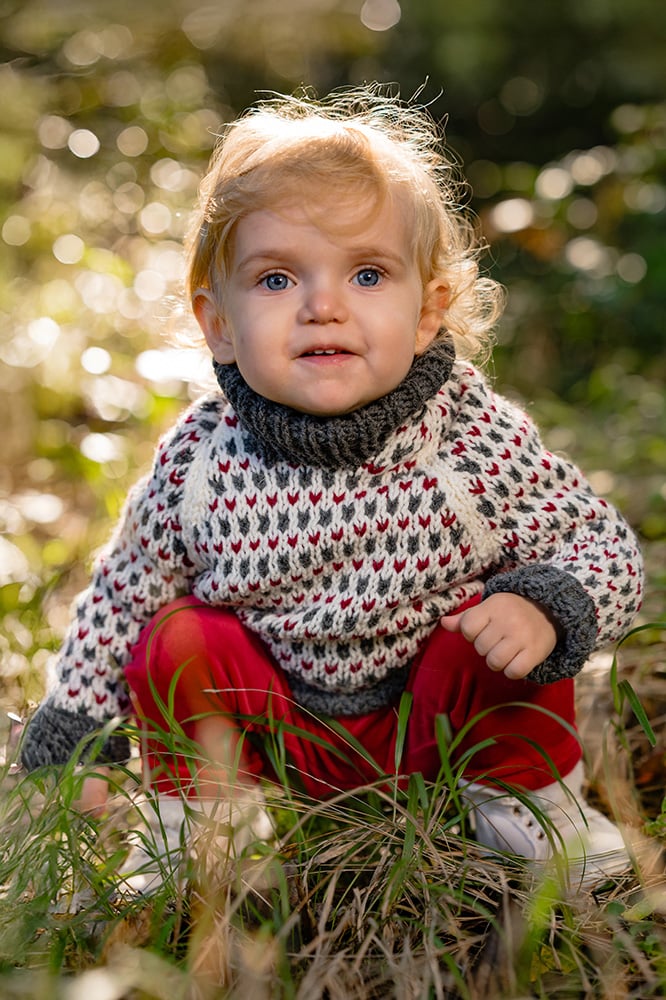
Snow Day Nordic Sweater: Free Children’s Knitting Pattern (Sizes 2–10)
THIS ARTICLE CONTAINS AFFILIATE LINKS THAT SUPPORT HANDY LITTLE ME CONTENT AND FREE PATTERNS.Snow Day Nordic Sweater is a cozy, classic children’s raglan pullover with a simple Nordic-style colorwork motif that looks bold but is easy to knit once you get into the rhythm.
This is a free knitting pattern for a warm, everyday sweater—perfect for chilly mornings, holiday outings, and (of course) snow days.
The sweater is worked flat in pieces and seamed, so you can check your progress as you go and easily adjust the length of the sleeves or body.
The colorwork is stranded knitting worked flat with a chart, and I’ve included quick tips for reading the chart on RS/WS rows and managing floats.
You’ll find the full free pattern below, and if you prefer a printable version, there’s also a PDF available in the shop.
Before You Get Started
- Skill Level: – Intermediate (advanced knitters)
- Construction: Worked flat (back, front, and sleeves) and seamed. Raglan shaping creates the yoke and neckline.
- Colorwork: This is stranded colorwork worked flat. Read the chart right to left on RS rows and left to right on WS rows.
- Chart repeats: The chart is a 20-stitch repeat worked edge-to-edge across the row. If your stitch count isn’t a multiple of 20, work a partial repeat at the end of the row.
- Shaping with the chart: When increasing or decreasing, continue working the chart sequence as established across the remaining stitches. The motif may shift slightly at the edges—this is normal.
- Floats: Try not to carry floats longer than 4–5 stitches without catching them in. Keep your floats relaxed by spreading your stitches on the right needle before changing colors.
- Gauge matters: Because colorwork can pull in, it’s worth making a small swatch in stockinette with the chart pattern to confirm you’re happy with your fabric and fit.

Materials Needed
Yarn
Alize Lanagold Classic (worsted/aran-style wool–acrylic blend) or similar.
Each 100 g ball = approx 240 m / 262 yds.
- Color A (Grey): ribbing (hem, cuffs, neck) and chart
- Color B (White)
- Color C (Red)
Because this is a stranded knit sweater in three colors, exact usage will vary a little, but these are good approximate totals (all colours combined):
- Size 2 (1–2 yrs): ~700 yds / 640 m total / ≈ 3 × 100 g balls
- Size 4 (3–4 yrs): ~800 yds / 730 m total / ≈ 4 × 100 g balls
- Size 6 (5–6 yrs): ~900 yds / 820 m total / ≈ 4 × 100 g balls
- Size 8 (7–8 yrs): ~950 yds / 870 m total / ≈ 4 × 100 g balls
- Size 10 (9–10 yrs): ~1,075 yds / 980 m total / ≈ 5 × 100 g balls
Yardage will vary by size and knitter, but the estimates above are generous and include a bit of extra yarn for swatching and tension differences.
Needles
- 6 mm (US 10) straight needles or circulars used flat
- 6 mm (US 10) circular or straight for neckband (A 40 cm / 16″ length circular works well)
- Or the size needed to obtain the gauge.
Notions
- Scissors
- Yarn needle/tapestry needle
- Tape measure
- Stitch holders x 2

Size Information
The pattern is written in US children’s sizes 2 (4, 6, 8, 10).
Ages are approximate – always go by body measurements when you can.
All measurements are finished garment measurements, with the sweater lying flat.
Approx age:
- Size 2 → 1–2 years
- Size 4 → 3–4 years
- Size 6 → 5–6 years
- Size 8 → 7–8 years
- Size 10 → 9–10 years
Finished Measurements (approx)
| Size | Approx age | Finished chest | Back length (hem to neck) | Sleeve length to underarm* |
|---|---|---|---|---|
| 2 | 1–2 yrs | ~24.5″ / 62 cm | ~13″ / 33 cm | ~8″ / 20 cm |
| 4 | 3–4 yrs | ~26.5″ / 67 cm | ~14″ / 35.5 cm | ~9″ / 23 cm |
| 6 | 5–6 yrs | ~28.8″ / 73 cm | ~15″ / 38 cm | ~10″ / 25.5 cm |
| 8 | 7–8 yrs | ~30.9″ / 78.5 cm | ~16″ / 40.5 cm | ~11″ / 28 cm |
| 10 | 9–10 yrs | ~33.1″ / 84 cm | ~17″ / 43 cm | ~12″ / 30.5 cm |
*Sleeve length is measured from the cuff to the underarm seam.
The sweater is designed with positive ease.
If you want a slimmer fit, you can knit a size down (as long as the chest still has a bit of room).
Gauge
- 15 sts and 22 rows = 10 × 10 cm / 4″ × 4″ in stocking stitch (stockinette)
- Using 6 mm needles, after light blocking.
- You must match this gauge for the sizes to come out as written.
Abbreviations
- k – knit
- p – purl
- st(s) – stitch(es)
- kfb – knit into the front and back of the same stitch (increase 1)
- k2tog – knit 2 together (right-leaning decrease)
- ssk – slip, slip, knit (left-leaning decrease)
- RS – right side
- WS – wrong side
- rep – repeat
Pattern Instructions
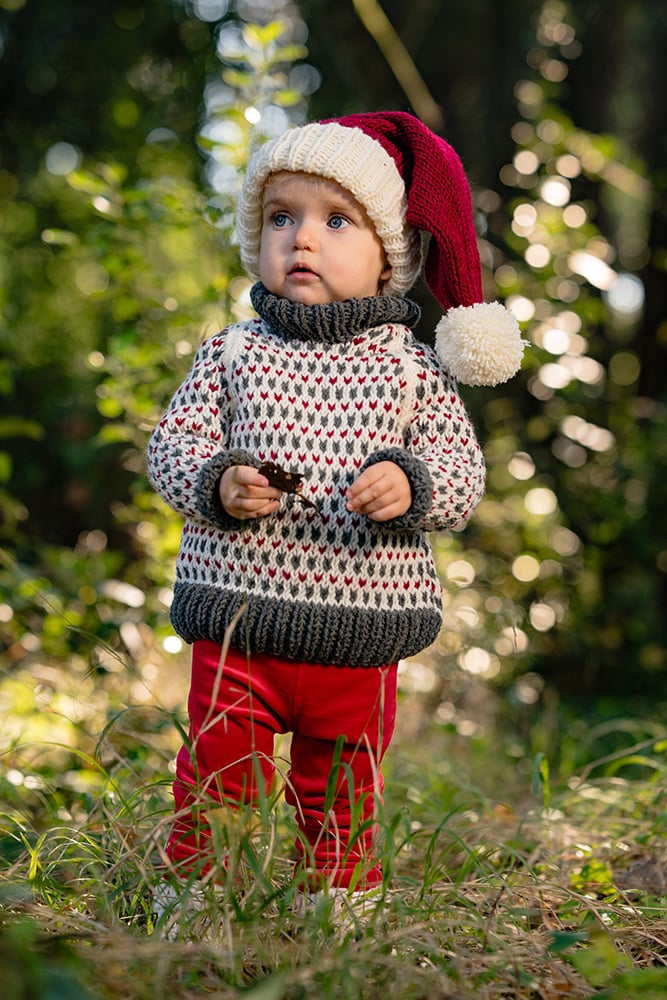
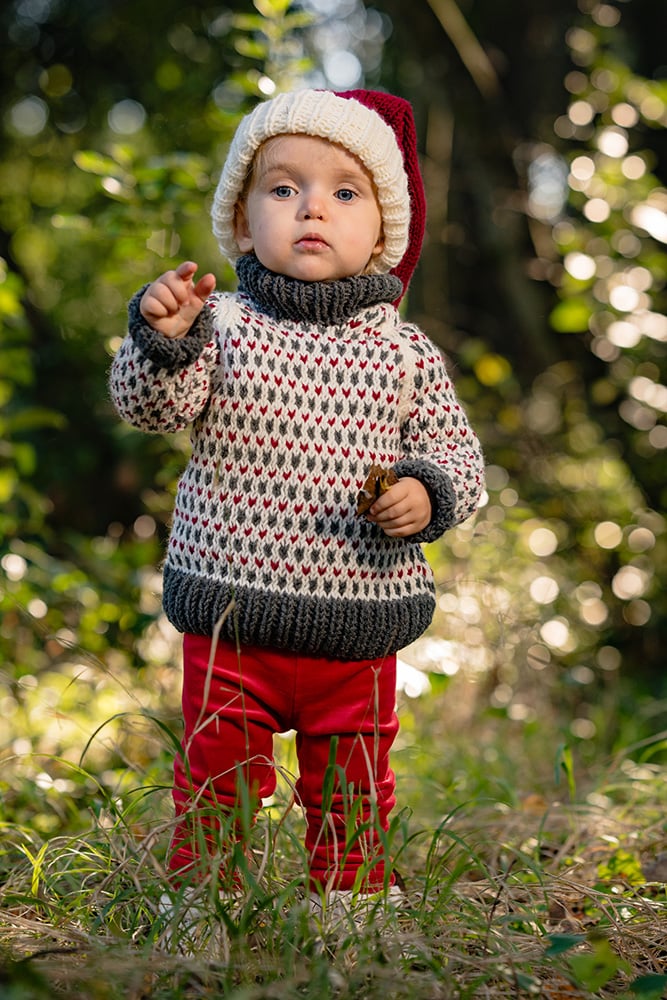
Printable PDF: If you prefer to knit from a printable version or like to keep patterns in a folder, you can purchase the ad-free PDF of this elf sweater pattern in my shop.
You can also make the Santa hat from this pattern here – knit without the stripes: Free Elf Hat Knitting Pattern – Striped Christmas Hat In 7 Sizes
Notes
- Sweater is worked flat in pieces: Back, Front, Sleeves; then seamed.
- It uses a simple raglan: you cast off a few stitches at the underarm and then decrease at each end of RS rows.
- Ribbing (hem, cuffs, neck) is in Grey (A) in 1×1 rib (K1, P1).
- Body/Sleeves: After ribbing in Grey (A), work the color chart with White (B) as the background and Grey (A) + Red (C) as shown.
- Sizes are given as: 2 (4, 6, 8, 10)
- When only one number is given, it applies to all sizes.
How to Read the Color Chart (Worked Flat)
This sweater is worked flat.
The chart is shown with Row 1 as a Right Side (RS) row.
- RS rows: Read the chart right to left and knit the stitches in the colors shown.
- WS rows: Read the chart left to right and purl the stitches in the colors shown.
Each square equals 1 stitch, and each chart row equals 1 row.
Chart Repeats (Edge to Edge)
The chart is a 20-stitch repeat worked across the entire row (edge to edge).
Start each row at the beginning of the chart repeat, and repeat the 20-stitch sequence across the row as many times as needed.
If your stitch count is not a multiple of 20, work a partial repeat at the end of the row to use all stitches.
Shaping While Following the Chart
When increasing or decreasing, continue working the chart sequence as established across the remaining stitches:
- Work the next stitch(s) in the repeat.
- If shaping changes the stitch count at the edges, the pattern may shift slightly—this is normal.
- Keep the motif flowing by repeating the chart wherever stitches remain.
Floats and Tension (Stranded Colorwork Tips)
When carrying a color across the back of the work, the carried strand is called a float.
- Try not to carry floats longer than 4–5 stitches without catching them in.
- To catch a float, twist the carried yarn around the working yarn on the WS before knitting/purling the next stitch in the chart color.
Tension tip: Always spread your stitches out on the right needle before changing colors, so floats stay relaxed.
Floats that are too tight can make the fabric pucker and reduce stretch—especially important for a child’s sweater.
On WS rows, keep floats neat by purling gently and checking that the carried yarn stays loose behind the work.
Tip: On rows that don’t use one of the contrast colors, simply carry it up the side (don’t strand it across the row), and pick it back up when it appears again.
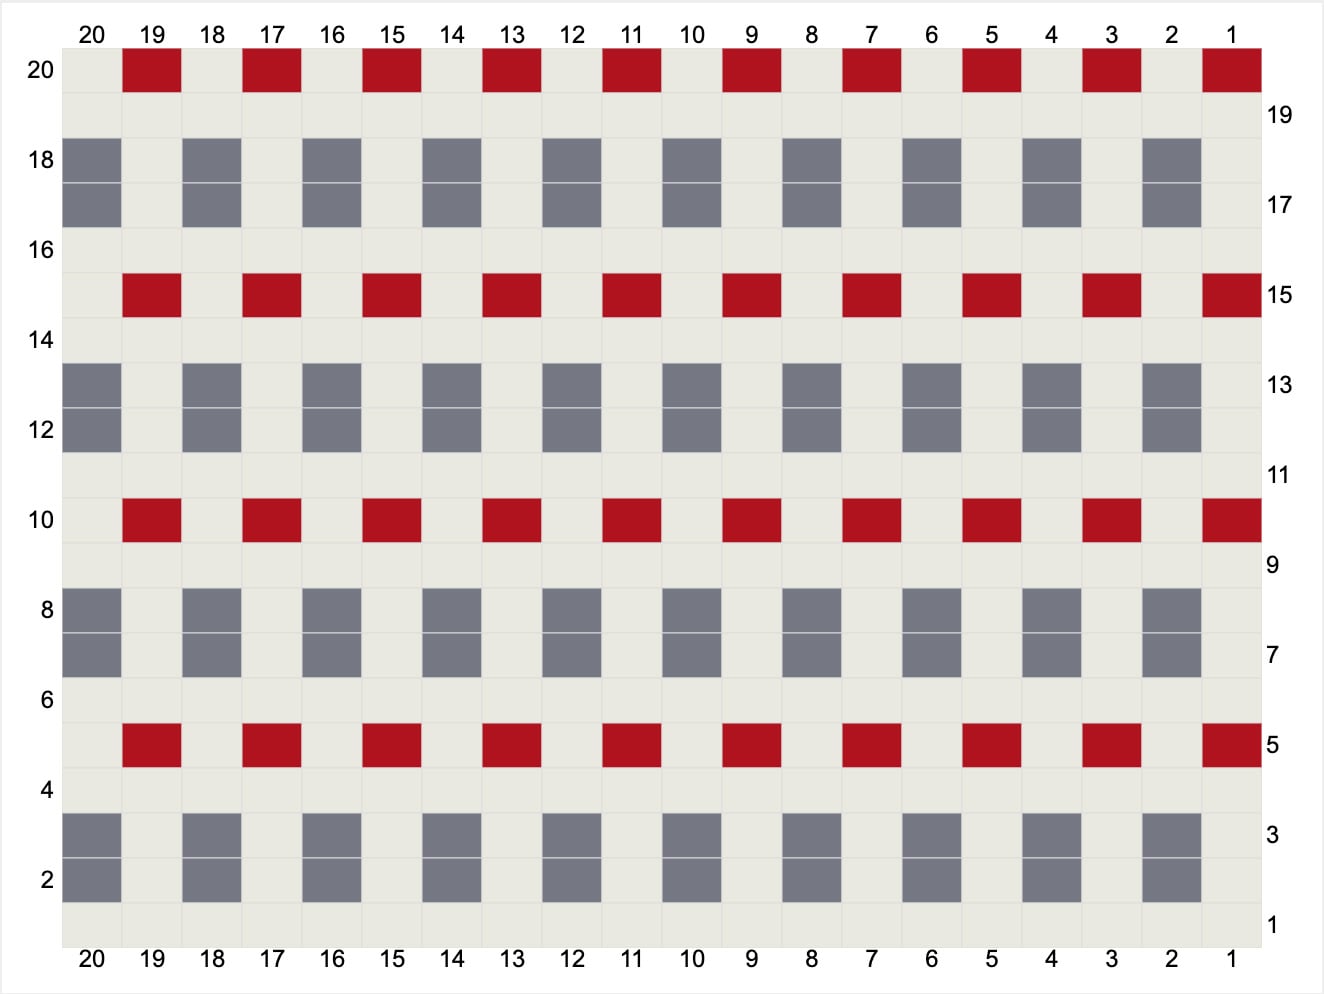
The Color Chart
- Color A (Grey): ribbing and the grey squares in the chart
- Color B (White): the blank/background squares in the chart
- Color C (Red): the red squares in the chart
The chart is worked edge-to-edge across the row.
Repeat the 20-stitch sequence as needed and work a partial repeat at the end if required.
Read RS rows right to left; WS rows left to right.
When increasing or decreasing, continue working the chart sequence as established across the remaining stitches.
Back
With A (Grey) and 6 mm/US 10 needles, cast on 46 (50, 54, 58, 62) sts.
Hem ribbing
Work in 1×1 rib (K1, P1) for 2″ / 5 cm, ending after a WS row.
Body
Change to stocking stitch and begin color pattern (follow color chart):
Work straight in pattern until the piece measures: 8 (9, 10, 11, 12)” / 20 (23, 25.5, 28, 30.5) cm from the cast-on edge (including hem), ending after a WS row.
Shape raglan (back) / Underarm shaping
- Next row (RS): Cast off 2 sts, knit to end.
- Next row (WS): Cast off 2 sts, purl to end.
You now have: 42 (46, 50, 54, 58) sts.
Raglan shaping
Raglan shaping + chart: On RS decrease rows, work the raglan edge stitches in Yarn B (White): k1, ssk, work chart as established to last 3 sts, then k2tog, k1 in Yarn B. On WS rows, p2 in Yarn B, work the WS chart as established across, then p2 in Yarn B.
Next row (RS) – raglan decrease row: K1, ssk, knit to last 3 sts, k2tog, K1. (2 sts decreased)
Next row (WS): Purl all sts.
Repeat these 2 rows, keeping the stripes correct, until 12 (14, 16, 18, 20) sts remain.
When you have 12 (14, 16, 18, 20) sts left:
Work 1 more WS row purl.
Place the remaining sts onto a stitch holder on the next RS row.
Set Back aside.
Front
Worked almost the same as the Back, with added neck shaping.
With A (Grey) and 6 mm/US 10 needles, cast on 46 (50, 54, 58, 62) sts.
Hem ribbing
Work in 1×1 rib for 2″ / 5 cm, ending after a WS row.
Body
Work in stocking stitch and color pattern as for Back, until the Front measures the same length as the Back to the underarm, ending after a WS row.
Shape raglan – lower part (before neck)
Shape underarm exactly as for Back:
Next row (RS): Cast off 2 sts, knit to end.
Next row (WS): Cast off 2 sts, purl to end.
You now have: 42 (46, 50, 54, 58) sts.
Begin raglan shaping:
Raglan shaping + chart: On RS decrease rows, work the raglan edge stitches in Yarn B (White): k1, ssk, work chart as established to last 3 sts, then k2tog, k1 in Yarn B. On WS rows, p2 in Yarn B, work the WS chart as established across, then p2 in Yarn B.
Next row (RS): K1, ssk, knit to last 3 sts, k2tog, K1.
Next row (WS): Purl all sts.
Repeat these 2 rows until you have: 22 (24, 26, 28, 30) sts remaining.
Shape neck and continue raglan
We’ll now split for the neck and continue decreasing only at the raglan edges, keeping the neck edges straight.
You have 22 (24, 26, 28, 30) sts on the needle.
Neck split row (RS)
Work as follows: K1, ssk, K 5 (6, 6, 7, 7), slip next 6 (6, 8, 8, 10) sts onto a stitch holder for the front neck, attach a second ball of yarn, K 5 (6, 6, 7, 7), k2tog, K1.
You now have: 7 (8, 8, 9, 9) sts for the left front, 6 (6, 8, 8, 10) sts on a holder for the centre front neck, 7 (8, 8, 9, 9) sts for the right front.
This row also worked 1 raglan decrease at each outer edge.
Next row (WS)
With WS facing, using both balls of yarn:
- Purl across first front side,
- Then purl across second front side.
You will now continue to work both front sides at the same time, each with its own ball of yarn.
Continue raglan shaping
From here on:
- On every RS row: decrease only at the outer raglan edge of each front.
- On every WS row: purl all sts.
- Do not decrease at neck edges – they are worked straight in stocking stitch.
Use this shaping:
- Left front (raglan edge at beginning of RS row): K1, ssk, knit to end.
- Right front (raglan edge at end of RS row): Knit to last 3 sts, k2tog, K1.
Continue in this way, keeping the stripe pattern in sequence, until:
- The front raglan edges are the same length as the Back raglan, and
- You have approximately 3 (4, 4, 5, 5) sts remaining on each front side.
Next RS row (each side separately):
- Knit across and cast off those remaining sts knitwise for each shoulder.
You now have:
- Front shoulders cast off, 6 (6, 8, 8, 10) sts on a holder at the centre front.
Sleeves
Sleeves are worked flat from cuff to top and seamed.
With A (Grey) and 6 mm/US 10 needles, cast on: 22 (24, 26, 28, 30) sts.
Cuff ribbing
Work in 1×1 rib (K1, P1) for 2″ / 5 cm, ending after a WS row.
Sleeve increases
Change to stocking stitch and begin the color pattern, starting with White (B):
At the same time, begin shaping the sleeve with increases on Row 1 of the next 5 sections.
You have 22 (24, 26, 28, 30) sts after the cuff.
(Rows 1–6)
- Row 1 (RS) – Increase row for all sizes:
- K1, kfb, knit to last 2 sts, kfb, K1. Sts after this row: 24 (26, 28, 30, 32)
- Rows 2–6: Work in stocking stitch.
(Rows 7–12)
- Row 7 (RS) – Increase row:
- K1, kfb, knit to last 2 sts, kfb, K1. Sts after this row: 26 (28, 30, 32, 34)
- Rows 8–12: Work in stocking stitch.
(Rows 13–18)
- Row 13 (RS) – Increase row:
- K1, kfb, knit to last 2 sts, kfb, K1. Sts after this row: 28 (30, 32, 34, 36)
- Rows 14–18: Work in stocking stitch.
(Rows 19–24)
- Row 19 (RS) – Increase row:
- K1, kfb, knit to last 2 sts, kfb, K1. Sts after this row: 30 (32, 34, 36, 38)
- Rows 20–24: Work in stocking stitch.
(Rows 25–30)
- Row 25 (RS) – Increase row:
- K1, kfb, knit to last 2 sts, kfb, K1.
- Sts after this row: 32 (34, 36, 38, 40)
- Rows 26–30: Work in stocking stitch.
You now have 32 (34, 36, 38, 40) sts on the needle for the sleeve.
From here, continue in stocking stitch and in the same color pattern, without further increases, until the sleeve measures: 8 (9, 10, 11, 12)” / 20 (23, 25.5, 28, 30.5) cm
from the cast-on edge (including cuff), ending after a WS row.
Underarm cast-offs (all sizes)
Next row (RS): Cast off 2 sts, knit to end.
Next row (WS): Cast off 2 sts, purl to end.
You now have:
- Size 2: 28 sts
- Size 4: 30 sts
- Size 6: 32 sts
- Size 8: 34 sts
- Size 10: 36 sts
SIZE 2 (1–2 YEARS) ONLY
Raglan shaping – Part 1 (28 sts down to 16 sts, via 18 sts)
Raglan shaping + chart: On RS decrease rows, work the raglan edge stitches in Yarn B (White): k1, ssk, work chart as established to last 3 sts, then k2tog, k1 in Yarn B. On WS rows, p2 in Yarn B, work the WS chart as established across, then p2 in Yarn B.
Work the following 4-row set, keeping the color pattern correct:
- Row 1 (RS – decrease row): K1, ssk, knit to last 3 sts, k2tog, K1. (–2 sts)
- Row 2 (WS): Purl all sts.
- Row 3 (RS – plain): Knit all sts (no decreases).
- Row 4 (WS): Purl all sts.
Repeat Rows 1–4 a further 4 times
(so you have worked this 4-row set 5 times in total).
After these 5 decrease rows, you will have 18 sts.
Then: Work Rows 1–4 once more (a 6th time).
On Row 1 of this 6th repeat you decrease again: 18 → 16 sts.
Complete Rows 2–4 to keep the color pattern and row count correct.
At the end of this section you have: 16 sts remaining.
Raglan shaping – Part 2 (from 16 sts to 8 sts)
From 16 sts, work as follows:
- Next row (RS – decrease row): K1, ssk, knit to last 3 sts, k2tog, K1. → 14 sts
- Next row (WS): Purl all sts.
- Next row (RS – decrease row): K1, ssk, knit to last 3 sts, k2tog, K1. → 12 sts
- Next row (WS): Purl all sts.
- Next row (RS – decrease row): K1, ssk, knit to last 3 sts, k2tog, K1. → 10 sts
- Next row (WS): Purl all sts.
- Next row (RS – decrease row): K1, ssk, knit to last 3 sts, k2tog, K1. → 8 sts
- Next row (WS): Purl all sts.
- On the following RS row: Cast off all 8 sts knitwise.
SIZES 4 (6, 8, 10) ONLY
Raglan shaping + chart: On RS decrease rows, work the raglan edge stitches in Yarn B (White): k1, ssk, work chart as established to last 3 sts, then k2tog, k1 in Yarn B. On WS rows, p2 in Yarn B, work the WS chart as established across, then p2 in Yarn B.
For larger sizes, use the same 4-row set to slow the shaping at first, then switch to a simple 2-row decrease set.
4-row set (slower shaping):
- Row 1 (RS – decrease row): K1, ssk, knit to last 3 sts, k2tog, K1. (–2 sts)
- Row 2 (WS): Purl all sts.
- Row 3 (RS – plain): Knit all sts (no decreases).
- Row 4 (WS): Purl all sts.
2-row set (faster shaping):
- Row 1 (RS – decrease row): K1, ssk, knit to last 3 sts, k2tog, K1. (–2 sts)
- Row 2 (WS): Purl all sts.
You start this section with:
- Size 4: 30 sts
- Size 6: 32 sts
- Size 8: 34 sts
- Size 10: 36 sts
How many times per size
Size 4 (30 sts):
- Work the 4-row set 5 times,
- then work the 2-row set 6 times.
- You’ll end with 8 sts.
Size 6 (32 sts):
- Work the 4-row set 6 times,
- then work the 2-row set 5 times.
- You’ll end with 10 sts.
Size 8 (34 sts):
- Work the 4-row set 6 times,
- then work the 2-row set 6 times.
- You’ll end with 10 sts.
Size 10 (36 sts):
- Work the 4-row set 7 times,
- then work the 2-row set 5 times.
- You’ll end with 12 sts.
As you work, check the length of the raglan edge (from the underarm cast-offs to the top of the sleeve) against the Back:
- If you reach the correct raglan length but still have more stitches than the target for your size, work one or two extra 2-row sets (decrease RS/purl WS) until you reach the stitch count.
- If you reach the target stitch count but the raglan edge is slightly shorter than the Back, work 1–2 extra plain RS/WS rows (no decreases) before casting off.
When:
- The sleeve raglan length matches the Back raglan, and
- You have roughly the target number of sts for your size,
then:
- Work 1 more WS row purl,
- On the next RS row, cast off all remaining sts knitwise.
Finishing
Block pieces (optional but nice): Gently block all pieces to measurements, taking care not to overstretch the ribbing. Let dry flat.
Weave in all ends on the WS, tidy up any jogs in the color rows if needed.
Step 1:
Seam the back right raglan sleeve seam using the mattress stitch. Make sure the right sides are facing you.
Step 2:
Join the right sleeve seam to the front raglan seam using the mattress stitch.
Make sure the right sides are facing you.
Step 3 – Neckband Stitches
Join the left raglan sleeve seam to the front raglan seam using the mattress stitch.
Make sure the right sides are facing you. Leave the left-back raglan seam open for now.
Using A (Grey) and 6 mm/US 10 needles:
With RS facing, starting at the left-back opening, pick up and knit along the left front neck edge, knit across the center-front held sts, pick up along the right front neck edge, knit across the back-neck held sts, then pick up along the remaining edge to return to the left-back opening—about 44 (48, 52, 56, 60) sts total.
The exact number isn’t critical; it just must sit smoothly and stretch easily over the head. Please note the neck is now worked back and forth – not joined in the round.
Work in 1 x 1 ribbing (K1, P1) for 4 inches (or your desired length), ending with a WS row.
Bind off loosely (go up a needle size for a looser bind off).
Step 4:
Join the remaining back raglan seam and continue up the neck ribbing (reversing the seam for the remaining half, so it looks neat when turned over).
Step 5:
Fold neck ribbing in half to WS and catch down loosely on the WS. This creates a folded-over collar (crew neck) with a neat edge.
Step 6:
Join the side and sleeve seams using the mattress stitch.
Then you can address any remaining loose ends.
Could you share your work with us?
I love seeing your finished projects on social media.
If you enjoyed making the Snow Day Nordic sweater knitting pattern, I’d love to see yours on Instagram, tag me @handylittleme.
If you are on Facebook, check out the Handylittleme Facebook group and share a photo.
I’d love to see your work.
Happy Knitting!
FAQ
Is this Fair Isle?
This pattern uses stranded colorwork.
“Fair Isle” is a specific traditional style of stranded knitting, but “stranded colorwork” is the most accurate term for this technique.
How do I keep my floats neat?
Try not to carry a float longer than 4–5 stitches without catching it in.
Keep floats relaxed by spreading your stitches on the needle before changing colors.
Tight floats can make the fabric pucker and reduce stretch.
My colorwork looks tighter than my stockinette—what should I do?
That’s common.
You can go up a needle size for the colorwork section, loosen your tension slightly, or check that you’re not pulling floats too tight.
A small chart swatch helps a lot.
Can I adjust the length?
Yes! You can add or subtract length in the body and sleeves.
If you adjust length significantly, just keep the chart pattern repeating as established.
Can I knit this in the round?
The nordic sweater pattern is written to be worked flat.
It can be adapted to the round, but you’ll need to adjust the construction and read all chart rows from right to left.
Free Knitting Patterns For Christmas
- 27 Knitted Stocking Stuffers (All Free Patterns!)
- Elf Dog Sweater Knitting Pattern (Free in 3 Sizes)
- Christmas Elf Dog Bandana Knitting Pattern (4 Sizes)
- 13 Vintage Knitted Christmas Stocking Patterns
- 30+ Free Christmas Knitting Patterns (Best Knitted Ideas)
- 33 Free Christmas Knitting Patterns For Kids
- 30 Christmas Sweater Knitting Patterns (Jumper Ideas)
- 17 One Skein Knitting Patterns {Easy + Quick}
- 35 Free Knitted Christmas Decorations (Knitting Patterns)
- Knit Tree Skirt Pattern (Free And Easy Christmas DIY)
- Knitted Santa Hat
- Dog Christmas Hat Pattern
- 17+ Nordic Knits For Christmas – Free Patterns
- 25 Free Knitted Christmas Baubles And Ornaments
- 15+ Free Knitted Advent Calendar Patterns
- Knitted Christmas Bauble Cover (Free Printable)
- Holly Jolly Dishcloth Knitting Pattern (Free Printable)
- Candy Cane C2C Dishcloth (Free Printable Knitting Pattern)