Elf Stripes Crochet Dog Bandana (Free Pattern)
THIS ARTICLE CONTAINS AFFILIATE LINKS THAT SUPPORT HANDY LITTLE ME CONTENT AND FREE PATTERNS.If your pup needs a little holiday magic this year, this crochet dog bandana is the perfect festive touch.
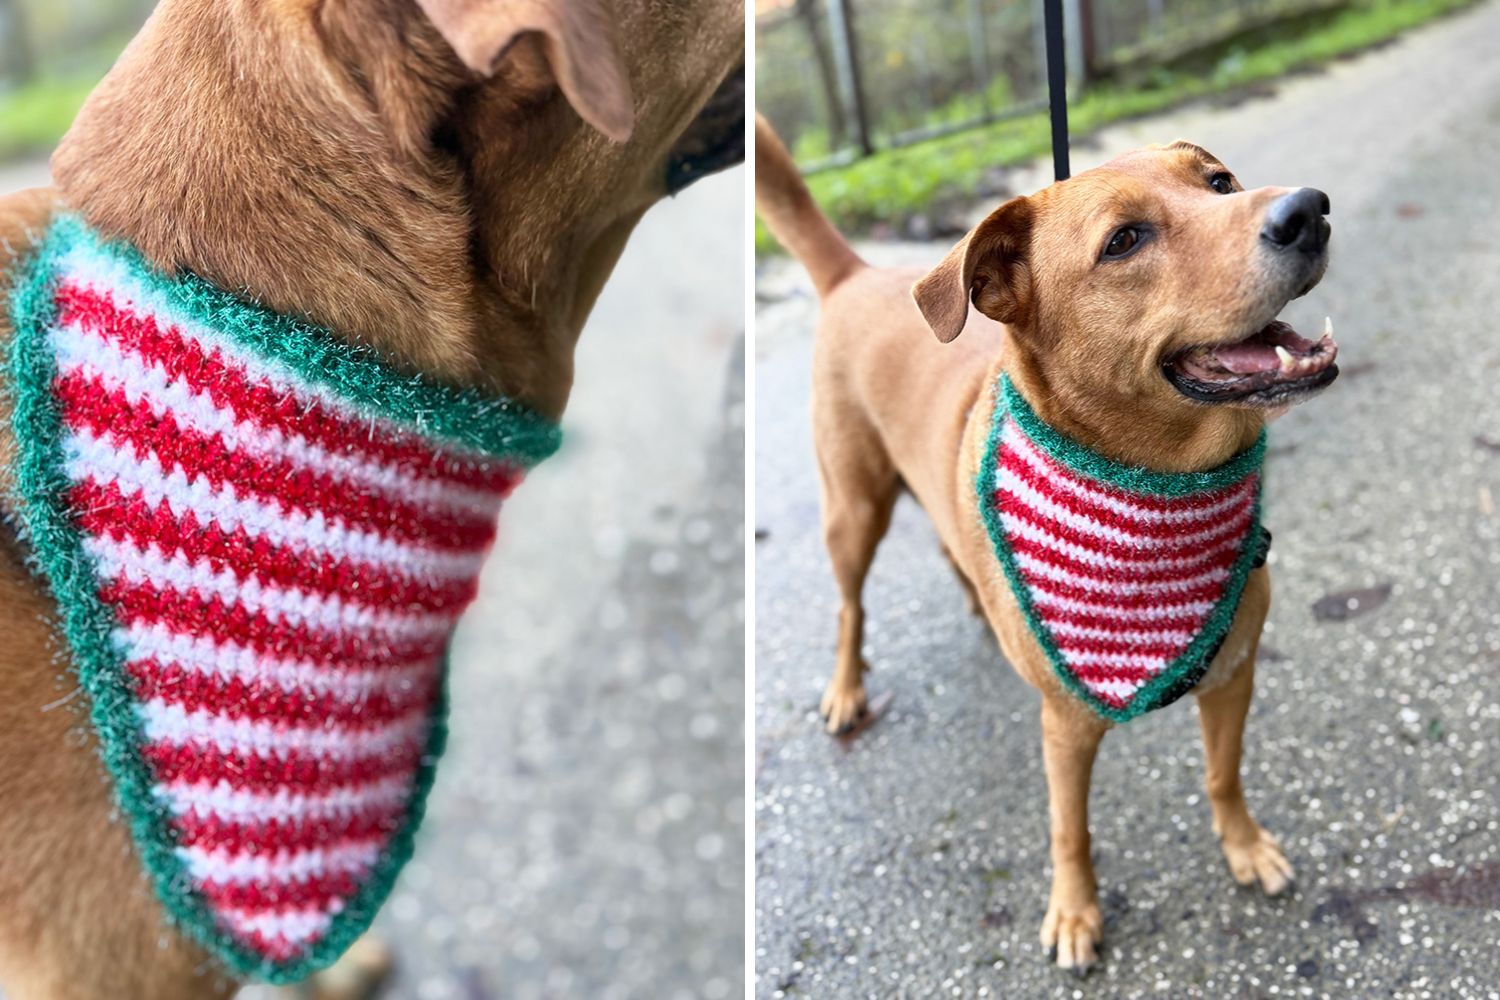
Worked in candy-cane stripes with a fluffy green ruffle, it’s a shallow triangle bandana that sits comfortably on the chest and ties neatly at the back of the neck, so it’s great for small dogs, big dogs, and every puppy in between.
Whether you’re dressing up your own dog, stitching a stack of Christmas bandanas to donate to local shelters, or making a matching accessory for a kid in the family, this free crochet pattern is a quick, cosy make that looks wonderfully cheerful in photos.
This project is ideal for advanced beginners who know their basic stitches and want a simple, customizable pattern that can be resized.
In this blog post, I’ll walk you through all the materials, sizing, and step-by-step instructions, so you can whip up a stripey elf bandana for the four-legged rascal who owns your heart.
Please scroll down to view the free pattern, or grab the printable PDF pattern in my shop here.
Before You Get Started
This pattern is worked from the tip up into a soft, shallow V, then finished with a ruffled border and two sturdy ties.
If you can work single crochet, change colors cleanly, and feel OK reading a few shaping notes, you’re good to go.
The sample is made with DK yarn held with a sparkly strand, but you can also experiment with worsted weight yarn from your stash; just swatch and check the measurements as you go.
If you love variegated looks, you could even try something like Caron Simply Soft Stripes yarn for a playful, self-striping version.
I’ve written this so you can make it for everything from tiny small dogs up to a big goofy boy like Max, and it would look just as cute on a dainty Daisy too.
Safety & sizing disclaimer:
Always make sure you can fit at least two fingers between the bandana and your dog’s neck, and remove any accessory if your dog seems uncomfortable or if there’s a risk of snagging during play.

Tools & Materials Needed
- Yarn
- Main DK yarn – 1 x of each = Sirdar Snuggly Replay DK (cotton/acrylic) in white and red
- Sparkle yarn – 1 x of each = YarnArt Christmas in white, red, and green
- Body stripes are worked with one strand of DK + one strand of sparkle held together
- Ruffle is worked with green sparkle only for a lighter, fluffier edge
- Hook
- 5 mm (US H-8) crochet hook, or size needed to obtain gauge
- Notions
- Tapestry needle for weaving in ends and tidying carried strands
- Tape measure
- Scissors
- Optional: cute buttons if you’d like to fasten the neck edge with buttons instead of ties
As you work, keep an eye on your edge loops and color changes so everything stays neat and flat.
Size Info and Gauge
The bandana is written for four different sizes:
- Small (S)
- Medium (M)
- Large (L)
- Extra Large (XL)
Approximate neck edge widths (triangle only, not including ties):
- S: 28 cm / 11″
- M: 36 cm / 14″
- L: 43–44 cm / 17″
- XL: 50 cm / 19.75–20″
Gauge
- 15 sts and 6 rows = 4″ (10 cm) in single crochet, worked flat, after light blocking.
- Gauge isn’t super strict here, but changes will affect final size and yarn usage, especially if you swap to a heavier yarn.

Abbreviations (US Terms)
- ch – chain
- sc – single crochet
- dc – double crochet
- sl st – slip stitch
- st(s) – stitch(es)
- RS – right side
- WS – wrong side
- rep – repeat
- inc – increase (2 sts worked into the same st)
When you work the first row, pay attention to your first chain, and always place your increases into the last st of the shaping rows.
Notes
- Bandana is worked from the tip up in rows.
- Shaping is created by working 2 increases on every RS row: one in the first st and one in the last st.
- WS rows are worked straight with no increases.
- Stripes are worked as: 2 rows in Yarn A (white), 2 rows in Yarn B (red), repeating.
- Color changes happen at the start of a RS row.
- The ruffled border is added along all sides, including the neck edge.
- Ties are worked separately from each top corner.
- You’ll repeat row 3 and 4 (your increase row and your straight row) until you reach the stitch count for your size.

Pattern Instructions
Please scroll down to view the free pattern, or grab the printable PDF pattern in my shop here.
Bandana Body (All Sizes)
- With Yarn A (white), ch 3.
- Row 1 (RS): 2 sc in 2nd ch from hook, 2 sc in last ch. (4 sts)
- Row 2 (WS): Ch 1, turn, sc in each st across. (4 sts)
- Row 3 (RS – inc row): Ch 1, turn, 2 sc in first st, sc in each st to last st, 2 sc in last st. (6 sts)
- Row 4 (WS): Ch 1, turn, sc in each st across. (6 sts)
Pattern repeat for body:
- RS rows (odd-numbered after Row 1): increase at both ends (2 sc in first st, sc across, 2 sc in last st).
- WS rows (even-numbered): sc in each st across.
Stripe Pattern
- After the initial Yarn A (white) rows, work 2 rows in Yarn B (red).
- Switch to 2 rows in Yarn A (white).
- Repeat: B x 2 rows, A x 2 rows, throughout the body.
- Change color at the beginning of a RS row (after turning and before you chain 1).
- Carry yarn neatly up the side or cut and weave in ends as preferred.
Size Instructions (Stitch Counts)
Continue repeating Rows 3–4 (keeping the stripe pattern) until you reach the stitch count for your chosen size at the end of a WS row:
- Small (S): work until you have 42 sts across the top.
- Medium (M): work until you have 52 sts across the top.
- Large (L): work until you have 64 sts across the top.
- Extra Large (XL): work until you have 74 sts across the top.
When you reach the stitch count for your size, fasten off Yarn A or B (whichever you ended on) and prepare for the border with Yarn C.
Ruffled Border
With RS facing, join Yarn C (green) to one top corner of the triangle.
Round 1 – Base Round
- Ch 1, sc evenly down the first slanted side of the triangle.
- When you reach the point at the bottom, work 3 sc in the very tip stitch to turn the corner neatly.
- Continue to sc evenly up the second slanted side to the opposite top corner, work 3 sc in each corner.
- Then continue to sc evenly along the neck edge, ending with 3 sc in the final corner point.
Aim for about 1 sc per row end; adjust as needed so the edge lies flat (a tiny bit of snugness is okay before the ruffle).
Round 2 – Ruffle
Still with Yarn C, and with RS facing:
- Sc in next st, 3 dc in next st; rep from * to * all the way along both slanted sides, ending with either a sc or 3 dc as pattern allows.
This combination will create a soft, wavy ruffle.
Fasten off and weave in ends.

Neck Ties
Make one tie at each top corner of the neck edge.
You can use Yarn C (green) or one of the stripe colors.
Left Tie
- With RS facing, join yarn to the left top corner st.
- Chain for your size:
- S: ch 30
- M: ch 35
- L: ch 40
- XL: ch 45
- Starting in 2nd ch from hook, sc in each ch back to the bandana.
- Slip stitch into the same corner st to secure. Fasten off and weave in the end.
Right Tie
- Join yarn to the right top corner st.
- Repeat the same number of chains as the left tie for your size.
- Starting in 2nd ch from hook, sc in each ch back to the bandana.
- Slip stitch into the same corner st, fasten off, weave in ends.
You can tie the bandana in a bow or a double knot, depending on yarn and dog size.
Finishing
- Weave in all ends securely.
- Lightly block the bandana if desired to smooth out the stripes and ruffle.
- Tie around your dog’s neck, leaving room for two fingers between bandana and neck for safety.
Could you share your work with us?
I love to see your work on social media.
If you enjoyed making the crochet dog bandana, I’d love to see yours on Instagram; tag me @handylittleme or #handylittleme.
If you are on Facebook, visit the handylittleme Facebook group and share a photo.
You can also find me on Ravelry, Pinterest, and YouTube.
Happy crocheting!

FAQ
What is the proper way for a dog to wear a bandana?
A dog bandana should sit comfortably along the front of the chest, not too long or tight, with the knot or bow resting on the back of the neck.
Lay the bandana flat, with the wrong side facing up, then place it under your dog’s neck and tie the ends into a secure bow or double knot, making sure you can slide two fingers between the bandana and your dog’s fur.
For very active dogs, or those that like to chew, supervise them while they’re wearing accessories or remove the bandana after photos and walks.
What size to make a dog bandana?
Use your dog’s neck measurement as a guide and compare it with the finished neck width of each size in the pattern.
- For tiny small dogs or toy breeds, go with the Small size.
- For medium pets, use the Medium or Large depending on how much coverage you’d like.
- For broad-chested or giant breeds, the XL will give you the most fabric.
If your dog falls between sizes or you’re using a different yarn (like Caron or another brand), it’s easy to tweak the pattern: simply keep increasing rows until the top edge of the triangle is the width you need, then add the border and ties.
This makes it very easy to adjust the instructions so they work for different breeds, ages, and fluff levels.
More Christmas Patterns
You may also enjoy these crochet Christmas patterns…
- Free Christmas Crochet Moss Stitch Dishcloth
- Farmhouse Crochet Tree Skirt (Free Pattern)
- Candy Cane Stripe Crochet Dishcloth (Free Printable)
- Crochet Christmas Bauble Cover (Free Printable Pattern)
- 20 Free Christmas Crochet Blanket Patterns (Easy + Festive)
- 50 Best Free Crochet Christmas Stocking Patterns
- Free Crochet Christmas Ornament Pattern – Goodie Bag
- 6 Free Crochet Gift Bag Patterns For Christmas
- 40 Free Christmas Crochet Patterns (Best For The Holiday!)
- 35 Best Christmas Amigurumi Crochet Patterns Free!
- Crochet Flat Christmas Tree Pattern (Free Appliqúe How To)
- Free Santa Crochet Pattern (Christmas Amigurumi)
- 40 Free Crochet Christmas Ornament Patterns
- 29+ Gift Ideas For Crocheters
- 10 Advent Calendar Ideas
- 15 Free Crochet Christmas Coasters – Quick Patterns