Free Crochet Christmas Ornament Pattern – Goodie Bag
THIS ARTICLE CONTAINS AFFILIATE LINKS THAT SUPPORT HANDY LITTLE ME CONTENT AND FREE PATTERNS.This blog post will show a free crochet Christmas ornament pattern – goodie bag.
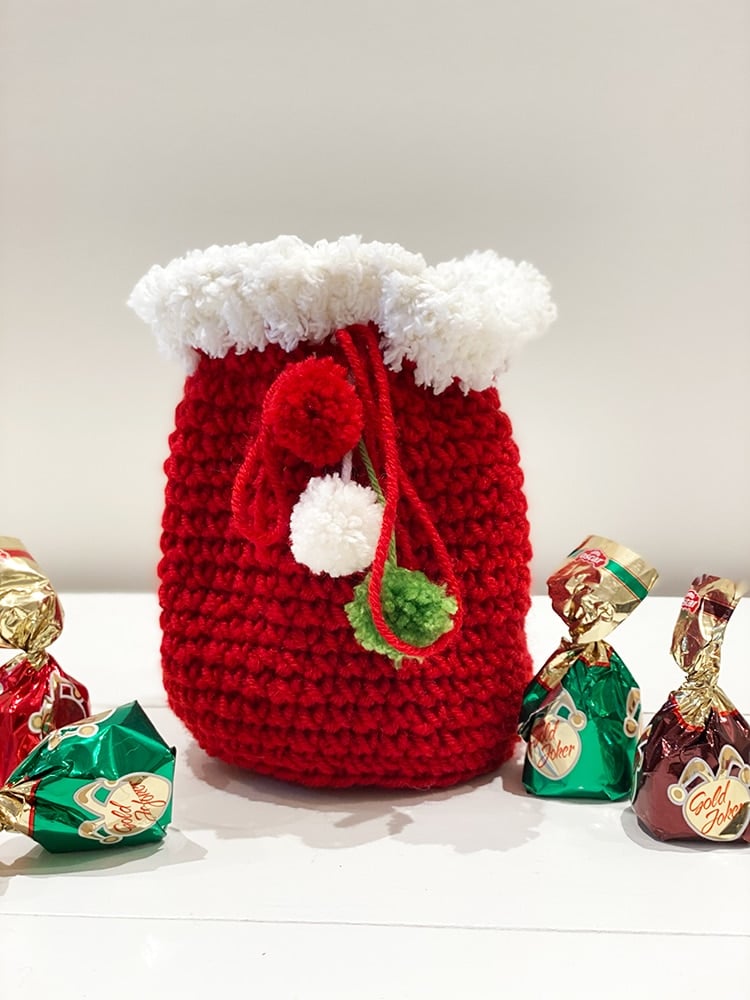
This crochet Christmas goodie bag pattern is a great quickie you can make in a flash for the holiday season!
The small goodie bags are made from scrap yarns that are an Aran/worsted weight yarn/10-ply yarn.
An excellent crochet ornament pattern that will upgrade your Christmas decor.
You will have so much fun making them!
Please scroll down to view the free pattern, or grab the printer-friendly ad-free PDF in my shop here.

Save this article
Enter your email address and we'll send it to your inbox.
By entering your email, you agree to receive patterns, tutorials, and updates from Handy Little Me. Unsubscribe at any time.
Great For Stash Busting!
You can use any yarn and improvise with whatever you have in your yarn stash!
Perfect for giving small gifts, the festive drawstring bag can fit one or two chocolates inside.
Made using single crochet stitches, this is a great pattern for beginners.
Related post: 6 Free Crochet Gift Bag Patterns For Christmas!

Resources and tutorials you may find helpful in following this pattern
This pattern is great for any beginner.
- You should be comfortable making a slip knot (how to make a slip knot (step by step)) and creating a chain (how to start a crochet chain).
- You should be comfortable working single crochet (how to single crochet (SC)).
- You should also be comfortable reading crochet patterns (how to read crochet patterns for beginners).
- And understanding crochet abbreviations and terms (US + UK).

Crochet Christmas Goodie Bags Pattern
Grab the inexpensive, ad-free, PDF printable pattern set in my shop with 6 other Christmas Crochet gift bag patterns (pictured above) for only $5!


Notes
Skill Level – Easy
Copyright Info
- Please do not copy, sell, redistribute, or republish this pattern.
- If you wish to share this pattern, link to the pattern page only.
- You may sell items produced using this pattern.
- Do NOT use the copyrighted photos for your product listing.
- For the copyright T&C please read my Terms of Use.
Measurements
The drawstring bag measures:
- Base diameter = 2.5 inches
- Height – 3 inches
Gauge – 12 stitches, 14 rounds to 10cm/4″

The Supplies You Need
Yarn
- Yarn A – White yarn – around 30g – Aran/worsted/10-ply yarn (I used leftovers of The Petite Wool from We Are Knitters)
- Yarn B – Red yarn – scraps around 10g for the crochet letter(s)
Hook
- Crochet Hook – Size 5 mm (US H/8)
Notions
- Scissors
- Stitch markers
- Tape measure
- Darning needle
Other Materials
- Thread, cord, or yarn for the drawstring

Abbreviations
The pattern is written using US crochet terms and abbreviations.
You can find a free PDF of both US and UK terms and abbreviations here. – Crochet Abbreviations And Terms (US + UK)
- CH – Chain
- PM – Place marker
- SC – Single crochet
- SS – Slip stitch
- RS – Right side

Pattern Instructions
For The Base
Do not turn at the end of the round, but continue working in a spiral, with the right side (RS) always facing.
Keep count of the sts by placing a marker (PM) on the last st of each round.
There are no turning chains in this pattern.
The Base Of The Bag – Work in Yarn A
- Make a 4 ch and join with an ss in the first ch to form a ring.
- Round 1: (RS) – 1 ch; 8 sc in ring (8 sts) PM. (see notes)
- Round 2: 2 sc in each sc. (16 sts)
- Round 3: *1 sc in next sc, 2 sc in next sc* rep from * to end. (24 sts)
- Round 4: 1 sc in each sc.
- Round 5 – sc all the sts into the back loop only.
The Body Of The Bag – In Yarn A
*Please note – keep the marker to denote which is the beginning/end of the round.
- Continue to work in a spiral – sc all of the sts in every round (in both loops) – until the bag measures = 3 inches.
- You can make the bag as tall as you want.
- Finish the last st with an ss and cut the yarn.
- Secure and weave in the ends.
- Weave in all other loose ends.
The Bag Handle – In Yarn A
- At one side of the bag, ch 20 sts in the same yarn and attach with an ss into the opposite side of the bag.
- Cut yarn, secure, and weave in any loose ends.
Share your work with us…
If you enjoyed making the pattern, I’d love to see yours on Instagram, be sure to tag me @handylittleme.
If you are on Facebook, stop over to the handylittleme Facebook group and share a photo.
I’d love to see your work.
Happy Crocheting!
Christmas Crochet Free Patterns
This Christmas crochet pattern is great for any advanced beginners who are learning how to crochet amigurumi toys.
For more festive free crochet patterns, please take a look at these blog posts:
- 20 Free Christmas Crochet Blanket Patterns (Easy + Festive)
- 50 Best Free Crochet Christmas Stocking Patterns
- 6 Free Crochet Gift Bag Patterns For Christmas
- 40 Free Christmas Crochet Patterns (Best For The Holiday!)
- 35 Best Christmas Amigurumi Crochet Patterns Free!
- Crochet Flat Christmas Tree Pattern (Free Appliqúe How To)
- Free Santa Crochet Pattern (Christmas Amigurumi)
- 40 Free Crochet Christmas Ornament Patterns
- 29+ Gift Ideas For Crocheters
- 10 Advent Calendar Ideas
Christmas Crafts
Crochet Lessons
If you are a new maker and need help with the crochet basics, check out the crochet lessons here – Crochet Lessons {With Video Tutorials}.
There, you will find tutorial posts for all the crochet techniques a newbie needs to know.
Including how to create a foundation chain (ch), single crochet, double crochet, and all the crochet abbreviations ( in UK and US terms) a maker needs to know.
And if you need more video tutorials, check out my YouTube channel here – Handy Little Me – YouTube
Join The Handy Little Me Facebook Group to connect with more makers.

Christmas Crochet
What can you crochet for Christmas?
There are many festive and creative crochet projects you can make for Christmas to get you into the holiday spirit!
Here are some ideas to get you started:
- Christmas Ornaments: Crochet mini stockings, snowflakes, candy canes, crochet angels, ugly Christmas sweater ornaments, snow globe ornaments, crochet star ornaments, crochet baubles to hang on the tree. Create tiny Santa hats or reindeer antlers for your ornaments. Crochet ornaments are a great addition to the classic Christmas baubles. Add a star ornament or a crochet snowflake to your tree.
- Stockings: Crochet personalized stockings for each family member. Add festive motifs like snowflakes, snow globes, Christmas trees, or holly. Great for holiday decorations
- Tree Skirt: Make a beautiful tree skirt to complement your Christmas tree. Use traditional colors like red, green, and white.
- Garlands: Crochet garlands with holiday-themed shapes like stars, hearts, or gingerbread men. String them across the fireplace or around the tree.
- Wreaths: Create a crochet wreath using holiday colors and embellishments. Add small crocheted decorations like bows or miniature ornaments.
- Table Decorations: Crochet festive placemats or coasters for the dining table. Make napkin rings with holiday motifs. The perfect addition to your holiday decor.
- Gift Wrapping Embellishments: Crochet small gift toppers, like bows or snowflakes, to add a handmade touch to your presents.
- Christmas Blankets: Design a cozy holiday-themed blanket with patterns like Christmas trees, reindeer, or snowmen.
- Holiday Amigurumi: Crochet festive amigurumi characters like Santa Claus, snowmen, or elves. Use them as decorations or as small gifts. Great for the festive season.
- Advent Calendar: Create a crochet advent calendar with pockets for each day leading up to Christmas. Fill the pockets with small treats or notes.
- Christmas Hats and Scarves: Make holiday-themed hats and scarves for the whole family. Add embellishments like jingle bells or pom-poms.

What is the best yarn for crochet Christmas ornaments?
Yarn Weights
When choosing yarn for crochet Christmas ornaments, the best yarn weight often depends on the size and style of the ornaments you’re making.
Here are some yarn weights commonly used for crochet Christmas ornaments, along with considerations for each:
- Fingering Weight:Advantages: Ideal for small, delicate ornaments with intricate details. Considerations: Requires a smaller hook; projects may take longer to complete.
- Sport Weight: Advantages: Slightly thicker than fingering weight, suitable for small to medium-sized ornaments. Considerations: Offers a balance between delicacy and speed of completion.
- DK (Double Knitting) Weight: Advantages: Versatile weight suitable for a variety of ornament sizes; works up faster than fingering weight. Considerations: Can be used for both small and medium-sized ornaments.
- Worsted Weight : Advantages: Commonly used for medium-sized ornaments; widely available in various colors. Considerations: It may not be as suitable for very small or intricate designs.
- Aran Weight: Advantages: Slightly heavier than worsted weight, suitable for larger ornaments. Considerations: Works well for ornaments with a bit more substance and structure.
- Bulky Weight): Advantages: Quick to work up; suitable for larger, chunky ornaments. Considerations: It may not be ideal for highly detailed or delicate designs.
Keep in mind that the best yarn weight also depends on the specific pattern you’re following.
Some patterns may recommend a particular weight of yarn to achieve the desired results.
Additionally, personal preference plays a role; some crafters enjoy the delicacy of finer yarns, while others prefer the speed of working with thicker yarns.
Yarn Fibers
The best yarn for crocheting Christmas ornaments depends on your specific preferences and the characteristics you want for your finished projects.
However, here are some popular yarn choices that work well for crochet Christmas ornaments:
- Cotton Yarn:Advantages: Durable, comes in various colors, and has a natural look. Considerations: It can lack stretch, so it’s best for ornaments that don’t require much flexibility.
- Acrylic Yarn:Advantages: Affordable, widely available, and comes in a vast array of colors. Considerations: It may lack the natural feel of other fibers.
- Mercerized Cotton:Advantages: It has a subtle sheen, giving your ornaments a polished look. Considerations: Typically more expensive than regular cotton.
- Metallic Yarn: Advantages: Adds a festive touch with metallic threads for a shiny finish. Considerations: It can be a bit tricky to work with due to the metallic content.
- Sparkle or Glitter Yarn: Advantages: Adds a touch of sparkle and glamour to your crochet Christmas decorations. Considerations: Some people may find it challenging to work with.
- Wool or Wool Blend Yarn: Advantages: Provides warmth and a cozy feel; has good elasticity. Considerations: Some people may be sensitive to wool.
- Bamboo Yarn: Advantages: Environmentally friendly, soft, and has a subtle sheen. Considerations: It may not have as much elasticity as other fibers.
- Nylon Yarn: Advantages: Durable and stretchy, suitable for ornaments that need flexibility. Considerations: Limited color options compared to other yarn types.
When choosing yarn for crochet Christmas ornaments, consider the intended use, the look and feel you want to achieve, and any special requirements for the specific crochet patterns you’re using.
It’s always a good idea to swatch with different yarns to see how they work up and to choose the one that best suits your project.
- Learn everything about yarn weights here – Yarn Weight Guide {+ Conversion Chart}
- Learn everything about yarn fibers here – Yarn Types Explained: A Guide To Different Fibers
How do you hang crochet ornaments?
There are several ways to hang crochet ornaments, and the method you choose may depend on the design of the ornament and your personal preference.
Here are some common ways to hang crochet ornaments:
- Crochet a Hanging Loop:
- If your ornament has a relatively small opening or a designated hanging loop, you can crochet a chain or loop directly into the design. Attach the loop securely to a hook or ornament hanger.
- Attach a Ribbon or Yarn Loop:
- Cut a length of ribbon or yarn, fold it in half, and create a loop. Thread the loop through the top of the ornament, bringing the loose ends through the loop and pulling tight. Tie a knot to secure the loop.
- Use Ornament Hangers:
- Ornament hangers are small hooks with a spiral design that can be easily inserted into the top of a crocheted ornament. They come in various colors and styles and are a convenient way to hang ornaments.
- Sew on a Hanging Loop:
- If your ornament is not designed with a hanging loop, you can sew a loop using a tapestry needle and matching yarn. Make sure to secure the loop firmly to the top of the ornament.
- String with Fishing Line:
- For a more discreet hanging option, use clear fishing line. Thread the line through the ornament, tie a secure knot, and use the excess line to hang the ornament.
- Attach to Garland or String:
- If you have multiple crochet ornaments, consider stringing them together to create a garland. Use a long piece of yarn or ribbon to thread through the ornaments, spacing them evenly.
- Hang on a Miniature Clothespin:
- Attach a miniature clothespin to the top of the ornament and clip it onto a branch of the Christmas tree.
- Create an Ornament Mobile:
- For a decorative display, create a mobile with crochet ornaments. Suspend the ornaments from a circular hoop or branch using strings of varying lengths.
When attaching hanging loops or strings, make sure to secure them well to prevent the ornaments from falling.
Consider the weight of the ornament and choose a method that provides adequate support.
Experiment with different hanging options to find the one that works best for your crochet ornaments and complements your holiday decor.

What To Crochet For Christmas Gifts?
Crocheting Christmas gifts can be a thoughtful and personal way to show your loved ones that you care.
Here are some ideas for crocheted Christmas gifts:
- Scarves and Cowls: Choose soft, cozy yarn in the recipient’s favorite colors. Experiment with different stitch patterns to add texture. Check out crochet scarf pattern here.- Crochet Scarf Patterns
- Hats: Crochet a stylish hat in a color that complements the recipient’s wardrobe. A hat is the perfect project for a last-minute gift. Add pom poms made with faux fur yarn for a trendy touch. Check out crochet hat patterns here. – Free Crochet Hat Patterns (Cozy + Cute!)
- Blankets and Afghans: Make a warm and snuggly blanket for a special someone. Personalize it with their favorite colors or a unique stitch pattern. Check out a free crochet blanket pattern here. – How To Crochet A Blanket + Free Beginner Pattern
- Socks and Slippers: Crochet warm and comfy socks or slippers. Consider using a fuzzy yarn for extra coziness. Check out sock crochet patterns here. – 33 Free Sock Crochet Patterns
- Mittens or Gloves: Keep hands warm with crocheted mittens or gloves. Add ribbing or other decorative details. Check out a free crochet mitten pattern here. – Fraser’s Ridge Mittens Crochet Pattern
- Amigurumi Toys: Create cuddly amigurumi toys. Choose animals, characters, or objects based on the recipient’s interests. It’s a cute idea for great gifts.
- Market Tote Bag: Crochet a reusable tote bag for grocery shopping or daily use. Use durable yarn in neutral or vibrant colors. Check out market bag patterns here. – 10 Of The Best Reusable Crochet Market Bag Patterns
- Coasters and Mug Cozies: Make a set of coasters or mug cozies for the coffee or tea lover. Personalize them with fun colors or stitch patterns. Learn how to make scrap yarn cup cozy here.- Crochet Cup Cozy Pattern
- Headbands and Ear Warmers: Keep ears warm with stylish crocheted headbands or ear warmers. Embellish them with buttons, flowers, or other decorations. Check out a free crochet headband pattern here.- How To Crochet A Headband (Easy For Beginners)
- Dishcloths and Pot Holders: Create practical and decorative kitchen items. Use cotton yarn for durability and easy cleaning. Check out dishcloth patterns here.- Crochet Dishcloths. How to crochet a potholder + video tutorial here. – How To Crochet Potholders (Free + Easy Pattern).
- Pillow Covers: Make decorative pillow covers in holiday colors. Add buttons, appliques, or other embellishments.
- Keychains or Bag Charms: Craft small items like keychains or bag charms. Shape them into festive symbols or cute animals.
- Lapghan or Lap Blanket: Create a smaller-sized blanket for cozy evenings on the couch. Customize it with the recipient’s favorite colors.
Hi! Thanks for the free pattern! It’s adorable! Also just wanted to let you know that Handy Kitty’s letter pattern is no longer available on Ravelry. But Moogly Crochet has a nice set that is also free. Here is the link: https://www.mooglyblog.com/the-moogly-crochet-alphabet/
Hello Roane,
Thanks for the update, I will change that link!
Louise
I love the little Christmas gift bags with letters on them! Can you recommend a pattern source for crocheted flowers? I’ve got a bee in my bonnet about a project I’d like to try.
Dear Jenna,
Thank you so much for your kind words about the little Christmas gift bags—I’m thrilled you like them!
For crocheted flower patterns, I’d recommend checking out Pinterest or Ravelry.
Both platforms are fantastic sources for all kinds of crochet inspiration and patterns, including flowers.
You’ll find a wide variety of styles, from simple blossoms to more intricate designs, perfect for any project you have in mind.
I can’t wait to see what you create with your idea—sounds like such a fun project!
Let me know if you need more help or suggestions.
Happy crocheting,
Louise
These are so cute!! I think I’ll make for my grandkids for Christmas this year and put some kind of gift in them and hide on the tree for them to find. How do you attach the initials to the basket? Sorry, I’ve never done it before
Hi Lynda!
What a lovely idea—your grandkids will have so much fun hunting for them on the tree!
To attach the initial:
Make the crochet letter (the post links to free letter patterns you can use). Leave a long tail (30–45 cm / 12–18″) on the letter.
Pin the letter where you want it.
Thread the tail onto a darning/tapestry needle and whip stitch around the edge of the letter using small, neat stitches.
Catch just the front strand of the bag’s stitch so the sewing is nearly invisible inside.
For letters with “holes” (A, O, P, R), add a couple of tiny anchor stitches inside the openings so the letter lies flat.
Weave the tail to the inside of the bag and secure it. Trim the end.
For kids’ gifts, I recommend stitching rather than glue so it holds up to excitement and play.
Happy crocheting!