How To Knit A Pocket (Inset Pocket For A Cardigan)
THIS ARTICLE CONTAINS AFFILIATE LINKS THAT SUPPORT HANDY LITTLE ME CONTENT AND FREE PATTERNS.In this post, you will see how to knit a pocket, an inset pocket for a cardigan.
There are many ways of creating a pocket in a garment, and this tutorial will show you an easy way to create an inline (inset) pocket.
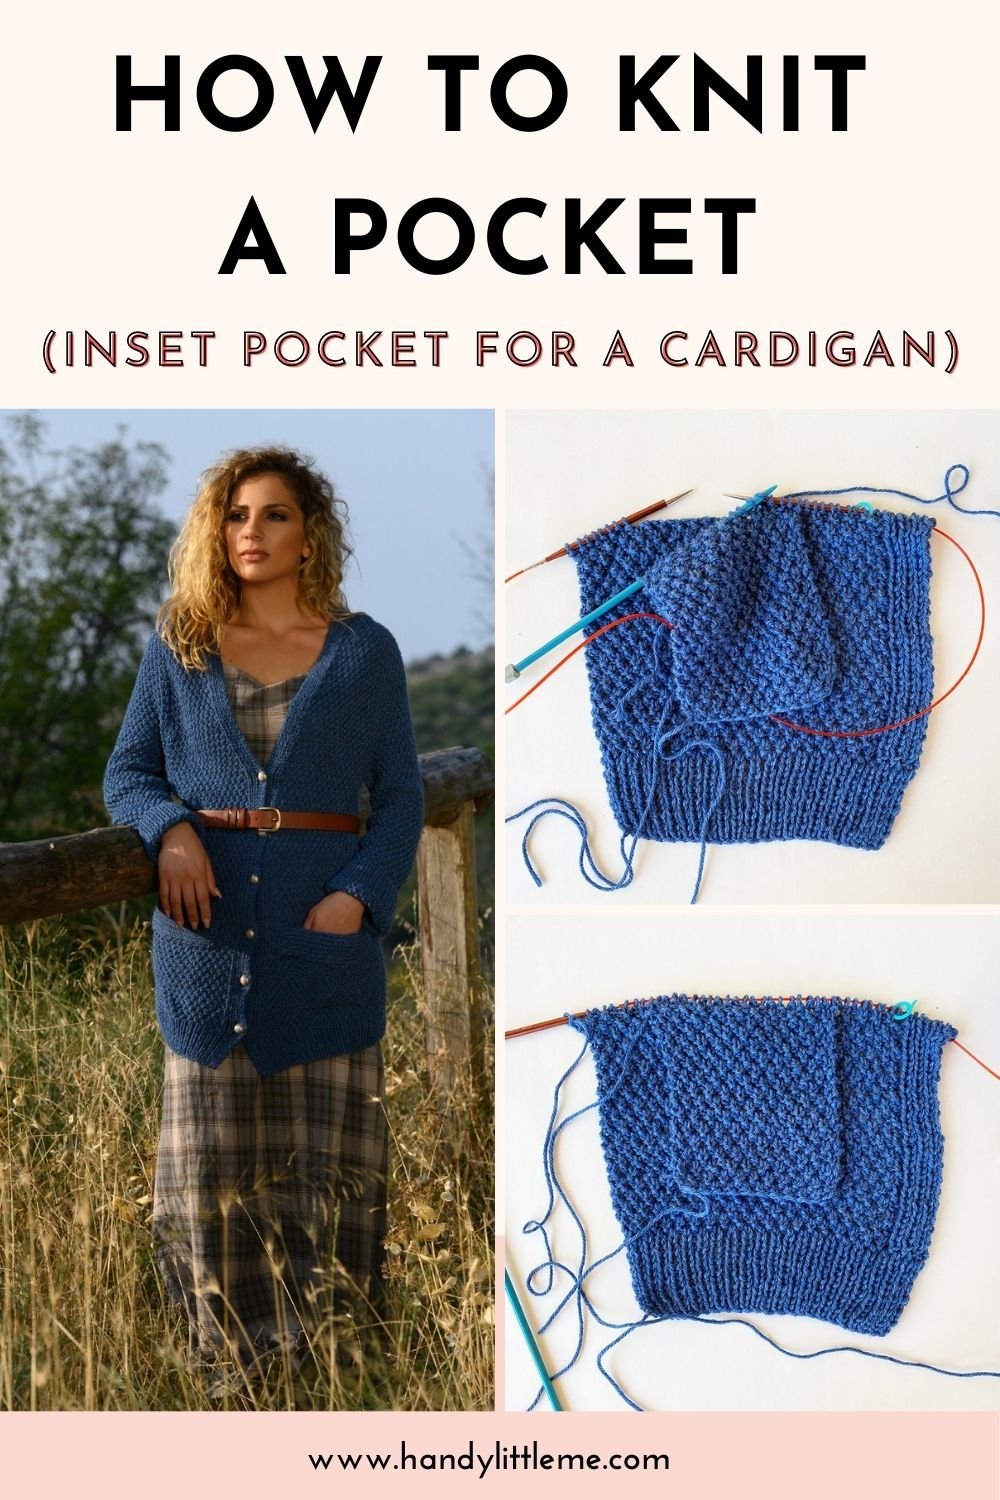
In this tutorial, I will work on the Outlander Claire’s Blue Cardigan Knitting Pattern.

The Cardigan Sweater With Pockets
This cardigan is knit in Irish moss stitch (double moss) and the pocket lining is also in this stitch pattern.
This is a really simple knits and purls stitch pattern, which is easily worked, and in the pattern, it tells you which row you need to finish on for the front piece and the pocket opening so that they match up when you come to create the pocket lining.
The pocket placement is made on the cardigan fronts; you will need a stitch holder or spare knitting needle to complete this particular pocket.
Inset Pocket Tutorial
Take a look at the tutorial below, and if you need help, head on over to the Handy Little Me Outlander Facebook group, where the rest of the group will help you, or you can leave a comment below.
- This tutorial is shown on the left front of the cardigan with set in pockets.
- When you see the instructions, refer to the stitch pattern – this is the 4-row repeat of the Irish moss (double moss) stitch pattern.
- The WS is the wrong side of the work.
- The RS is on the right-side of the work.
- A spare needle or DPN – a double-pointed needle is needed for the pocket lining stitches.
- I worked the pocket on circular needles – not knit in the round.

How To Knit A Pocket
- Knit Up To Where The Pocket Is Joined In The Pattern.
Knit your front to where the pattern instructs you to join in the pocket lining.
For the left front, this will ask you to work row 1 of the stitch pattern (on the RS), ready to begin the pocket on row 2 (the WS).
You can mark out where the stitches are that you are going to cast off with stitch markers if you need to (this should be the width of your pocket).
You should have your left front on the needles and the pocket lining (the extra stitches on the needle in the image below) on a spare needle or DPN (double-pointed needle).
I knit the pocket lining in the same stitch pattern as the cardigan, but you can knit this in another stitch – like garter stitch or stockinette stitch if you want to.
- Create The Pocket Edge
You need to follow the pattern to create the pocket edge, and this will ask you to do the following:
Next row: Work the 6 (7, 8, 8, 9, 10) sts in row 2 of patt, then cast off 22 (22, 22, 24, 24, 24) sts in patt, cont in patt to marker, sm, K1, P1 to the end of the row.
The stitches that you cast off become the pocket edge.
You will cast off those stitches on the RS row (this is for the left front/on the right front, you will cast off on the WS row.)
Next, you will turn the front section so that you will be working across the WS – wrong side row. - Join The Pocket Lining
On the WS – wrong side row, you will now knit across the pocket lining stitches that are on the spare needle.
This is row 3 of the stitch pattern.
Next row: You will work across the first 14 (15, 16, 16, 17, 18) sts in patt on the working needle, then across the 22 (22, 22, 24, 24, 24) sts on the spare needle (the pocket lining sts), then across the second set of sts on the working needle 6 (7, 8, 8, 9, 10) sts all in the patt.
You should be looking at the wrong side of both pieces.
Take care to pull those stitches tight when you’re jumping from the main needle to the spare needle and back. - Now Your Pocket Lining Is Attached
Now, you will see that your pocket lining is attached.
Those new stitches from the lining are connected on the circular needle. - Turn The Work To Continue
Now, turn the work to continue working from row 4 of the stitch pattern with the working yarn.
Now you will cont to work on the left front in the patt (you are now on row 4 of patt) until you have worked 17 inches from the CO edge, ending with row 4 of patt.
Place a closed st marker on the side seam edge of the last row worked. - Creating The Pocket Tops
The top edge of the pocket will need a ribbed band, as seen on the cardigan that Claire wears in season 5 of Outlander.
These ribbed tops are knitted and stitched on top of the pocket that you have just created.
See the knitting pattern for the instructions.
- Sewing The Pocket Down
The pocket needs to be sewn down on the wrong side to make it a proper pocket and not just a flap.
You can attach it if you want to now with a tapestry needle, or you can wait and do it after blocking.
The pieces of the cardigan may need blocking depending on the type of yarn you use.
To stitch the pocket down, you can whipstitch one stitch at the edge of the pocket, where you can see a purl bump.
Then you can continue to do that on every purl stitch bump on every other row.
You can do that on all three pocket edges you can see on the wrong side.
(In the image below the tapestry needle is seaming the pocket sides).


Creating A Pocket On The Right Front
Creating the pocket on the right front is done in the same way but opposite. You can see the instructions for this below.
When working the pocket on the right front, you will be asked in the pattern to work row 3 of the pattern on the RS, then work row 4 of the patt as follows:
Next row: Work 14 (15, 16, 16, 17, 18) sts in row 4 of patt, then cast off 22 (22, 22, 24, 24, 24) sts in patt, cont in patt across the second set of sts on the working needle 6 (7, 8, 8, 9, 10) sts all in the patt.
Then you will work the following on row 1 of patt :
Next row: You will work across the first 6 (7, 8, 8, 9, 10) sts in patt on the working needle, then across the 22 (22, 22, 24, 24, 24) sts on the spare needle (the pocket lining sts), then across the second set of sts on the working needle 14 (15, 16, 16, 17, 18) sts all in the patt.
Finally, you will continue on in the established pattern once the pocket lining has been joined:
Now you will continue to work in the patt (you are now on row 2 of patt) until you have worked 17 inches from the CO edge, ending with row 4 of patt.
Place a closed st marker on the side seam edge of the last row worked.

What Is An Inset Pocket?
An inset pocket is a type of pocket that is integrated into a garment or accessory so that it lies flush with the fabric rather than protruding from the surface.
Inset pockets are often found in tailored clothing, such as jackets, trousers, skirts, and dresses.
Here are some key characteristics of inset pockets:
- Flush Integration: Unlike patch pockets or welt pockets, which are sewn onto the surface of the garment, inset pockets are sewn into a slit or opening in the fabric, creating a seamless and streamlined appearance.
- Professional Finish: Inset pockets are often associated with a more formal and tailored look due to their clean and polished finish.
- Versatility: Inset pockets can be constructed in various shapes and sizes, including square, rectangular, angled, or curved openings, depending on the design of the garment.
- Stability and Durability: Inset pockets are typically reinforced with interfacing or lining to add stability and prevent stretching or sagging over time.
- Construction Techniques: Inset pockets are constructed using precision sewing techniques, such as understitching, edge stitching, and topstitching, to ensure clean lines and secure attachment to the garment.
Inset pockets can be functional, providing a discreet place to store small items like keys or coins, or they can be purely decorative, adding visual interest to the garment without practical utility.
Overall, inset pockets are a classic and sophisticated feature in garment construction, offering style and functionality to tailored apparel.
How Do You Knit A Small Pocket?
To knit a small pocket, you can follow these general steps:
- Cast On: Using the yarn and needle size of your choice, cast on the desired number of stitches for the width of the pocket. The number of stitches will depend on the size of the pocket you want and the gauge of your yarn.
- Knit in the Desired Stitch Pattern: Work in the stitch pattern of your choice for the desired pocket length. You can use basic stitches like garter stitch, stockinette stitch, or ribbing, or you can choose more intricate stitch patterns for added interest.
- Create the Pocket Flap (Optional): If you want to add a flap to your pocket, you can do so by knitting a separate piece and attaching it to the top of the pocket. To knit the flap, cast on the desired number of stitches for the width of the flap, then work in your chosen stitch pattern for the desired length. You can shape the flap by decreasing stitches on each side for a triangular shape or by working short rows for a rounded shape.
- Bind Off: Once the pocket and flap (if applicable) are the desired size, bind off your stitches to secure them.
- Seam or Attach the Pocket: If you knitted the pocket and flap separately, seam the sides and bottom of the pocket to create a pouch. If you knit the pocket and flap as one piece, you can skip this step.
- Attach the Pocket to Your Project: Use a yarn needle and matching yarn to sew the pocket onto your garment or accessory. You can position the pocket wherever you like and use the same yarn or a contrasting color for added detail.
- Add Embellishments (Optional): You can personalize your pocket by adding buttons, appliques, or embroidery to the flap or front of the pocket.
Following these steps, you can knit a small pocket to add functionality and style to your knitting projects.
Feel free to customize the size, shape, and design of your pocket to suit your preferences and project needs.
How Do You Sew A Pocket Lining In Knitting?
Sewing a pocket lining in knitting involves attaching a fabric lining to the inside of a knitted pocket to provide structure, durability, and a clean finish.
Here’s a general guide on how to sew a pocket lining in knitting:
- Prepare the Fabric Lining: Choose a lightweight fabric for the lining that complements your knitted project. Cotton or polyester blends work well. Cut the fabric to the same size and shape as the pocket, leaving a seam allowance of about 1/4 inch (0.6 cm) on all sides.
- Pin the Lining to the Pocket: Place the fabric lining inside the knitted pocket, aligning the edges neatly. Pin the lining in place along the top edge and sides of the pocket, leaving the bottom edge open.
- Hand Stitch or Machine Stitch: You can either hand stitch or machine stitch the lining to the knitted pocket. If hand stitching, use a simple whip stitch or running stitch along the top edge and sides of the pocket. Make sure to catch both the knitted fabric and the lining fabric with each stitch. If using a sewing machine, sew along the top edge and sides of the pocket with a straight stitch, backstitching at the beginning and end of the seams for reinforcement.
- Finish the Bottom Edge (Optional): To finish the bottom edge of the pocket, you can fold the raw edges of the lining and knitted fabric under and sew them together with a whip stitch or a machine stitch. Alternatively, you can leave the bottom edge open if you prefer.
- Trim Excess Fabric (Optional): Trim any excess fabric or yarn tails from the seams to create a neat finish.
- Press the Pocket: Once the lining is securely attached, press the pocket with an iron on a low heat setting to smooth out any wrinkles and creases.
- Repeat for Additional Pockets: If your project has multiple pockets, repeat the process for each pocket.
By following these steps, you can sew a fabric lining into your knitted pockets to add stability and functionality to your knitting projects.
Experiment with different fabrics and techniques to achieve the desired look and feel for your pockets.
Happy Knitting!