
How To Knit Lifted Increases: RLI and LLI Tutorial
THIS ARTICLE CONTAINS AFFILIATE LINKS THAT SUPPORT HANDY LITTLE ME CONTENT AND FREE PATTERNS.Learn how to knit lifted increases with this easy step-by-step tutorial for RLI and LLI.
Lifted increases are a useful way to add stitches to your knitting without leaving a noticeable hole or bump.
They are often described as nearly invisible increases because they create a new stitch from the stitch below, rather than from the strand between stitches.
In this guide, you’ll learn what lifted increases are, how to work a right lifted increase and a left lifted increase, when to use them, and how they compare to other knitting increases like M1L and M1R.
You’ll also find video tutorials below so you can see exactly how each increase is worked.
Save this article
Enter your email address and we'll send it to your inbox.
By entering your email, you agree to receive patterns, tutorials, and updates from Handy Little Me. Unsubscribe at any time.
Quick Answer: What Are Lifted Increases In Knitting?
Lifted increases are knitting increases that create a new stitch by lifting part of an existing stitch from a previous row.
They are often used when you want a neat, subtle increase that blends into the fabric.
The two common lifted increases are:
- RLI = Right Lifted Increase
- LLI = Left Lifted Increase
Both increases add one new stitch to your work, but they are worked in slightly different places and lean in different directions.
Lifted Increases At A Glance
| Detail | Information |
|---|---|
| Technique | Lifted increases |
| Common abbreviations | RLI and LLI |
| Meaning | Right lifted increase and left lifted increase |
| Type of stitch | Increase |
| Stitch count | Increases by 1 stitch |
| Commonly used in | Sweaters, sleeves, raglans, shawls, hats, and shaping |
| Best for | Smooth, subtle increases |
| Often compared with | M1L, M1R, KFB, yarn over |
Before You Start
Before learning RLI and LLI, it helps if you already know how to:
- Knit the knit stitch
- Recognize knit stitches from previous rows
- Identify the stitch below the stitch on your needle
- Keep an even tension
- Count stitches in your pattern
Lifted increases are beginner-friendly once you know how to knit and can identify the parts of a stitch.
In stockinette stitch, the knit side shows smooth V-shaped stitches, while the wrong side shows purl bumps.
If you are seeing a purl bump, you may be looking at the purl side of the fabric.
For RLI and LLI, you will be looking closely at the legs of the stitch below your working stitch.
The right leg of the stitch and the left leg of the stitch are the two sides of the V shape.
What Is A Lifted Increase In Knitting?
A lifted increase is a knitting increase that creates a new stitch by lifting part of an existing stitch from a previous row.
Unlike a yarn over, which creates a visible hole, or some increases that can leave a small bump, lifted increases are designed to blend neatly into the fabric.
There are two common lifted increases:
- RLI: Right lifted increase
- LLI: Left lifted increase
Both methods add one new stitch to your work, but they are worked in different places.
Lifted increases are especially useful when you want shaping to look smooth and subtle.

What does RLI mean in knitting?
RLI stands for right lifted increase.
RLI is the right-leaning increase in this pair of lifted increases.
It is made by lifting the right leg of the stitch below the next stitch on the left-hand needle, then knitting into that lifted stitch.
It is often used when you want an increase that leans to the right or sits neatly on the right side of a shaped area.
You may see this written in patterns as:
- RLI
- Right lifted increase
- Right-leaning lifted increase
- Lifted increase right
Always check the pattern notes if the designer gives a specific method, as instructions can vary slightly.
What does LLI mean in knitting?
LLI stands for left lifted increase.
This increase creates a new stitch by lifting part of the stitch below the stitch you have just worked.
It is often used when you want an increase that leans to the left or sits neatly on the left side of a shaped area.
You may see this written in patterns as:
- LLI
- Left lifted increase
- Left-leaning lifted increase
- Lifted increase left
LLI and RLI are often used as a pair to create balanced shaping.
Why use lifted increases?
Lifted increases are helpful when you want to add stitches without making the increase too obvious.
You may choose lifted increases because they:
- Look neat and subtle
- Do not usually leave a visible hole
- Blend well into stockinette stitch
- Work well for garment shaping
- Can be used in pairs for balanced increases
- Create a smoother look than some other increase methods
The method you choose will depend on your knitting pattern and the effect you want to achieve.
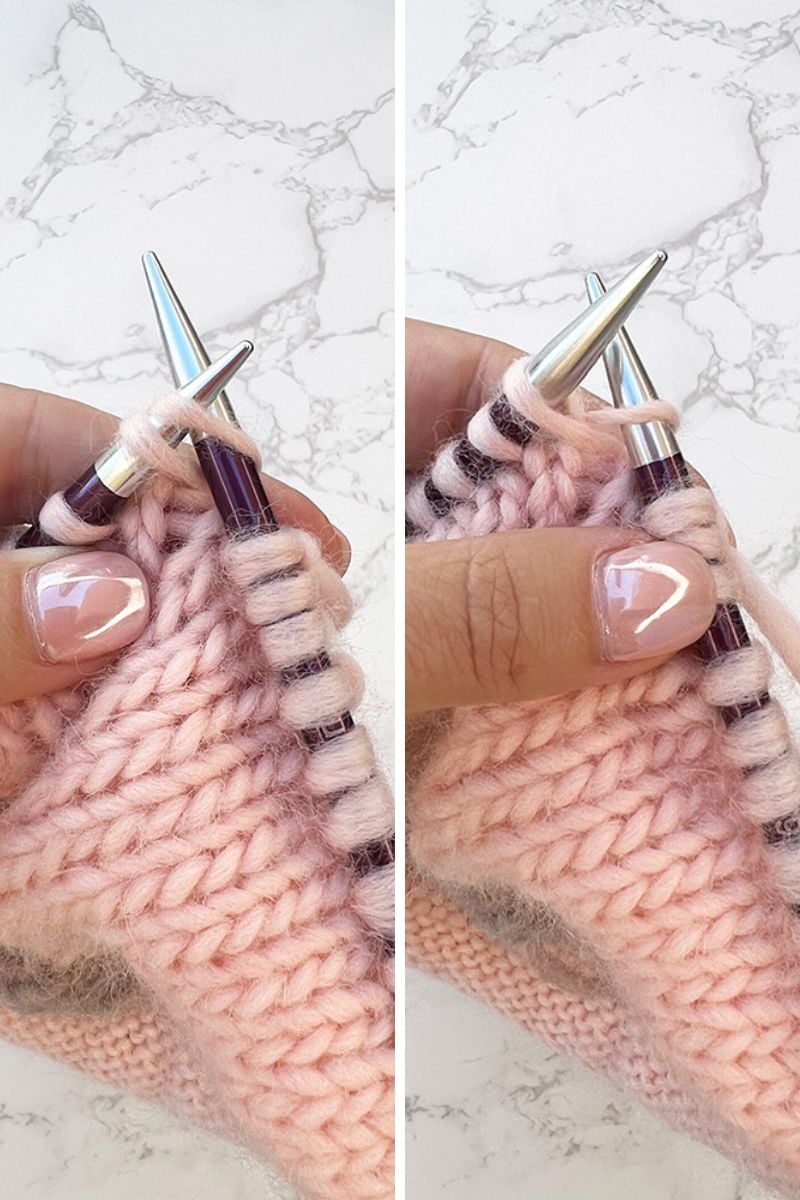
How To Knit RLI: Right Lifted Increase
To work a right lifted increase:
- Knit to the place in your pattern where the increase is needed.
- Look at the next stitch on the left-hand needle.
- With the right-hand needle tip, lift the right side of the stitch below the next stitch on the left-hand needle.
- Place that lifted stitch onto the left-hand needle.
- Knit into the front of the lifted stitch.
You have now increased one stitch.
This creates a new stitch before the next stitch is worked.

Video Tutorial: How To Knit RLI
Watch the video tutorial below to see how to knit RLI step by step.
This will show you how to find the stitch below the next stitch on the left-hand needle, lift it, and knit into it to create a right lifted increase.
Step-By-Step RLI Instructions
Here is the right lifted increase broken down more slowly.
Step 1: Knit to the increase
Work across your row until you reach the place where your pattern tells you to work an RLI.
The next stitch should still be on the left-hand needle.
Step 2: Find the stitch below
Look at the next stitch on the left-hand needle.
Find the stitch directly below it from the previous row.
This is the stitch you will lift to create the new increase.
Step 3: Lift the right side of the stitch below
Use the right needle tip to lift the right leg of the stitch below the next stitch on the left-hand needle.
Place this lifted stitch onto the left-hand needle.
Try not to pull too tightly, as this can make the next step harder to work.
Step 4: Knit the lifted stitch
Knit into the front of the lifted stitch.
This creates one new stitch.
Step 5: Continue knitting
After working the RLI, continue with the next stitch in your pattern.
How To Knit LLI: Left Lifted Increase
To work a left lifted increase:
- Knit to the place in your pattern where the increase is needed.
- Knit the next stitch.
- Look at the stitch below the stitch you just knitted on the right-hand needle.
- With the left-hand needle tip, lift the left side of the stitch below.
- Knit into the back of the lifted stitch.
You have now increased one stitch.
This creates a new stitch after the stitch you have just worked.

Video Tutorial: How To Knit LLI
Watch the video tutorial below to see how to knit LLI step by step.
This will show you how to knit the next stitch, find the stitch below it, lift the correct side, and knit into the back of the lifted stitch.
Step-By-Step LLI Instructions
Here is the left lifted increase broken down more slowly.
Step 1: Knit the next stitch
Work to the place where your pattern asks for an LLI.
Knit the next stitch as normal.
This stitch will now be sitting on the right-hand needle.
Step 2: Find the stitch below
Look at the stitch you just knitted on the right-hand needle.
Find the stitch below it from the previous row.
For LLI, you will usually lift the left side of the stitch below the stitch on the right-hand needle.
Step 3: Lift the left side of the stitch
Use the left-hand needle to lift the left side of that stitch.
Place it onto the left-hand needle.
This lifted stitch will become your new increase.
Step 4: Knit into the back loop of the lifted stitch
Knit into the back loop of the lifted stitch.
This twists the lifted stitch and helps it sit neatly in the fabric.
Step 5: Continue knitting
After working the LLI, continue with your pattern.
Easy Way To Remember RLI And LLI
A simple way to remember the difference is:
- RLI happens before the next stitch.
- LLI happens after you knit a stitch.
For RLI, you lift from the stitch below the next stitch on the left-hand needle.
For LLI, you knit a stitch first, then lift from the stitch below the stitch you just worked.
RLI Vs LLI: What Is The Difference?
The main difference between RLI and LLI is where the new stitch is created.
RLI is worked into the stitch below the next stitch on the left-hand needle.
LLI is worked into the stitch below the stitch you have just knitted on the right-hand needle.
| Increase | Meaning | Where It Is Worked | Direction |
|---|---|---|---|
| RLI | Right lifted increase | Before the next stitch | Right-leaning |
| LLI | Left lifted increase | After knitting a stitch | Left-leaning |
RLI is usually used on the right side of a pair of increases.
LLI is usually used on the left side of a pair of increases.
When worked together, they can create balanced shaping that looks neat and subtle.
Lifted Increases Vs M1L And M1R
Lifted increases are different from M1L and M1R.
M1L and M1R are made by lifting the horizontal strand of yarn between two stitches and knitting into it.
RLI and LLI are made by lifting part of a stitch from a previous row.
Both types of increases are useful, but they create slightly different results.
| Increase Type | How It Is Made | Finished Look |
|---|---|---|
| RLI and LLI | Worked from a stitch in a previous row | Very subtle and smooth |
| M1L and M1R | Worked from the strand between stitches | Neat, directional increase |
| Yarn over | Worked by wrapping the yarn over the needle | Creates a visible hole |
| KFB | Worked into the front and back of one stitch | Creates a small bar |
M1 increases are common and easy to spot in many patterns.
Lifted increases can look more subtle and nearly invisible, especially in stockinette stitch.
The best increase to use will depend on your pattern and the finished effect you want.
Do Lifted Increases Leave Holes?
Lifted increases are usually designed to avoid holes.
Because the new stitch is created from part of an existing stitch, the increase can blend smoothly into the fabric.
If you are seeing holes, check that you are lifting the correct part of the stitch and knitting it as instructed.
Also, make sure your tension is even and not too loose.
When Should You Use Lifted Increases?
Use lifted increases when your pattern asks for RLI, LLI, or lifted increases.
You may see them in patterns for:
- Sweaters
- Cardigans
- Sleeves
- Raglan shaping
- Yokes
- Shawls
- Hats
- Mittens
- Socks
- Subtle garment shaping
They are especially useful when you want a nearly invisible increase in stockinette stitch.
Are Lifted Increases Hard For Beginners?
Lifted increases can feel a little tricky at first because you need to identify the correct stitch from the row below.
However, once you understand where to look, the technique becomes much easier.
If you are new to lifted increases, practice slowly on a small swatch before using them in a project.
Using a smooth, light-colored yarn can also make it easier to see the stitches clearly.
Common Lifted Increase Mistakes
Lifting the wrong strand
Lifted increases are worked from a stitch in a previous row, not from the horizontal strand between two stitches.
If you lift the strand between stitches, you may accidentally work a make one increase instead.
Confusing RLI and LLI
RLI is worked before the next stitch.
LLI is worked after you knit a stitch.
Remembering this difference can help you place the increases correctly.
Pulling the lifted stitch too tight
The lifted stitch can feel tight, especially if your tension is firm.
Try to keep your knitting relaxed so the stitch is easier to lift and work into.
Creating a hole
If a hole appears, check that you are knitting into the correct part of the lifted stitch.
Working into the correct loop helps the increase sit neatly.
Using the wrong increase for the pattern
Different increases create different effects.
If your pattern asks for RLI or LLI, use that method unless you are intentionally substituting another increase.
Lifted Increase Practice Swatch
If you are new to RLI and LLI, try practicing both on a small swatch.
Cast on 20 stitches.
- Row 1: Knit all stitches.
- Row 2: Purl all stitches.
- Row 3: Knit 2, RLI, knit to last 2 stitches, LLI, knit 2.
- Row 4: Purl all stitches.
Repeat Rows 3 and 4 a few times.
This will help you see how the increases look and how they shape your fabric.
Your stitch count will increase as you repeat these rows, so this swatch is just for practicing the movement of the RLI and LLI increases.
Lifted Increases Knitting FAQs
What is a lifted increase in knitting?
A lifted increase is a knitting increase made by lifting part of a stitch from a previous row and knitting into it to create a new stitch.
What does RLI mean in knitting?
RLI means right lifted increase.
It creates one new stitch by lifting part of the stitch below the next stitch on the left-hand needle.
What does LLI mean in knitting?
LLI is the left-leaning version of the lifted increase.
It is made by lifting the left leg of that stitch below the stitch you have just knitted, then knitting into the back loop of the lifted stitch.
Are lifted increases invisible?
Lifted increases are often described as nearly invisible because they blend neatly into the knitted fabric and usually do not leave a noticeable hole.
What is the difference between RLI and LLI?
RLI is worked before the next stitch on the left-hand needle.
LLI is worked after knitting a stitch.
They are often used together as paired increases.
Are RLI and LLI the same as M1R and M1L?
No, they are different increases.
RLI and LLI are worked from stitches in previous rows, while M1R and M1L are worked from the strand between stitches.
When should I use lifted increases?
Use lifted increases when your pattern asks for them or when you want a neat, subtle increase that blends into your knitting.
Can beginners learn lifted increases?
Yes, beginners can learn lifted increases, especially if they already know how to knit and can identify stitches from previous rows.
More Knitting Increase And Decrease Tutorials
If you found this lifted increases tutorial helpful, you may also like these knitting guides:
- How To Increase Stitches In Knitting
- KFB Knitting: How To Knit Front And Back
- M1L and M1R Knitting Increases
- How To Yarn Over In Knitting
- How To Decrease Knitting
- How To Knit 2 Together (K2tog)
- SSK Knitting Tutorial: How To Slip Slip Knit
- P2tog Knitting: How To Purl Two Together
- SSP Knitting: How To Slip Slip Purl
- PSSO Knitting: How To Pass Slipped Stitch Over
- How To Knit CDD: Centered Double Decrease Tutorial
- Knitting Abbreviations
- How To Read Knitting Patterns
Lifted increases are a useful technique to learn if you want to add stitches neatly and subtly.
Both RLI and LLI create new stitches without leaving a noticeable hole or bump, making them a great choice for smooth shaping in garments, shawls, hats, and other knitting projects.
The increase method you choose will depend on your pattern and the effect you want to achieve.
Watch the video tutorials above, practice slowly on a small swatch, and soon lifted increases will feel much easier to work.
Happy knitting!