M1L and M1R Knitting Increases: Make One Left and Right
THIS ARTICLE CONTAINS AFFILIATE LINKS THAT SUPPORT HANDY LITTLE ME CONTENT AND FREE PATTERNS.Learn how to knit M1L and M1R increases with this easy step-by-step tutorial.
M1L and M1R stand for make one left and make one right.
These are directional knitting increases used to add stitches neatly without creating large holes.
You will often see the M1L and M1R increase method in knitting patterns for garments, sleeves, raglans, shawls, hats, mittens, socks, and other projects where shaped increases are needed.
If you have ever seen M1L or M1R in a knitting pattern and wondered what they mean, this guide will walk you through both techniques.
You’ll also find two video tutorials below — one for M1L and one for M1R — so you can see exactly how each increase is worked.
Quick Answer: What Are M1L And M1R In Knitting?
M1L and M1R are knitting increases that create one new stitch by lifting the strand between two stitches and knitting into it.
- M1L means make one left and creates a left-leaning increase.
- M1R means make one right and creates a right-leaning increase.
Both increases add one stitch to your work and are often used as a pair for balanced shaping.
M1L And M1R At A Glance
| Increase | Meaning | Direction | How It Is Worked |
|---|---|---|---|
| M1L | Make one left | Leans left | Lift strand front to back, knit through back loop |
| M1R | Make one right | Leans right | Lift strand back to front, knit through front loop |
Before You Start
Before you begin, it helps to understand where the new stitch is created.
For both M1L and M1R, you will lift the small horizontal strand, sometimes called the ladder, between the stitch on your right-hand needle and the stitch on your left-hand needle.
This strand is then twisted as you knit into it, which helps prevent a hole from forming.
If you are a left handed knitter, the movement may feel slightly different depending on how you hold your yarn and needles, but the goal is the same: lift the strand between the stitches and twist it in the correct direction.
You may also want to check your gauge if you are using these increases in a fitted garment, as your tension can affect how visible the increases look.
Practice them slowly on a small swatch before using them in a pattern.
What Does M1 Mean In Knitting?
In knitting, M1 means make one.
It is a type of increase where you create a new stitch by lifting the strand of yarn between two stitches and knitting into it.
There are two common versions:
- M1L = Make one left
- M1R = Make one right
Both increases add one new stitch to your work, but they lean in different directions.
This makes them useful when you want your shaping to look balanced, especially when increasing on both sides of a marker, sleeve, neckline, or raglan line.
What Is M1L In Knitting?
M1L stands for make one left.
This is a left-leaning increase.
To work M1L, you lift the strand between the stitches from front to back, then knit into the back loop.
This twists the lifted strand and creates a new stitch without leaving a large hole.
M1L Abbreviation
In knitting patterns, you may see this written as:
- M1L
- Make 1 left
- Make one left
- Left-leaning increase
These usually refer to the same technique.
How To Knit M1L: Make One Left
To work a make one left increase:
- Knit to the point where your pattern asks you to make the increase.
- Look for the ladder between the first stitch on your left hand needle and the stitch on your right needle.
- Insert the left needle under this strand from front to back, then knit into the back loop.
- This creates one new stitch and increases your stitch count by one.
The new knit stitch will lean slightly to the left.
Knit M1L Video Tutorial
Video: How To Knit M1L – Make One Left Tutorial
What Is M1R In Knitting?
M1R stands for make one right.
This is a right-leaning increase.
To work M1R, you lift the strand between the stitches from back to front, then knit into the front loop.
Like M1L, the stitch is twisted to prevent a hole from forming.
M1R Abbreviation
In knitting patterns, you may see this written as:
- M1R
- Make 1 right
- Make one right
- Right-leaning increase
These usually mean the same technique.
How To Knit M1R: Make One Right
To work a make one right increase:
- Knit to the point where your pattern asks you to make the increase.
- Look for the ladder between the stitch on your right-hand needle and the first stitch on your left-hand needle.
- Insert the left-hand needle under this strand from back to front, then knit into the front loop.
- This creates one new stitch and increases your stitch count by one.
The new stitch will lean slightly to the right.
Knit M1R Video Tutorial
Video: How To Knit M1R – Make One Right Tutorial
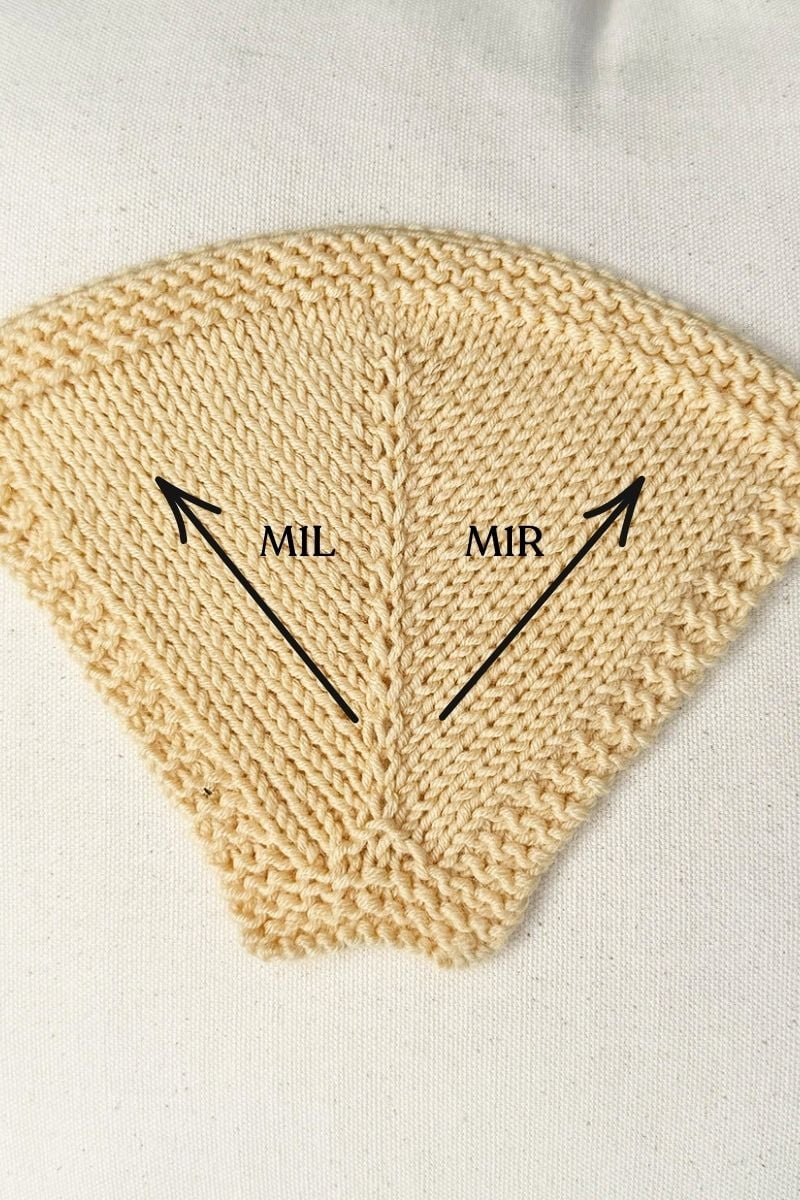
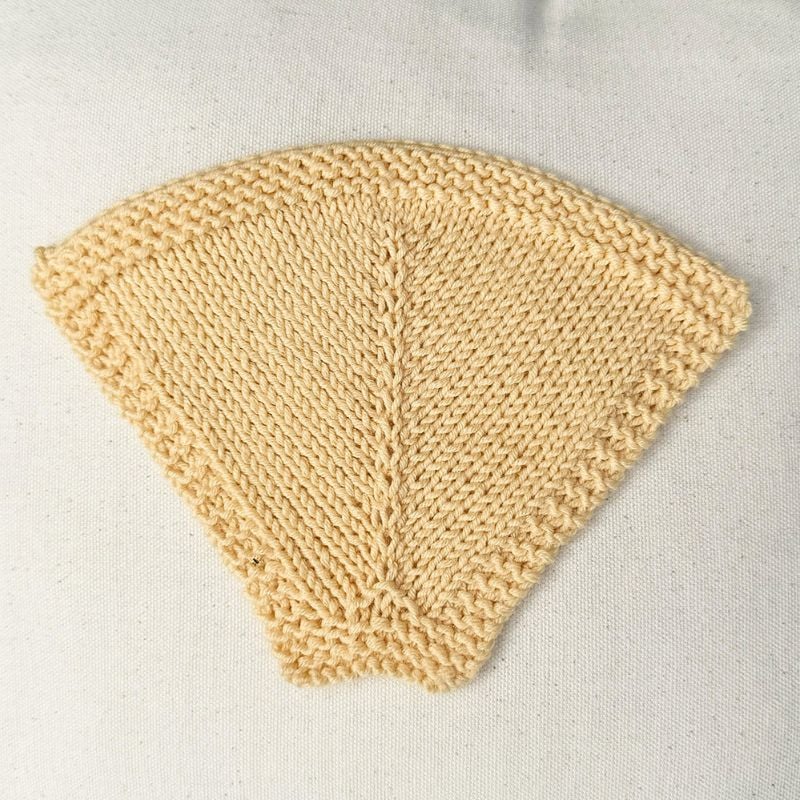
Free Printable M1L And M1R Sample Swatch Pattern
Use the free printable pattern card with clear instructions below to practice the M1L and M1R knitting increases.
This small swatch creates a center stitch with a make one right increase on one side and a make one left increase on the other, so you can clearly see how the increases lean.
How To Knit M1L And M1R (Sample Swatch)
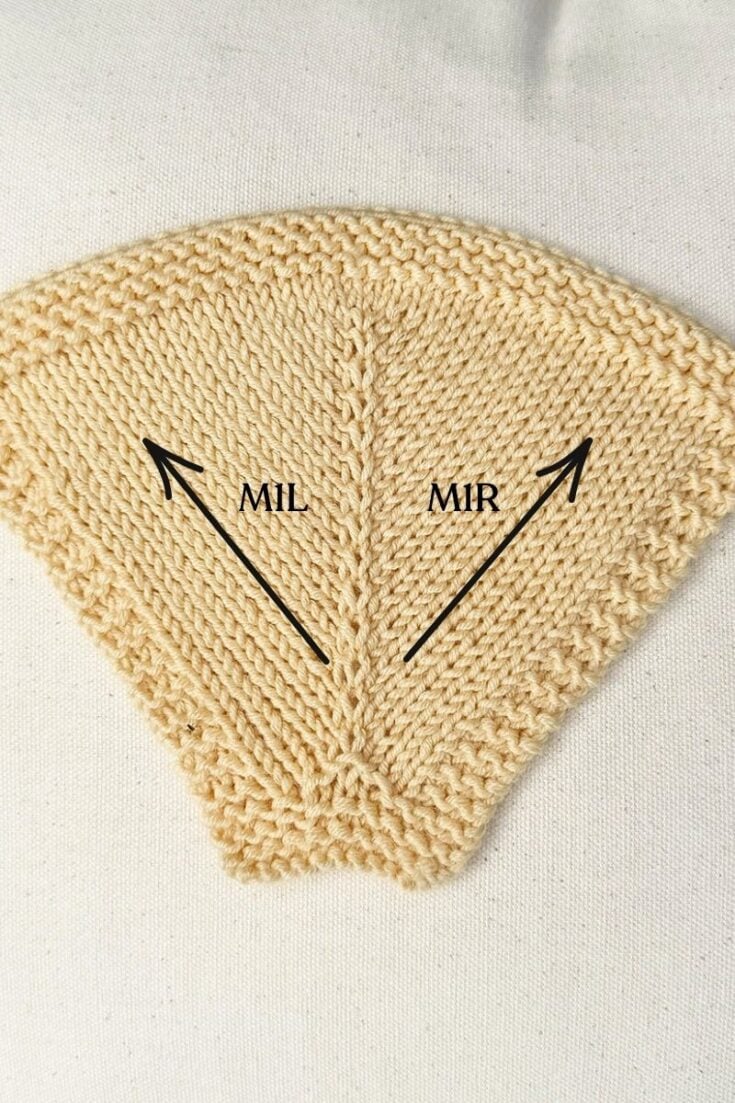
Create a simple sample swatch to learn how to knit M1L and M1R increases.
This practice pattern shows you where to place make one right and make one left increases on either side of a center stitch, so you can see how each increase leans and how they shape your knitting.
Materials
- Smooth DK or worsted/Aran weight yarn
Tools
- Use the needle size recommended for your yarn
- Scissors
- Tapestry needle
Instructions
Cast on and set up
Cast on 11 sts.
Knit 5 rows.
Start pattern rows
- Row 1 (RS): K5, M1R, K1, M1L, K5. 13 sts
- Row 2 (WS): K3, P to last 3 sts, K3.
- Row 3 (RS): K6, M1R, K1, M1L, K6. 15 sts
- Row 4 (WS): Rep row 2.
- Row 5 (RS): K7, M1R, K1, M1L, K7. 17 sts
- Row 6 (WS): Rep row 2.
- Row 7 (RS): K8, M1R, K1, M1L, K8. 19 sts
- Row 8 (WS): Rep row 2.
Then continue:
RS: K to centre stitch, working M1R before the centre stitch and M1L after it.
WS: Rep row 2.
Continue until the swatch is wide enough for your photos — around 41 stitches is usually enough.
Final rows
Knit 6 rows.
Bind off loosely.
Block lightly if needed.
Notes
Abbreviations
- K – knit
- P – purl
- M1L – make one left
- M1R – make one right
- RS – right side
- WS – wrong side
- St(s) – stitch(es)
Gauge is not important for this sample swatch.
M1L Vs M1R: What Is The Difference?
The main difference between M1L and M1R is the direction the increase leans.
- M1L leans to the left.
- M1R leans to the right.
They are often used together in the same project to create balanced shaping.
For example, your pattern may ask you to work one increase before a marker and another increase after a marker.
Always follow the instructions in your knitting pattern, as designers may place M1L and M1R differently depending on the shaping they want.
Easy Way To Remember M1L And M1R
A helpful way to remember the difference is:
- M1L: front to back, knit through the back.
- M1R: back to front, knit through the front.
You can also think of it like this:
- For M1L, lift the strand from the front.
- For M1R, lift the strand from the back.
It can feel confusing at first, but once you practice both increases a few times, the movements will become much easier to remember.
When Should You Use M1L And M1R?
M1L and M1R increases are used when you want to add stitches without creating obvious holes.
You may see them in patterns for:
- Sweaters
- Cardigans
- Raglan shaping
- Sleeves
- Hats
- Shawls
- Mittens
- Socks
- Neckline shaping
They are especially useful when you want your increases to look neat and directional.
Do M1L And M1R Leave Holes?
When worked correctly, M1L and M1R should not leave large holes.
The lifted strand is twisted as you knit into it, which helps close the gap and create a tidy increase.
If you are seeing holes, check that you are knitting into the correct loop:
- For M1L, knit into the back loop.
- For M1R, knit into the front loop.
If the strand is not twisted, the increase may leave a small eyelet.
M1L And M1R Vs KFB
- M1L, M1R, and KFB are all knitting increases, but they look different.
- KFB means knit front and back. It is worked into an existing stitch and usually creates a small bar or bump.
- M1L and M1R are worked into the strand between two stitches and are often less visible.
- Use KFB when your pattern asks for a simple bar increase.
- Use M1L and M1R when your pattern asks for directional increases.
M1L And M1R Vs Yarn Over
- M1L and M1R are different from yarn overs.
- A yarn over creates a new stitch and usually leaves a decorative hole.
- M1L and M1R create new stitches by twisting the strand between stitches, so they are designed to be more subtle.
- Use yarn over for lace or eyelet effects.
- Use M1L and M1R for neat shaping without large holes.
Common M1L And M1R Mistakes
Lifting the strand the wrong way
The direction you lift the strand matters.
For M1L, lift from front to back.
For M1R, lift from back to front.
If you reverse these, your increase may lean in the opposite direction.
Knitting into the wrong loop
For a neat increase, make sure you knit into the correct part of the lifted strand.
For M1L, knit through the back loop.
For M1R, knit through the front loop.
Pulling the yarn too tight
The strand between your stitches can be tight, especially when working M1R.
Try not to pull your stitches too tightly before the increase.
This will make it easier to lift the strand and knit into it.
Forgetting which increase goes where
M1L and M1R are often paired together in knitting patterns.
Read your pattern carefully and check whether it asks for M1L or M1R before or after a marker.
The placement can affect how the shaping looks.
M1L And M1R Knitting FAQs
What does M1L mean in knitting?
M1L means make one left. It is a left-leaning increase made by lifting the strand between two stitches from front to back and knitting into the back loop.
What does M1R mean in knitting?
M1R means make one right. It is a right-leaning increase made by lifting the strand between two stitches from back to front and knitting into the front loop.
Are M1L and M1R the same as yarn overs?
No, M1L and M1R are not the same as yarn overs.
A yarn over creates an eyelet, while M1L and M1R are designed to be more subtle increases.
Which is easier, M1L or M1R?
Many knitters find M1L easier because M1R can feel tighter to work.
Both become easier with practice.
Which increase goes before and after a marker?
In many patterns, you may see instructions such as knit to marker, slip marker, M1L, or M1R before marker, slip marker, then continue knitting.
A common placement is to work M1R before a marker and M1L after a marker, but this is not a fixed rule.
Always follow the instructions in your knitting pattern, as the designer may choose a different placement depending on the direction of the shaping.
If there is confusion, look at whether the increases are meant to lean toward the marker or away from the marker.
Why is my M1 increase leaving a hole?
Your M1 increase may leave a hole if the lifted strand is not twisted.
Check that you are knitting into the correct loop for M1L or M1R.
More Knitting Tutorials
If you found this tutorial helpful, you may also like these beginner knitting guides:
- KFB Knitting: How To Knit Front And Back
- How To Yarn Over In Knitting
- How To Knit 2 Together (K2tog)
- SSK Knitting Tutorial: How To Slip Slip Knit
- PSSO Knitting: How To Pass Slipped Stitch Over
- How To Knit For Beginners
- Knit Vs Purl
- Knitting Abbreviations
The M1L and M1R knitting increases are useful techniques to learn, especially if you want to knit garments, shawls, hats, and other shaped projects.
At first, the difference between make one left and make one right can feel a little tricky, but with practice, they become much easier to remember.
Once you know how to work both increases, you’ll be able to follow many more knitting patterns with confidence.