Reputation Bookmark Knitting Pattern (Free Printable)
THIS ARTICLE CONTAINS AFFILIATE LINKS THAT SUPPORT HANDY LITTLE ME CONTENT AND FREE PATTERNS.Are you ready for it?
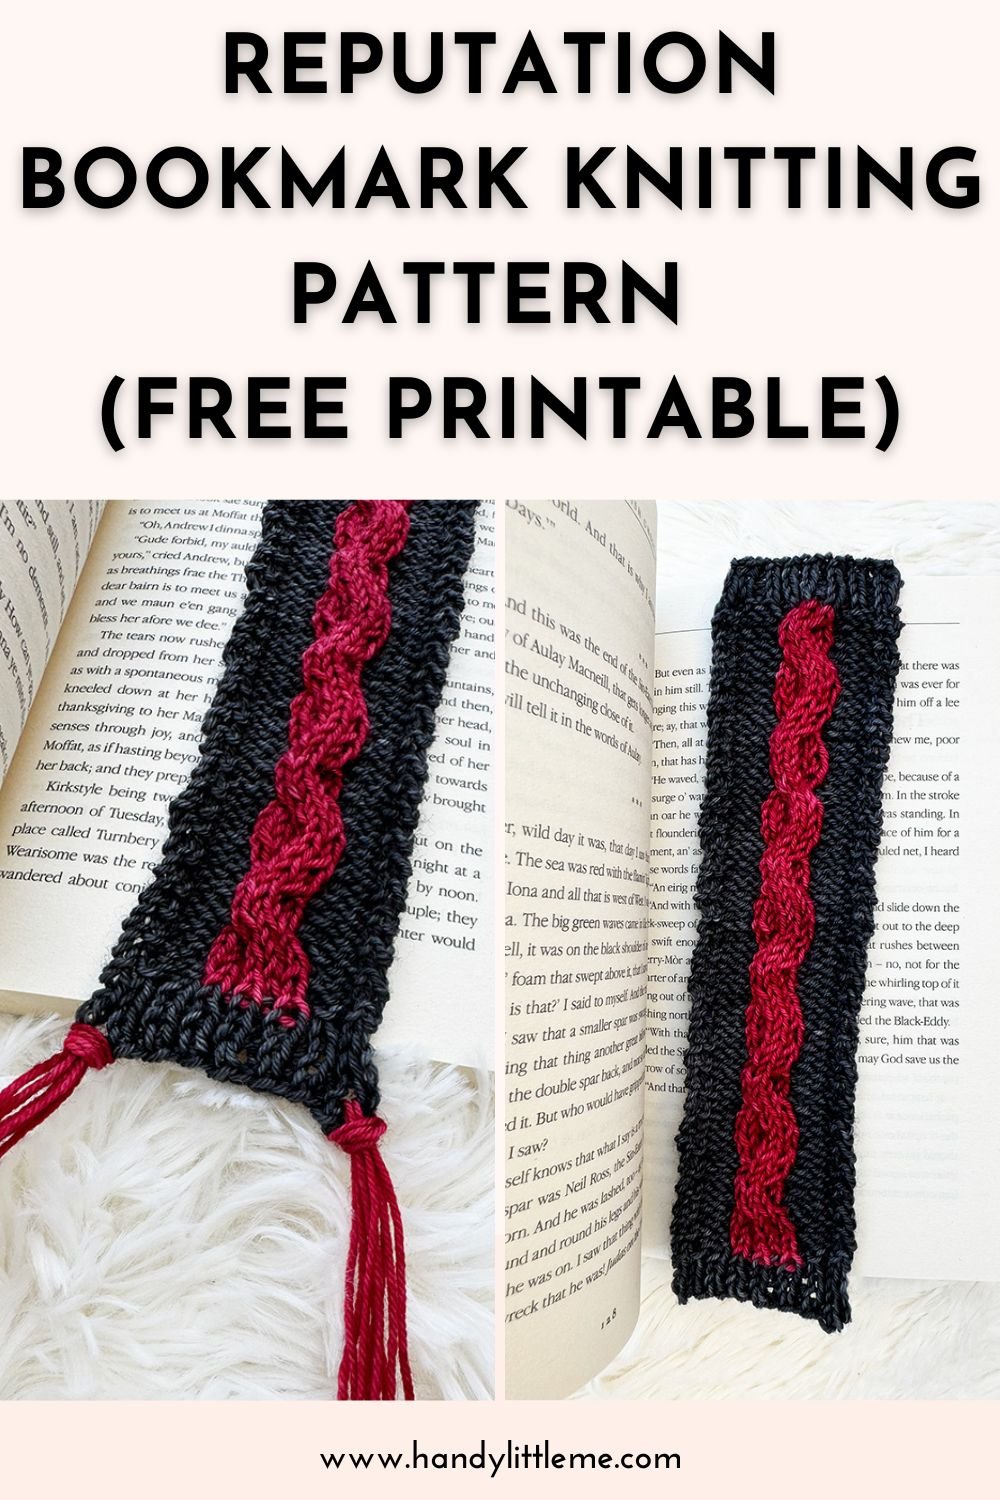
Channel your Reputation-era mood with a sleek, two-tone cable bookmark that slips perfectly between your favorite chapters.
This is a quick, stash-busting knit with striking contrast—think bold lyrics, late-night reading, and a pop of red on grey.
This tutorial-style post walks you through everything: supplies, size & gauge, abbreviations, step-by-step instructions, and colorwork tips (so you can work the two colors without dragging floats across the back).
Save this article
Enter your email address and we'll send it to your inbox.
By entering your email, you agree to receive patterns, tutorials, and updates from Handy Little Me. Unsubscribe at any time.
Before You Get Started
A few notes to set you up for a flawless knit:
- This is an easy, speedy project—perfect for using scraps and mini skeins.
- The design features a center cable in a second color for that Reputation contrast moment.
- Worked flat, with 1×1 ribbing at both ends for a polished finish.
- This pattern (and finished items) is for personal use only.
Tools & Materials
Yarn (Fingering/4 Ply) — ~10 g / 40 m total
- Yarn A (Main): Grey — Dark Omen Yarn, Merino Sock Mini, “Void”
- Yarn B (Contrast cable): Red — Dark Omen Yarn, Merino Sock Mini, “Blood Garnet”
You can use any yarn weight/needle size, but your finished size will vary.
Needles & Notions
- 3.5 mm (US 4) short double-pointed needles (or straight needles if you prefer)
- Cable needle (for 3.5 mm / US 4)
- Darning/tapestry needle
- Scissors
- Tape measure
- Stitch markers (optional)

Size & Gauge
- Finished length: ~9 in (from tip to tip, after blocking)
- Width: ~2 in
- Gauge: Gauge – 28-30 stitches per 10 x 10 cm/4 inches (not critical for a bookmark, but helpful).
Abbreviations
- CO – cast on
- Cont – continue
- K – knit
- P – purl
- St(s) – stitch(es)
- Rep – repeat
- RS – right Side
- WS – wrong side
- 1×1 ribbing – K1, P1 every row
- C6B – Slip next 3 sts to cable needle and hold at back; K3 from left needle, then K3 from cable needle
- C6F – Slip next 3 sts to cable needle and hold at front; K3 from left needle, then K3 from cable needle

Colorwork Tip (No Floats!)
You’ll work two colors side-by-side without carrying yarn across the back (so: no floats).
This is an intarsia-style approach:
- Make two small balls/bobbins—one for Yarn A (grey) and one for Yarn B (red).
- At every color change, twist the yarns once to lock them and avoid holes: bring the new color up from under the old color before you start knitting with it.
- Keep each color only with its section (grey edges, red cable panel). Don’t strand across the back.
- Gently snug the color join so it’s neat but not tight; your edges will look crisp and flat.
- If your balls tangle, pause and let the work dangle to untwist, then continue.

Pattern Instructions
CO 16 sts with Yarn A.
Ribbed Tip (Bottom)
Work 1×1 ribbing (K1, P1) for 1 inch.
Cable Panel
Unless otherwise stated, follow the color cues in each row.
Tip: Place markers to frame the 6-stitch cable panel if you like.
Row 1 (RS): Yarn A K2, P3, add Yarn B K6, switch to Yarn A P3, K2.
Row 2 (WS): Yarn A K5, Yarn B P6, Yarn A K5.
Row 3: Yarn A K2, P3, Yarn B C6B, Yarn A P3, K2.
Row 4: Yarn A K5, Yarn B P6, Yarn A K5.
Rows 5–8: Rep Rows 1 and 2.
Row 9: Yarn A K2, P3, Yarn B C6F, Yarn A P3, K2.
Row 10: Yarn A K5, Yarn B P6, Yarn A K5.
Rows 11–12: Rep Rows 1 and 2.
Repeat Rows 1–12 until your bookmark measures 8.5 inches from the CO edge.
Ribbed Tip (Top) & Bind Off
Work 1×1 ribbing for 4 rows, binding off on Row 4 in pattern.
Finishing & Blocking
- Weave in all yarn tails neatly at the color joins.
- Block lightly to size (steam or wet block, according to your yarn). Keep it flat so the cable pops and the edges stay crisp.
- Optional: Add a small tassel in Yarn B for a Reputation-worthy flourish.
Stash Notes & Substitutions
- Mini skeins and scraps are perfect—just keep high contrast between colors for that iconic look.
- Swapping yarn weights? Use an appropriate needle size and aim for a firm fabric so your bookmark stays flat and sleek.

Free Printable
If you prefer to work from a printed pattern or just want a version you can take on the go, I’ve got you covered!
You can print the pattern below to keep it handy while you knit.
It’s a simple, easy-to-follow design that’s perfect for relaxing while working on a project you’ll actually use.
Reputation Bookmark Knitting Pattern

Knit a sleek, beginner-friendly bookmark inspired by Reputation, featuring a simple lace texture and a clean finish.
Perfect for gifts, stash-busting, and quiet knitting time.
Materials
- Yarn (Fingering/4 Ply) — ~10 g / 40 m total
- Yarn A (Main): Grey — Dark Omen Yarn, Merino Sock Mini, “Void”
- Yarn B (Contrast cable): Red — Dark Omen Yarn, Merino Sock Mini, “Blood Garnet”
- You can use any yarn weight/needle size, but your finished size will vary.
Tools
- 3.5 mm (US 4) short double-pointed needles (or straight needles if you prefer)
- Cable needle (for 3.5 mm / US 4)
- Darning/tapestry needle
- Scissors
- Tape measure
- Stitch markers (optional)
Instructions
Cast on
CO 16 sts with Yarn A.
Ribbed Tip (Bottom)
Work 1x1 ribbing (K1, P1) for 1 inch.
Cable Panel
Unless otherwise stated, follow the color cues in each row.
Tip: Place markers to frame the 6-stitch cable panel if you like.
- Row 1 (RS): Yarn A K2, P3, add Yarn B K6, switch to Yarn A P3, K2.
- Row 2 (WS): Yarn A K5, Yarn B P6, Yarn A K5.
- Row 3: Yarn A K2, P3, Yarn B C6B, Yarn A P3, K2.
- Row 4: Yarn A K5, Yarn B P6, Yarn A K5.
- Rows 5–8: Rep Rows 1 and 2.
- Row 9: Yarn A K2, P3, Yarn B C6F, Yarn A P3, K2.
- Row 10: Yarn A K5, Yarn B P6, Yarn A K5.
- Rows 11–12: Rep Rows 1 and 2.
Repeat Rows 1–12 until your bookmark measures 8.5 inches from the CO edge.
Ribbed Tip (Top) & Bind Off
Work 1x1 ribbing for 4 rows, binding off on Row 4 in pattern.
Finishing & Blocking
- Weave in all yarn tails neatly at the color joins.
- Block lightly to size (steam or wet block, according to your yarn). Keep it flat so the cable pops and the edges stay crisp.
- Optional: Add a small tassel in Yarn B for a Reputation-worthy flourish.
Stash Notes & Substitutions
- Mini skeins and scraps are perfect—just keep high contrast between colors for that iconic look.
- Swapping yarn weights? Use an appropriate needle size and aim for a firm fabric so your bookmark stays flat and sleek.
Notes
Size & Gauge
- Finished length: ~9 in (from tip to tip, after blocking)
- Width: ~2 in
- Gauge: Gauge - 28-30 stitches per 10 x 10 cm/4 inches (not critical for a bookmark, but helpful).
Abbreviations
- CO – cast on
- Cont – continue
- K – knit
- P – purl
- St(s) – stitch(es)
- Rep – repeat
- RS - right Side
- WS – wrong side
- 1x1 ribbing – K1, P1 every row
- C6B – Slip next 3 sts to cable needle and hold at back; K3 from left needle, then K3 from cable needle
- C6F – Slip next 3 sts to cable needle and hold at front; K3 from left needle, then K3 from cable needle
Colorwork Tip (No Floats!)
You’ll work two colors side-by-side without carrying yarn across the back (so: no floats).
This is an intarsia-style approach:
- Make two small balls/bobbins—one for Yarn A (grey) and one for Yarn B (red).
- At every color change, twist the yarns once to lock them and avoid holes: bring the new color up from under the old color before you start knitting with it.
- Keep each color only with its section (grey edges, red cable panel). Don’t strand across the back.
- Gently snug the color join so it’s neat but not tight; your edges will look crisp and flat.
- If your balls tangle, pause and let the work dangle to untwist, then continue.
FAQs & Extra Tips
Can I knit this with straight needles?
Yes—use any needles you like for flat knitting.
My color join looks holey. Help?
Make sure you twist the yarns at every color change (new color comes up from under the old).
Give the join a gentle snug.
Do I have to cable without a needle?
For most knitters, a cable needle keeps things tidy on such a small piece—but feel free to go without if you’re comfortable.
Can I make it longer/shorter?
Absolutely. Work more or fewer 12-row repeats before the final rib.
If you cast this on tonight, there’s a good chance you’ll be turning pages with it by tomorrow—look what you made me do.
Happy knitting! 🖤🧶
Loved This Tutorial?
Don’t forget to pin it for later and tag @handylittleme on Instagram with your finished bookmark!
Want More Swift-Inspired Knits?
- 17+ Free Bookmark Knitting Patterns For Book-Lovers
- Lover Bookmark Knitting Pattern
- Swiftie Bracelet Bookmark Knitting Pattern
- 1989 Bookmark Knitting Pattern
- Cruel Summer Bookmark Knitting Pattern
- Speak Now Bookmark Knitting Pattern
- Midnights Bookmark Knitting Pattern
- Willow Bookmark Knitting Pattern
- Folklore Bookmark Knitting Pattern
- The Tortured Poet Bookmark Knitting Pattern
- Autumn Leaves & Evermore: A Knitted Lace Bookmark
- Enchanted Bookmark Knitting Pattern