Cable Shrug Knitting Pattern (Outlander Inspired)
THIS ARTICLE CONTAINS AFFILIATE LINKS THAT SUPPORT HANDY LITTLE ME CONTENT AND FREE PATTERNS.This cable shrug knitting pattern will allow you to create a shrug with a cabled design.
I wanted to share with you another free knitting pattern that has been inspired by the TV show Outlander.
Scroll down for the free pattern or you can purchase a printer-friendly ad-free PDF here.

Inspired By The Outlander Costumes
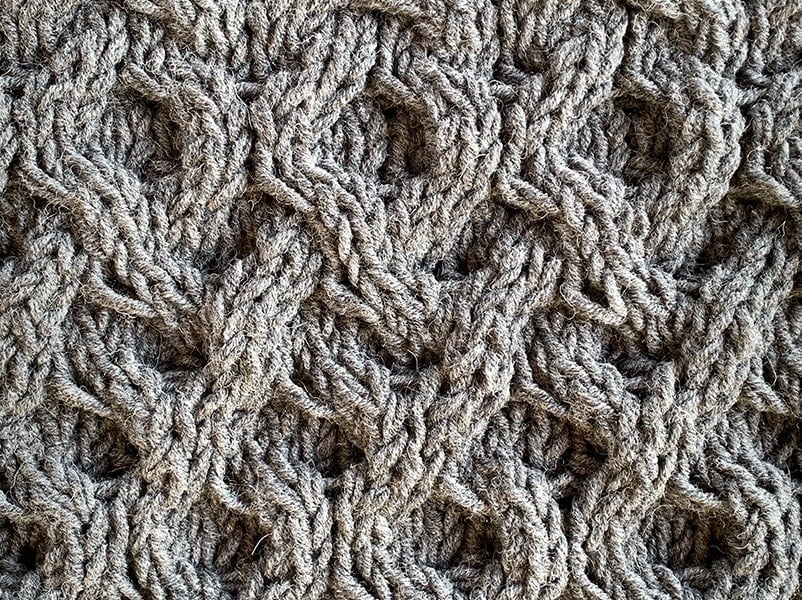
Inspired by Claire Fraser wearing beautiful knitted pieces, the shrug is knit by working the honeycomb cable.
If you have never knit this cable before, it is fairly easy once you get into it.
It is very versatile, as it can be worn up high to protect your head when it is really cold, or down around your shoulders.
This is an intermediate-level knitting pattern, and the techniques you will need to know are knit, purl, k2tog, CF (cable forward), and CB (cable back) as well as knitting on circular needles to accommodate the number of stitches.
Visit the Outlander Pattern Collection Ebooks in my shop below:
- The Ultimate Outlander Knitting Pattern Collection – With 39 Knitting Patterns.
- The Complete Outlander Knitting Pattern Bundle – With 55 Knitting Patterns.
Popular Patterns
- Outlander Carolina Shawl Pattern
- Claire’s Rent Shawl Knitting Pattern
- Outlander Cowl Knitting Pattern (Claire Season 1)
- Journeycake Sontag Shawl Knitting Pattern
- Jenny’s Shawl Knitting Pattern (Outlander Knit)
- Fraser Tartan Shawl Knitting Pattern
- Beret Knitting Pattern (Beginner Friendly!)
- Fraser’s Ridge Outlander Shawl Pattern
- Outlander Capelet Knitting Pattern
- Shrug Knitting Pattern
- Faux Fur Scarf Pattern {Easy + Quick Knit}
- 30 Free Knitting Patterns For Shrugs And Wraps

The Honeycomb Cable Pattern
The honeycomb cable stitch pattern is an easy knitting repeat of eight rows.
It looks really intricate to knit, but it’s actually quite easy, once you get used to the pattern.
Using knit and purl techniques, plus two simple cable techniques, you can create this beautiful and modern-looking design.
This is not a reversible pattern, meaning the wrong side looks different than the right side.
The cable abbreviations you need to know are :
- C4B = Cable 4 Back. Slip 2 Hold Back: Knit 2 + Knit 2 from Cable Needle
- C4F = Cable 4 Front. Slip 2 Hold Front: Knit 2 + Knit 2 from Cable Needle

Outlander Cable Shrug Pattern
- Get the ad-free, inexpensive printable PDF pattern HERE.
- See ALL of the Outlander Pattern Ebooks here.
- View more Outlander Knitting Patterns here.
Notes
- Please do not copy, sell, redistribute, or republish this pattern.
- If you wish to share this pattern, link to the pattern page only.
- You may sell items produced using this pattern.
- Do NOT use copyrighted photos for your product listing.
- For the copyright T&C please read my Terms of Use.
Skill Level – Intermediate
Gauge
10 x 10 cm /4 x 4 inches = 10 sts and 14 rounds in pattern.
Measurements / Sizes
Women’s small/medium
Length laying flat – 18 inches/46 cm
Width – 11 inches / 28 cm
To make this in a larger size – cast on more stitches – in multiples of 8 Stitches.

The Supplies You Need…
Yarn
- 2 x 100g Skeins of bulky/chunky/12 Ply yarn – I used two strands of yarn knit together of Alize Yarn 100g in grey.
- You can purchase Alize yarns from YarnStreet or on Etsy.
- Alize Lanagold Yarn Substitute List.
- Knit with two strands together.
- Yarn weight – Bulky/Chunky/12 Ply.
- Yarn Weight Guide (+ Conversion Chart)
Needles
- 12mm (US 17) circular knitting needles – I used my interchangeable circular needles on a 24″ cable as there were many stitches.
- 12 mm (US 17) cable needle.
Notions

Abbreviations / Knitting Abbreviations And Terms (US And UK) List
- Approx – Approximately
- Beg – Begin(ning)
- Cont – Continue(ing)
- C4F – Cable 4 forward – Slip the next two stitches onto a cable needle and hold at the front of the fabric. Knit the next two stitches from the left-hand needle and then knit the two stitches on the cable needle.
- C4B – Cable 4 back – Slip the next two stitches onto a cable needle and hold at the back of the fabric. Knit the next two stitches from the left-hand needle and then knit the two stitches on the cable needle.
- K – Knit
- K2tog – Knit the next 2 stitches together P – Purl
- M1 – Make 1 stitch
- Rem – Remaining
- Rep – Repeat
- Rnd(s) – Round(s)
- St(s) – Stitch(es)

Pattern Instructions
Cast on 96 stitches, pm, and join in the round being careful not to twist sts.
- Round 1 – Purl
- Round 2 – Knit
- Round 3 – Purl
- Round 4 – Knit
Begin the honeycomb pattern >
- Round 1 – *C4F, C4B, rep from * to end
- Round 2 – Knit
- Round 3 – Knit
- Round 4 – Knit
- Round 5 – *C4B, C4F, rep from * to end
- Round 6 – Knit
- Round 7 – Knit
- Round 8 – Knit
Repeat rows *1-8* of the honeycomb pattern until the piece measures – 12′′ (this is just a guide – you can make it longer).
After the last row of the honeycomb pattern at your desired length – Knit 1 round.
Then cont like this:
- Round 1 – Purl
- Round 2 – Knit
- Round 3 – Purl
- Round 4 – Cast off (knit).
Weave in all loose ends.

Share your work with us…
I love seeing your finished projects on social media.
If you enjoyed making the pattern, I’d love to see yours on Instagram, be sure to tag me @handylittleme.
I’d love to see your work.
Happy Knitting!


