Claire’s Rent Shawl Knitting Pattern
THIS ARTICLE CONTAINS AFFILIATE LINKS THAT SUPPORT HANDY LITTLE ME CONTENT AND FREE PATTERNS.Claire’s Rent Shawl Knitting Pattern will allow you to create a large triangle shawl with two different colored stripes in the design.
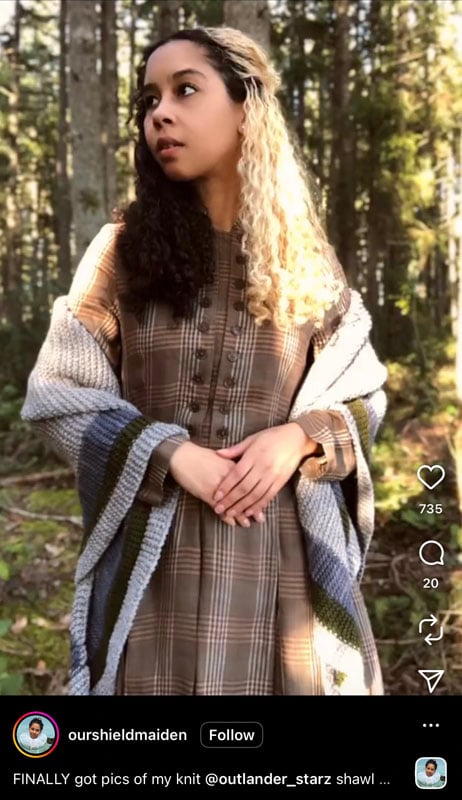
This shawl is seen in Outlander season 1 episode 5, ‘Rent,’ worn over a tartan dress when Claire attends to the clan MacKenzie.
Knowledge of intarsia – working with more than one color is needed for this pattern.
The full pattern is free below, or you can purchase the ad-free printable PDF here.

Claire’s Rent Shawl Knitting Pattern
Notes
Skill Level – Intermediate
The shawl knits up quickly, and the design makes for a relaxing and enjoyable knit.
Make it in the colors Claire wears in our favorite show, or choose new colors to suit you!
Copyright Info
- Please do not copy, sell, redistribute, or republish this pattern.
- If you wish to share this pattern, link to the pattern page only.
- You may sell items produced using this pattern.
- Do NOT use copyrighted photos for your product listing.
- For the copyright T&C, please read my Terms of Use.

Size Information
Gauge – 10 x 10 cm/4 x 4 inches = 18 sts and 30 rows in garter stitch.
Measurements / Sizes
*Please note – these sizes are just a rough guide; you can knit this shawl until it is comfortable for you to wear – test it out against yourself to see if you want to make the length shorter or longer before dividing the sections.
The smallest sizes will result in the shawl meeting in the middle of your waist; the larger sizes will allow you to wrap the shawl around your body and tie it at the back of your waist.
- M – Width tip to tip – 68 inches/172 cm
- M – Length – top to bottom = 31 inches/79 cm
- You can add fewer or more stitches to adjust the size to increase or decrease.
- Add fewer by – 40 stitches and more by + 40 sts.
- Where you can adjust the size is noted in the pattern.

The Supplies You Need
Yarns
- Yarn A – Cascade 220 – Shire 2445 100g/220yards x 1 (S/M) x 2 (L/XL) x 2.5 (XL/XXL)
- Yarn B – Cascade 220 – Black 8555 100g/220yards x 1 (S/M) x 2 (L/XL) x 2.5 (XL/XXL)
- Yarn C – Cascade 220 – Smoke Heather 9450 100g/220yards x 3 (S) x 4 (M) x 5 (L/XL) x 6 (XL/XXL)
- Yarn Weight Guide (+ Conversion Chart) – Medium 04/Worsted/Aran/10 Ply.
Yarn notes
- Please note that the skeins of yarn needed for Yarn A and Yarn B will need to be made into two balls for each color.
- This is because of the intarsia technique used in the pattern; you will have to attach one ball at one end of the work and the other at the other end when you are knitting.
Yarn Substitutes
- Knit Picks – Wool of The Andes Worsted
- Cascade yarns – Cascade 220 Merino
- Berroco – Lanas
- Knit Picks – Simply Wool Worsted
- Mirasol Yarn – Huni
- Filcolana – Peruvian Highland Wool
- Evoke Hand-Dyed Yarn – Woolganic Australian Organic Wool Hand-dyed
Needles
- 5 mm (US 8) knitting needles – I used my interchangeable circular needles on a 40″/100cm cable (32″ is also ok), as there were many stitches – I did not join in the round to knit.
- Spare cable 40″ with end caps.
Notions
- Tape measure
- Darning needle
- Scissors
- Stitch markers
- Stitch holder or spare cable with end caps to hold stitches.
Print + Stitch
Purchase the ad-free PDF pattern
Want a clean, printable version of this pattern? You can purchase the ad-free PDF in my shop. It’s perfect for printing, saving to your device, and making without distractions.
Abbreviations
- Beg – beginning
- Cont – Continue
- Foll – following
- K – knit
- K2tog – knit the next 2 stitches together
- YO – yarn over needle
- PM – place marker
- SM – slip marker
- Rem – remaining
- Rep – repeat
- RS – right side
- WS – wrong side

Pattern Instructions
- Yarn A – Shire 2445 (dark green)
- Yarn B – Black 8555 (black)
- Yarn C – Smoke Heather 9450 (light green)
With Yarn A – Cast on 3 sts.
- Row 1: Knit.
- Row 2: K1, YO, PM, K1, YO, K1. (5 sts)
- Row 3: K to the end, slipping the marker.
- Row 4: K to marker, YO, SM, K1, YO, K to end.
- Rep rows 3 and 4 until there are 15 sts, then rep row 3 again, ready to start the next section on a RS row.
In the next stage, you will join Yarn B.
- Row 1 (RS): Cont to knit with Yarn A, K6, add in Yarn B from the backside and K1 stitch before the marker, YO, SM, K1, YO, K1, attach the second ball of Yarn A, K to end.
- Row 2 (WS): Knit the row, slip the marker, and maintain the color pattern.
- Row 3: With Yarn A, K6, with Yarn B K to marker, YO, SM, K1, YO, K to color change, K to end in Yarn A.
- Row 4: Rep row 2.
- Rep rows 3 and 4 until there are 27 sts on the needle.

In the next stage, you will join in Yarn C, the main color.
- Row 1 (RS): With Yarn A, K6, With Yarn B, K6, add in Yarn C by knitting the first stitch before the marker, YO, SM, K1, YO, K1, and attach the second ball of Yarn B and K6, then K6 in Yarn A.
- Row 2 (WS): K across all stitches, maintaining the color pattern and slipping the marker.
- Row 3: With Yarn A, K6, With Yarn B, K6, with Yarn C K to marker, YO, SM, K1, YO, K to color change, K6 in Yarn B, K6 in Yarn A.
- Row 4: Rep row 2.
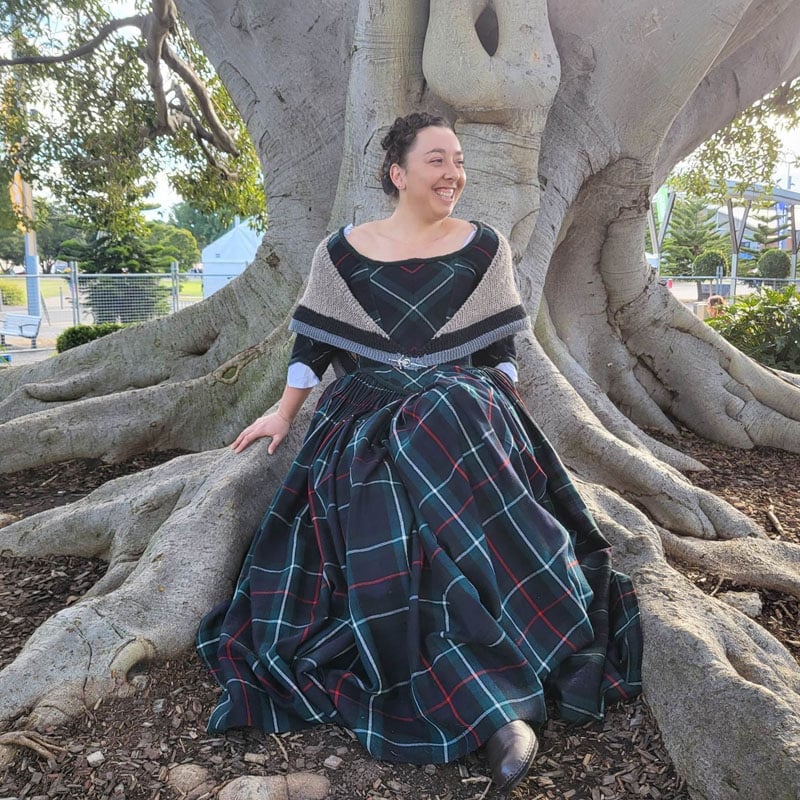
- Rep rows 3 and 4 until you have 145 sts (S), 185 sts (M – as seen in the photos), 225 (L), 265 (XL).
*This is where you can adjust the size.
- If you stop at 145 or 155 sts, this will be an S – small size.
- If you stop at 175 or 185 sts, this will be the M – medium size.
- If you want to make the L size, you will need approx 225 sts.
- For the XL/XXL size, you will need approx 265+ sts.
- You can add fewer or more stitches to adjust the size.
- Add fewer by – 40 stitches and more by + 40 sts.

Finish The Right Section
- Row 1: K to 5 sts before the center spine marker (maintaining the color pattern), K2tog, PM, K1, K2tog (remove center marker).
- Place the rem sts (the left side) on a stitch holder or spare cable with caps.
- Turn the shawl to continue working on the right section.
- Row 2: K to the end of the row, maintaining the color pattern.
- Row 3: K to 2 sts before the marker, K2tog, SM, K2, turn.
- Row 4: Rep row 2.
- Rep rows 3 and 4 until you have 14 (16, 18, 20) sts left.

Now, you will cont to decrease the right section, maintaining the color pattern as you knit until you have 3 sts left on the needle:
- Row 1: K to last 4 sts, K2tog, remove marker, K2.
- Row 2: K to end, maintaining the color pattern.
- Row 3: K to last 3 sts, K2tog, k1.
- Row 4: Rep row 2.
- Row 5: K to last 2 sts, K2tog.
- Row 6: Rep row 2.
- Row 7: K to last 2 sts, K2tog.
- Row 8: Rep row 2.
- Row 9: K to last 4 sts, K2tog, K2.
- Row 10: Rep row 2.
- Row 11: K to last 4 sts, K2tog, K2.
- Row 12: Rep row 2.
- Row 13: K to last 4 sts, K2tog, K2.
- Row 14: Rep row 2.
- Row 15: K to last 3 sts, K2tog, K1.
- Row 16: Rep row 2.
Row 17: K to last 2 sts, K2tog. - Row 18: Rep row 2.
- Row 19: K to last 2 sts, K2tog.
- Row 20: Rep row 2.
- Row 21: K2, K2tog, K2.
- Row 22: Rep row 2.
- Row 23: K2, K2tog, K1.
- Row 24: Rep row 2.
- Row 25: K1, K2tog, K1.
- Row 26: Rep row 2.
- Row 27: Cast off 3 sts.

Finish The Left Section
Place sts from the spare cable or stitch holder onto the working needles/cable.
Start at the center spine and join Yarn C to the first st.
- Row 1: With Yarn, K2, PM, K to the end of the row, maintaining the color pattern.
- Row 2: K until 2 sts before the marker (maintaining color pattern), K2tog, SM, K2.
- Row 3: K to the end of the row, maintaining the color pattern.
- Rep rows 2 and 3 until you have 14 (16, 18, 20) sts left.
Now decrease as follows until you have 3 sts left on the needle:
- Row 1: K to 2 sts before marker – K2tog, SM, K2.
- Row 2: K to end, slipping the marker and maintaining the color pattern.
- Row 3: K to last st before marker – remove the marker, K2tog, K1.
- Row 4: K to end, maintaining the color pattern.
- Row 5: K to last 2 sts, K2tog.
- Row 6: Rep row 4.
- Row 7: K to last 2 sts, k2tog.
- Row 8: Rep row 4.
- Row 9: K to last 4 sts, K2tog, K2.
- Row 10: Rep row 4.
- Row 11: K to last 4 sts, K2tog, K2.
- Row 12: Rep row 4.
- Row 13: K to the last 4 sts, K2tog, K2.
- Row 14: Rep row 4.
- Row 15: K to the last 3 sts, K2tog, K1.
- Row 16: Rep row 4.
- Row 17: K to last 2 sts, K2tog.
- Row 18: Rep row 4.
- Row 19: K to last 2 sts, K2tog.
- Row 20: Rep row 4.
- Row 21: K to the last 4 sts, K2tog, K2.
- Row 22: Rep row 4.
- Row 23: K1, K2tog, K2.
- Row 24: Rep row 4.
- Row 25: K1, K2tog, K1.
- Row 26: Rep row 4.
- Row 27: Cast off 3 sts.
To Finish:
Weave in all of the loose ends and try it on!
You can view more Outlander Knitting Patterns here.

Video Tutorial
There is a video tutorial to help you change yarn colors and divide the stitches.
You can also view a video on how to wear the Rent shawl on my YouTube channel here.
Design Inspired By The Outlander Costumes
If you have been watching the Outlander TV series, Claire wore a distinctive triangle shawl in season one.
Inspired by the Claire rent shawl she wears in the Rent episode, the triangle-shaped shawl is knit in garter stitch.
Featuring the intarsia technique, two colored stripes are worked from the bottom up.
Visit the Outlander Pattern Collection Ebooks in my shop below:
- The Ultimate Outlander Knitting Pattern Collection – With 39 Knitting Patterns.
- The Complete Outlander Knitting Pattern Bundle – With 55 Knitting Patterns
Popular Patterns
- Outlander Carolina Shawl Pattern
- Outlander Brianna Fingerless Gloves Pattern
- Outlander Claire’s Cable Knit Wrist Warmers
- Outlander Cowl Knitting Pattern (Claire Season 1)
- Jenny’s Shawl Knitting Pattern (Outlander Knit)
- Beret Knitting Pattern (Beginner Friendly!)
- Journeycake Sontag Shawl Knitting Pattern
- Brianna’s Capelet Outlander Knitting Pattern
- Outlander Capelet Knitting Pattern
- Shrug Knitting Pattern
- Highland Forest Shawl Knitting Pattern

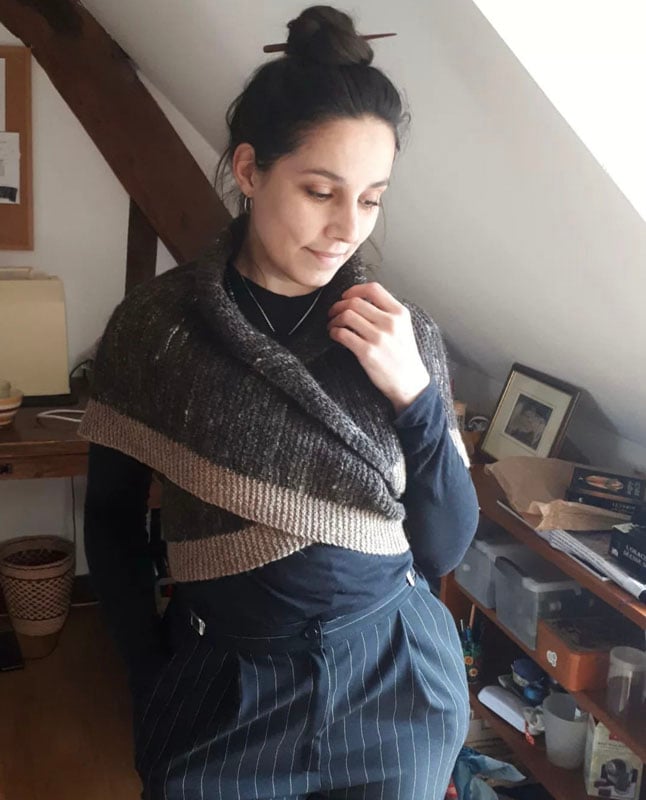
Outlander Claire’s Knitwear
Inspired by Claire Fraser’s beautiful knitted pieces, the shawl is knit from the bottom up.
The shawl will grow in size through a series of increases made with yarnovers.
This also gives a nice open stitch design down the spine of the shawl and along the edges.
To make the shawl shorter, like Claire’s, you can make it in a smaller size and fasten it with a pin or a button.
For a longer shawl that can be worn tied at the back, as seen below, you must make a larger size.
- This pattern is part of my Outlander collection; you can see the other Outlander knitting patterns here.
- If you are looking for a heavier knit shawl, you may like this pattern Outlander Carolina Shawl Pattern or The Highland Forest Shawl Knitting Pattern

Helpful Resources
This Outlander Claire shawl pattern is great for any intermediate knitter.
- Knitting cast-on methods
- Knitting Lessons
- How to cast on knitting
- How to cast off knitting for total beginners (step by step)
- How to knit garter stitch
- How to knit the purl stitch (for beginners + a video tutorial)
- How to knit stockinette stitch (for beginners)
- How to read knitting patterns for beginners
- Knitting abbreviations and terms (US and UK)
- How to knit rib stitch.
- You should also know how to yarn over.
- You should know how to change yarn colors.

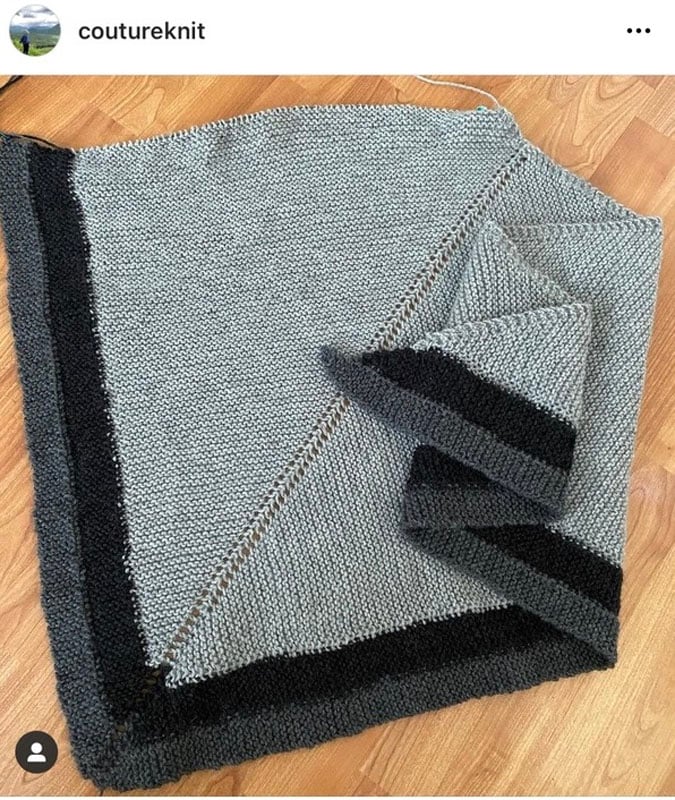
Knitted by Our Community
See how knitters have brought this pattern to life with their own yarn choices and style.
Share Your Make
I love seeing your finished projects on social media.
If you enjoyed making the pattern, I’d love to see yours on Instagram, tag me @handylittleme or #handylittleme to be featured.
You can also join the Handy Little Me Outlander Facebook Group.
I’d love to see your work.
Happy knitting!


Thanks so much for the free pattern. I will share.
Hello Mary, I’m so happy you like the pattern, I hope you enjoy making it! 🙂
Hi there! I saved a pin from this link months ago, but my pin shows the shawl longer and a dark green. I’m looking at the Cascade yarns and trying to figure out which you might have used for the green shawl. Is it Hunter Green #8893?
Hello Emily, I moved that shawl pattern as it was not a true representation of the shawl that Claire wears in the Rent episode in Outlander season 1. So I created a different design and updated the pattern.
However, the shawl you are looking for is now called ‘The Highland Forest Shawl’ and you can find that here – https://www.handylittleme.com/highland-forest-shawl-knitting-pattern/
I hope that helps! 🙂
Louise
I’ve been challenging myself by attempting this pattern, but I’ve stumbled upon a problem I can’t seem to work out! I’ve finished the right section, and of course then start on the left, however after a few rows it’s just not looking right. I’m hoping you can help me set some things straight:
The very center stitch, the one in between the yarnover holes, did I make a mistake by not working that on the right section? Because I can’t seem to get the two sides to match at the center. Also, the joint of yarn at the beginning of that left section, how do you go about that without it looking weird?
From what I can tell by a few rows now, it appears that my left section is working upwards instead “out” like the right side did – what am I doing wrong?:-/
Hello Mel,
When you are at the bit in the pattern where you have to separate the two halves – to continue to work on the right section first, while the other half is waiting on a spare cable, you start to decrease that half close to the spine.
You will be knitting 2 sts together near to the spine to make that decrease happen.
On the left section, you will also decrease the sts close to the centre spine.
Before you separated the two sections – you should have been increasing twice – once on the right side of the spine and again on the left side by making those yarn overs.
When rejoining the yarn to the left section, I used a darning needle to thread the yarn through the first stitch at the back and then continued to knit.
After that when I had finished the shawl I weaved the end in and made it secure.
I hope that helps,
Louise 🙂
When decreasing left and right sides, what’s the repeat when knitting a larger size? I’ll need to decrease 4 additional stitched from the pattern as it written, but it’s not clear what the decrease pattern should be.
Thank you! Great pattern btw, easy and forgiving!
Hello Colie,
When you start to decrease the shawl you will be decreasing the 2 sts closest to the marker every time – until you can cast off the last 3 stitches.
You will cast off the first two colours so that they stop and do not continue with a long stripe down the edge.
When you reach the point where the first edge colour needs to be decreased, you will remove the marker and keep decreasing that colour until it is gone, then you do the same with the next colour and finally, with the main colour, you decrease until you have 3 sts left.
I hope that helps!
Louise
Hello! I am currently making this shawl and I am really having a hard time comprehending the left and right sides being done separately. How will they be attached to each other if done separately? I’m sure it’s really simple but I just can’t imagine it coming together lol. Thank you!
Hello Christine,
You knit a base point (the end point of the triangle) before you separate the left and right sides.
This is then forming each side of the triangle and allows for the knitted rows to flow in another direction.
It works out…you have to try it and see.
There is a video tutorial to help you see that part also on my YouTube channel.
The link is in the post above.
I hope that helps,
Louise
Hi! I’m relatively new to knitting and have begun this project- is it normal for the center of the shawl to curve quite a bit? It’s in the gray, at the increases. Will that work itself out?
Thanks!
Hi Jessica G,
Welcome to the wonderful world of knitting, and I’m so glad you’re trying out this project!
Yes, it’s normal for the center of the shawl to curve a bit at the increases, especially while you’re still working on it.
This happens because the fabric hasn’t been stretched or blocked yet.
Once the shawl is complete, blocking will help even out the shape and smooth the curves, giving it that lovely, finished look.
Keep going—you’re doing great!
Let me know if you have any other questions as you work on the pattern.
Happy knitting! 😊
Louise