Outlander Claire’s Cable Knit Wrist Warmers
THIS ARTICLE CONTAINS AFFILIATE LINKS THAT SUPPORT HANDY LITTLE ME CONTENT AND FREE PATTERNS.The Outlander Claire’s cable knit wrist warmers pattern will allow you to create large twisted cables in an intricate design.
I wanted to share with you another free knitting pattern that has been inspired by the TV show Outlander.
Notes
Skill Level – Intermediate
The wrist warmers knit up quickly, and the cable twist design makes for a relaxing and enjoyable knit.
The pattern instructions include knitting the wrist warmers flat on two needles and knitting in the round.
*Please note – the middle cable is longer – that is why there are more rows for the middle section without doing another cable row.*
- There is a video tutorial over on my YouTube channel to help you work the C24F – You can view that here.
- If you want to learn more about knitting cables in the round, please see this guide – Knitting Cables In The Round {A How To Guide}
Copyright Info
- Please do not copy, sell, redistribute, or republish this pattern.
- If you wish to share this pattern, link to the pattern page only.
- You may sell items produced using this pattern.
- Do NOT use the copyrighted photos for your product listing.
- For the copyright T&C, please read my Terms of Use.

Size Information
Women’s small/medium
- Length = 10 inches
- Width (laying flat and unstretched) = 4 inches
To size up – You could add 2-4 stitches to the non-cable sections and increase the cast on by 4-8 stitches.
Gauge = 18 sts in 24 rows in 10 x 10cm/4 x 4 inches / in stocking stitch.
The supplies you need…
Yarn
- 1 x 100g skein of any medium-weight yarn (04)/Aran/Worsted/10 Ply.
- Yarn weight chart
- I used La Mia Natural Wool 100g (3.5 oz) 200m (218 yd) in the color brown H6.
- Good Yarn Substitute – Cascade 220 in Walnut Heather 8013.
Needles
- 5mm (US 8) straight knitting needles or 16″ circular knitting needles (not to join in the round)
- 5mm (US 8) cable needle
Notions

Abbreviations
Knitting Abbreviations And Terms (US And UK)
- CO – cast on
- Cont – Continue
- C24F – (Cable 24 front) – Slip 12 stitches onto a cable needle and hold in front of work (k2, P2) 3 times from the left needle, then (K2, P2) 3 times from the cable needle.
- K – knit
- P – purl
- St(s) – stitch(es)
- Rep – repeat
Pattern Instructions
Knit flat on two needles:
Left Wrist Warmer
CO 52 sts
K2, P2 – 2×2 ribbing for 2 rows.
- (K2, P2) – x 7 for 28 sts, K 24 to end of row
- P 24, (K2, P2) to end of row
- (K2, P2) x 7 for 28 sts, K 24 to end of row
- P 24, (K2, P2) to end of row
- (K2, P2) x 7 for 28 sts, K 24 to end of row
- P 24, (K2, P2) to end of row
- (K2, P2) x 7 for 28 sts, K 24 to end of row
- P 24, (K2, P2) to end of row
Cable 1
- (K2, P2), C24F, K 24
- P 24, (K2, P2) to end of row
- (K2, P2) x 7 for 28sts, K 24
- P 24, (K2, P2) to end of row
- (K2, P2) x 7 for 28sts, K 24
- P 24, (K2, P2) to end of row
- (K2, P2) x 7 for 28sts, K 24
- P 24, (K2, P2) to end of row
Cable 2
- (K2, P2), C24F, K 24
- P 24, (K2, P2) to end of row
- (K2, P2) x 7 for 28sts, K 24 to end of row
- P 24, (K2, P2) to end of row
- (K2, P2) x 7 for 28sts, K 24 to end of row
- P 24, (K2, P2) to end of row
- (K2, P2) x 7 for 28sts, K 24 to end of row
- P 24, (K2, P2) to end of row
- (K2, P2) x 7 for 28sts, K 24 to end of row
- P 24, (K2, P2) to end of row
- (K2, P2) x 7 for 28sts, K 24 to end of row
- P 24, (K2, P2) to end of row
- (K2, P2) x 7 for 28sts, K 24 to end of row
- P 24, (K2, P2) to end of row
Cable 3
- (K2, P2), C24F, K 24
- P 24, (K2, P2) to end of row
- (K2, P2) x 7 for 28sts, K 24 to end of row
- P 24, (K2, P2) to end of row
- (K2, P2) x 7 for 28sts, K 24 to end of row
- P 24, (K2, P2) to end of row
- (K2, P2) x 7 for 28sts, K 24 to end of row
- P 24, (K2, P2) to end of row
Cable 4
- (K2, P2), C24F, K 24
- P 24, (K2, P2) to end of row
- (K2, P2) x 7 for 28sts, K 24 to end of row
- P 24, (K2, P2) to end of row
- (K2, P2) x 7 for 28sts, K 24 to end of row
- P 24, (K2, P2) to end of row
- (K2, P2) x 7 for 28sts, K 24 to end of row
- P 24, (K2, P2) to end of row
K2, P2 – 2 x 2 ribbing for 2 rows.
Cast off in rib.

Right Wrist Warmer
CO 52 sts
P2, K2 – 2×2 ribbing for 2 rows.
- K 24, (P2, K2) to end of row
- (P2, K2) x 7 for 28 sts, P 24
- K 24, (P2, K2) to end of row
- (P2, K2) x 7 for 28 sts, P 24
- K 24, (P2, K2) to end of row
- (P2, K2) x 7 for 28 sts, P 24
- K 24, (P2, K2) to end of row
- (P2, K2) x 7 for 28 sts, P 24
Cable 1
- K 24, P2, C24F, K2
- (P2, K2) x 7 for 28sts, P 24 to end of row
- K 24, (P2, K2) to end of row
- (P2, K2) x 7 for 28sts, P 24 to end of row
- K 24, (P2, K2) to end of row
- (P2, K2) x 7 for 28sts, P 24 to end of row
- K 24, (P2, K2) to end of row
- (P2, K2) x 7 for 28sts, P 24 to end of row
Cable 2
- K 24, P2, C24F, K2
- (P2, K2) x 7 for 28sts, P 24 to end of row
- K 24, (P2, K2) to end of row
- (P2, K2) x 7 for 28sts, P 24 to end of row
- K 24, (P2, K2) to end of row
- (P2, K2) x 7 for 28sts, P 24 to end of row
- K 24, (P2, K2) to end of row
- (P2, K2) x 7 for 28sts, P 24 to end of row
- K 24, (P2, K2) to end of row
- (P2, K2) x 7 for 28sts, P 24 to end of row
- K 24, (P2, K2) to end of row
- (P2, K2) x 7 for 28sts, P 24 to end of row
- K 24, (P2, K2) to end of row
- (P2, K2) x 7 for 28sts, P 24 to end of row
Cable 3
- K 24, P2, C24F, K2
- (P2, K2) x 7 for 28sts, P 24 to end of row
- K 24, (P2, K2) to end of row
- (P2, K2) x 7 for 28sts, P 24 to end of row
- K 24, (P2, K2) to end of row
- (P2, K2) x 7 for 28sts, P 24 to end of row
- K 24, (P2, K2) to end of row
- (P2, K2) x 7 for 28sts, P 24 to end of row
Cable 4
- K 24, P2, C24F, K2
- (P2, K2) x 7 for 28sts, P 24 to end of row
- K 24, (P2, K2) to end of row
- (P2, K2) x 7 for 28sts, P 24 to end of row
- K 24, (P2, K2) to end of row
- (P2, K2) x 7 for 28sts, P 24 to end of row
- K 24, (P2, K2) to end of row
- (P2, K2) x 7 for 28sts, P 24 to end of row
P2, K2 – 2×2 ribbing for 2 rows.
Cast off in rib.
Making Up
Stitch the side seam using the invisible seam stitch.
Weave in any loose ends.

Knit in the round on circular needles: Make 2 the same.
CO 52 sts
K2, P2 / 2×2 ribbing for 2 rounds.
Round 1: (K2, P2) x 7 for 28 sts, K 24 sts.
Rep Round 1; 8 more times.
Cable 1
Round 1: K2, P2, C24F, K24.
Round 2: (K2, P2) x 7 for 28 sts, K 24 sts.
Rep round 2; 6 more times.
Cable 2.
Round 1: K2, P2, C24F, K24.
Round 2: (K2, P2) x 7 for 28 sts, K 24 sts.
Rep round 2; 12 more times.
Cable 3.
Round 1: K2, P2, C24F, K24.
Round 2: (K2, P2) x 7 for 28 sts, K 24 sts.
Rep round 2; 6 more times.
Cable 4.
Round 1: K2, P2, C24F, K24.
Round 2: (K2, P2) x 7 for 28 sts, K 24 sts.
Rep round 2; 7 more times.
K2, P2 / 2×2 ribbing for 2 rounds.
Cast off in patt.
Weave in any loose ends.
Grab The Ad-Free Printable PDF Pattern Here

Inspired By The Outlander Costumes
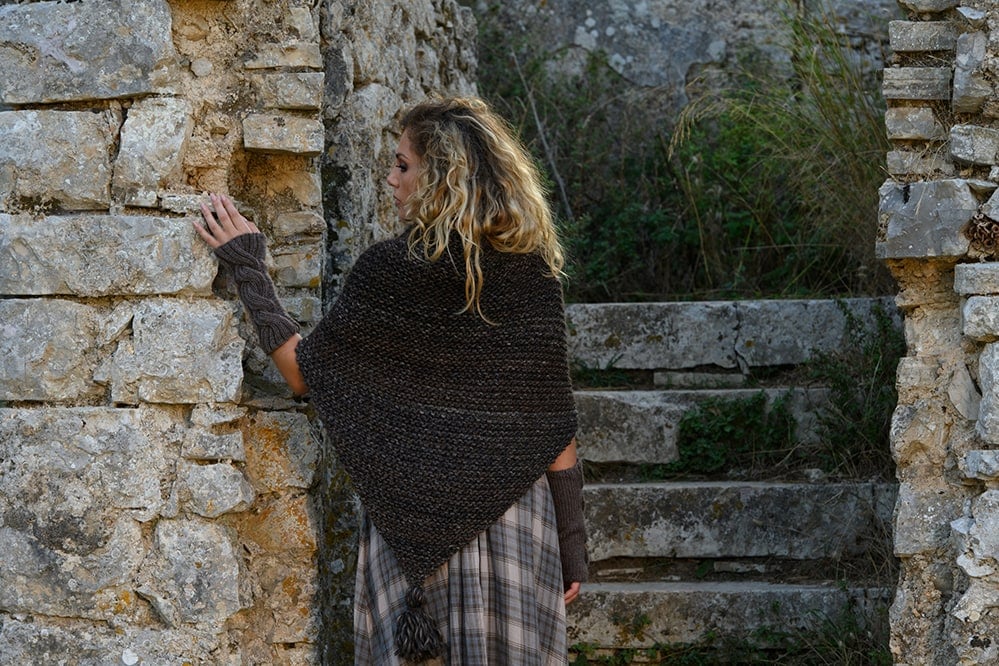
If you have been watching the Outlander TV series, through all of the seasons, Claire has worn fingerless gloves and wrist warmers.
The wrist warmers that inspired this design were knit in dark brown yarn, so I chose a similar shade in natural wool.
The large cables are seen twisting up through the design, fanning out at both the bottom, where the arm is, and at the top of the hand.
This pattern is part of my Outlander collection – Outlander Pattern Library
Popular Patterns
- Knitted Arm Warmers (Celtic Cable Stitch Pattern)
- Highlander Arm Warmers Pattern
- Castle Leoch Cable Cuff Arm Warmers Pattern
- The Wedding Cable Knit Arm Warmers Pattern
- Simple Knit Arm Warmers Pattern (Je Suis Prest)
- Outlander Carolina Shawl Pattern
- Claire’s Rent Shawl Knitting Pattern
- Outlander Brianna Fingerless Gloves Pattern

The Outlander Claire’s Arm Warmers Design
Inspired by Claire Fraser wearing beautiful knitted pieces, the arm warmers are knit flat and then seamed.
I knit the left warmer first and reversed the pattern for the right because I wasn’t sure at first if I was going to leave a thumb hole or not.
I decided to seam them fully so that they can’t be worn as fingerless gloves.
There are also pattern instructions for knitting wrist warmers in the round.
It is seen below with the Sassench Tassel Shawl Knitting Pattern.
The Cable Knit Stitch – C24F
This pattern is for intermediate knitters, as the cable stitch is a little bit more complicated.
The cable itself is intertwined throughout the front piece of the wrist warmers with a stocking stitch flat piece on the underside of the arm/wrist.
The pattern may look a little daunting if you are a beginner who is looking to do something more intricate, but once you get into it, the cables become easy and you start to see it all take shape.
Cable Twists Explained
In the pattern you will see that the cable twists are knit forward – the abbreviation is – C24F.
A tip for remembering which way a cable will twist, either to the front or the back of the work is to think of this;
- The RIGHT way – these stitches are held behind – C24B
- The LEFT way – these stitches are held in the front – C24F

Cable Knitting Notes
In this pattern, you will see that both wrist warmers are knit with the cable to the front.
This abbreviation is explained below;
Left wrist warmer cable + Right wrist warmer cable
- C24F – (Cable 24 front) – Slip 12 stitches onto a cable needle and hold in front of work, (k2, P2) 3 times from the left needle, then (K2, P2) 3 times from the cable needle.
The pattern could also be altered to knit the right warmer with a C24B instead so that the cables are mirrored.
The abbreviation for this if you wanted to change the right wrist warmer would be;
- C24B – (Cable 24 back) – Slip 12 stitches onto a cable needle and hold at the back of work, (k2, P2) 3 times from the left needle, then (K2, P2) 3 times from the cable needle.

More Outlander Knitting Patterns
Whenever I watch Outlander, I just love to look at the costumes and see how beautifully they are pieced together.
Claire and Brianna’s costumes have motivated many knitters to make shawls, infinity scarves, and more throughout the five seasons that have aired so far.
I wanted to make a collection of knits that are inspired by both Claire and her daughter Brianna, from gloves, wrist warmers, and scarves.
Visit the Outlander Pattern Collection Ebooks in my shop below:

Resources and tutorials you may find helpful in following this pattern:
This pattern is great for any intermediate knitters.
- Knitting cast-on methods
- Knitting Lessons
- How to cast on knitting
- How to cast off knitting for total beginners (step by step)
- How to knit garter stitch
- How to knit the purl stitch (for beginners + a video tutorial)
- How to knit stockinette stitch (for beginners)
- How to read knitting patterns for beginners
- Knitting abbreviations and terms (US and UK)
- How to knit rib stitch
- You should be comfortable working cable stitches and using a cable needle.
- The mattress stitch – how to seam knitting
- How to knit – a complete beginner’s guide

Grab The Ad-Free Printable PDF Pattern Here
Could you share your work with us?
I love seeing your finished projects on social media.
If you enjoyed making the cable pattern, I’d love to see yours on Instagram, be sure to tag me @handylittleme.
If you are on Facebook, stop over to the Handylittleme Facebook Group and share a photo.
I’d love to see your work.
Happy knitting!
I am in love with this pattern, I am currently in the middle of the first arm warmer and LOVE the ribbed cabling.
Hi Claudia! Thank you so much for your comment, I am so happy you like the pattern 🙂
Absolutely love this! Have made a couple of pair for me and friends! Thank you!
Hi! Thank you for your comment, I am so happy that you like the pattern 🙂
I’m a little late to this pattern but it is hard. By the time I get to the second half of the cable (the dozen stitches held forward) I can barely get my needle in the loop it’s so tight. Am I doing this wrong?
Hello Beth, it is a little tight because of the number of stitches you need to cable, but it shouldn’t be so tight that you find it difficult to work from the stitches on the cable needle. Perhaps you are knitting too tightly and need to relax your tension when you work.
When you pull your yarn through the loop, it is really tempting to pull it as tight as you can to make sure that loop/stitch doesn’t slip off somewhere. As you knit along the cable row, your stitches are all tight, but in order to knit the cable, they must be loose enough to accommodate the needle.
Instead of tightening the yarn around your needle, try changing the position of the needles themselves, doing this can sometimes make a difference.
I hope that helps 🙂
Love this pattern as I do all outlander knitting. If I wanted to make a hole for the thumb how would I seam them up then ? Thanks in advance
Hello Karla, working from another pair of fingerless gloves I designed that do have a thumb hole in the side seam you can do the following:
Stitch the side seam using the invisible seam stitch.
Start by stitching the length of the wrist for 5 inches, leave a gap of 2 inches for the thumb hole and then stitch a further 2 inches to close the top of the mitts.
You can also measure the from the base of your thumb to where you want the gap to close on the arm warmers if you want to leave a shorter gap – say 1.5 inches.
I hope that helps! 🙂
Hi! I love your pattern! Am I able to knit in the round with my circular needles?
Hello Josely,
You could knit them in the round – the pattern may have to be adjusted in places but it is possible!
Any instructions that say to knit in stockinette stitch will just be knitting every round on circulars.
I hope that helps!
Louise
Not sure if you’re still responding to questions regarding this pattern, but do you have instructions for size large? The pattern shown if S/M. Thank you.
Hello Vikki,
You could add 2-4 stitches to the non-cable sections and increase the cast on by 4-8 stitches.
I hope that helps!
Louise