Outlander Brianna Fingerless Gloves Pattern
THIS ARTICLE CONTAINS AFFILIATE LINKS THAT SUPPORT HANDY LITTLE ME CONTENT AND FREE PATTERNS.This Outlander Brianna fingerless gloves pattern will allow you to create gloves knit in the round, and the finished mitts will look great made in any color.
I wanted to share another free knitting pattern inspired by the TV show Outlander.
The full pattern is free below, or you can purchase the ad-free printable PDF here.

Fingerless Gloves Worn By Brianna In Outlander
This design is inspired by the gloves Brianna wore with her capelet in Outlander season 4, episode 9, ‘The Birds and the Bees’.
They have a curled edge at the wrist, top of the hand, and on the thumb to resemble Brianna’s gloves in the image below.
Basic knowledge of knitting is all that is required for you to get started.

Outlander Brianna Fingerless Gloves Pattern
Purchase the inexpensive, ad-free, PDF printable pattern in my shop here.
See ALL of the Outlander Pattern Ebooks here.
Skill Level – Intermediate
Notes
The hand warmers knit up quickly, and the simple design makes for a relaxing and enjoyable knit.
The Brianna fingerless gloves are perfect for the colder weather, as they have been knit with medium-weight yarn (04), in Himalaya Everyday New Tweed, shade 75122 – olive green.
Using knit stitches, you will create an interesting design, knit in the round on circular needles, with the thumb gusset.
The thumb gusset is explained in the pattern and is easy to follow; knitting in the round, so you don’t have to pick up and knit stitches later; there is also no seaming.
You may also enjoy the men’s version of this pattern – Men’s Fingerless Gloves Knitting Pattern.

Size Information
Measurements
- Women’s small/medium/large. In patt – S (M/L)
- Length from wrist to top of hand – 12.5 inches
- Width (laying flat) – 3/3.5/4 inches
- Thumb – 2 inches
Gauge – 18 sts/24 rounds in 4 inches/10 cm/in stocking stitch.
Print + Stitch
Purchase the ad-free PDF pattern
Want a clean, printable version of this pattern? You can purchase the ad-free PDF in my shop. It’s perfect for printing, saving to your device, and making without distractions.
The Supplies You Need
Yarn
- 1 x 100g skein of any medium-weight yarn (04)/Aran/Worsted weight yarn/10 Ply.
- Yarn Weight Guide (+ Conversion Chart)
- I used Himalaya Every Day New Tweed in Olive Green 75122.
- Good Yarn Substitute – Cascade 220 in Forest Green 8267.
- Cascade 220 Heathers or Cascade 220 Superwash.
Needles
- 5 mm (US size 8) 9″ circular knitting needles (or 16″)
- Using the magic loop technique.
- (Tutorial – Magic loop knitting | step by step)
Notions
- Tape measure
- Darning needle/tapestry needle
- Scissors
- Stitch markers
- Stitch holder
Abbreviations
Knitting Abbreviations And Terms (US And UK)
- CO – cast on
- Cont – Continue
- K – knit
- M1 – Make 1 stitch
- St(s) – stitch(es)
- Rep – repeat
- PM – Place marker
Pattern Instructions
Outlander fingerless gloves – make 2 pieces.
The pair of fingerless gloves is knit in the round.
- CO 32 (34, 40) sts, pm and join in the round, being careful not to twist sts.
- You will use the magic loop technique to knit these gloves in the round.
- Knit every round until the piece measures 8 inches from the cast-on edge (or until you have the length you desire).
Thumb Hole
- K 15 (17, 19), PM, M1, K1, M1, pm, K 16 (16, 20). 34 (36, 42) sts
- Knit round.
- K 15 (17, 19) M1, K3, M1, K 16 (16, 20). 36 (38, 44) sts
- Knit round.
- K 15 (17, 19), M1, K5, M1, K 16 (16, 20). 38 (40, 46) sts
- Knit round.
- K 13 (14, 17), remove the marker and place 12 sts onto a stitch holder, CO 1 st, and K 13 (14, 17) to the end of the round. 39 (41, 47) sts in total, including the 12 on the st holder.
- Remove markers.
Hand
- Knit every round until the piece measures 3.5 inches from the thumb hole or until your desired length reaches the top of your hand.
- Cast off loosely.
Thumb
- Place the 12 sts from the stitch holder onto the needles.
- Pick up and knit 1 st from the CO edge.
- Knit every round until the thumb measures 2 inches.
- Cast off loosely.
Making up
Weave in any loose ends.
Place a stitch or two in the glove if there is a gap beside the base of the thumb.

Inspired By The Outlander Costumes
If you have been watching the Outlander TV series, in season four, you have probably noticed the beautiful costumes and knitted pieces that Claire’s daughter, Brianna, wears, including her olive-green fingerless mittens.
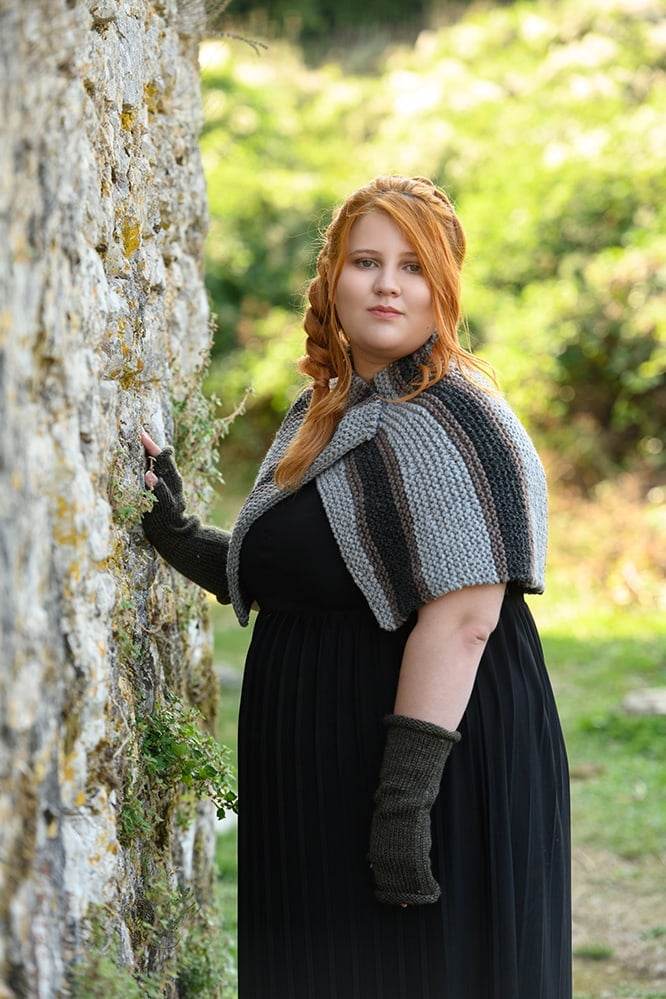
Brianna wears various knitted pieces, including a striped capelet and a simple garter-stitch infinity scarf.
They are also in many neutral colors, from shades of grey, olive greens, black, and brown.
Seen worn below with the Brianna Outlander Capelet, featuring short row shaping.
Related Post: Outlander Costumes – Including The Knitwear And More!
More Outlander Knitting Patterns
Whenever I watch Outlander, I just love looking at the costumes and seeing how beautifully they are pieced together.
Claire and Brianna’s costumes have motivated many knitters to make shawls, infinity scarves, and more throughout the four seasons that have aired so far.
I wanted to make a collection of knits that are inspired by both Claire and her daughter, Brianna.
- You can see more Outlander knitting patterns here – Outlander Patterns {Beginner + Intermediate}
- Grab the Ultimate Outlander Pattern Collection Ebook set in my shop here – The Ultimate Outlander Knitting Pattern Collection
- See more fingerless mitts here – Mittens + Gloves
- View the free crochet patterns here – Outlander Crochet Patterns
Popular Patterns
- Outlander Claire Carolina Fingerless Gloves Pattern
- Malva Christie Fingerless Gloves Pattern {Cable Knit}
- Fraser’s Ridge Fingerless Mittens Pattern
- Geillis Fingerless Gloves Pattern (Cable Knit)
- Celtic Cable Fingerless Gloves Pattern
- Red Jamie Cable Knit Fingerless Mittens Pattern
- River Run Fingerless Mitts Knitting Pattern
- Apothecary Outlander Fingerless Gloves Pattern
- Sassenach Chevron Mitts (Knitting Pattern)
- The Fraser Chevron Gloves (Knitting Pattern)
- Mist Of The Highlands Mitts (Knitting Pattern)

Helpful Resources
This pattern is great for any advanced beginner knitters.
- Knitting cast-on methods
- Knitting Lessons
- How to cast on knitting
- How to cast off knitting for total beginners (step by step)
- How to knit garter stitch
- How to knit the purl stitch (for beginners + a video tutorial)
- How to knit stockinette stitch (for beginners)
- How to read knitting patterns for beginners
- Knitting abbreviations and terms (US and UK)
- How to knit rib stitch
- How to join knitting in the round with circular knitting needles

Share Your Make
I love seeing your finished projects on social media.
If you enjoyed making the pattern, I’d love to see yours on Instagram, tag me @handylittleme or #handylittleme to be featured.
You can also join the Handy Little Me Outlander Facebook Group.
I’d love to see your work.
You can also find me on Ravelry and Pinterest.
Happy knitting!
I am finally getting around to starting these, and am already frustrated. 40 stitches of yarn at weight 4 on 16-inch, 5mm circulars is not enough to fit around and still be able to knit.
Did you have this issue? If yes, what was your solution? Did you just use DPNs instead?
I wonder if shorter-length circulars are a thing.
Hello, I worked on the 5mm circular needles/16″ cable just fine, pulling through the extra cable, when I knit (using the magic loop technique), as you are right, you cannot knit in the round on that size cable without having excess cable. You can use DPN’s if you prefer. I think you can buy 9″ circulars – but I think you would still have excess cable to pull through, with the number of stitches you need to cast on for this project. If you any further issues, please contact me, thanks for visiting and I hope that helps 🙂
I M also having difficulty with using circular needles. Will using the double pointed needles end up the same as knitting with a circular needle and how to proceed with the thumb?
Hello Suzanne,
Yes, using the double pointed needles will have the same result as using the circulars.
You will also use them for the thumb, dividing the stitches over three needles in order to knit that section.
I hope that helps!
Louise
Im a bit frustrated. I have small hands so I am using. 36: stitch cast on. Am following the pattern instructions for the decreased thumb hole but don’t get the point of placing markers. When I get to the last row of knitting 17 and placing 12 on a stitch holder the steps doesn’t seem to make sense. Is there suppose to be 12 stitches between the markers? If so the increases don’t addd up.
Hello Suzanne,
So for a 36 cast on, you would adjust the thumb hole instructions as follows:
K 17, pm, M1, K1, M1, pm, K 18 (38 sts)
Knit round
K 17, M1, K3, M1, K 18 (40 sts)
Knit round
K 17, M1, K5, M1, K 18 (42 sts)
Knit round
K 15, remove marker and place 12 sts onto a stitch holder, CO 1 st and K 15 to the end of the round.
Remove markers.
So you will be placing the 12 sts onto the stitch holder for the thumb. However if you want the thumb to be smaller then you can work this as follows:
K 16, remove marker and place 10 sts onto a stitch holder, CO 1 st and K 16 to the end of the round.
The markers are there to let you see where the thumb section is as you are working and making those increases.
I hope that helps!
Louise
I know it is an old thread but I am making them on 9” circular knitting needles and they are working perfectly.
hi I’m really excited to make these. I’m to the thumb hole part of the directions
I’m new to knitting in the round.
I am using the magic loop technique , so I divided my 40 stitches onto 20 on each needle.
I am confused about the thumb hole directions.
I knit 19, put in a place marker, made a stitch, knit my last (20th) stitch and made one more. Stitch.
What is my 20th stitch I’m supposed to knit?
Thanks for your help.
Hello Kim, I think if you are referring to this line in the pattern for the thumb – K 19, pm, M1, K1, M1, pm, K 20 – you knit 19 stitches, place a marker, make 1 stitch, Knit one stitch, make one stitch, place another marker and then knit the 20 stitches that are left on the other needle. I hope that helps you and if you have any further questions just send me an email or use the contact form and I will get back to you. Happy Knitting! 🙂
First of all, thanks for this lovely pattern. I am currently ~ 2in. into the glove and it seems like it’s too wide. Is this supposed to shrink as I go along? Thanks!
Hello Betty, thank you, I am happy that you like the pattern. The measurements of the gloves are in the pattern – if it seems too wide, you could cast on fewer stitches and adjust the stitch counts for the thumb and hand sections later on. For example, cast on 34 or 36 stitches and when you come to the thumb hole section instead of working K 19, pm, M1, K1, M1, pm, you can work (for CO 36sts) K 17, pm, M1, K1, M1, pm, K 18 and then adjust the other lines accordingly. I hope that helps! Thanks for visiting 🙂
I noticed you don’t have slip marker in the directions. For the 3 row of the thumb hole would you knit 19, slip marker, m1, k3, m1, slip marker, k20 or do you k19, slip marker, M1, k3, slip marker, M1, k20?
Hello Kenzie,
For row 3 of the thumb hole you will:
K 19, SM, M1, K3, M1, SM, K 20.
You will slip the marker when you come to it – you do not move it from its position.
The increases are happening within the area in between the markers, you will see the thumb section growing here.
I hope that helps!
Louise
I’ve got this pattern now your the greatest with all these Putlander patterns! Thank you!
Hello Vicky, I’m so happy you like them, I hope you enjoy the pattern 🙂
I would rather work flat knitting. I don’t like knitting in the round. can you make a pattern for straight/flat knitting?
Hello Cindy, at the moment I only have this pattern to be knit in the round. Thanks for the idea, perhaps in the future I will write it up to be knit flat also. Thanks for visiting! 🙂
Hello! I love this pattern and so far have been doing ok considering this is my first attempt with magic loop. i’m stuck on the thumb part though, do you have a video demonstrating the K 19, pm, M1, K1, M1, pm, K 20 part? After i knit 19, place a marker, make a stitch then knit a stitch, there’s nothing left on that needle. i’m not sure how to add a stitch at the end of the first needle. am i reading this wrong? thanks in advance!
Hello Jennifer,
Sorry I don’t have a video for the thumb section.
You would knit 19, place the marker, make 1 stitch, knit one and then make one stitch again, then place another marker, then knit 20.
You need to pick up and knit a stitch (M1) after you have K1 – this may be a little tricky because it is in the ‘join’ between the sections.
But you will be able to make one there – this is important for the thumb increases.
I hope that helps!
Louise
Hello. What does M1 mean? How do you “make one stitch”? Is that knitting? Is there a video that I can see this being done? Thanks
Hello Mary Kate,
When a knitting pattern instructs you to “M1” (make one) without specifying right or left, it’s usually asking for a basic increase stitch where you create an additional stitch.
In this case, you can use a neutral M1 method that doesn’t lean in a particular direction.
Here’s how to do it:
Insert your left needle under the bar between the two stitches from the previous row, lifting it onto your left needle.
This bar is the horizontal thread that runs between the stitches.
Knit through the back loop of this new stitch.
By knitting through the back loop, you twist the stitch, closing the hole and making the increase less noticeable.
This method is neutral and will not slant your stitches either to the right or left, making it a simple “make one” that works for any increase situation where direction isn’t specified.
I hope that helps!
Louise
I am sure making this harder than it is, but the CO1 is confusing me. Where is it placed in relation to the thumb stitches and the main body?
Hi Maria,
Thank you for your comment!
Don’t worry—you’re not alone in finding that part a bit tricky at first.
The CO1 (cast on 1 stitch) is worked to bridge the gap created when you place the thumb stitches on hold.
Here’s how it works:
After placing the thumb stitches onto a stitch holder, you’ll have a small gap where those stitches were.
The CO1 is added right after you move the thumb stitches onto the holder.
It is placed between the stitches of the main body to close that gap and ensure the glove continues seamlessly.
Think of it as creating a new stitch to stabilize the main body of the glove while the thumb section is left to be worked later.
Let me know if this clears things up or if you need further help—I’m happy to guide you through it!
Happy knitting,
Louise 😊
Under step 7 of the thumb hole, where it says to place 12 sts on a stich holder, does that mean to place 12 of the 13 you just knit? Or the 12 next sts on the other needle? This part is unclear. Thanks
Hello Emily,
You knit 13 (14, 17) stitches, remove the marker, then place the next 12 stitches onto the stitch holder.
These are the thumb stitches, which include those you have just increased.
I hope that helps!
Louise