How To Knit Using The Magic Loop Method – Tutorial
THIS ARTICLE CONTAINS AFFILIATE LINKS THAT SUPPORT HANDY LITTLE ME CONTENT AND FREE PATTERNS.The magic loop technique is a fantastic way to knit in the round, especially for smaller projects like socks, mittens, sweater sleeves, or the crown of a hat.
If you’ve struggled with double-pointed needles (DPNs) or find short cables too limiting, this great alternative allows you to work seamlessly with a long circular needle instead.
In this tutorial, you’ll learn the magic loop method step by step — with both a photo tutorial and a video tutorial to guide you.
Whether you’re an experienced knitter or just starting out, mastering this technique will open up new possibilities for your knitting projects.
Before You Get Started
Here are a few things to know before you begin:
- The magic loop knitting technique is ideal for small circumference knitting when you don’t have the right size circular needles or your cable length isn’t short enough.
- Instead of switching to DPNs, you can knit small tubes using a long cable — smoother, easier, and more efficient.
- It’s perfect for projects like socks, mittens, sleeves, crown of hats, baby booties, or small stuffed toys.
- A long circular needle (32 inches or longer) allows you to knit even the smallest circumferences without gaps.
- This results in even tension and a seamless finish for beautifully polished projects.
Video Tutorial: Learn The Magic Loop In Action
Watch the video tutorial to see the magic loop method in motion — this step-by-step demonstration will show you exactly how to cast on, knit, and continue working in the round using a long circular needle.
Tools/Materials Needed
- Long circular needle – at least 32″ in length (Addi Turbo or similar smooth cable needles are great).
- Yarn – any yarn recommended for your project, or any beautiful yarn you want to use to practice this technique. –
- Need help choosing a yarn? Check out this guide: Yarn Weight Guide (+ Yarn Conversion Chart)
- Your pattern – to determine the required stitch count.
How To Knit Using The Magic Loop Method
The magic loop allows you to knit small tubes in the round using one long circular needle.
Follow these simple steps of the magic loop tutorial to master the technique.
1. Cast on the required number of stitches.
Before you begin, make sure you have the right needle size and a flexible cable at least 32 inches long.
Cast on the required number of stitches for your project.
Make sure you have an equal number of stitches on the left needle and right needle tip for balanced knitting.
(For this tutorial, 18 stitches were cast on.)
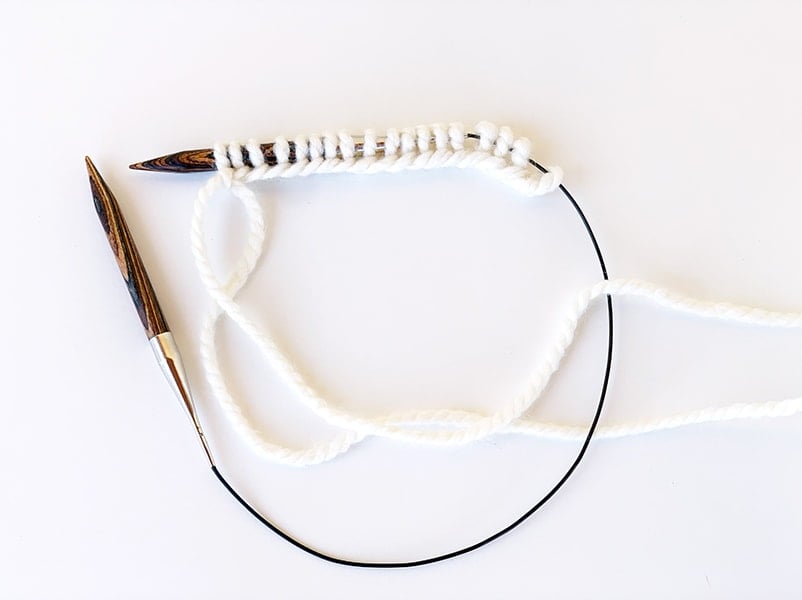
2. Divide the stitches.
Slide half of the stitches onto the front needle and the second half of the stitches onto the back needle.
Pull the center of the cable up to create a loop of cable sticking out on the left-hand side.

3. Arrange your stitches
Ensure the first half of the stitches are on the front needle and the back stitches rest on the side of the cord.

4. Arrange your yarn
Move your working yarn into position:
If knitting, keep it behind your work.
If purling, let it hang between the needles.

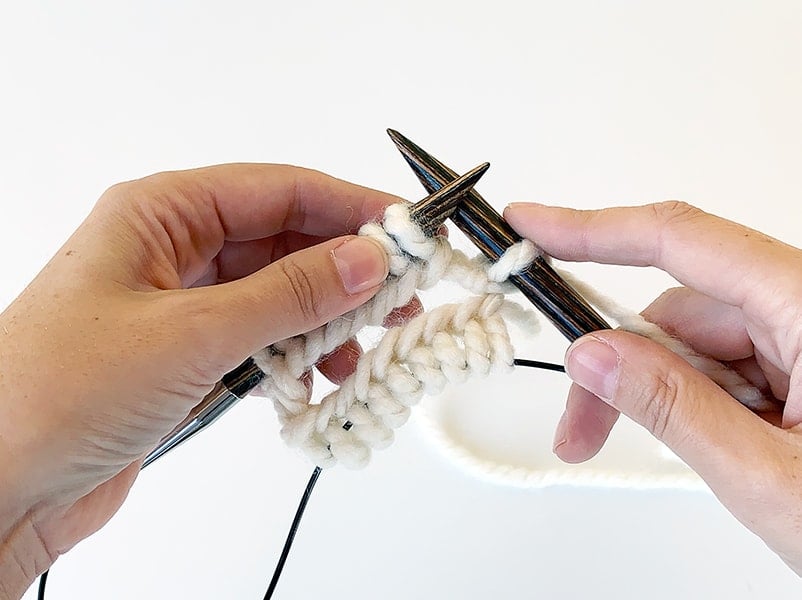
5. Knit the first stitch
Pull the back needle so that the stitches move onto the top of the needle.
Insert the right hand needle into the first stitch on the front needle and knit it.

6. Knit across the front needle
Continue knitting across the first round of stitches until you reach the last stitch.
7. Turn the work
Once you’ve knit across the first row of stitches on the left needle, turn your work.
The unworked stitches now facing you were previously on the right needle.
Pull the back needle (the one you just worked) so the completed stitches rest on the cable loop.
Then slide the unworked stitches onto the front needle.
Keep the working yarn to the back as you knit the next set of stitches.

8. Knit across the stitches
Bring the back needle around and knit the first stitch on the front needle.
Knit across all the stitches on the front needle.
When you’ve completed these sets of stitches, you’ve finished one full round.

9. Rotate and repeat
Turn your work so the unworked stitches are at the front.
Pull the back needle again, shifting the stitches forward.
Slide the next set of stitches into position on the front needle.
Repeat these steps to continue knitting small circumference projects in the round!

Why Use The Magic Loop Method?
The magic loop knitting technique is ideal for small circumference knitting when you don’t have the right size circular needles or if your cable length isn’t short enough.
Instead of switching to DPNs, you can knit small tubes with a long cable, making the process smoother and more efficient.
This method is perfect for:
- Knitting socks (especially the second sock)
- Mittens and fingerless gloves
- Sweater sleeves
- Hats – including decreasing at the crown of a hat
- Small items like baby booties or stuffed toys
With a long circular needle (usually 32 inches or longer), the loops of cable allow you to work even the smallest circumference without any gaps.
This results in even tension, fewer tension issues, and a seamless finish.
Projects To Practice The Magic Loop Method
Now that you’re comfortable with this technique, find your next knitting project below.
- Irish Moss Stitch Hat Pattern
- Free Sock Knitting Pattern (Easy + Simple For Beginners)
- Easy Mittens Knitting Pattern (Knit In The Round)
- Ribbed Beanie Knitting Pattern (Unisex Mariner’s Hat)
- Outlander Brianna Fingerless Gloves Pattern
Each of these knitting patterns benefits from the magic loop technique, helping you create seamless small items without tension issues.

FAQs & Extra Tips
1. Why not use a small circular needle?
While small circular knitting needles (like 9-inch circulars) are an option, they may not always work for smaller-diameter projects.
The magic loop provides more flexibility with needle length and ensures a comfortable grip — especially useful when knitting socks or mittens.
2. Are there other ways to knit small-diameter tubes in the round?
Yes! There are different ways you can use:
- Double-pointed needles (DPNs) – the traditional method.
- Two circular needles – divide your stitches across two cables.
- Short circular needles – good for some projects, but they can feel tight or awkward.
The magic loop method seems like a little trick, and it is often the favourite choice for seamless small projects because it’s easy, efficient, and versatile.
3. What are common magic loop mistakes?
Here are a few issues knitters often run into when learning the magic loop technique — and how to fix them:
- Twisted stitches — Always double-check that your cast-on stitches face the same direction before joining.
- Uneven tension or ladders — Keep a light but firm tension on the first two stitches after each needle change.
- Cable kinks or stiffness — Warm your cable in your hands or run it under warm water before knitting to relax it.
- Losing track of the start of your round — Always use a stitch marker or colored loop of yarn to mark your beginning.
4. How to avoid laddering with the magic loop?
Laddering happens when there’s a loose gap between the stitches at the cable bends.
To prevent it:
- Tug gently on the first two stitches of each needle after you switch sides — this tightens the join.
- Keep tension even throughout your knitting; don’t pull too tight or too loose.
- Shift your dividing point occasionally — instead of always changing sides at the same spot, move the split between front and back stitches every few rounds. This distributes any looseness and prevents visible ladders.
- Check your cable flexibility — a smooth, flexible cable (like Addi or ChiaoGoo) makes a big difference in maintaining even tension.
5. What is the difference between a magic circle and a magic loop?
These two terms sound similar but refer to different techniques:
- Magic Loop (knitting) – A method for knitting small circumferences in the round using one long circular needle. It’s used for projects like socks, mittens, sleeves, or hat crowns.
- Magic Circle (crochet) – A way to start crocheting in the round by forming an adjustable ring of yarn that can be pulled tight to close the center hole.
So if you see ‘magic circle’ in a knitting pattern, it’s likely a mix-up — that term is actually for crochet!
Final Thoughts
The magic loop method is a game-changer for small circumference projects, allowing you to
knit effortlessly with a long circular needle.
Whether you’re making sweater sleeves, socks, or mittens, this technique eliminates the hassle of short cables and double-pointed needles, making circular knitting much easier.
Try it out today, and let me know in the comments if this is your favourite method for knitting in the round!
Happy knitting!

More Knitting Tutorials & Free Patterns You May Like:
For more inspiration, find tons of free knitting patterns at Handy Little Me.
- 20+ Fall Oversized Knits (Sweater Knitting Patterns)
- How To Knit A Hat For Complete Beginners (+ Video Tutorial)
- How To Knit – A Complete Beginner’s Guide
- 20 Temperature Blanket Patterns (The Ultimate Guide)
- How To Knit A Hat With Circular Needles (Step-By-Step)
- 31 Free Baby Blanket Knitting Patterns (Easy Knit Blankets)
- How To Knit Baby Booties (Step-By-Step)
- Knitted Dog Sweater Pattern (3 Sizes)
- 12 Simple Knitting Stitches For Beginners
- How To PSSO In Knitting (Pass Slipped Stitch Over)
- What Is TBL In Knitting? (Knit Through The Back Loop)
- 37+ Patterns To Use Up Your Yarn Stash (Small Projects)
- Free Dog Sweater Knitting Pattern (Straight Needles)
- Super Easy Corner To Corner Baby Blanket Pattern (Knit)
- Easy Baby Sweater Knitting Pattern For Beginners
- How To Knit A Baby Hat (Straight Needles)
- Pumpkin Knitting Pattern (Beginner Friendly!)
- 8 Cable Stitch Knitting Patterns
- Free Knitted Heart Pattern (Easy + Quick Project)
How do you knit in pattern when you are using the magic loop method. Like if you have cables or knit two together. I hope I worded this correctly. Thanks so much for such beautiful patterns.
Hello Connie, knitted cables in the round are similar to cables knitted flat, except that the right side of the cable is always facing you as you stitch. Converting cable rows to cables in the round requires just a few simple changes.
Remember that when knitting in the round, there are no wrong-side rows; all rows are right-side rows facing you as you knit. Therefore, all the right-side rows of the chart or written instructions are worked as they are written; all wrong-side rows will need to be converted to in-the-round knitting.
To convert a wrong-side row, remember that all purls worked on the wrong side become knit stitches, while all knit stitches worked on the wrong side become purl stitches.
I think this will probably need more explaining, so I plan to create a blog post for this in the future.
As for K2tog – you would knit the two stitches together as you would if you were working on straight needles.
I hope that helps 🙂
Thank you.
Hi Louise,
Is there any benefit to knitting the magic loop over using the four needle method?
Thank you,
Hello Melissa,
It’s mostly a matter of preference, some people find using circulars and the magic loop technique more comfortable than using DPNs.
I do, I could never feel comfortable using DPNs and much prefer using my circular needles for everything, even knitting flat (not in the round).
If you’re good at maintaining tension the only downside of using DPNs in the round is managing extra needles.
If you’re not so good at keeping an even tension, the magic loop technique tends to be easier.
I hope that helps!
Louise