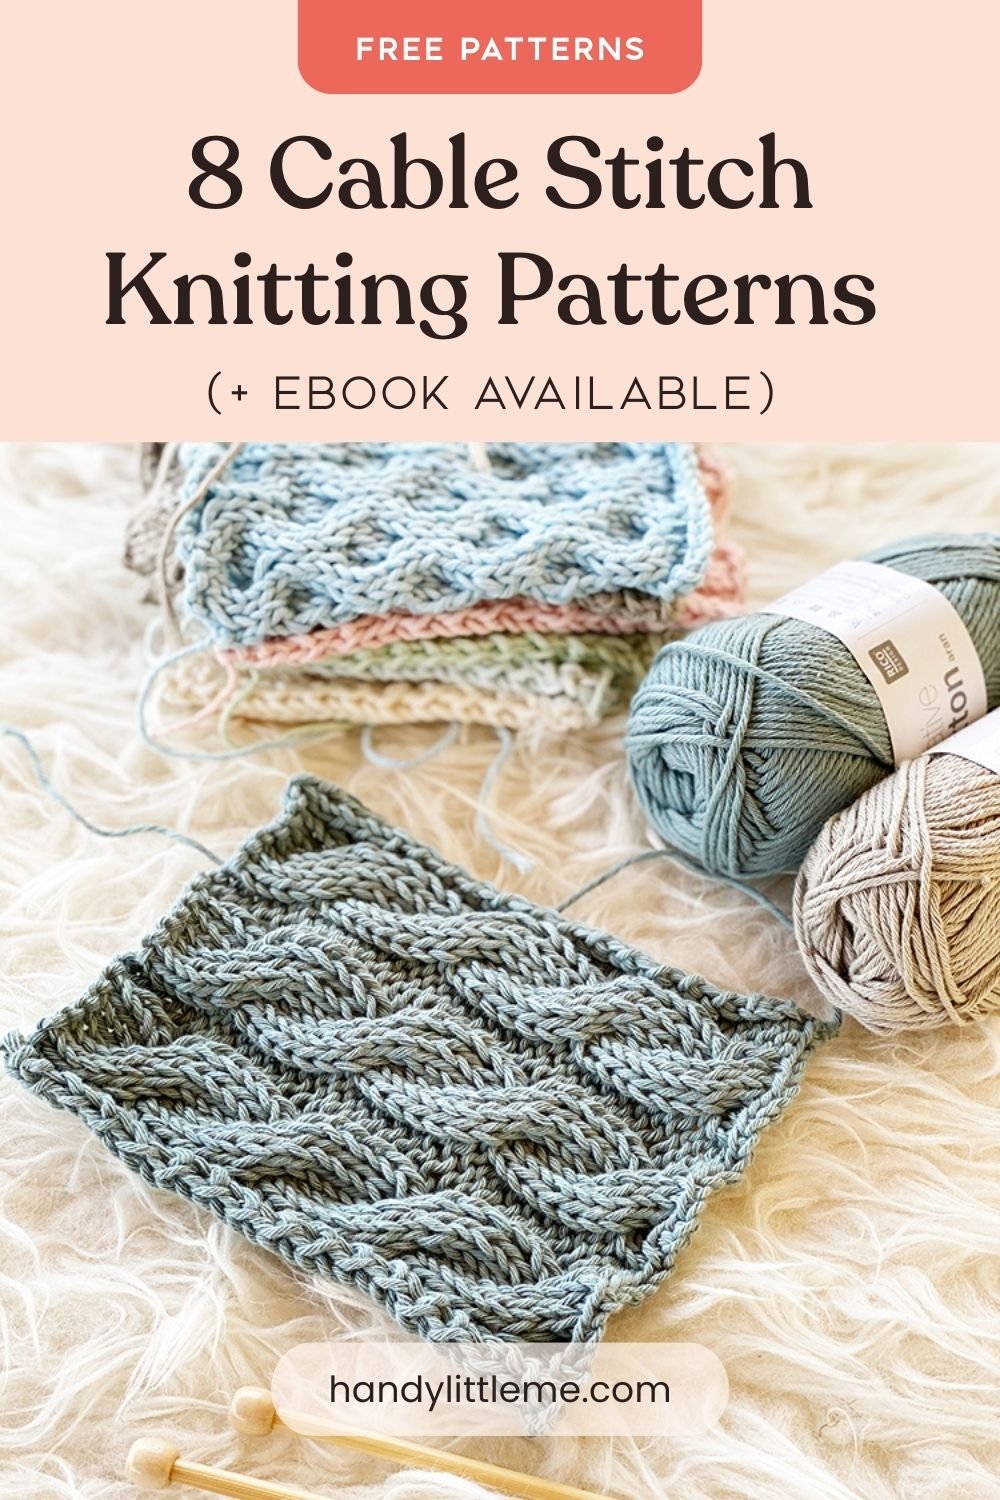
8 Cable Stitch Knitting Patterns
THIS ARTICLE CONTAINS AFFILIATE LINKS THAT SUPPORT HANDY LITTLE ME CONTENT AND FREE PATTERNS.In this post, you’ll find 8 cable stitch knitting patterns, from simple beginner cables to more textured, intermediate twists.
Plus quick tips to help you read cable instructions and get neat, consistent results.
You’ll practice the most common cable moves used in sweaters, hats, scarves, mittens, and blankets, so once you’ve swatched these, you’ll recognize them everywhere.
New to cables? Start with the easiest pattern first, use a cable needle, and focus on keeping your tension even before you speed up.
View the free patterns below, or grab your printer-friendly, ad-free PDF Ebook here.

Cable Knitting
From a newbie knitter to the more advanced, knowing how to knit cables can make your knitting projects more interesting.
Mastering these stitches will allow you to explore various cable designs and add texture to your projects.
Many of these stitches are used repeatedly in sweaters, cardigans, accessories, and blankets.
8 Cable Stitch Knitting Patterns
The instructions below outline eight cable stitch patterns.
Advanced beginner knitters will be ready to move on to trying out cables and twists.
Practicing a cable-knitting pattern will give you a better understanding of how to add interesting texture to your work.
The front of your work will show the cable set of stitches; this will be the right side.
The back of your work will not be the same as the front, as these patterns are not reversible.
Abbreviations
Knitting Abbreviations And Terms (US And UK)
- CO – Cast on
- Cont – Continue(ing)
- C4B – (K2 and 2) – slip the next 2 sts onto a cable needle and hold at the back of the work, K2 from the left-hand needle, then knit the 2 sts from the cable needle.
- C4F – (K2 and 2) – slip the next 2 sts onto a cable needle and hold at the front of the work, K2 from the left-hand needle, then knit the 2 sts from the cable needle.
- C6B – (K3 and 3) – slip the next 3 sts onto a cable needle and hold at the back of work, K3 from the left-hand needle, then knit the 3 sts from the cable needle.
- C6F – (K3 and 3) – slip the next 3 sts onto a cable needle and hold at the front of work, K3 from the left needle, then knit the 3 sts from the cable needle.
- K – Knit
- P – Purl
- Rep – Repeat
- St(s) – Stitch(es)
Please note…
Where it says to work each stitch in the manner it presents, this means to knit the knit stitches and purl the purl stitches.
Print + Stitch
Purchase the ad-free PDF eBook
Want a clean, printable version of these patterns? You can purchase the ad-free PDF eBook in my shop. It’s perfect for printing, saving to your device, and making whenever you’re ready.
Supplies
- 5.5 mm (US 9) Knitting Needles.
- Cable Needle.
- Yarn – Rico Creative Cotton Aran
Tip 1 – If you don’t have a cable needle, use a double-pointed knitting needle instead.
Tip 2 – You can also use any yarn weight (for example, dk weight yarn, aran weight yarn, or bulky yarn) and size mm needles to practice these examples.
Tip 3 – You can use any cast-on method, but I recommend using the long-tail cast-on method.

1. 4-Stitch Cable (To The Right)
- For symmetry, work on a multiple of 7+3 sts + 1 edge st on each side.
- I cast on 25 sts for the sample.
- 1st row (right side of work): K1 (edge), *P3, K4*, rep from * to * to last 4 sts, P3 then K1 (edge).
- 2nd, 3rd, 4th, and 6th rows: Work each st in the manner that it presents.
- 5th row: K1 (edge), *P3, C4B* rep from * to * to last 4 sts, P3, then K1 (edge).
- These last 6 rows form the pattern.

2. 4-Stitch Cable (To The Left)
- For symmetry, work on a multiple of 8 sts + 1 edge st on each side.
- I cast on 26 sts for the sample.
- 1st row (right side of work): K1 (edge), *P2, K4, P2, rep from * to * to last st, K1 (edge).
- 2nd, 3rd, 4th, and 6th rows: Work each st in the manner that it presents.
- 5th row: K1 (edge), *P2, C4F, P2* rep from * to * to last st, then K1 (edge).
- These last 6 rows form the pattern.

3. 6-Stitch Twisted Cable (To The Right)
- For symmetry, work on a multiple of 9+3 sts + 1 edge st on each side.
- I cast on 32 sts for the sample.
- 1st row (right side of work): K1 (edge), *P3, K6*, rep from * to * to last 4 sts, P3 then K1 (edge).
- 2nd, and 4th rows: Work each st in the manner that it presents.
- 3rd row: K1 (edge), *P3, C6B* rep from * to * to last 4 sts, P3, then K1 (edge).
- These last 4 rows form the pattern.

4. 6-Stitch Twisted Cable (To The Left)
- For symmetry, work on a multiple of 9+3 sts + 1 edge st on each side.
- I cast on 32 sts for the sample.
- 1st row (right side of work): K1 (edge), *P3, K6*, rep from * to * to last 4 sts, P3 then K1 (edge).
- 2nd, 3rd, 4th, 5th, 6th, and 8th rows: Work each st in the manner that it presents.
- 7th row: K1 (edge), *P3, C6F* rep from * to * to last 4 sts, P3, then K1 (edge).
- These last 8 rows form the pattern.

5. 6-Stitch Cable (To The Right)
- For symmetry, work on a multiple of 9+3 sts + 1 edge st on each side.
- I cast on 32 sts for the sample.
- 1st row (right side of work): K1 (edge), *P3, K6*, rep from * to * to last 4 sts, P3 then K1 (edge).
- 2nd, 3rd, 4th, 5th, 6th, and 8th rows: Work each st in the manner that it presents.
- 7th row: K1 (edge), *P3, C6B* rep from * to * to last 4 sts, P3, then K1 (edge).
- These last 8 rows form the pattern.

6. 6-Stitch Cable (To The Left)
- For symmetry, work on a multiple of 9+3 sts + 1 edge st on each side.
- I cast on 32 sts for the sample.
- 1st row (right side of work): K1 (edge), *P3, K6*, rep from * to * to last 4 sts, P3 then K1 (edge).
- 2nd, 3rd, 4th, 5th, 6th, and 8th rows: Work each st in the manner that it presents.
- 7th row: K1 (edge), *P3, C6F* rep from * to * to last 4 sts, P3, then K1 (edge).
- These last 8 rows form the pattern.

7. 12 Stitch Cable
- This pattern is shown on 20 sts.
- 1st (right side of work) and 5th rows: Knit.
- 2nd and every alternate row (4 and 6): Work each st in the manner that it presents.
- 3rd row: C6B (K3 and 3), C6F (K3 and 3).
- These last 6 rows form the pattern.

8. Cells
- For symmetry, work on a multiple of 8sts +1 edge sts on each side.
- For this swatch, I cast on 34 sts
- 1st (right side of work) and 5th rows: knit all sts.
- 2nd and every alternate row: work each st in the manner it presents.
- 3rd row: K1 (edge) *C4B, C4F, rep from * to last st, K1 (edge).
- 7th row: K1 (edge), *C4F, C4B, rep from * to last st, K1 (edge).
- These last 8 rows form the pattern.

E-Books
Grab your inexpensive, ad-free, PDF printable pattern ebook in my shop here.
You may also be interested in this ebook – 12 Simple Knitting Stitches For Beginners.
More Cable Knitting Patterns
As well as being able to knit cable stitches, you may also want to learn how to read a knitting chart, as many cable designs come with a chart.
To start putting your cable stitches into use, here are a few patterns you may want to look at (including chunky cables):
- 31+ Free Cable Stitch Patterns To Knit (+ Tutorials)
- Knitting Cables In The Round (A Beginners Guide)
- How To Knit The Staghorn Cable Stitch
- One Skein Knit Hat Pattern (Easy Quick Simple Cable)
- Men’s Aran Sweater Knitting Pattern
- Free Cable Mittens Knitting Pattern (Classic Knit)
- Geillis Fingerless Gloves Pattern (Cable Knit)
- Cable Shrug Knitting Pattern (Outlander Inspired)
- Celtic Cable Fingerless Gloves Pattern
- Chunky Cable Knit Blanket Pattern
- Baby Beanie Hat Pattern (Cable Knit)

Cable Knitting FAQ
What is a cable knit pattern?
A cable knit pattern creates raised twists that look like ropes or braids.
You make cables by temporarily holding a few stitches to the front or back (often on a cable needle) and then knitting the next stitches before you return to knit the held stitches.
As a result, the way you position those held stitches determines the direction of the twist, so the cable will lean left or right depending on whether you hold them in front or behind.
Does cable knitting use more yarn?
Usually only a little.
Cables add depth and can tighten the fabric, so heavily cabled designs may need slightly more yarn than plain stockinette.
The best way to estimate is to swatch the cable pattern, measure your gauge, and follow the yardage given in your project pattern (or add a small buffer if the fabric is densely cabled).
Do I need a cable needle?
Not always.
A cable needle is helpful for beginners, but many small cables can be worked without one once you’re confident in holding stitches briefly.
Related Post: Learn To Cable Without A Cable Needle: Written Steps + Video Picks
What do C4F and C4B mean?
They’re common abbreviations for crossing 4 stitches: front (C4F) or back (C4B), which changes the direction the cable leans.
Related Post: How To Knit A Simple Cable Pattern (+ Video Tutorial)
Why do my cables look loose?
Loose cables usually come from slack at the crossing.
Try snugging the first stitch after the cross and keeping a consistent tension on the held stitches.
What’s the easiest cable stitch to start with?
A simple 2/2 or 3/3 cable (small stitch count, repeating crosses) is usually the best “first cable.”
Share Your Work With Us…
I love seeing your finished projects on social media.
If you enjoyed making the easy cable knitting patterns, I’d love to see yours on Instagram, tag me @handylittleme.
If you are on Facebook, stop over to the handylittleme Facebook group and share a photo.
I’d love to see your work.
Happy Knitting!
Helpful Resources
- Knitting cast-on methods
- Knitting Lessons
- How to cast on knitting
- How to cast off knitting for total beginners (step by step)
- How to knit garter stitch
- How to knit the purl stitch (for beginners + a video tutorial)
- How to knit stockinette stitch (for beginners)
- How to read knitting patterns for beginners
- Knitting abbreviations and terms (US and UK)
- How to knit rib stitch
- How to substitute yarn in a knitting pattern
- Knitting Skill Levels Explained
- How To Knit – A Complete Beginner’s Guide
More Patterns You May Be Interested In…
- How To Knit A Hat For Complete Beginners (+ Video Tutorial)
- 20 Temperature Blanket Patterns (The Ultimate Guide)
- 31 Free Baby Blanket Knitting Patterns (Easy Knit Blankets)
- How To Knit Baby Booties (Step-By-Step)
- Knitted Dog Sweater Pattern (3 Sizes)
- 12 Simple Knitting Stitches For Beginners
- How To Knit The Diamond Cable Stitch (Free Stitch Pattern)
- 37+ Patterns To Use Up Your Yarn Stash (Small Projects)
- Free Dog Sweater Knitting Pattern (Straight Needles)
- Super Easy Corner To Corner Baby Blanket Pattern (Knit)
- Easy Baby Sweater Knitting Pattern For Beginners
- How To Knit A Baby Hat (Straight Needles)
- Pumpkin Knitting Pattern (Beginner Friendly!)
- How To Knit A Hat With Circular Needles
- Free Knitted Heart Pattern (Easy + Quick Project)
- 20+ Fall Oversized Knits (Sweater Knitting Patterns)
- Bookmark Knitting Pattern (Celtic Cable)
- Ribbed Beanie Knitting Pattern (Unisex Mariner’s Hat)

how do you do a turn in a cable using just three stitches? the pattern says to put 2 stitches on a cable needle and hold behind then knit the next stitch, p, knit the two stitches off the cable needle. I’m making a fisherman’s sweater and I have 131 cast on stitches I tried doing what it says but then I don’t have enough stitches for the rest of the pattern. It’s that p stitch in the cable that is screwing things up. The next row at the same place as the cable has only 3 stitches. This cable cluster is call CB3 It is in the first row after the waist band so if I don’t get it right the whole sweater will be off. if I take the two stitches and hold them behind on the cable needle, then knit the next stitch, then p the next stitch I would need 132 stitches, but all the other rows use the 131 stitches I have cast on. If I take the two stitches and put them on the cable needle and hold them behind and knit the next stitch then purl that same stitch I have increased a stitch and have one two many stitches for the next row. Please help me figure this out. The whole rest of the pattern say P1 or Purl 8 this part of the pattern just says purl. It is very confusing.
Hello Cindy,
When you knit C3B, this is right-leaning cable/cable 3 back.
C3B means you’ll be twisting 2 stitches over 1 stitch in a cable knit.
The number 3 stands for how many stitches there are in total in the cable.
You can place one stitch onto a cable needle and place it at the back of the work, then knit the next two stitches on the left-hand needle, then place the stitch you had on the cable needle back onto the left-hand needle, and then knit that stitch.
This creates a cable twist.
As for your pattern instructions, perhaps contact the pattern designer?
I hope that helps!
Louise
Hi, Louise,
I love your knitting blog, and really enjoy your patterns! I bought your Men’s Cable Knit Aran Sweater a couple years ago, and it turned out great! My husband loves it! I just wondered if you might have a hat pattern to match in the same yarn? I have leftover yarn and my husband would like a matching hat and scarf.
Thanks again!
Laura
Hello Laura,
Thank you so much for your kind words, I’m so happy you like the blog and patterns.
Sorry I don’t have a hat or scarf pattern to match the Aran sweater.
You can view all of the men’s patterns I have here – https://www.handylittleme.com/category/knitting/mens-knitting-patterns/
Happy knitting!
Louise
I want some clarification on “work each st in the manner it presents.” I have heard different things on what it means, so does it mean knit on the knit and purl on the purl, or does it mean something different? I also had a question where the holding the cable needle for front and back of the work. Is front closer to the body or away? And vice versa for back. Thanks
Hello Autumn Rain,
Yes ‘work each stitch in the manner it presents‘ means to knit the knit stitches and purl the purls.
When you hold the cable needle to the front of the work, it will be placed with the stitches in front, it hangs in the front (the normally the right side of the work) towards your body.
When you place the cable needle to the back, it hangs over the back of the work (normally the wrong side of the work) away from your body.
I hope that helps,
Louise
I am not sure how you derive 32 sets from a multiple of 9 + 3 sts plus 1 st edge? I would think that would be 31. What am I missing here?
Hello Michelle,
There is another edge stitch – as there are 2 edge stitches, one on each side.
9+3 sts + 1 edge st on each side.
I hope that helps,
Louise