Knitting Cables In The Round (A Beginners Guide)
THIS ARTICLE CONTAINS AFFILIATE LINKS THAT SUPPORT HANDY LITTLE ME CONTENT AND FREE PATTERNS.In this blog post, you will see knitting cables in the round – a beginner’s guide.
Knitting cables in the round may seem complicated, but it is similar to knitting them flat.
The main difference is that in the round, the right side of the work is always facing you as you work.
This post will explain how you can convert a cable knitting pattern from knitting flat on straight needles to knitting in the round.
Save this article
Enter your email address and we'll send it to your inbox.
By entering your email, you agree to receive patterns, tutorials, and updates from Handy Little Me. Unsubscribe at any time.
Cable Knitting Patterns
First, choose a cable knitting pattern that is knit flat like one of the below:
- Regency Red Cable Knit Fingerless Gloves Pattern
- Geillis Fingerless Gloves Pattern (Cable Knit)
- Craigh na Dun Fingerless Mittens Knitting Pattern
- Lallybroch Fingerless Mittens Knitting Pattern
- Red Jamie Cable Knit Fingerless Mittens Pattern
- River Run Fingerless Mitts Knitting Pattern
- Herb Garden Cable Knit Mittens Pattern
Get Your Materials
Second, grab the materials you need:
- Notebook/pen/pencil
- Yarn weight needed for the pattern
- Circular knitting needles/DPNs (Double Pointed Needles), the size needed for your pattern
- Cable needle
- Scissors
- Stitch markers
- Tape measure

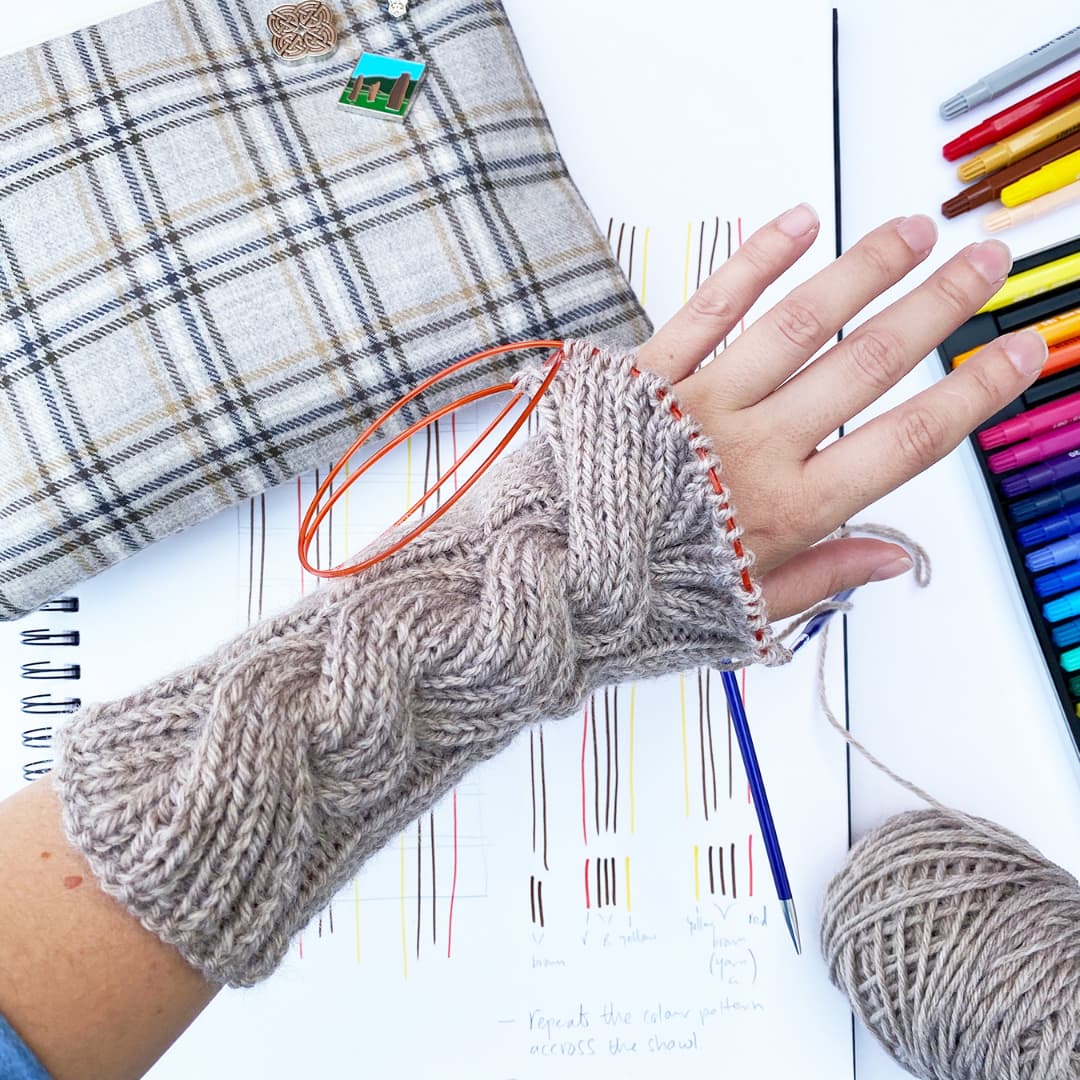
Knitting Cables In The Round
- Read through your pattern
Read through your chosen pattern and check the cable repeat pattern.
See if the pattern includes written instructions, a chart, or both.
- Change the cable repeat pattern
When changing the flat knit cable repeat rows, you can rewrite them in your notebook to follow them easily when knitting in the round.
When knitting in the round there are no wrong side rows, every row is the right side.
This means that the pattern’s right-side rows (RS) will stay the same.
You will only need to change the wrong side rows (WS).
To convert a wrong side row, change all the knit stitches to purl stitches and all the purl stitches to knit stitches.
- Time to cast on and join in the round
Cast on the number of stitches given in your pattern on your circular needles or DPNs and join the stitches to knit in the round.
You will work the first row – the RS right side row as it is written in your pattern.
Work the setup rows you need to work on before the cable, changing any stitches on the WS rows (See step 2 if you need help).
- Knit the cable
Knit the cable row in your pattern.
For example, if you are working a C4B – cable 4 back, you would slip 2 sts onto your cable needle and hold it at the back of the work.
Then, knit the 2 sts on the left-hand needle, with the CN (cable needle) at the back of the work.
Bring the cable needle to the front of the work and knit the 2 sts on that.
Complete the rest of the row according to your pattern (this will be a right side row). - Example – Cable knit flat
In this example, I will use Outlander Claire’s Cable Knit Wrist Warmers Pattern.
This is the first cable pattern knit flat on two needles:
Cable 1
1. K2, P2, C24F, K 24
2. P 24, K2, P2 to end of row
3. K2, P2 – 28sts, K 24
4. P 24, K2, P2 to end of row
5. K2, P2 – 28sts, K 24
6. P 24, K2, P2 to end of row
7. K2, P2 – 28sts, K 24
8. P 24, K2, P2 to end of row
- Example – Cable converted to knit in the round
This is the first cable pattern converted:
Cable 1
1. K2, P2, C24F, K24.
2. K2, P2 – 28 sts, K 24 sts.
Rep round 2 – 6 more times.
- Conclusion
If the pattern is written for knitting cables in the round, just follow the instructions as they are.
If the pattern you have is for knitting cables flat on straight needles and you want to convert to knitting in the round, then change the wrong side rows – knit stitches become purl stitches, and purl stitches become knit stitches.
If the instructions say that you should knit the knit stitches and purl the purls – then you can follow those pattern instructions without making any changes, for the cable stitches will be knit while the background stitches are purled.


Resources and Tutorials
You may find the following resources helpful:
Knitting Lessons
If you are a new knitter and need help with the knitting basics, check out these posts here and be your own knitting instructor – Knitting Lessons (With Video Tutorials).
There, you will find step-by-step tutorials for all the different knitting techniques a newbie needs to know.
Including how to cast on, how to bind off, how to knit the basic stitches, how to knit the knit stitch, how to knit the purl stitch, the stockinette stitch, ribbing, the garter stitch, the mattress stitch, short rows, how to yarn over, how to measure gauge, how to pick up dropped stitches, and a list of knitting abbreviations (UK + US terms), and more.
For easier projects, check out this pattern category.
There, you will find a range of free patterns- Beginner Knitters
And if you need more video tutorials to help you practice your basic knitting skills, check out my YouTube channel here – Handy Little Me – YouTube.
Could you share your work with us?
I love seeing your finished projects on social media.
If you enjoyed making this tutorial, I’d love to see yours on Instagram, be sure to tag me @handylittleme.
If you are on Facebook, stop over to the Handylittleme Facebook Group and share a photo.
You can also check out my Facebook page here.
You can also find us on YouTube, Pinterest, Ravelry, and Twitter.
I’d love to see your work.
Happy Knitting!
Everything You Need To Know About Cable Knitting
What is knitting in the round?
Knitting in the round is a technique where stitches are joined in a continuous loop, creating a seamless and tubular fabric.
Unlike flat knitting, which involves turning the work at the end of each row, knitting in the round is typically done using circular needles or double-pointed needles.
This method is commonly employed for creating cylindrical objects such as hats, socks, and sleeves, as well as for larger projects like sweaters and blankets.
The absence of seams in circular knitting eliminates the need for stitching pieces together, resulting in a more streamlined and polished finished product.
It offers efficiency in working on projects without purl rows and allows for incorporating various stitch patterns, including cables and intricate lace designs.
Knitting in the round is a versatile technique that offers both practical and aesthetic advantages in the creation of a wide range of garments and accessories.
Related Post: How To Join Knitting In The Round With Circular Knitting Needles
Can you knit cables in the round?
Yes, it is absolutely possible to knit cables in the round.
When working on a circular knitting project, such as a hat or a sweater, the technique for knitting cables remains the same as in flat knitting.
The key difference is that, in the round, you don’t need to turn your work at the end of each row.
Cable patterns are typically worked over a specified number of stitches, and you follow the cable chart or written instructions, crossing stitches to create the desired cable twists.
Pay attention to any adjustments needed for the specific project, like ensuring that cable crossings occur on the right side of the work, and be mindful of the overall stitch count to maintain the pattern integrity.
Knitting cables in the round adds a wonderful texture and visual interest to your seamless, circular projects, creating a distinctive and engaging design.
How do you prevent ladders when knitting cables?
It’s crucial to maintain consistent tension throughout the cable section to prevent ladders when knitting cables.
After completing a cable twist, ensure that the first stitch following the twist is tightened to eliminate any slack.
If using a cable needle, be mindful of the tension when transferring stitches, avoiding excessive looseness.
Choosing the appropriate size of cable needle, practicing good stitch management on regular needles, and experimenting with tensioning techniques can also contribute to preventing ladders.
Additionally, using a circular needle may help distribute the weight evenly, and blocking the finished project can even out tension and reduce the appearance of ladders.
Through practice and experience, knitters can develop their strategies to achieve a smooth and ladder-free cable knitting experience.
Related Post: How To Pick Up A Dropped Knit Stitch
What type of yarn is best for cables?
The best type of yarn for cables is typically one with good stitch definition and a balanced blend of fibers.
Animal fiber yarns that showcase the intricate twists and turns of cables effectively are those with a smooth texture, such as merino wool, alpaca, or a blend of wool and silk.
Worsted weight yarns are often preferred for cable projects as they strike a balance between providing enough structure for the cables to stand out and not being too bulky.
Additionally, choosing smooth yarns with some elasticity can be beneficial for accommodating the compression and expansion of stitches during cable crossings, helping to maintain a well-defined cable pattern.
Learn everything about the different yarn weights here, including (worsted yarn, chunky yarn, super bulky yarn, and more) – Yarn Weight Guide {+ Conversion Chart}
Learn everything about yarn fibers here – Yarn Types Explained: A Guide To Different Fibers
Can you knit all the cable stitches in the round?
Yes, you can certainly knit all types of different cable stitches in the round.
Knitting different cables in the round is a common and versatile technique.
How to read a cable knitting chart in the round?
Reading a cable knitting chart in the round is essential for successfully navigating intricate cable patterns.
In a cable chart, each square represents a stitch, and the symbols or cables are depicted within the grid.
Typically, the chart is read from bottom to top, with each row corresponding to a round in circular knitting.
The right side of the chart usually represents the stitches facing you, and the left side represents the back of the work.
Pay attention to key symbols or legends provided on the chart that indicate the types of cable crosses and any special stitches.
As you work in the round, remember that every round is treated as a right-side (RS) round in terms of cable crossings.
Additionally, be aware of any repeats in the chart and ensure you follow them consistently.
Practice interpreting cable charts on simpler patterns before attempting more complex designs to build confidence and proficiency in reading charts for circular cable knitting.
Can you knit a mock cable stitch in the round?
Yes, you can knit a mock cable stitch in the round.
Mock cables are a way to create the look of cables without actually crossing stitches.
They are often simpler and more beginner-friendly than complex cables.
Mock cables can vary in complexity, and there are different techniques to achieve the faux cable look.
A good idea is to experiment with different stitch combinations and techniques to find the mock cable style that suits your project.
Always follow the specific instructions provided in your pattern if you are working from one.
Does cable knitting use more yarn?
Cable knitting itself does not inherently use more yarn than other knitting techniques.
The amount of yarn required for a knitting project depends on factors such as the stitch pattern, gauge, and overall design.
While cables introduce texture and depth to the fabric, they typically don’t consume significantly more yarn than, for example, a plain stocking stitch.
However, it’s important to note that the gauge may change slightly when working cable patterns, and individual stitch motifs can affect the overall yardage needed.
Hi. I just need some clarification. In your instructions knitting the cable you say:
R1: K2-P2-C24F-K24. That is clear but in round 2 you say: K2-P2-28 stitches… are the 28 stitches also purl stitches ?
Thanks
Hello Uta,
For the flat knit cable – In round 2 – you will Purl 24 stitches then K2, P2 to the end of the row.
You will work in 2×2 ribbing for the last part of the row.
For the cable in the round – in round 2 you will K2, P2 for 28 stitches (this means working in 2×2 ribbing for 28 stitches) then you will knit 24 stitches.
I hope that helps!
Louise