Herb Garden Cable Knit Mittens Pattern
THIS ARTICLE CONTAINS AFFILIATE LINKS THAT SUPPORT HANDY LITTLE ME CONTENT AND FREE PATTERNS.The herb garden cable knit mittens pattern is perfect for anyone who loves to knit cables!
The pair of mittens are knit flat, featuring a 5-stitch cable with a bobble design.
The thumb section is then knit in the round.
Scroll down for the free pattern or you can purchase a printer-friendly, ad-free PDF here.

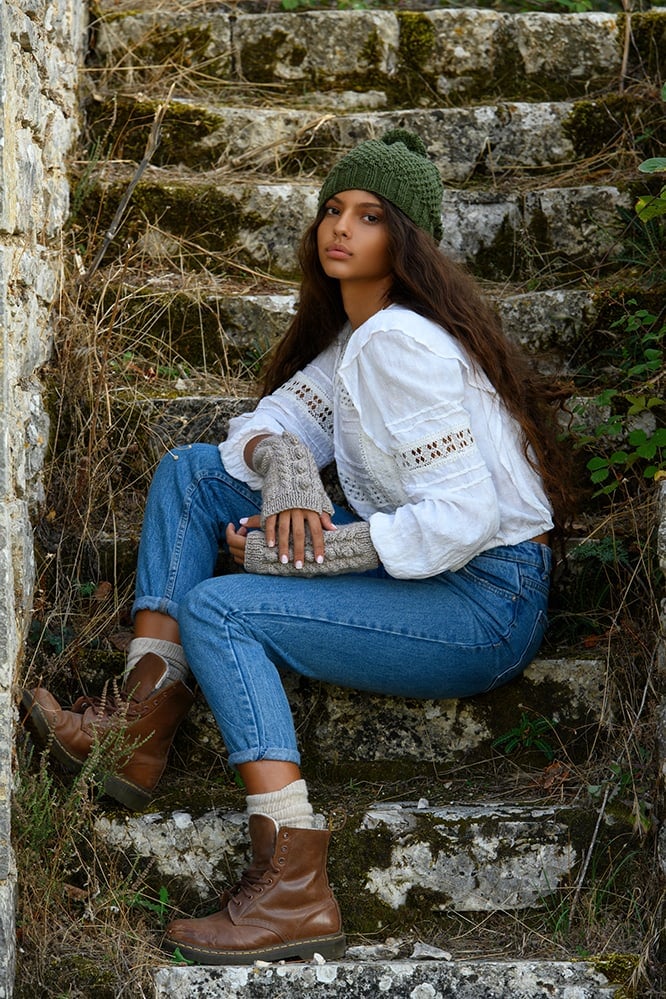
Cable-Knit Gloves
The fingerless mitts design has more texture as they are knitted using a cable repeat with bobbles.
You can knit them with the thumb or without so they can be worn in a number of ways, from fingerless gloves to arm warmers.
You can see more fingerless mitts patterns here –
- Craigh na Dun Cable Fingerless Mittens Knitting Pattern
- Lallybroch Fingerless Mittens Knitting Pattern
- Apothecary Outlander Fingerless Gloves Pattern
- River Run Fingerless Mitts Knitting Pattern
- Red Jamie Cable Knit Fingerless Mittens Pattern

More Outlander Knitting Patterns
The Outlander costumes have motivated many knitters to make shawls, infinity scarves, and more throughout the five seasons that have aired so far.
I wanted to make an Outlander collection of knits that are inspired by both Claire and her daughter Brianna, from Sontag shawls, mittens, and scarves.
Check out all of the Outlander free knitting patterns here – The Outlander Pattern Library
You can see a roundup of Outlander Knitting Patterns here. – Outlander Patterns {Beginner + Intermediate}
There are also the Outlander Pattern Collection Ebooks you can view in my shop below:
Popular Patterns
- Outlander Carolina Shawl Pattern
- Outlander Brianna Fingerless Gloves Pattern
- Fraser’s Ridge Fingerless Mittens Pattern
- Long Fingerless Gloves Knitting Pattern
- Celtic Cable Fingerless Gloves Pattern
- Geillis Fingerless Gloves Pattern (Cable Knit)
- Outlander Claire Carolina Fingerless Gloves Pattern
- Malva Christie Fingerless Gloves Pattern {Cable Knit}
- Sassenach Chevron Mitts (Knitting Pattern)
- The Fraser Chevron Gloves (Knitting Pattern)
- Mist Of The Highlands Mitts (Knitting Pattern)

Resources and tutorials you may find helpful in following this pattern:
This pattern is great for any intermediate knitters.
- Knitting cast-on methods.
- Knitting Lessons
- How to cast on knitting
- How to cast off knitting for total beginners (step by step)
- How to knit garter stitch
- How to knit the purl stitch (for beginners + a video tutorial)
- How to knit stockinette stitch (for beginners)
- How to read knitting patterns for beginners
- Knitting abbreviations and terms (US and UK)
- How to knit rib stitch patterns (1×1 and 2×2 ribbing)
- You can see a tutorial on the MB – Make Bobble here.
- You can see help for seaming using the mattress stitch (the mattress stitch – how to seam knitting).
- You should also know how to knit in the round using the magic loop technique for the thumb section (magic loop knitting | step by step).
- Plus how to knit short rows (wrap and turn)(for the thumb).
- How to knit – a complete beginner’s guide

Herb Garden Cable Knit Mittens Pattern
- Purchase the inexpensive ad-free, PDF printable pattern in my shop here.
- Shop the Outlander Accessories Collection Ebook here.
- Shop ALL of the Outlander Pattern Ebooks here.
Skill Level – Intermediate
Notes
The mittens knit up quickly and the simple design makes for a relaxing and enjoyable knit.
You can see a video tutorial showing you how to MB – Make Bobble – How to knit a bobble stitch over on my YouTube channel here.
If you want to convert this pattern to knit in the round please see this guide – Knitting Cables In The Round {A How To Guide}
Copyright
- Please do not copy, sell, redistribute, or republish this pattern.
- If you wish to share this pattern, link to the pattern page only.
- You may sell items produced using this pattern.
- Do NOT use copyrighted photos for your product listing.
- In all product listings please credit Handy Little Me (Louise Bollanos) as the designer.
- For the copyright T&C please read my Terms of Use.
Size
- Women’s – To fit an average-sized hand.
- Please note – you can adjust the length by adding more repeat rows or less.
- Measurements:
- Height = 8 inches/20cm
- Width = 8 inches/20cm (laying flat before seaming).
- When seamed – 4 inches/10cm laying flat.
Gauge – 18sts/20 rows in 4 inches/10 cm in stocking stitch.
The supplies you need…
Yarn
- 1 x skein of any medium-weight yarn (04)/Worsted weight yarn/Aran/10 Ply 100g
- I used Cascade 220 Heathers (100% Peruvian Highland Wool 100g / 3.5oz / 220 yds/200 meters) in Fog Hatt- col.2442
Needles
- 4 mm (US 6) Knitting needles.
- 4.5 mm (US 7) knitting needles.
- 4.5 mm (US 7) 9″ or 16″ circular knitting needles are needed for the thumb section.
- I used my interchangeable circular needles on a 40cm/16′′ cable.
- I did not join in the round to knit the main cable pattern section of the mitt.
- I did join in the round to complete the thumb section and used the magic loop method.
- You may want to use a smaller cable for this section if you have one.
- Cable needle 4 mm (US 6)/4.5 mm (US 6.5) size.
Notions
- Tape measure
- Darning needle/tapestry needle
- Scissors
Abbreviations / Knitting Abbreviations And Terms (US And UK) List
- CO – Cast on
- Cont – Continue
- C4B – Cable 4 back – slip the first two stitches onto a cable needle and hold at the back of the work. Knit the next two stitches on the left-hand needle and then knit the two stitches from the cable needle.
- C4F – Cable 4 forward – Slip the first two stitches of the cable panel onto a cable needle and hold at the front of the work, knit the next two stitches, and then knit the two stitches held on the cable needle.
- C5B – Cable 5 back – slip the next 3 stitches on a cable needle and leave at the back of the work, K2, then K3 from the cable needle.
- K – Knit
- KFB – Knit into the front and back of the stitch (increase).
- MB – Make bobble – KFB into the next stitch 5 times so you have 5 sts, then turn and only work on these 5 sts, P5, turn, K5, turn, P5, turn, K5, turn, pass 2nd, 3rd, 4th and 5th sts over 1st st to cast off and make the bobble.
- P – Purl
- PM – Place marker
- SM – Slip marker
- St(s) – Stitch(es)
- Rep – Repeat
- RS – Right side
- WS – Wrong side
- W+T – Wrap and Turn – Short row shaping
Pattern Instructions
Worked flat knitting back and forth on two needles:
Both mittens are worked the same (the right mitten and left mitten), then seamed.
With 4 mm (US 6) knitting needles cast on – 54 sts
- Row 1 (RS:) *K1, P1 – rep from * to the end of the row.
- Row 2 (WS): Knit the knits and purl the purls to the end of the row.
Rep rows 1 and 2 twice more.
Change to 4.5 mm (US 7) knitting needles.
- Row 1: (RS) P5, *K4, P2, K5, P2, K4,* P10, rep from * to* P5.
- Row 2: (WS) K5, *P4, K2, P5, K2, P4,* K10, rep from * to * K5.
- Row 3: P5, *C4F, P2, C5B, P2, C4B,* P10, rep from * to * P5.
- Row 4: K5, *P4, K2, P5, K2, P4,* K10, rep from * to * K5.
- Row 5: P5, *K4, P2, K5, P2, K4,* P10, rep from * to * P5.
- Row 6: K5, *P4, K2, P5, K2, P4,* K10, rep from * to * K5.
- Row 7: P5, *C4F, P2, K2, MB, K2, P2, C4B*, P10 rep from * to * P5.
- Row 8: K5, *P4, K2, P5, K2, P4*, K10, rep from * to * K5.
- These 8 rows form the repeat pattern for the cable. Rep the 8 rows 4 more times.
- Then work rows 1 and 2 again.
Change to 4 mm (US 6) knitting needles.
- Row 1: *K1, P1 – rep from * to the end of the row.
- Row 2: Knit the knits and purl the purls to the end of the row.
- Rep rows 1 and 2 twice more.
- Cast off in pattern.
Making Up
Please note – when you are making up the mittens, check the measurements/ circumference against your own arm/hand and adjust accordingly so that you have a comfortable fit.
If you have adjusted the length of the mittens, you may need to also adjust the measurements for seaming.
Sew the side seam of the mittens using the mattress stitch.

Both Mittens
Starting at the bottom edge (where the hand will insert and this will be pulled up the arm) you will stitch the seam for approx – 5 inches/13 cm.
Leave a hole for your thumb that will measure approx – 1.5 inches/4cm.
Seam the remainder of the mitten for 1.5 inches/4 cm.
Repeat with the second mitten.
You can leave your loose ends until you have completed the thumb section, just in case you want to adjust anything when you try them on.
Thumb
Knitting the thumb section is optional – you may wish to leave your mitts as they are or you may want to add the thumb.
This is up to you!
Using your 4.5mm (US 6.5) circulars pick up and knit 8 (10, 12) sts on each side (16, 20, 24) sts total.
Starting from the top of the thumbhole.
I picked up 8 sts on each side (16 in total) to have a tighter thumb section.
You may wish to make this larger for your thumb/hand size – so you can add 2 sts – go up to 10 sts on each side (20 total) or 12 sts on each side (24 total).
Knit 1 round.
Start the shaping:
- Round 1: (RS) – K until 2 sts from the end, W+T,
- Round 2: (WS) – P until 2 sts from end, W+T,
- Round 3: K until 2 sts from the last wrap, W+T,
- Round 4: P until 2 sts from the last wrap, W+T.
- Rep the short rows 3 and 4 once more.
- K all sts in the round picking up the wraps and knitting them together with the accompanying stitch.
- Next round: K1, P1 to the end of the round.
- Cast off in rib.

Share your work with us…
I love seeing your finished projects on social media.
If you enjoyed making the fingerless mittens, I’d love to see yours on Instagram, be sure to tag me @handylittleme.
I’d love to see your work.
Happy knitting!