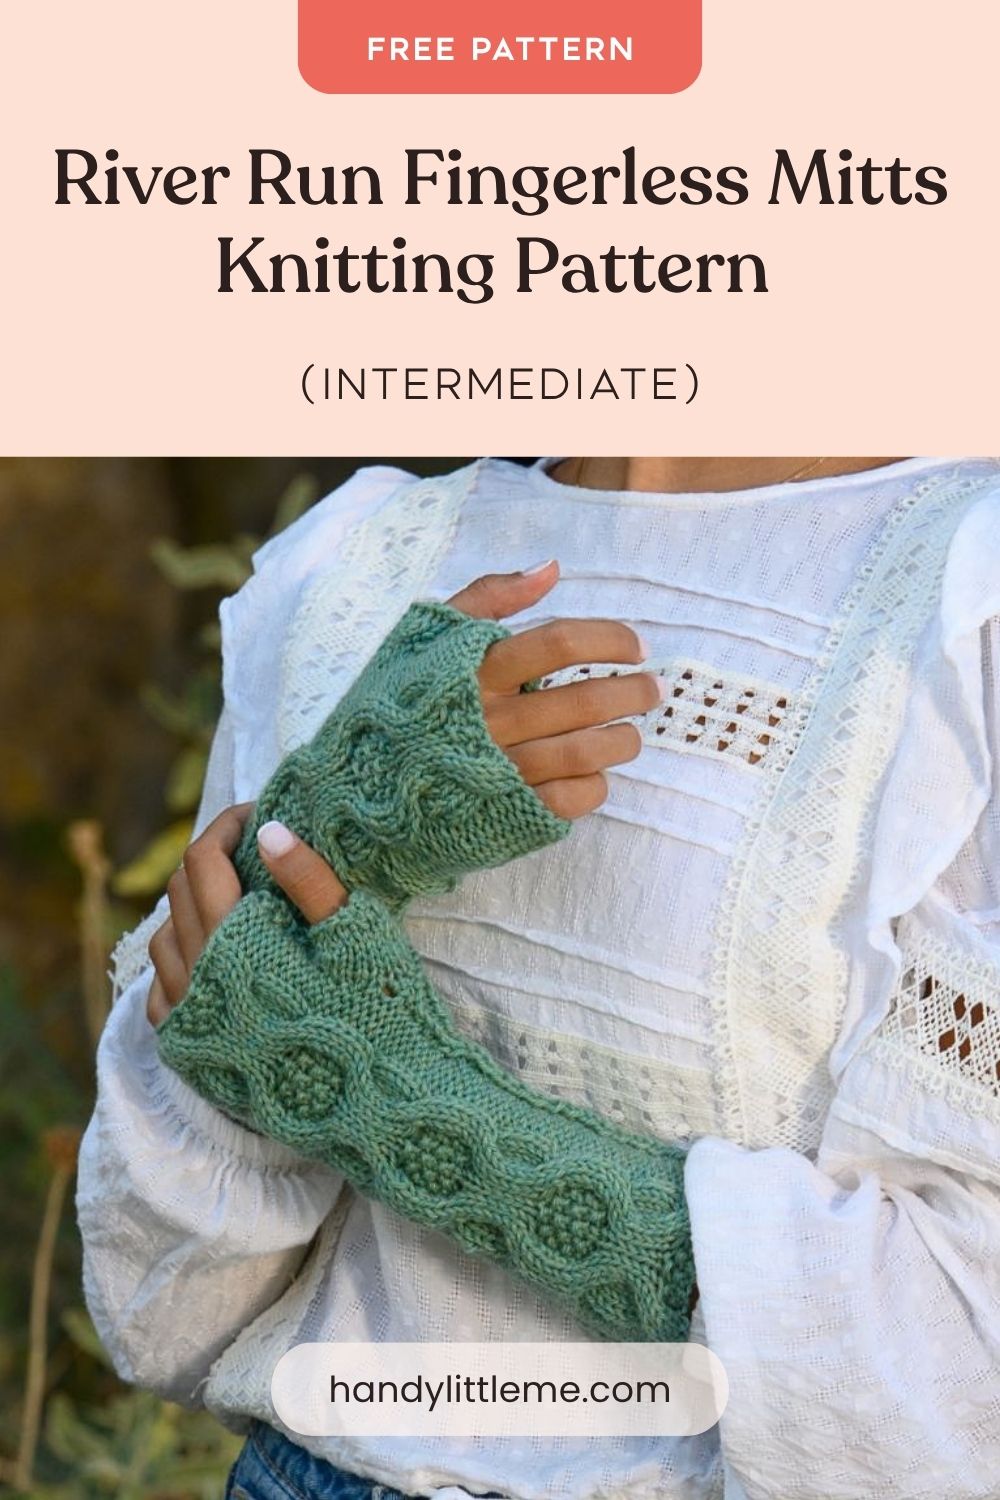
River Run Fingerless Mitts Knitting Pattern
THIS ARTICLE CONTAINS AFFILIATE LINKS THAT SUPPORT HANDY LITTLE ME CONTENT AND FREE PATTERNS.The River Run fingerless mitts knitting pattern is perfect for anyone who loves to knit cables!
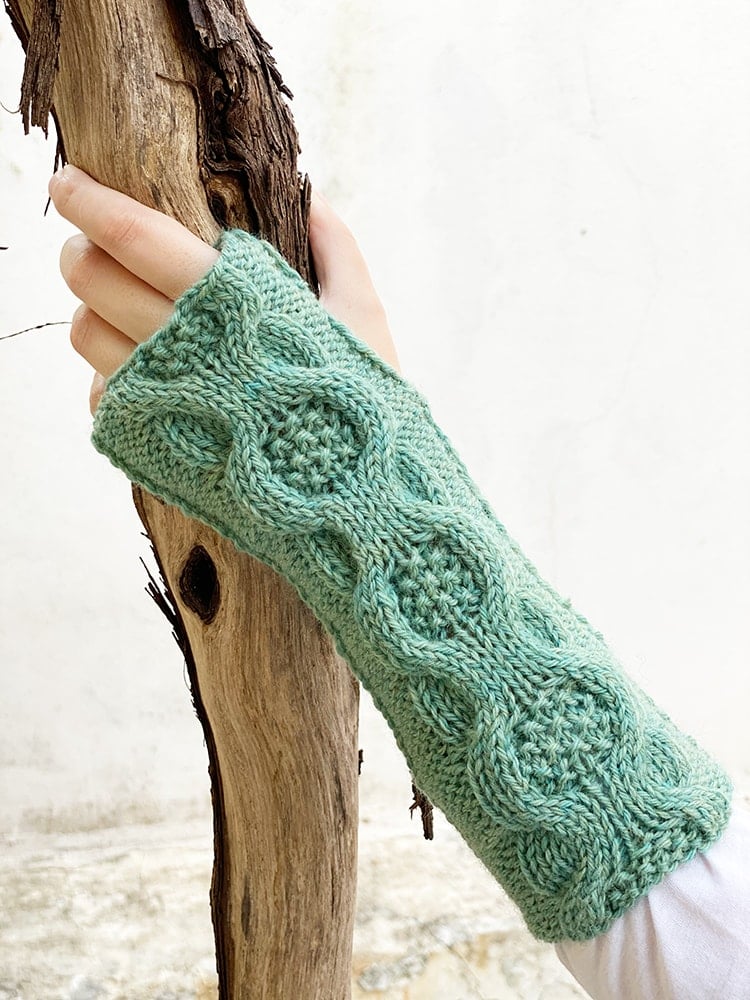
The mittens are knit flat, with the top side featuring the medallion moss stitch cable design and the underside in 1×1 ribbing.
The thumb section is then knit in the round.
The full pattern is free below, or you can purchase the ad-free printable PDF here.

Before You Get Started
- Before you get started, take a moment to read through the full pattern and gather your supplies.
- These fingerless mitts are knit flat and then seamed, making them a lovely project for confident beginners who want to practice simple shaping and textured stitches.
- You can use stitch markers to help keep track of your pattern repeats, and it’s always a good idea to knit a gauge swatch first so your mitts turn out the right size.
- Choose a soft, warm yarn that feels comfortable against the skin, especially if you plan to wear them often through the colder months.

River Run Fingerless Mitts Knitting Pattern
Skill Level – Intermediate
Notes
The mittens knit up quickly, and the simple design makes for a relaxing and enjoyable knit.
If you want to convert this pattern to knit in the round, please see this guide – Knitting Cables In The Round {A How To Guide}
Size Information
Women’s small/medium/large
- Please note – you can adjust the length by adding more repeat rows or less.
- The pattern is written for all sizes starting with the small size – with changes for different sizes listed in all necessary places.
- To follow the pattern more easily, circle or highlight all numbers pertaining to your size before beginning.
Small
- For the small size, you will cast on 41 sts.
- You will P5 for the edges surrounding the cable.
- Measurements:
- Width – 7 inches (Lying flat and not seamed)
- Length- 10 inches
Medium
- For the medium size, you will cast on 47 sts.
- You will P6 for the edges surrounding the cable.
- Measurements:
- Width – 8 inches (Lying flat and not seamed)
- Length- 10 inches
Large
- For the large size, you will cast on 53 sts.
- You will P7 for the edges surrounding the cable.
- Measurements:
- Width – 9 inches (Lying flat and not seamed)
- Length- 10 inches
Gauge
18sts/20 rows in 4 inches/10 cm in stocking stitch.

Materials
Yarn
- 1 x skein of any medium-weight yarn (04)/Worsted/Aran/10 Ply 100g
- I used Cascade 220 Heathers (100% Peruvian Highland Wool 100g / 3.5oz / 220 yds/200 meters) in Aventurine Heather – col.1003
Needles
- 4.5mm (US 7) knitting needles.
- 4.5mm (US 7) 9″ or 16″ circular needles are needed for the thumb section.
- I used my interchangeable circular needles on a 40cm/16′′ cable.
- I did not join in the round to knit the main section of the mitt.
- I joined in the round to complete the thumb section and used the magic loop technique.
- You may want to use a smaller cable for this section if you have one.
- Cable needle 4.5mm (US 6.5) size.
Notions
- Tape measure
- Darning needle
- Scissors
- Stitch marker.
Abbreviations
Knitting Abbreviations And Terms (US And UK)
- CO – Cast on
- Cont – Continue
- C6B – Slip the first three stitches onto a cable needle and hold it at the back of the work. Knit the next three stitches on the left-hand needle and then knit the three stitches from the cable needle.
- C6F – Slip the first three stitches of the cable panel onto a cable needle and hold at the front of the work, knit the next three stitches, and then knit the three stitches held on the cable needle.
- K – Knit
- P – Purl
- PM – Place marker
- SM – Slip marker
- St(s) – Stitch(es)
- Rep – Repeat
- RS – Right side
- WS – Wrong side
- W+T – Wrap and turn – for short row shaping.
Print & Stitch
Purchase the ad-free PDF pattern
Want a clean, printable version of this pattern? You can purchase the ad-free PDF in my shop. It’s perfect for printing, saving to your device, and making without distractions.
Pattern Instructions
Worked flat knitting back and forth on two needles:
Left mitten
Cast on – 41 (47/53) sts
- Row 1: (RS) P5 (P6/P7), K4, (P1, K1) 3 times, K3, P5 (P6/P7), PM, K1, P1 to the end of the row.
- Row 2: (WS) K1, P1 to marker, SM, K5 (K6/K7), P3, (K1, P1) 4 times, P2, K5 (K6/K7).
- Rows 3 and 4: As rows 1 and 2.
- Row 5: P5 (P6/P7), C6F, K1, C6B, P5 (P6/P7), SM, K1, P1 to the end of the row.
- Row 6: K1, P1 to marker, SM, K5 (K6/K7), P13, K5 (K6/K7).
- Row 7: P5 (P6/P7), K13, P5 (P6/P7), SM, K1, P1 to the end of the row. Row 8: K1, P1 to marker, SM, K5 (K6/K7), P13, K5 (K6/K7).
- Rows 9 to 12: As rows 7 and 8 twice more.
- Row 13: P5 (P6/P7), C6B, K1, C6F, P5 (P6/P7), SM, K1, P1 to the end of the row.
- Row 14: As row 2.
- Rows 15 and 16: As rows 1 and 2.
These 16 rows form the repeat pattern for the cable.
Rep the 16 rows 3 more times.
Cast off in pattern.
Right mitten
Cast on – 41 (47/53) sts
- Row 1: (RS) P1, K1 for 18 (22/26) sts, PM, P5 (P6/P7), K4, (P1, K1) 3 times, K3, P5(P6/P7), PM,
- Row 2: (WS) K5 (K6/K7), P3, (K1, P1) 4 times, P2, K5 (K6/K7), SM, P1, K1 to the end of the row.
- Rows 3 and 4: As rows 1 and 2.
- Row 5: P1, K1 to the marker, SM, P5 (P6/P7), C6F, K1, C6B, P5 (P6/P7)
- Row 6: K5 (K6/K7), P13, K5 (K6/K7), SM, P1, K1 to the end of the row.
- Row 7: P1, K1 to the marker, SM, P5 (P6/P7), K13, P5 (P6/P7).
- Row 8: K5 (K6/K7), P13, K5 (K6/K7), SM, P1, K1 to the end of the row.
- Rows 9 to 12: As rows 7 and 8 twice more.
- Row 13: P1, K1 to the marker, SM, P5 (P6/P7), C6B, K1, C6F, P5 (P6/P7).
- Row 14: As row 2.
- Rows 15 and 16: As rows 1 and 2.
These 16 rows form the repeat pattern for the cable.
Rep the 16 rows 3 more times.
Cast off in pattern.
Finishing
Please note – when you are making up the mittens, check the measurements against your arm/hand and adjust accordingly to ensure a comfortable fit.
If you have adjusted the length of the mittens, you may also need to adjust the seaming measurements.
Sew the side seam of the mittens using the mattress stitch.
You can leave your loose ends until you have completed the thumb section, just in case you want to adjust anything when you try them on.

Finish the left mitten
Starting at the bottom edge (where the hand will insert and this will be pulled up the arm) you will stitch the seam for approx – 7 inches/18 cm.
Leave a hole for your thumb that measures approx. 1.5 inches/4cm.
Seam the remainder of the mitten for 1.5 inches/4 cm.
Finish the right mitten
Repeat with the second mitten, making sure it’s the right way around for your right arm/hand.

Thumb
Knitting the thumb section is optional – you may wish to leave your mitts as they are, or add the thumb.
This is up to you!
Using your 4.5mm (US 7) circulars, pick up and knit 8 (10, 12) sts on each side (16, 20, 24) sts total.
Starting from the top of the thumbhole.
I picked up 8 sts on each side (16 in total) to have a tighter thumb section.
You may wish to make this larger for your thumb/hand size, so you can add 2 sts – go up to 10 sts on each side (20 total) or 12 sts on each side (24 total).
Knit 1 round.
Start the shaping:
- Round 1: (RS) – K until 2 sts from the end, W+T,
- Round 2: (WS) – P until 2 sts from end, W+T,
- Round 3: K until 2 sts from the last wrap, W+T,
- Round 4: P until 2 sts from the last wrap, W+T.
- Rep the short rows 3 and 4 once more.
- K all sts in the round, picking up the wraps and knitting them together with the accompanying stitch.
- Next round: K1, P1 to the end of the round.
- Cast off in rib.
Share Your Make
I love seeing your finished projects.
If you enjoyed making the mitts, I’d love to see yours on Instagram, tag me @handylittleme or #handylittleme.
I’d love to see your work!
Grab Your Printable PDF Pattern Here…
More Patterns
- Craigh na Dun Cable Fingerless Mittens Knitting Pattern.
- Lallybroch Fingerless Mittens Knitting Pattern
- Apothecary Outlander Fingerless Gloves Pattern
- Red Jamie Cable Knit Fingerless Mittens Pattern
- Herb Garden Cable Knit Mittens Pattern
- Outlander Brianna Fingerless Gloves Pattern
- Fraser’s Ridge Fingerless Mittens Pattern
- Outlander Claire Carolina Fingerless Gloves Pattern
- Sassenach Chevron Mitts (Knitting Pattern)
- The Fraser Chevron Gloves (Knitting Pattern)
- Mist Of The Highlands Mitts (Knitting Pattern)
- The Complete Outlander Knitting Pattern Bundle – With 55 Knitting Patterns
- Shop ALL of the Outlander Pattern Ebooks here.
- View my free Outlander Pattern Library here.
Helpful Resources
This pattern is great for any intermediate knitters.
- Knitting cast-on methods.
- Knitting Lessons
- How to knit – a complete beginner’s guide
- How to cast on knitting
- How to cast off knitting for total beginners (step by step)
- How to knit garter stitch
- How to knit the purl stitch (for beginners + a video tutorial)
- How to knit stockinette stitch (for beginners)
- How to read knitting patterns for beginners
- Knitting abbreviations and terms (US and UK)
- How to knit rib stitch patterns (1×1 and 2×2 ribbing)
- You can see help for seaming using the mattress stitch (the mattress stitch – how to seam knitting).
- You should also know how to knit in the round using the magic loop technique for the thumb section (magic loop knitting | step by step).
- Plus how to knit short rows (wrap and turn) (for the thumb).