Easy Mittens Knitting Pattern (Knit In The Round)
THIS ARTICLE CONTAINS AFFILIATE LINKS THAT SUPPORT HANDY LITTLE ME CONTENT AND FREE PATTERNS.This easy mittens knitting pattern is an excellent project for anyone learning how to knit in the round using the magic loop technique.
I wanted to share a mitten pattern you can make in around 2-3 hours.
The mittens are perfect for the colder weather, as they have been knit with super bulky yarn (06), in one of my favorite yarns to knit with – Lion Brand Wool-Ease Thick and Quick.
The full pattern is free below, or you can purchase the ad-free printable PDF here.

Easy Mittens Knitting Pattern For Beginners
Skill Level – Easy (advanced beginner knitter)
Notes
Make super chunky knitted mittens to keep your hands warm and toasty this winter!
There is a video tutorial to help you knit the thumb of a mitten over on my YouTube channel here.
Copyright Info
- Please do not copy, sell, redistribute, or republish this pattern.
- If you wish to share this pattern, link to the pattern page only.
- You may sell items produced using this pattern.
- Do NOT use the copyrighted photos for your product listing.
- For the copyright T&C, please read my Terms of Use.
Size Information
Size mittens = Adult medium
Finished measurements – laying flat and unstretched = 8 inches Circumference/10 inches long, including the cuff.
Gauge – 10 sts and 15 rounds = 4 inches/10 cm in Stockinette stitch

The Supplies You Need
Yarn
- 1 skein of Lion Brand Wool-Ease Thick and Quick in Fisherman.
- Super bulky/super chunky/14-ply – 106 yards.
- Lion Brand Yarn (wool-ease thick and quick) works well for this project.
- Yarn Weight Guide (+ Conversion Chart)
Needles
- Set of 10.00mm (US 15) 16″ circulars
- Or a set of 10mm (US 15) 20″ circulars.
- Please note that you may need to learn the magic loop technique. (View Tutorial – Magic loop knitting | step by step)
Notions
- Tape measure
- Darning needle/yarn needle
- Scissors
- Stitch markers
- Stitch holder

Abbreviations
Knitting Abbreviations And Terms (US And UK)
- Approx – Approximately
- Beg – Begin(ning)
- CO – Cast on
- K – Knit
- K2tog – Knit the next two stitches together
- M1 – Make one stitch
- P – Purl
- PM – Place marker
- Rem – Remaining
- Rep – Repeat
- Rnd(s) – Round(s)
- SM – Slip marker
- St(s) – Stitch(es)
Print + Stitch
Purchase the ad-free PDF pattern
Want a clean, printable version of this pattern? You can purchase the ad-free PDF in my shop. It’s perfect for printing, saving to your device, and making without distractions.
Pattern Instructions
Time needed: 1 day, 2 hours and 30 minutes
How To Knit Mittens – Step By Step Detailed Instructions
- The Cuff
With 10mm (US 15) circular knitting needles CO 18sts,
PM (place stitch marker) and Join in the round – being careful not to twist sts.
*Remember to use the magic loop technique if your cable is 16 inches or more.
1st round – K1, P1 to the end of the round.
Rep 1st round – Cont to work in 1×1 ribbing for 2 inches.
Next round – *K8, M1, K1* – then rep from * to * once more time (2 sts increased = 20 sts).
Knit 3 rounds.
- Thumb Increase
1. K9, pm, M1, K1, M1, pm, K10 (2 sts increased = 22 sts).
2. Knit to the end of the round (slipping markers).
3. K9, SM, M1, K3, M1, SM, K10 (2 sts increased = 24 sts)
4. Knit to the end of the round (slipping markers).
5. K9, SM, M1, K5, M1, SM, K10 (2 sts increased = 26 sts)
6. Knit to the end of the round (slipping markers). - Placing The Thumb Stitches Onto A Stitch Holder
7. K9, remove the marker and place 7sts onto a stitch holder.
8. Remove the next marker.
9. Co 1 st and K 10. (20 sts) - Knitting The Body
Knit 12 rounds
- Decreasing The Body Of The Mitten
1. K2tog, K6, K2tog, K2tog, K6, K2tog. (16 sts)
2. *K2tog, K4, K2tog*, rep from * to *. (12 sts)
3. *K2tog, K2, K2tog*, rep from * to * (8 sts left on needles).
4. Cut yarn and leave a long tail – about 8/9 inches, weave that tail through the rem sts, and pull up tight at the top of the mitten.
5. Secure and weave in any loose ends. - Placing The Thumb Stitches Onto The Needles
Place the 7 sts on the stitch holder onto the needles.
Pick up and knit 1 st from the CO edge. (8 sts) - Adding A Stitch Marker
Place a stitch marker under the picked-up stitch to mark the beg of the round.
- Knitting The Thumb
1. Knit 8 rounds.
2. To decrease the thumb – *K2tog* to the end of the round. (4 sts)
3. Cut a tail of yarn and weave through the rem sts, then pull up tight to close.
4. Secure and weave in any loose ends. - Finishing The Mitten
Turn the mitten to the right side (the stockinette stitch side) and use the yarn from near the picked-up stitch to close the gap near the base of the thumb.
Weave in any other loose ends. - Repeat The Pattern
Repeat the pattern for the second mitten.
The left and right mittens are created in the same way.


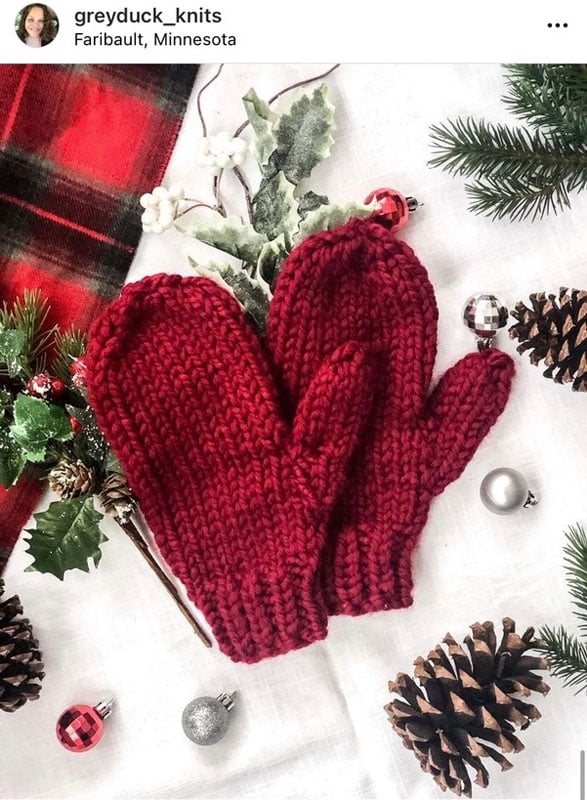
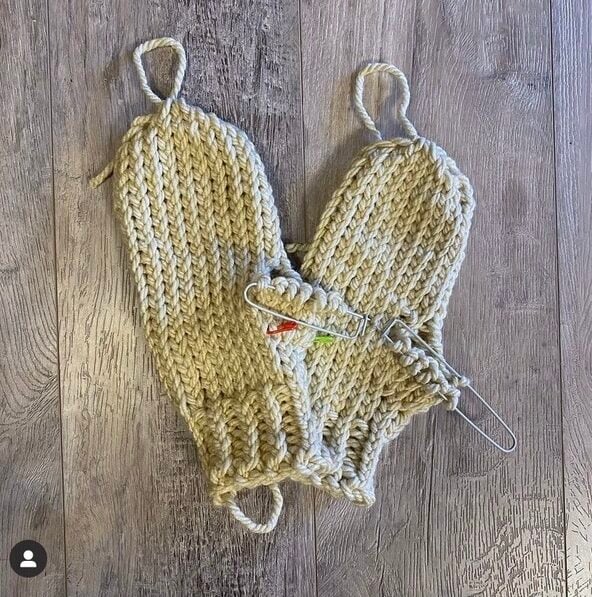
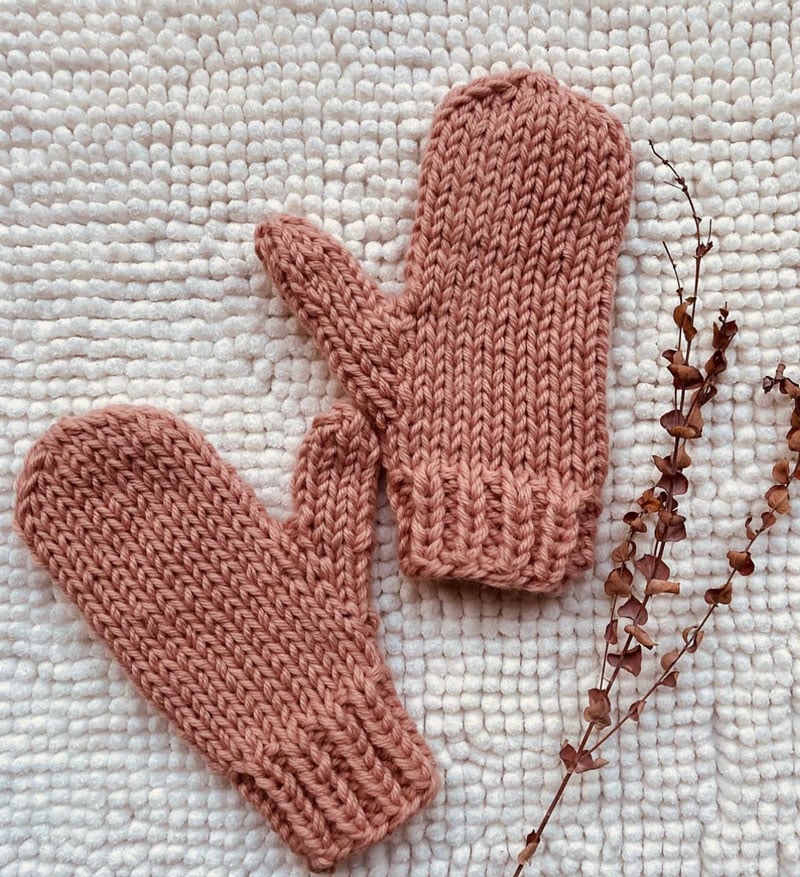
Knitted by Our Community
See how knitters have brought this pattern to life with their own yarn choices and style.

Share Your Make
I love seeing your finished projects on social media.
If you enjoyed making the easy knit mittens, I’d love to see yours on Instagram, tag me @handylittleme.
If you are on Facebook, stop over to the handylittleme Facebook group and share a photo.
I’d love to see your work.
Happy Knitting!
Inside Out?
You may see that the purl side of your work is on the outside.
Don’t worry; this is perfectly okay because of how you position your hands while you work; the knitting just flipped to the inside of the needle.
It’s fine to continue with it inside out, but if it bothers you, poke it back through the center of the needle, and it will be fixed.
If you’re still close to the cast on, it may flip back on you.
Once it’s a little longer, it should stay where it is.
Knitting with the tube inside out is not a problem at all; it’s just a matter of personal preference.
An Easy Pair Of Mittens To Knit!
The classic mittens are easy to make, with advanced beginner knitters in mind.
Using knit and purl stitches, you will create ribbing for the cuff, knit in the round, and it will also introduce you to decreasing and shaping.
The pattern and photo tutorial below will help you to create your mittens in no time at all, even if you are a fairly new knitter.

The Yarn + Needles I Used…
I made the mittens using Lion Brand Wool-Ease Thick and Quick yarn in Fisherman (yarn weight – super bulky/super chunky/14 ply).
I knit them on size 10 mm (US 15) 16″ circular needles, so there was no seaming involved, just a few loose ends to sew in at the end.
You could use 9″ circulars if you wish, as using the 16″ or 20″ circulars means you must use the magic loop technique.
If you are new to using circulars, they soon become your favorites to work on once you get used to them.
You may also enjoy this pattern – The Bernie Knitted Mittens Pattern {Quick Knit}

Helpful Resources
This pattern is great for any advanced beginner knitters.
- Knitting cast-on methods
- Knitting Lessons
- How to cast on knitting
- How to cast off knitting for total beginners (step by step)
- How to knit garter stitch
- How to knit the purl stitch (for beginners + a video tutorial)
- How to knit stockinette stitch (for beginners)
- How to read knitting patterns for beginners
- Knitting abbreviations and terms (US and UK)
- How to knit rib stitch patterns (1×1 and 2×2 ribbing)
- How to join knitting in the round with circular knitting needles
Are Mittens Hard To Make?
The difficulty of making mittens depends on several factors, including your skill level, the complexity of the mitten pattern you choose, and your familiarity with knitting or crocheting techniques.
For beginners, simple mitten patterns with basic stitches like knit and purl can be relatively easy to follow.
However, shaping the thumb gusset and joining the mitten top can be tricky for beginners.
As you gain more experience and confidence in your knitting or crocheting skills, you can try more intricate mitten patterns that incorporate different stitches, colorwork, or decorative elements.
These patterns may require more advanced techniques and careful attention to detail.
Overall, while making mittens can be challenging for beginners, with practice and patience, it’s certainly an achievable project for crafters of all skill levels.
Starting with a simple pattern and gradually progressing to more complex designs can help you build your skills and confidence over time.
Additionally, there are many resources available, such as online tutorials and instructional books, to guide you through the process.
More Free Knitting Patterns
You may also like these mitten patterns…
- Snow Mountain Mittens Pattern
- The Bernie Knitted Mittens Pattern
- Fuzzy Knit Mittens Pattern
- Free Cable Mittens Knitting Pattern
More Patterns You May Be Interested In…
- How To Knit A Hat For Complete Beginners (+ Video Tutorial)
- 20 Temperature Blanket Patterns (The Ultimate Guide)
- How To Knit A Hat With Circular Needles (Step-By-Step)
- 31 Free Baby Blanket Knitting Patterns (Easy Knit Blankets)
- How To Knit Baby Booties (Step-By-Step)
- 32 Super Simple Knitting Projects For Beginners
- 12 Simple Knitting Stitches For Beginners
- Free Knitted Dishcloth Patterns
- 37+ Patterns To Use Up Your Yarn Stash (Small Projects)
- Free Dog Sweater Knitting Pattern (Straight Needles)
- Super Easy Corner To Corner Baby Blanket Pattern (Knit)
- Easy Baby Sweater Knitting Pattern For Beginners
- How To Knit A Baby Hat (Straight Needles)
- Pumpkin Knitting Pattern (Beginner Friendly!)
- 8 Cable Stitch Knitting Patterns
- Free Knitted Heart Pattern (Easy + Quick Project)
- 20+ Fall Oversized Knits (Sweater Knitting Patterns)
- Ribbed Beanie Knitting Pattern (Unisex Mariner’s Hat)
Thank you for the free pattern. I am 81 years of age and only retired at 79 due to stage 4 matasticized cancer. I am mostly a cable knitter
; throws, pillows, scarves. I spent 10 years in the Navy (2 volunteer tours in NAM), 25 years as a NASA contractor (Apollo, Sky lab, Hubble, and finally The James Webb Space Telescope.) I have knitted off and on as a relaxing tool since many of the projects I’ve been involved in have been a tad stressful. I have been married for 62 years to my wonderful wife (she who completes me) with two great children. Thank you again for your site. Merry Christmas.
Martin (A child of the Gael, my mother’s son.)
Hello Martin, thank you so much for visiting my site and taking a look around at the patterns. I enjoyed reading about your interest in knitting and working for NASA! Wow, that is amazing 🙂 I hope you continue to relax with your knitting and have a very merry Christmas!
attractive & hopefully easy
These mittens are really easy to make and quick to work up, I hope you enjoy the pattern! 🙂
Good Morning,
I’m wondering if you can help me. I would really like to try your pattern for the Easy Mittens Knitting Pattern and I’m stumped. I have the correct needles and yarn weight but am unable to do the initial join after casting on 18 stitches. Am I doing something wrong?? I prefer knitting in the round over DPN’s so I was excited when I found your pattern. Any help is appreciated. I have a beautiful purple yarn that I’d love to see worked up as mittens.
Thanks in advance 🙂
Nicole
Hello Nicole, if you take a look at this post with a video tutorial here – https://www.handylittleme.com/how-to-knit-in-the-round/ it should help you to be able to join in the round on your circulars. I hope that helps and if you need further help, please email me – hello@handylittleme.com. Thanks 🙂 Louise
I want to make these for someone with bigger hands. How would I go about that? This pattern says the mittens are 8” circumference but I need them to be 10” circumference.
Hello Sabrina, you will have to adjust the number of stitches you cast on to make the gloves larger. Instead of 18 stitches, you could cast on 20 or 22 or 24. I think 22 will be a good number to make the gloves have a circumference of 10 inches. Then you would have to adjust the number of stitches you work in the rest of the pattern from there. I hope that helps! 🙂
For the increase and decrease rounds should I increase and decrease an extra stitch or leave that the same and just knit the extra stitches?
I would increase and decrease the extra stitches also. You will be increasing the original number of cast-on sts through the pattern, so they will then have to be decreased in order for the shaping to look correct. I hope that makes sense 🙂
I was perusing Pinterest and came upon your mitten pattern. I have some extra Thick n Quick and decided to check out your pattern. I have been knitting for years and I’ve never seen anyone knit inside out like this before. Very interesting! Is that an English thing? I have learned over the years that there are a million different ways to knit! I normally knit from my front needle (therefore right side out) and I also find it easier to use a longer cord when I’m doing magic loop.
Thank you for the pattern! Off to look for my yarn so I can make these mittens…
Hello Monica, I’m not sure it’s an English thing to knit the mittens inside out, that just kind of happened when I wrote the pattern! I hope you enjoy making them, they are very quick to knit up 🙂
Hi Louise,
Do I have to have my mittens inside out to for it to work out? I just noticed I’ve been knitting normally, but your pictures show inside out.
Thanks,
Shauna
Hello Shauna,
No, you can knit them with the right side out and they will look the same.
Sometimes for smaller projects, I knit with the inside out facing me, just the way I feel comfortable.
Either way is acceptable and the mittens will look the same.
I hope that helps,
Louise
Does this pattern work for children sizes also? Can I buy patterns for all sizes as I knit for charity. Thanks. Mary
Hello Mary, the cast on number of stitches in this pattern is for a woman’s size medium. I don’t have the pattern for any other size at the moment. Thanks for visiting 🙂
Hi, I am having a bit of trouble knitting the thumbs on the mittens. I’m not quite sure how to join the yarn back in after cutting it off at the top of the mitten. Is there an easy way to do this? Thanks
Hello Linsey, to join the yarn, you need to attach it to the first loop on the needle before you start knitting again. I normally thread a darning needle with the yarn, pull it through the first loop on the needle and then tie it once to secure. I hope that helps 🙂
Hello, I apologize but I can’t seem to figure out how to do the thumb… Do you have more clear pictures for each step?
Kind regards,
Heidi
Hello Heidi,
Sorry, I don’t have any more images for the thumb instuctions.
Perhaps you can as in the Handy Little Me Facebook group, message me or send an email if you can explain further what you need help with?
Thanks,
Louise
YAY – finished one! I made a few mistakes with the thumb, but I’ll call it my twist on your design. Now I need to make the next one match! I think the second one will be a bit easier (I hope.) Thanks for the pattern. I hope to move on to the cable mittens at some point and hopefully then socks.
Hello Maria,
I’m so happy you are enjoying the mittens pattern, perhaps you can rework the thumb when you have finished the second mitten?
Enjoy!
Louise
How comes it’s a stocking stitch when you turned it inside out? When you say Knit 12 rounds for the body, is that all in knit stitch? Or do you purl anywhere.
Thanks!
Hello Nicole,
When you knit in the round on circular needles, your knitted fabric looks like garter stitch bumps on the wrong side and stocking stitch on the right side.
So you knit those 12 rounds for the body – on the circulars and it looks like stocking stitch.
I hope that helps!
Louise
Hello! Beginner knitter and very excited to try this pattern. Question on the needles: if I’m doing the magic loop method, can they be longer than 20″? Seems most of the size 15 16-20″ or even 9 are sold out online 🙁 It’s mostly now 36-40
Thanks in advance 🙂 Love your site!
Hello Emily,
Yes you can use any size cable really, the shorter ones may make it a bit easier for you, but I often use a longer one if my shorter cables are busy with other projects!
The results of the project will be the same.
I hope that helps and happy knitting!
Louise
Thank you so much!! Can’t wait to try this 🙂
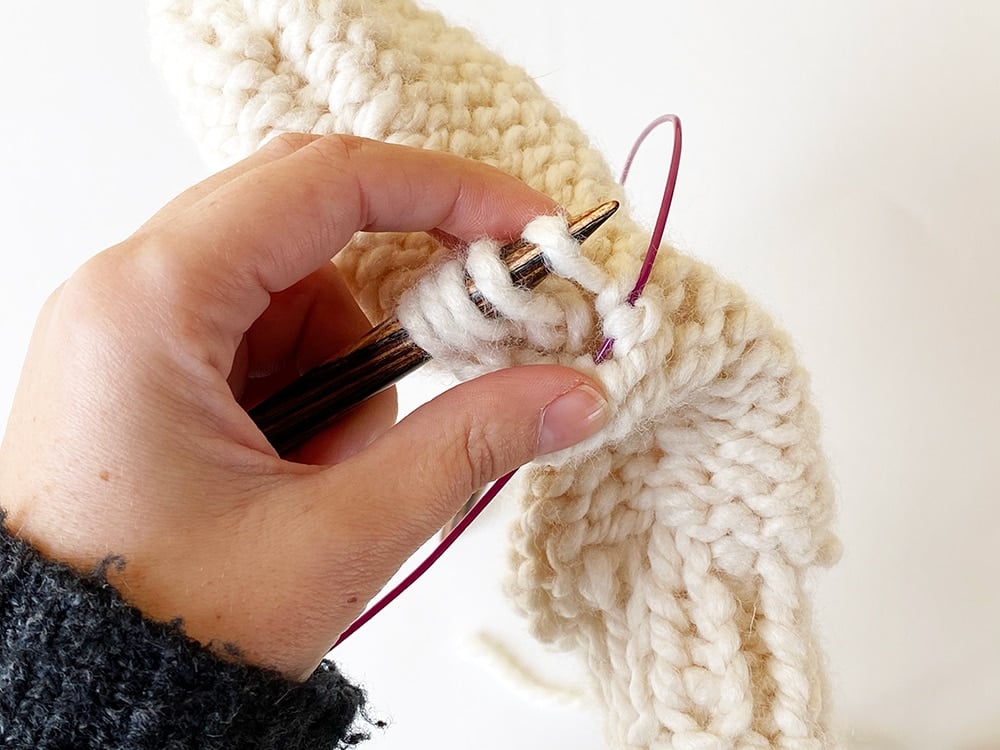
Hello! I’ve been working away on this pattern and having a lot of fun but I’ve hit a roadblock. On step 9, “Co 1 st and K10”, am I supposed to cast on 1 stitch with my working yarn on the right needle? Or am I supposed to cast on a new stitch in the place I just removed the thumb marker? I have no idea how to do that if it’s the latter! Help?
Hello Isla,
For this step you should remove the marker, then cast on 1 st and K 10.
You can use the thumb method to cast on that stitch if it is easier, using your working yarn and then continuing to knit.
I hope that helps!
Louise
I just happened upon your website and was excited to see your pattern for these easy mittens. Is there any chance that you can build a pattern for a “glove” that you put your tennis racquet handle in one end and your hand in the other end (where the cuff is)? I cannot find a pattern/instructions and have Googled high and low. I have a store-bought version of the glove but it is not knitted. I can take a photo and send it to you of this item, if that will help. Thanks in advance for trying to help me achieve my goal of securing a pattern so I can knit myself a glove to wear while playing tennis.
Hello Elaine,
I haven’t seen a tennis glove before!
I can’t commit to any projects right now, as I have so much on preparing for new collections and collaborations.
Perhaps you could adapt a glove pattern that you already have? To add an extra strap around the cuff?
Let me know how it goes!
Louise
Thanks, Louise. I can appreciate how busy you are. I’m not skilled enough to do that and there is no need for an extra strap around the cuff. Maybe I’ll find a pattern ‘one of these days.’ I’ll keep looking.
Do you have any video on how to “Pick up and knit 1 st from the CO edge. (8 sts)” from step 6? I don’t know how to do that…
Hello Lindsey, you might find this video tutorial helpful – https://www.youtube.com/watch?v=xETHVFIByP0&t=4s
You can pick up a stitch the same as you would M1 (make one) from the cast-on edge.
I hope that helps!
Louise
Hi! I’m making a bunch of these for gifts. I have made two so far but have a question… the markers you place when increasing for thumb do not seem to serve a purpose. What exactly are they for?
Hi, Brittany,
So happy to hear you’re making these as gifts—that’s wonderful! 🎁
The markers placed during the thumb increases are there to help you keep track of where the increases start and to ensure they stay consistent as you add stitches.
They act as a guide so you can easily see where each increase goes without losing your place.
If they aren’t helping, you can remove them once you’re comfortable with the pattern flow.
Hope that helps, and happy knitting!
Louise
Happy new year, and thanks so much for this lovely pattern! My son is a skater so I spend many hours at the rink watching him (which I love to do), but I’m incapable of sitting with my hands idle. I made one mitten in an evening while watching him skate his session, then finished the second while on hold with a government helpdesk at work the next day (shhhh tell no one…). Let’s hear it for instant gratification!!!
Hi Christina,
Happy New Year to you too; your message really made me smile!
I love that you finished one mitten at the rink and the other while on hold with a government helpdesk 😂 (your secret is safe with me). And yes; hooray for instant gratification knits!
Thanks so much for sharing, and I’m really glad you enjoyed the pattern.
Warmly,
Louise