Free Easy Cardigan Knitting Pattern (Straight Needles)
THIS ARTICLE CONTAINS AFFILIATE LINKS THAT SUPPORT HANDY LITTLE ME CONTENT AND FREE PATTERNS.In this post, I want to share with you a super cozy, free, easy cardigan knitting pattern for beginners with straight needles.
This cardigan has an oversized fit, making it really soft and comforting to wrap yourself up for everyday wear during the colder months.
Wear it at home, with jeans, leggings, a lounge suit, or your PJs; anything goes, really!
The full pattern is free below, or you can purchase the ad-free printable PDF here.

An Easy Cardigan Knitting Pattern
This is an easy pattern for those of you who are at the advanced beginner level, and the techniques you will need to know are knit, purl, K2tog, and SSK.
Using mainly knit and purl stitches, this pattern will also introduce you to decreasing and shaping.
The cardigan features raglan sleeves, which means the sleeve extends in one piece fully to the collar, leaving a diagonal seam from the underarm to the collarbone.
For new knitters who have never attempted to knit a garment, this is the perfect pattern for you.

Why Is This Cardigan So Easy To Knit?
This raglan cardigan is so easy, you will want to make more than one!
- It uses only knit and purl stitches.
- It works quickly, as you will use 7 mm (US 10.5) and 8 mm (US 11) needles and bulky/chunky yarn.
- Has minimal shaping and a loose, baggy fit.
- The shaping is clear and simple to understand.
- All of the pieces are knit flat (even though I used circular needles to accommodate the number of stitches).

The Yarn I Used
I made the cardigan using a bulky/chunky/12-ply yarn – The Petite Wool from We Are Knitters.
This meant the sweater was knitted quickly on size 7 mm (US 10.5) and 8 mm (US 11) knitting needles.
I selected the color natural, but this cardigan could be made in any color you like.
You could substitute this yarn with any yarn that is bulky/chunky/12-ply yarn, like Paintbox Yarns Simply Chunky from Love Crafts or something from Lion Brand Yarn.

Helpful Resources
This free knitting pattern is great for any advanced beginner knitters.
- Knitting cast-on methods
- Knitting Lessons
- How to cast on knitting
- How to cast off knitting for total beginners (step by step)
- How to knit garter stitch
- How to knit the purl stitch (for beginners + a video tutorial)
- How to knit stockinette stitch (for beginners)
- How to read knitting patterns for beginners
- Knitting abbreviations and terms (US and UK)
- How to knit rib stitch patterns (1×1 and 2×2 ribbing)
- How to knit two stitches together (K2tog)
- How to knit – a complete beginner’s guide

Cardigan Knitting Pattern (Stay Home + Be Cozy)
Purchase the inexpensive, ad-free, PDF printable pattern in my shop here.
You may also like this Rainbow Cardigan, which is similar in design but in Rainbow-colored stripes – Rainbow Cardigan Knitting Pattern (5 Sizes)
Copyright Notes
- Please do not copy, sell, redistribute, or republish this pattern.
- If you wish to share this pattern, link to the pattern page only.
- You may sell items produced using this pattern.
- Do NOT use the copyrighted photos for your product listing.
- For the copyright T&C, please read my Terms of Use.
Pattern Notes
Skill Level – Easy (beginner to advanced beginner)
The raglan cardigan knits quickly in chunky/bulky yarn, and the simple design makes for a relaxing and enjoyable knit.
The pattern is written for all sizes, starting with the small size, with changes for different sizes listed in all necessary places.
To follow the pattern more easily, circle or highlight all numbers pertaining to your size before beginning.
Further Notes
- The oversized cardigan is worked in 5 pieces: A back panel, two front panels (with a ribbed front band), and two sleeves.
- Each piece is worked in St St (K on RS, P on WS) from the lower edge upwards, beginning with a ribbed lower band.
- A circular needle is used to accommodate the number of stitches.
- Work back and forth on the circular needle as if working on straight needles.
- When you see ‘work as established’ in the instructions, this means continuing in the current pattern stitch.

Measurements and Size
The sizes are S / M / L / 1X + 2X.
Finished Bust About – 36 (40, 42, 46) in.
Finished Length About 28 (29, 30, 31) in.
*In the photographs, I am wearing a medium size.
This cardigan is meant to be really baggy and oversized – so the fit is not fitted/tight to the body.
Gauge – 4 inches/10 cm = 12 stitches in 16 rows of st st.
Tip – For the best results, you can make a gauge swatch before you start – learn more about gauge here – How to measure gauge in knitting.

The Supplies You Need
Yarn
The Petite Wool from We Are Knitters – Natural (100g/3.5oz/153 yds/140m) 100% Peruvian Wool.
For the following sizes, you will need approx:
- Small – 6 (918 yards)
- Medium – 7 (1,071 yards)
- Large – 8 (1,224 yards)
- 1X – 9 (1,377 yards)
- 2X – 10 (1,530 yards)
Chunky/bulky weight yarn/12 ply – Yarn Weight Guide (+ Conversion Chart)
You can substitute with Lion Brand Yarns – Lion Brand Hue and Me.
Needles
- 7 mm (US size 10.5) knitting needles – circular with a 40″/100cm cable.
- 8 mm (US size 11) knitting needles – circular with a 40″/100cm cable.
- Circular knitting needles are advised because of the large number of stitches – this is worked back and forth – as you would knit with straight needles.
Notions
- Tape measure
- Darning needle/tapestry needle/yarn needle
- Scissors
- Stitch markers

Abbreviations
Knitting Abbreviations And (US And UK)
- Beg – begin(ning)(s)
- Cont – continue
- K – knit
- K2tog – knit the next two stitches together
- M1 – make one stitch
- P – purl
- PM – place marker
- Rep – repeat
- RS – right side
- SSK – slip, slip, knit
- SM – slip marker
- St(s) – stitch(es)
- St St – stockinette stitch
- WS – wrong side
Stitch Explanations
- M1 (make 1) An increase worked by lifting the horizontal strand lying between needles and placing it onto the left needle. Knit this new stitch through the back loop – one st increased.
- SSK (slip, slip, knit) Slip the next 2 sts as if to knit, one at a time, to the right needle; insert the left needle into the fronts of these 2 sts and knit them together – one st decreased.
- 1×1 ribbing (K1, P1) to work in simple ribbing you will K1, P1 on every row.

Print + Stitch
Purchase the ad-free PDF pattern
Want a clean, printable version of this pattern? You can purchase the ad-free PDF in my shop. It’s perfect for printing, saving to your device, and making without distractions.
Cardigan Pattern Instructions
Back
With 7 mm (US 10.5) needles cast on 63 (69, 75, 81), sts.
- Row 1 (RS): P1, *K1, P1: rep from * to end of row.
- Row 2 (WS): K the knit sts and P the purl sts to the end of the row.
- Rep row 2 until the piece measures 2.5 inches from the CO edge, ending with a WS row as the last row you work.
- Change to 8mm (US 11) needles – Beg with a (RS) K row and work in St St until the piece measures S (19″) M (19.5″) L (20″) 1X/2X (20.5″) from the cast-on edge, ending with a WS row as the last row you work.
Shape The Armholes
- Row 1 (RS): Cast off 3 (5, 6, 8) sts, K to end of row. 60 (64, 69, 73) sts.
- Row 2 (WS): Cast off 3 (5, 6, 8) sts, P to end of row. 57 (59, 63, 65) sts
- Row 3 (RS) Decrease Row: K2, K2tog, K to last 4 sts, SSK, K2. 55 (57, 61, 63) sts.
- Row 4 (WS): Purl
- Work rows 3 and 4 – for 16 (17, 18, 19) more times. 23 (23, 25, 25) sts
- Cast off.
Left Front
With 7 mm (US 10.5) needles – Cast on 41 (45, 47, 51) sts
- Row 1 (RS): *K1, P1: rep from * to last st K1 (edge).
- Row 2 (WS): K1 edge, K the knit sts and P the purl sts to the end of the row.
- Keeping the front edge st in garter st and rem sts in rib as established, work until rib measures the same length as the back rib, end with a WS row as the last row you work.
- Change to 8 mm (US 11) needles.
- Row 1 (RS): K to last 11 sts, PM work in rib as established to last st, K1.
- Row 2 (WS): K1, work in rib as established to marker, SM, P to end of row.
- Rep last 2 rows, slipping the marker as you work until the piece measures the same length as back before shaping, end with a WS row as the last row you work.
- S (19″) M (19.5″) L (20″) 1X/2X (20.5″).
Shape Raglan Armhole and Front Edge
- Row 1 (RS): Cast off 3 (5, 6, 8) st, K to marker, SM, work in rib as established to last st, K1 – 38 (40, 41, 43) sts.
- Row 2 (WS): K1, work in rib to marker, SM, P to end of row.
- Row 3 (RS): Decrease Row: K2, K2tog, K to 2 sts before marker, SSK, SM, work in rib to last st, K1 – 36 (38, 39, 41) sts.
- Row 4 (WS): Rep row 2.
- Row 5 (RS): K2, K2tog, K to marker, SM, work in rib to last st, K1 – 35 (37, 38, 40) sts.
- Rep rows 2-5 for 6 (7, 7, 8) more times.
- Work rows 4 and 5 for 3 (2, 3, 2) more times, then work row 4 one more time – 14sts.
Neck Extension
- Row 1 (RS): cast off 3 sts, remove marker, work in rib to last st, K1. (11 sts)
- Row 2 (WS): K1, work in rib to end of row.
- Row 3 (RS): Work in rib to last st, K1.
- Rep rows 2 and 3 until neck extension measures about 7 (7, 8, 8) inches.
- Cast off.

Right Front
With 7 mm (US 10.5) needles – Cast on 41, (45, 47, 51) sts
- Row 1 (RS): K1 (edge) *P1, K1; rep from * to end of row.
- Row 2 (WS): Work in rib as established to last st, K1 (edge).
- Keeping the front edge st in garter st and rem sts in rib as established, work until rib measures the same length as the back-piece rib (2.5 inches), end with a WS row as the last row you work.
- Change to 8 mm (US 11) knitting needles.
- Row 1 (RS): K1, work in rib as established over the next 10 sts, PM, K to end of row.
- Row 2 (WS): P to marker, SM, work in rib as established to last st, K1.
- Rep last 2 rows, slipping marker as you come to it until the piece measures the same length as back before shaping, end with a RS row as the last row you work.
- S (19″) M (19.5″) L (20″) 1X/2X (20.5″).
Shape Raglan Armhole and Front Edge
- Row 1 (WS): Cast off 3 (5, 6, 8) sts, P to marker, SM, work in rib to last st, K1 – 38 (40, 41, 43) sts.
- Row 2 (RS) Decrease Row: K1, work in rib to marker, SM, K2tog, K to last 4 sts, SSK, K2 – 36 (38, 39, 41) sts.
- Row 3 (WS): P to marker, SM, work in rib to last st.
- Row 4 (RS): K1, work in rib to marker, SM, K to last 4 sts, SSK, K2 – 35 (37, 38, 40) sts.
- Row 5 (WS): Rep row 3.
- Rep rows 2-5 for 6 (7,7,7,8) more times.
- Work rows 4 and 5 for 2 (1, 2, 1) more times, then rep row 4 once more. – 14 sts.
Neck Extension
- Row 1 (WS): Cast off 3 sts, remove marker, work in rib to last st, K1. (11 sts)
- Row 2 (RS): K1, work in rib to end of row.
- Row 3 (WS): Work in rib to last st, K1.
- Rep rows 2 and 3 until neck extension measures about 7 (7, 8, 8) inches.
- Cast off.
Sleeves
With 7 mm (US 10.5) knitting needles – Cast on 33 (35, 37, 41) sts
- Row 1 (RS): P1, *K1, P1; rep from * to end of row.
- Row 2 (WS) K the knit sts and P the purl sts to the end of the row.
- Rep row 2 until the piece measures about 2.5 inches from beg, end with a WS row as the last row you work.
Shape Sleeve
- Change to 8 mm (US 11) knitting needles.
- Row 1 (RS) Increase Row: K1, M1, K to last st, M1, K1 – 35 (37, 39, 43) sts
- Beg with a WS (purl) row, work even in st-st for 5 (5, 3, 3) rows then rep row 1.
- Rep last 6 (6, 4, 4) rows for 6 (8, 10, 11) more times. 49 (55, 61, 67) sts.
- Work even in St St until the piece measures about 17 (17.5, 17.5, 18) inches from the cast-on edge.
Shape Raglans
- Row 1 (RS): Cast off 3 (5, 6, 8) sts, K to end of row. – 46 (50, 55, 59) sts
- Row 2 (WS): Cast off 3 (5, 6, 8) sts, P to end of row. – 43 (45, 49, 51) sts
- Row 3 (RS) Decrease Row: K2, K2tog, K to last 4 sts, SSK, K2. – 41 (43, 47, 49) sts
- Row 4: Purl.
- Rep rows 3 and 4 for 16 (17, 18, 19) more times.
- Cast off rem 9 (9, 11, 11) sts.

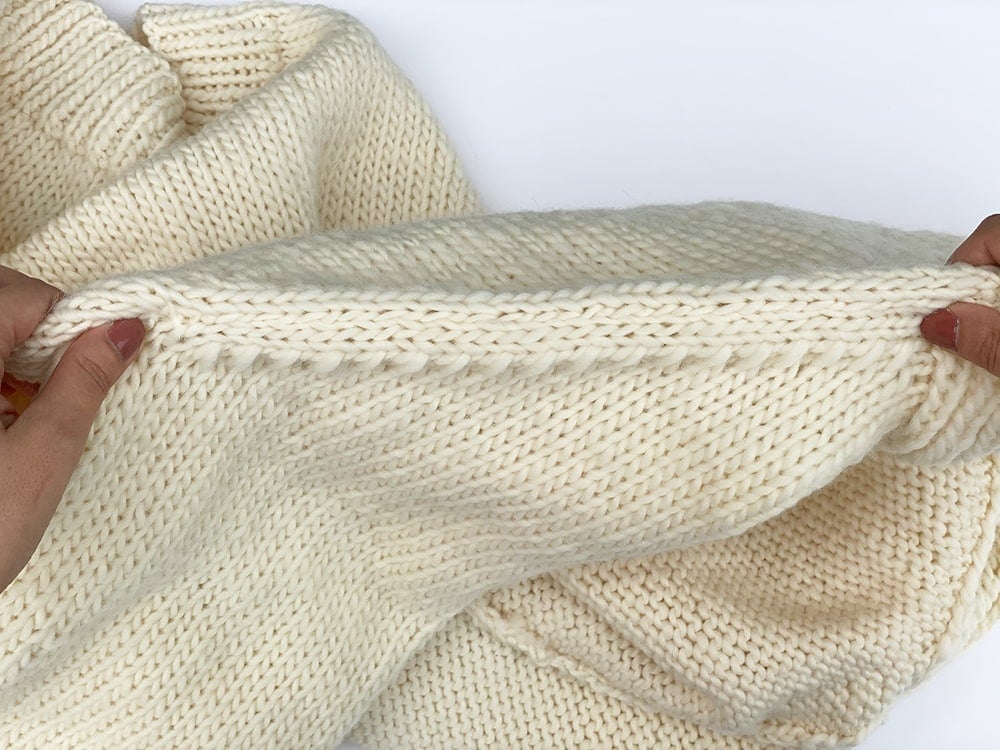
Finishing
You can see a step-by-step photo tutorial below that will help you make up the raglan cardigan.
Seaming Tutorial
You can see a tutorial on using the mattress stitch to seam here – Mattress Stitch – How To Seam Knitting.
Time needed: 1 day, 1 hour and 20 minutes
How To Sew A Cardigan
- Sewing The Sleeve To the Back
Sew the left sleeve raglan seam to the back piece raglan seam.

- Sewing The Sleeve To The Left Front
Sew the left sleeve raglan seam to the left front raglan seam.
- Sewing The Other Sleeve To the Back
Sew the right sleeve raglan seam to the back piece raglan seam.
- Sew The Sleeve To The Right Front
Sew the right sleeve raglan seam to the right front raglan seam.
- Sew The Neck Extensions
Sew the ends of the neck extensions together, then sew the long edge of the extension to the tops of the sleeves and back of the neck.
- Sew Sleeves
Sew the sleeve seams using the mattress stitch.

- Sew Side Seams
Sew the side seams using the mattress stitch.
Then weave in all loose ends.


More Easy Knit Sweater Patterns
You may also enjoy these knitting patterns, including easy cardigan patterns and chunky cardigans…
- Chunky Cardigan Knitting Pattern
- Cardigan Knitting Pattern (Fall Comfort)
- Claire’s Modern Blue Cardigan
- Irish Moss Stitch Cardigan Knitting Pattern
- Cotton Comfort Easy Knit Cardigan Pattern
- Oversized Chunky Knit Sweater Pattern
- Striped Sweater Knitting Pattern
- Chunky Turtleneck Sweater Knitting Pattern
- Forest Haze Sweater Knitting Pattern
- Circular Knitting: Bottom-Up Sweater Knit In The Round
- 31 Cardigan Knitting Patterns (Free + Easy Ideas)
Share Your Make
I love seeing your finished projects on social media.
If you enjoyed making the sweater pattern, I’d love to see yours on Instagram, tag me @handylittleme.
If you are on Facebook, stop over to the handylittleme Facebook group and share a photo.
I’d love to see your work.
Happy Knitting!
Thank you for the pattern – I am looking forward to knitting this sweater! Can you pls clarify finished bust size for 2X and the instructions for 2X. It appears that instructions for 1X and 2X are identical???
thank you
Hello MRS,
For the 1X/2X size the bust is around 46 inches.
The 1X and 2X sizes have been placed together because the cardigan is oversized, so this can cover both of those sizes.
The same for any of the other sizes – the small size could fit someone who is small (and be oversized) or between the small and medium sizes (still oversized but not as baggy).
I hope that makes sense.
Happy knitting!
Louise
Hello,
Yes – you will work rows 3 and 4 – for the grand total of 16 (17, 18, 19) more times. Until you have 23 (23, 25, 25) sts remaining.
So I had an error there by adding that line twice but you do need to work the rows that it stated first and the second number so that you end up with the final amount of sts – 23 (23, 25, 25) sts.
I hope that makes sense!
Louise
Hello Kezzie,
You are working in 1×1 ribbing for the ribbed section of the back piece.
The first row – Row 1 (RS): P1, *K1, P1: rep from * to end of row.
The Second – Row 2 (WS): K the knit sts and P the purl sts to the end of the row.
If the first st of your second row is a purl stitch then you will purl that stitch, knit the next stitch and so on.
You are creating ribbing, so you will purl any purl stitches you see o that second row and knit the knit stitches.
I hope that helps!
Louise
Hi! Could I double up on a DK yarn instead? For a medium would I need double the amount of skeins? Specifically looking at Paintbox 100% cotton DK, 137 yards. Not sure how many skeins or if that will even work to sub a different weight.
Thank you!
Hello Ashten,
DK yarn (cotton) knit with two strands together might not be thick enough. You could try an Aran/Worsted/10 Ply yarn knit with two strands together or a single strand of bulky/chunky/12 ply yarn.
For the sizes – each ball is 50g/93 yards – so to work out how much you will need – the large size in the pattern says that you need 20 x 50g balls = 1000g / 20 x 93 = 1,860 yards.
I hope that helps,
Louise
I’m using bamboo straight needles – is this ok? Thanks
Hello Jaqui,
Yes, you can use straight needles to knit instead of the circulars – the cardigan is knit flat not in the round.
I hope that helps!
Louise
I cannot master circular needles so can I use ordinary needles for this please
Hello Carol,
Yes of course – the sweater is knit flat – back and forth not in the round.
I just use circulars for everything and find them easier when knitting a garment so I can see the width of the pieces easily.
I hope you enjoy the pattern!
Louise 🙂
Hello! I really enjoy your blog nd purchased this pattern and just finished my back piece. I did want to know how to prevent the curling of my project? Will this be fixed when I start to sew my pieces together
Hello Lindsay,
You can try blocking your pattern pieces before sewing them together, this can help to flatten the edges.
https://www.handylittleme.com/blocking-knits/
Or if you want to go ahead and start seaming them together, you can see how that works out.
It should keep them flat, as the edges will be joined and the weight will help the garment to hang properly.
I hope that helps,
Louise
Thanks again for the help on the back. I couldn’t reply back, so I am posting another comment. Lol. I am now working on left front and am a bit confused. Is Row 1 end the only side that will be edged? Or do I work the garter stitch on the other end as well? So I guess is there only one side that will be edged?
Hello Lindsay,
Yes, only one side of the left front will have a front band – the other side is where you will eventually shape the armholes.
A graphic in the pattern shows you the shape of the front.
On the right front, the front band will be on the opposite side to the left – so that when you wear it they are both laying flat at the front of your body.
It is best to email if you have further questions.
I hope that helps,
Louise
I have been searching for a sweater pattern like this ! This pattern knits up quickly and was easy to follow. Best of all the oversized fit keeps you snuggly warm !! Love it! So far have made 3…. Great pattern!
Hello Alicia,
I am so happy you like the pattern!
Happy knitting 🙂
Louise
Do you have any pattern ideas on how I can add pockets to this cozy cardigan? I am almost done with the cardigan and I would love to add some pockets to keep the tissues in! Thanks.
Hello Lindsay,
You can learn more about how to knit a pocket here – https://www.handylittleme.com/how-to-knit-a-pocket/
It may help and be adaptable to the stay home cardigan.
If you don’t want to add an inline pocket, you could knit two squares with one ribbed edge (for the top of the pocket) and stitch them on top of the fronts where you want the pockets to go.
Happy knitting!
Louise
I’ve been knitting for years, but never attempted to follow an actual pattern . Your page is by far the easiest to understand and your pictures, videos and descriptions of different stitches are making this experience quite fun. Thank you for taking the time to include everything we need to know to make this cardigan
Hello Cecile,
Thank you so much for your kind words! I’m thrilled to hear that you’re finding the pattern easy to follow and that it’s making your knitting journey more enjoyable.
It means a lot to know the videos and step-by-step guides are helpful—especially for such a special project like a cardigan!
Wishing you lots of cozy, creative moments as you knit.
Can’t wait to see how yours turns out!