How To Knit A Gauge Swatch (Measure Knitting)
THIS ARTICLE CONTAINS AFFILIATE LINKS THAT SUPPORT HANDY LITTLE ME CONTENT AND FREE PATTERNS.In this blog post, you will see how to knit a gauge swatch (measure knitting).
Gauge is also referred to as tension in some knitting patterns.
Knitting a gauge swatch can help you see if your knitted item has the correct gauge and will work out the right size.
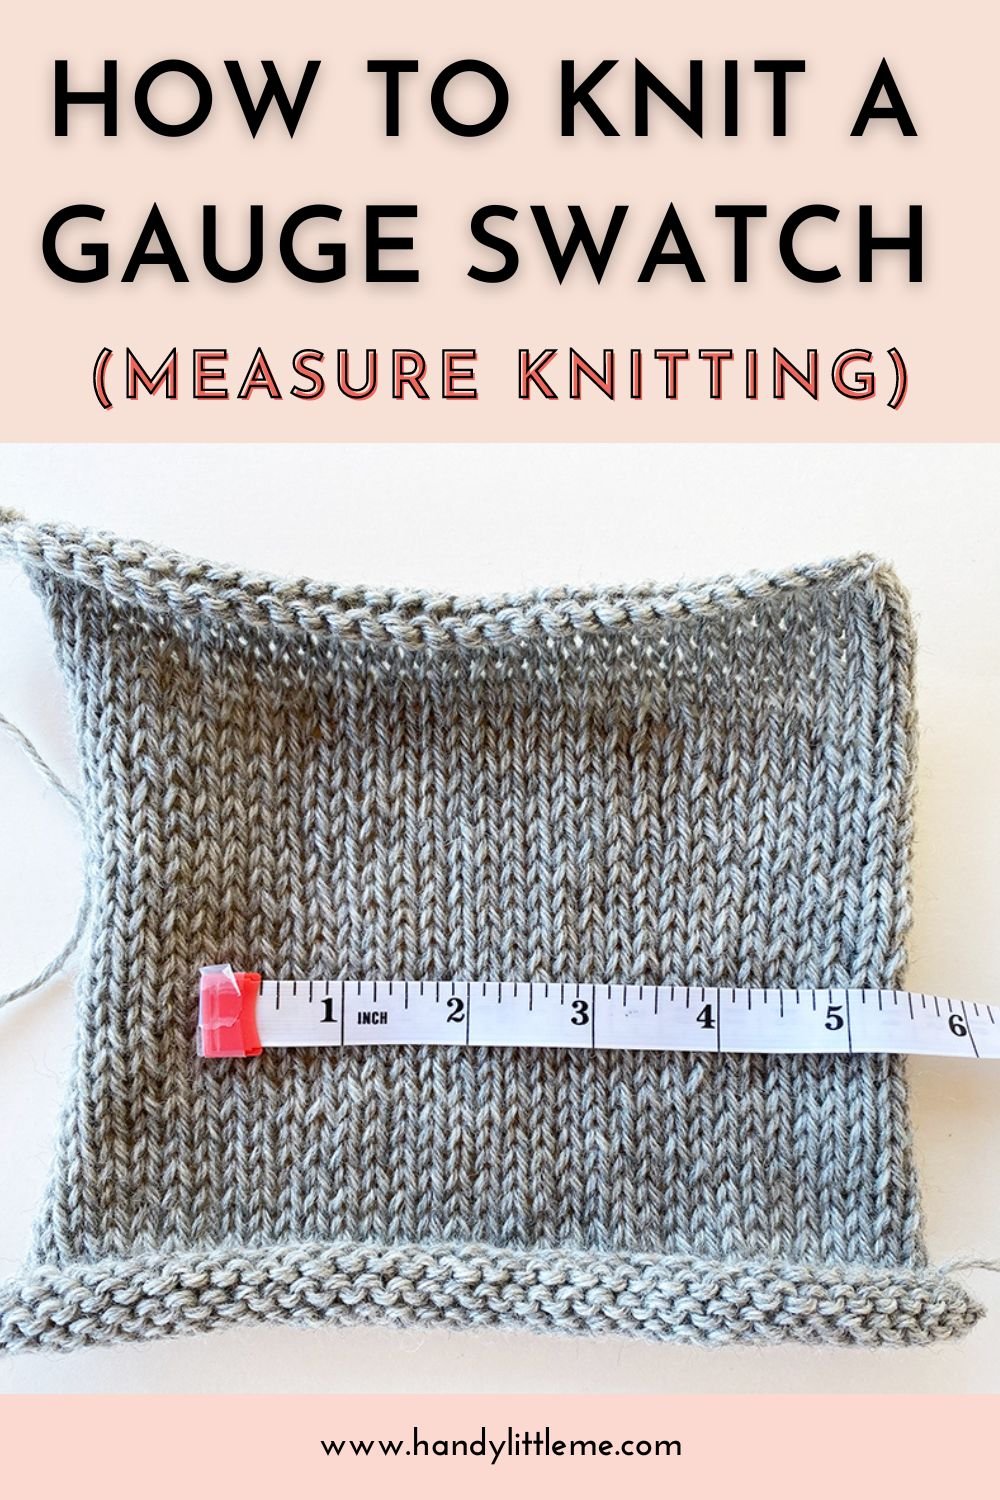
The gauge is the number of stitches per inch on the horizontal and the number of rows per inch on the vertical.
Save this article
Enter your email address and we'll send it to your inbox.
By entering your email, you agree to receive patterns, tutorials, and updates from Handy Little Me. Unsubscribe at any time.
Why You Should Create A Gauge Swatch
It’s a great way to begin a new project by making a gauge swatch to check that you have the exact gauge measurements as the pattern designer.
Most knitting patterns will tell you the gauge so you can check to see if yours is the same using the same size needles and weight of yarn.
Not checking your gauge before you start a project may mean that your project will turn out too big or too small than you intended.
Every Knitter Knits Differently
Sometimes when knitting, the finished item might look a bit different from the pattern photos.
This may be because you decided to use different needles, different yarn, or maybe your knitting tension is different, so your gauge doesn’t match up to the pattern.
Every knitter knits differently, some knit tight and some knit loose, so all of our projects have the possibility to turn out in various sizes.
Someone who knits very tightly will have a much tighter fabric than someone who knits loosely.
This means your knitting tension will be different.
This is why learning how to knit a gauge swatch and checking your gauge is important, especially for a garment like a sweater, where sizing is more important than a scarf.

How To Knit A Gauge Swatch
Getting into the habit of knitting a gauge swatch before you start a project will have some benefits, even though you will be excited to get started right away.
If the gauge of a pattern says 10 x 10 cm /4 x 4 inches = 18 sts and 20 rows with size 5 mm (US 8) needles and worsted weight yarn, that tells you what you need to make your sample swatch.

How To Get Started
With the right size needles recommended on the pattern and the yarn weight it suggests, you can begin to knit your gauge/tension square.
Make sure you knit in whatever stitch is specified on the patterns, for example, garter stitch, stockinette stitch, etc.
You should also knit a few extra rows so that your square width is a bit larger than 4×4 inches, so you can get an accurate measurement of your row gauge with your tape measure when lying flat.

Cast Off As It States In The Pattern
When you cast off, you should measure the swatch lying flat when it is no longer on the needles.
It is better to measure it flat so you can get an accurate gauge measurement.
If you plan on blocking your knitting when you are finished, then you should also block the knit swatches, so you can measure after that.
Time needed: 1 day, 2 hours and 30 minutes
How To Knit A Gauge Swatch
- Knit your square and measure in the middle across the sample
Get your measuring tape, ruler, or special gauge measuring tool (yes these are really handy!) and lay your swatch out flat. Measure the center of the swatch and start counting. You need to measure the stitches across the knitting.

- Next measure the rows going up and down
You also need to measure the rows going up and down. Measuring both the stitches going across and rows up and down is going to give you your gauge.
- You can also use a gauge measuring tool
Use a gauge measuring tool if you have one. I use my Knit Pro gauge Tool for this. You can also get a similar tool here. This may make it easier for you to count your stitches and rows. First, measure your stitches across…
Related Post: How To Count Rows In Knitting - Turn it to measure the rows up and down
Then, you can turn it to measure your rows up and down.
- Adjust if necessary
If your gauge measurements match up with the pattern gauge instructions you are following that’s great! You can now start knitting. If not you will have to adjust. For example, if you knit 6 stitches per inch instead of 9, your knitting is looser and you will need to knit another swatch using smaller needles. If you have the opposite problem and your knitting is too tight, then you will have to go up a needle size. You may even have to try a few different needle sizes. Keep knitting samples and changing your needle size until you match the gauge given on your pattern. You may need to change your yarn if that still doesn’t work.


Knitting Gauge FAQs
Here are common questions and answers about knitting a gauge swatch.
How do I know my gauge?
You need to knit a gauge swatch, also known as a tension square.
This will allow you to see how many stitches you have going across and how many rows up and down in 4×4 inches.
This is important to test out before you start knitting.
How do you measure gauge in knitting?
To make an accurate gauge swatch or tension square you need to knit a sample a bit larger than 4 x 4 inches.
Then you can get your measuring tape and see how many stitches you have per inch across the square and how many rows you have per inch measuring up and down.
How does needle size affect gauge?
In general, the heavier the yarn weight, the larger the size needle you should use with it.
This is because it will make big stitches, so you will need fewer of them.
The thinner the yarn, the thinner the needle you should use with it, and the smaller the stitches, so you need more of them.
- Learn everything about the different yarn weights here – Yarn Weight Guide {+ Conversion Chart}
- Learn everything about yarn fibers here – Yarn Types Explained: A Guide To Different Fibers
- Learn how to read a yarn label here – How To Read A Yarn Label (Step By Step)
How do you measure stitches per inch?
Measure 4 inches, count the stitches (half-stitches, too), and divide this number by 4 (it may be a fraction).
This is stitches per inch. If you have more stitches per inch than your pattern calls for that means your stitches are too small.
You will now have to try using a larger needle size.
How do you count rows in stocking stitch?
In order to count your rows in stocking stitch, you just need to count the “V’s” in the column with the right side facing you.
As you can see, each V is equivalent to one row.
How do you measure garter gauge?
In your sample swatch, look at the rows of garter stitch going up and down – each one of the ridges is 2 rows of knitting.
Count the number of ridges and multiply that by 2.
Do this by counting up and down the sample from top to bottom.
Remember – First, count the stitches across, next count the ridges going up and down, then multiply them by 2.
This will give you your garter stitch gauge.
How do you do tension in knitting?
If the number of stitches and rows is less than quoted, knit another swatch, using smaller needles.
If the number of stitches and rows is greater, use larger needles.
You may need to knit samples a few times until the stated tension is achieved.
It is more important to obtain the right number of stitches than rows.
What do I do if my gauge swatch is too big?
If your gauge swatch is coming out larger than the suggested gauge in your pattern, you have a few options to address the issue.
Firstly, try using a smaller needle size to achieve a tighter tension and smaller stitches.
You can also try adjusting your tension while knitting, ensuring you’re not inadvertently knitting too loosely.
Additionally, consider using a different yarn weight or adjusting the number of stitches in your pattern to compensate for the larger gauge.
Remember to make a new swatch after making any adjustments to ensure it aligns with the pattern’s requirements.
Does the material of the knitting needles affect the knitting gauge?
The material of the knitting needle can indeed affect the knitting gauge to some extent.
Wooden needles tend to have more grip and friction than metal needles, which can result in slightly looser stitches and a larger gauge.
Conversely, metal needles are often smoother, allowing stitches to slide more easily, which can lead to tighter stitches and a smaller gauge.
Gauge distinctions between each needle material may be subtle, but they can still affect the overall size and fit of the finished knitting project.
So it’s important to knit your swatch and your project with the same type of needle.
Should I block my gauge swatch?
Blocking your gauge swatch is generally a good idea, as it helps ensure the most accurate measurements before starting your project.
Blocking evens out the stitches relaxes the yarn, and allows the fabric to settle into its final dimensions.
This process can reveal any potential changes in gauge that may occur after washing or wearing the finished item.
By blocking your gauge swatch, you can identify and adjust for any discrepancies in your knitting tension before committing to a larger project, ultimately leading to a better-fitting and more professional-looking finished product.
Learn everything about blocking knitting here – Blocking Knits – How To Block Knitting Guide
What can I do with old knitting swatches?
Old knitting swatches can be repurposed in various creative ways rather than being discarded.
They can serve as patches for repairing knitted garments or as decorative elements on other projects.
Swatches can be sewn together to create unique accessories like scarves, blankets, or even tote bags, adding a touch of texture and color.
They also make excellent coasters or trivets, providing both functionality and charm to your home décor.
If you have a collection of swatches in different yarns or stitch patterns, you could assemble them into a sampler-style wall hanging, showcasing your knitting skills and preserving your progress over time.
You can also keep your first swatch as a keepsake of your knitting journey!
Knitting Lessons
If you are new to the knitting world and need help with the knitting basics, check out these posts here and be your own knitting instructor – Knitting Lessons (With Video Tutorials).
There, you will find step-by-step tutorials for all the different knitting techniques a newbie needs to know.
Including how to cast on, how to bind off, how to knit the basic stitches, how to knit the knit stitch, how to knit the purl stitch, the stockinette stitch, how to knit the seed stitch, the rib stitch, the simple garter stitch, the mattress stitch, short rows, how to yarn over(yo), the magic loop technique, how to fix knitting mistakes, and a list of knitting abbreviations (UK + US terms), how to knit the linen stitch, and more.
For an easy-level knitting pattern, check out this pattern category for more recommendations, here, you will find a range of knitting patterns – Beginner Knitters
And if you need more video tutorials to help you practice your basic knitting skills, check out my YouTube channel here – Handy Little Me – YouTube.
Could you share your work with us?
I love seeing your finished projects on social media.
If you enjoyed this how to knit a gauge swatch tutorial, I’d love to see yours on Instagram, be sure to tag me @handylittleme or #handylittleme to be featured.
If you are on Facebook, stop over to the Handylittleme Facebook group and share a photo, I’d love to see your work!
You can also find us on Pinterest and Etsy.
More Patterns You May Be Interested In…
- How To Knit A Hat For Complete Beginners (+ Video Tutorial)
- 20 Temperature Blanket Patterns (The Ultimate Guide)
- How To Knit A Hat With Circular Needles (Step-By-Step)
- 31 Free Baby Blanket Knitting Patterns (Easy Knit Blankets)
- How To Knit Baby Booties (Step-By-Step)
- Knitted Dog Sweater Pattern (3 Sizes)
- 12 Simple Knitting Stitches For Beginners
- How To Knit – A Complete Beginner’s Guide
- 10 Free Left Handed Knitting Tutorials
- Free Knitted Dishcloth Patterns
- 37+ Patterns To Use Up Your Yarn Stash (Small Projects)
- Free Dog Sweater Knitting Pattern (Straight Needles)
- Super Easy Corner To Corner Baby Blanket Pattern (Knit)
- Easy Baby Sweater Knitting Pattern For Beginners
- How To Knit A Baby Hat (Straight Needles)
- Pumpkin Knitting Pattern (Beginner Friendly!)
- Free Knitted Heart Pattern (Easy + Quick Project)
- 20+ Fall Oversized Knits (Sweater Knitting Patterns)
- Ribbed Beanie Knitting Pattern (Unisex Mariner’s Hat)
- How To Knit Lace Leaves (Free Pattern + Tutorial)
- What Are Stitch Markers? (Must Have Knitting Tools)
Hi Louise: I would consider myself as an advanced beginner (mostly self-taught). I understand the basics and need for a swatch. When ordering yarn for a project/pattern, would I need to order extra for the swatching process?
Thanks. Love your posts.
Hello Ellen,
There are two options here – you could swatch using the yarn from the exact amount you need – and reuse it by pulling it out later if needed – and use the excess for seaming etc.
Or buy extra so that you can swatch and have more incase you need it.
I like to buy extra (one ball or skein) because I always worry that I will have to play yarn chicken and I get anxious about that!
It’s also good to have extra for seaming or incase something goes wrong etc.
I hope that helps and thanks so much for visiting my site 🙂
Louise
When I do my gauge square, what do I do when the stitches across are correct but the rows are different. I am so confused on this subject
Hello Sue,
If you’re pretty close to reaching the right row gauge, try a different needle/hook material.
You could also try a different yarn. The closer the yarn you’re using matches the yarn in the sample (in terms of fiber and ply), the closer gauge you’ll be able to achieve.
It’s not always possible to match a designer’s exact gauge. For garments, aim to match the stitch gauge, and then take note in the difference between your row gauge and the pattern’s. You may be able to compensate by adding/removing a row or two as you work.
I hope that helps!
Louise
Hello Louise
Thank you for the swatch information very helpful as I have got in such a muddle on this before. I love looking at your patterns and advices.
Tiggy
Hello Tiggy,
I’m so happy you found the information useful.
Happy knitting!
Louise
thanks for the article! i’m a beginner and i googled what it meant which was no help but now i understand it!
Hello K,
I’m so happy you found the information useful.
Happy knitting!
Louise