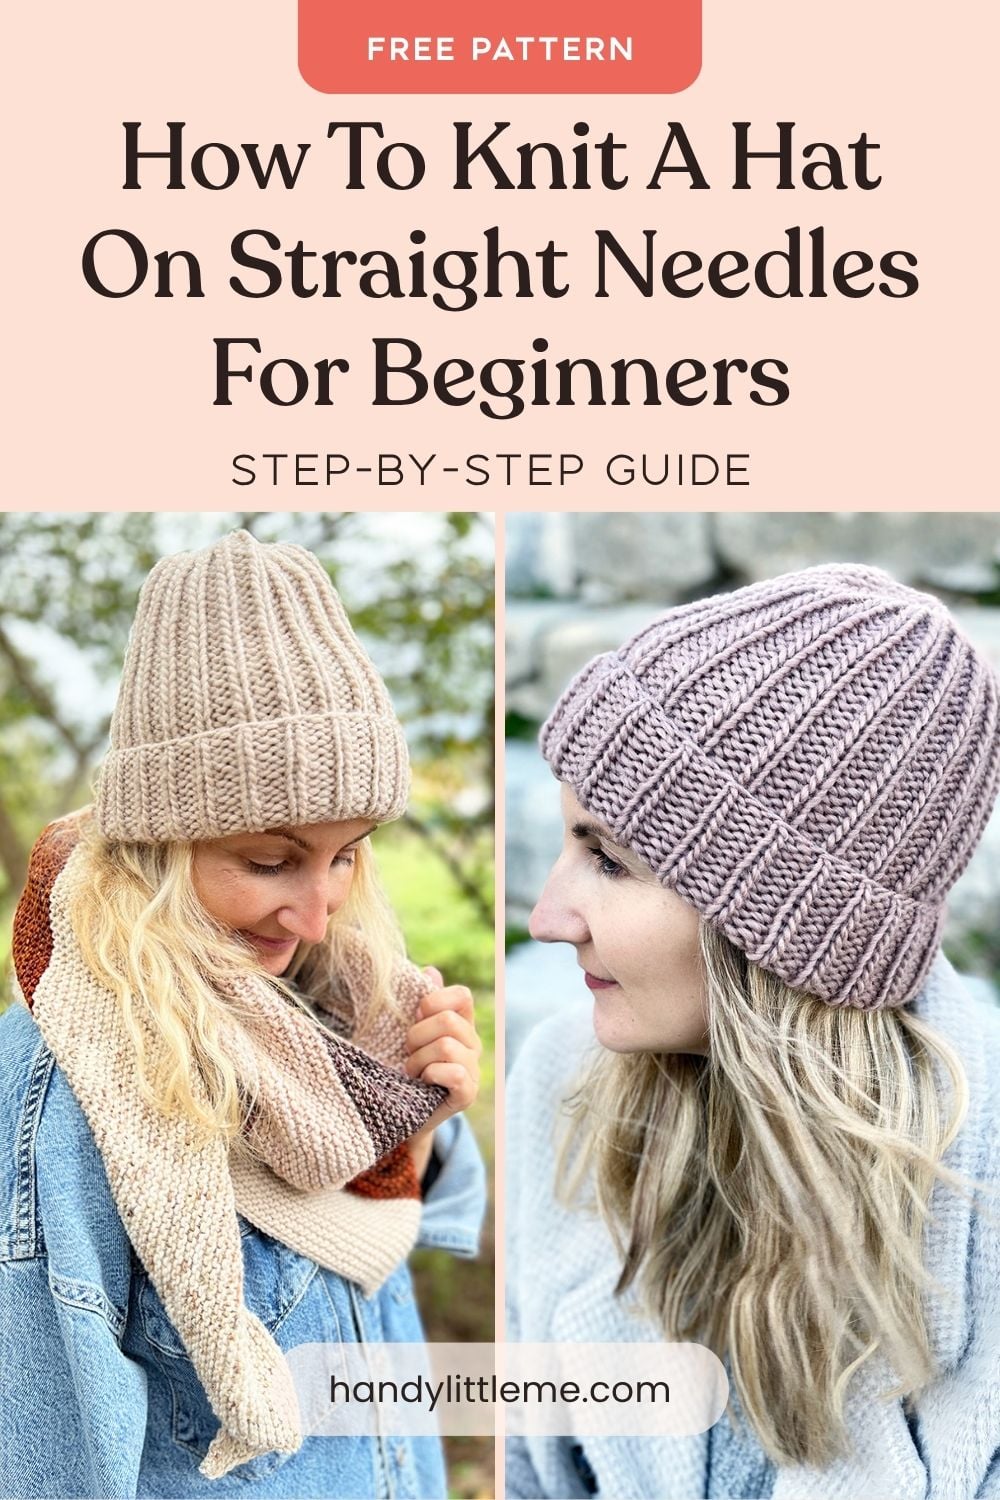
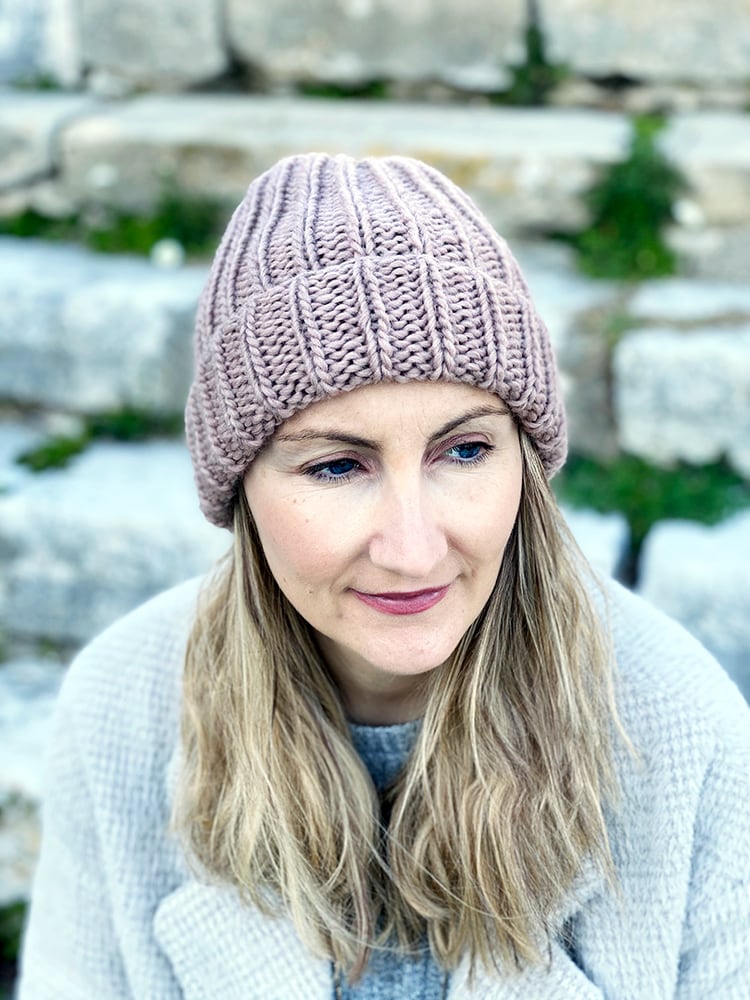
How To Knit A Hat On Straight Needles For Beginners
THIS ARTICLE CONTAINS AFFILIATE LINKS THAT SUPPORT HANDY LITTLE ME CONTENT AND FREE PATTERNS.Learn how to knit a hat on straight needles with this easy beginner beanie pattern.
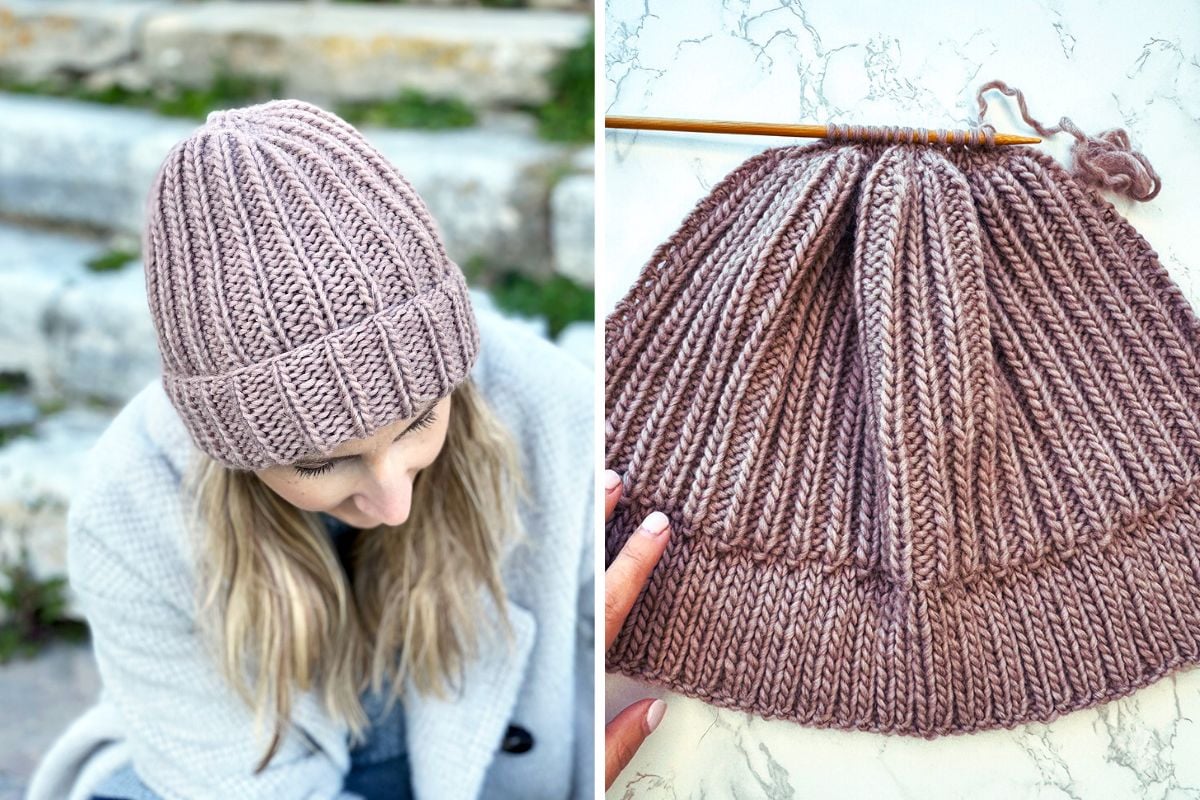
This hat is worked flat, back and forth in rows, and then seamed at the back using mattress stitch – so you don’t need circular needles or double-pointed needles to make it.
The full free pattern is written out below and includes seven sizes from baby to adult large, plus step-by-step instructions and a video tutorial to help you follow along.
If you would like a clean, ad-free version to print or save, you can purchase the printable PDF pattern in my shop.

Quick Pattern Facts
| Pattern Detail | Information |
|---|---|
| Skill level | Basic / beginner knitter |
| Method | Knit flat on straight needles |
| Needles | 6 mm / US 10 straight knitting needles |
| Yarn weight | Bulky / chunky / 12 ply yarn |
| Stitch pattern | Ribbing |
| Construction | Knit flat, then seamed at the back |
| Sizes included | Baby 0–3 months to adult large |
| Techniques used | Knit, purl, K2tog, P2tog, mattress stitch |
| Pattern includes | Written instructions, step-by-step photo tutorial, video tutorial |
| PDF option | Optional ad-free printable PDF available in my shop |
Can You Knit A Hat With Straight Needles?
Yes, you can knit a hat with straight needles.
This pattern is worked flat in rows, then seamed at the back when you finish knitting.
It’s a great option if you are a beginner knitter and you’re not ready to knit in the round yet.
Straight needles can feel much more familiar when you are learning, and this simple ribbed beanie is a lovely first hat project.
You’ll use basic knit and purl stitches, then learn a little shaping at the top of the hat with simple decreases.
About This Beginner Hat Pattern
- This easy hat pattern is perfect for anyone learning how to knit.
- The hat is knit in ribbing, which gives it plenty of stretch and creates a comfortable fit. It also has a folded brim for extra warmth.
- The simple design makes this a relaxing project, and because the hat is knit flat, you don’t have to worry about circular needles, double-pointed needles, or joining in the round.
- Basic beanies are great for gifts, winter accessories, charity knitting, or using up chunky yarn from your stash.
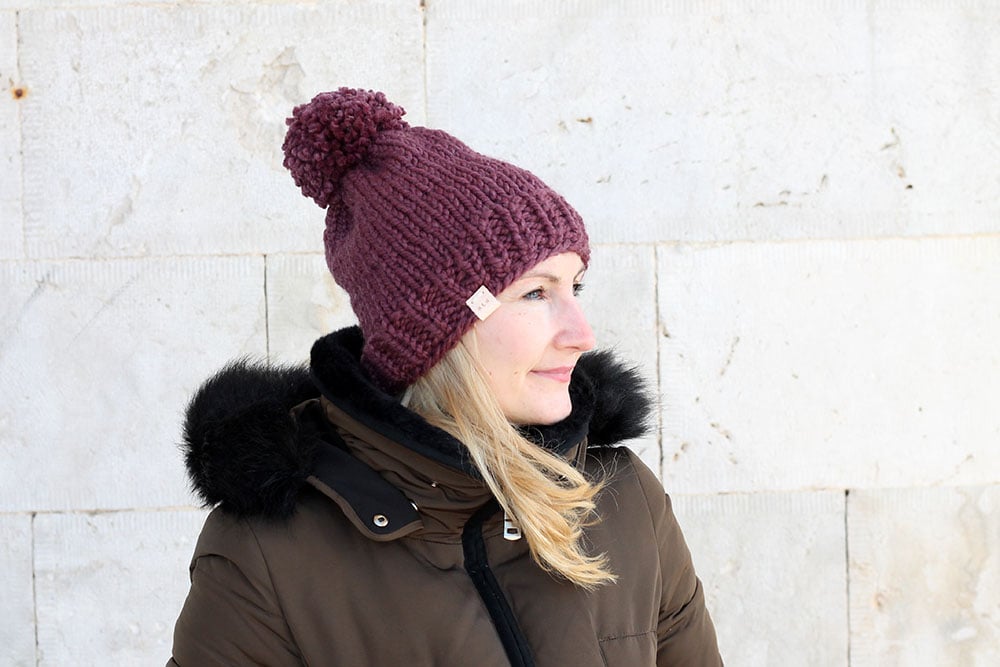
- You can keep the hat plain, as shown, or add a yarn pom pom or faux-fur pom pom if you want a little extra finish.
Copyright Info
- Please do not copy, sell, redistribute, or republish this pattern.
- If you wish to share this pattern, link to the pattern page only.
- You may sell finished items produced using this pattern.
- Do NOT use the copyrighted photos for your product listing.
- For the copyright T&C, please read my Terms of Use.
Hat Sizes Included
This pattern includes seven sizes.
The head circumference / hat circumference is written in inches.
Measure around the head before choosing your size.
If you are between sizes, you may wish to size up for a more relaxed fit or size down for a snug beanie.
| Size | Head Circumference |
| Baby 0–3 months | 13–15 inches |
| Baby 3–12 months | 15–18 inches |
| 1–2 years toddler | 18–19 inches |
| 3–12 years child | 19–21 inches |
| Teen / adult small | 21–22 inches |
| Adult medium | 22–24 inches |
| Adult large | 24–26 inches |
Gauge
16 sts and 20 rows = 4 x 4 inches / 10 x 10 cm in the main body ribbing.
Gauge is important for hats because it affects the finished size.
If your gauge is too tight, try going up a needle size. If your gauge is too loose, try going down a needle size.
The Supplies You Need
Yarn
- 1 Skein of The Petite Wool from We Are Knitters.
- Each ball is 100 GR. 153yds. 140 M.
- 100% Peruvian wool.
- The yarn weight is bulky weight yarn/chunky/12 ply.
- Yarn Weight Guide (+ Conversion Chart)
Estimated Yardage
| Size | Estimated Yardage |
| Baby 0–3 months | 48 yds |
| Baby 3–12 months | 58 yds |
| 1–2 years toddler | 60 yds |
| 3–12 years child | 70 yds |
| Teen / adult small | 76 yds |
| Adult medium | 92 yds |
| Adult large | 106 yds |
Needle Size
Notions
- Tape measure
- Yarn needle or tapestry needle
- Scissors

Abbreviations
New to knitting abbreviations? For this pattern, you only need to know how to cast on, knit, purl, decrease with K2tog and P2tog, and seam the hat when you finish.
- CO – Cast on
- Cont – Continue(ing)
- K – Knit
- K2tog – Knit the next 2 stitches together
- P – Purl
- P2tog – Purl the next 2 stitches together
- Rem – Remaining
- Rep – Repeat
- RS – Right side
- St(s) – Stitch(es)
- WS – Wrong side
Related Post: Knitting Abbreviations And Terms (US And UK)
How To Knit A Hat On Straight Needles: Step-By-Step Tutorial
- Below, you will see a step-by-step photo tutorial showing you how to knit a hat with straight needles.
- The hat in the photographs and the instructions in this tutorial are for the adult medium size.
- For the baby, child, teen, and other adult sizes, scroll down to the full written size instructions further down the page.
- You can also view the video tutorial below if you would like to follow along.
Step 1 – Cast On
Cast on 72 sts (this is the adult medium size – for more sizes, please see the instructions further down the page).
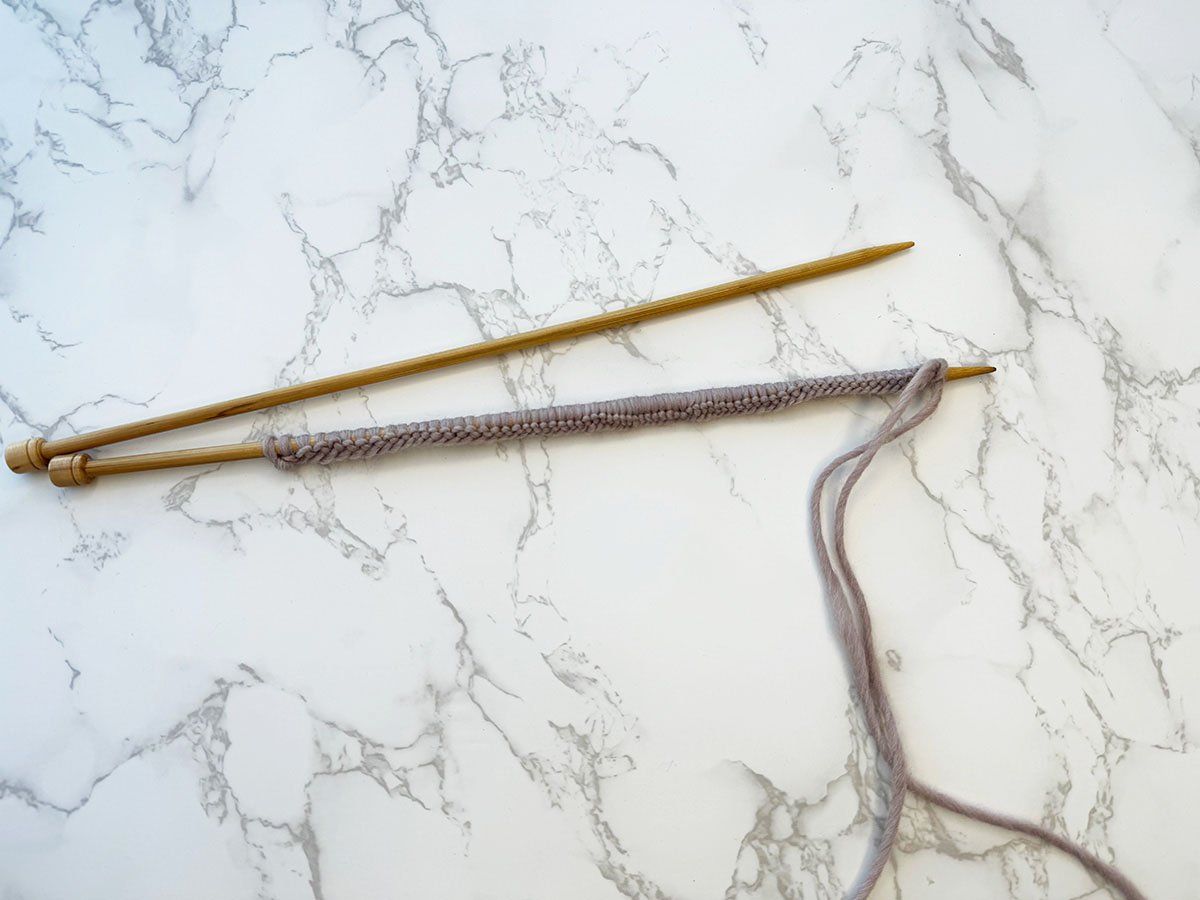
Step 2 – Knit Rows 1 and 2
- Row 1: (RS) – P1, K2 – rep to the end of the row.
- Row 2: (WS) – P2, K1 – rep to the end of the row.

Step 3 – Knit the brim of the hat
Rep rows 1 and 2 until the piece measures 3 inches from the cast-on edge, ending with a WS row.

Step 4 – Knit the main body of the hat
- Row 1: (RS) – K1, P2 – rep to the end of the row.
- Row 2: (WS) – K2, P1 – rep to the end of the row.
- Rep rows 1 and 2 until you have worked 10 inches from the cast-on edge, ending with a WS row.

Step 5 – Decrease the top of the hat
- Row 1: K1, P2tog – rep to the end of the row.
- Row 2: K1, P1 – rep to the end of the row.
- Row 3: K2tog – rep to the end of the row.
- Row 4: Purl – rep to the end of the row.
- Row 5: K2tog – rep to the end of the row.
- Row 6: Purl – rep to the end of the row.
- Cut the yarn leaving a long tail of around 15 inches.
- Thread the yarn through the yarn needle, then thread it through the remaining stitches and pull them together tight.

Step 6 – Seam the beanie using the mattress stitch
The last step is sewing the two edges of the beanie together.
I used a seaming technique called the mattress stitch. (Check it out here – The Mattress Stitch – How To Seam Knitting).
This allows you to create an invisible seam in your knitting so you don’t see where the edges meet.
To do this, you:
- Place the edges together – line them up.
- Start at the top of the hat, with the right sides facing you.
- Thread your needle and secure the top of the hat first with a stitch.
- Then, start to push the needle through the first stitch on one side of the fabric edge.
- Then move over to the other side and push your needle through the first stitch.
- Pull them together and continue to seam, picking up an edge stitch on one side and again on the other as you go.
- You can pick up stitches every one bar or two bars on the edges – this is up to you. I generally pick up every 2 bars.
- Just be careful that what you do to one side of the knitting should also be done on the other side to keep them even.

Step 7 – Seaming the brim of the hat
When you come to the brim of the hat, you need to turn this over – so the right sides are facing you to seam.
This is so you get an invisible seam on the right sides of the knitted fabric.
When you have finished seaming, secure your yarn on the inside of the hat and weave in any loose ends.
Your hat is now ready to wear.

Video Tutorial
The video tutorial below will help you follow along.
Print + Stitch
Purchase the ad-free PDF pattern
Want a clean, printable version of this pattern? You can purchase the ad-free PDF in my shop. It’s perfect for printing, saving to your device, and making without distractions.
All Hat Sizes – Pattern Information
The full written pattern for all seven sizes is below.
Choose the size you want to make, then follow the cast-on number, brim length, body length, and decrease instructions for that size.
After knitting your chosen size, use the making-up instructions to seam the hat.
Grab your inexpensive, ad-free, PDF printable pattern in my shop here.
The PDF has a written pattern with seven sizes and includes step-by-step photographs.
Baby 0-3 Months
Cast on 33 sts
- Row 1: (RS) – P1, K2 – rep to the end of the row.
- Row 2: (WS) – P2, K1 – rep to the end of the row.
Rep rows 1 and 2 until the piece measures 1.5 inches from the cast-on edge, ending with a WS row.
Knitting the main body of the hat
- Row 1: (RS) – K1, P2 – rep to the end of the row.
- Row 2: (WS) – K2, P1 – rep to the end of the row.
Rep rows 1 and 2 until you have worked 5 inches from the cast-on edge, ending with a WS row.
Decrease:
- Row 1: K1, P2tog – rep to the end of the row.
- Row 2: K1, P1 – rep to the end of the row.
- Row 3: K2tog – rep to the end of the row.
- Row 4: Purl – rep to the end of the row.
- Row 5: K2tog – rep to the end of the row.
- Row 6: Purl – rep to the end of the row.
Cut the yarn and leave a long tail of around 15 inches.
Thread through the remaining stitches and pull up tight.
Baby 3-12 Months
Cast on 42 sts
- Row 1: (RS) – P1, K2 – rep to the end of the row.
- Row 2: (WS) – P2, K1 – rep to the end of the row.
Rep rows 1 and 2 until the piece measures 2 inches from the cast-on edge, ending with a WS row.
Knitting the main body of the hat
- Row 1: (RS) – K1, P2 – rep to the end of the row.
- Row 2: (WS) – K2, P1 – rep to the end of the row.
Rep rows 1 and 2 until you have worked 6 inches from the cast-on edge, ending with a WS row.
Decrease:
- Row 1: K1, P2tog – rep to the end of the row.
- Row 2: K1, P1 – rep to the end of the row.
- Row 3: K2tog – rep to the end of the row.
- Row 4: Purl – rep to the end of the row.
- Row 5: K2tog – rep to the end of the row.
- Row 6: Purl – rep to the end of the row.
Cut the yarn and leave a long tail of around 15 inches.
Thread through the remaining stitches and pull up tight.
1-2 Years Child
Cast on 48 sts
- Row 1: (RS) – P1, K2 – rep to the end of the row.
- Row 2: (WS) – P2, K1 – rep to the end of the row.
Rep rows 1 and 2 until the piece measures 2 inches from the cast-on edge, ending with a WS row.
Knitting the main body of the hat
- Row 1: (RS) – K1, P2 – rep to the end of the row.
- Row 2: (WS) – K2, P1 – rep to the end of the row.
Rep rows 1 and 2 until you have worked 7 inches from the cast-on edge, ending with a WS row.
Decrease:
- Row 1: K1, P2tog – rep to the end of the row.
- Row 2: K1, P1 – rep to the end of the row.
- Row 3: K2tog – rep to the end of the row.
- Row 4: Purl – rep to the end of the row.
- Row 5: K2tog – rep to the end of the row.
- Row 6: Purl – rep to the end of the row.
Cut the yarn and leave a long tail of around 15 inches.
Thread through the remaining stitches and pull up tight.
3-12 Years Child
Cast on 57 sts
- Row 1: (RS) – P1, K2 – rep to the end of the row.
- Row 2: (WS) – P2, K1 – rep to the end of the row.
Rep rows 1 and 2 until the piece measures 3 inches from the cast-on edge, ending with a WS row.
Knitting the main body of the hat
- Row 1: (RS) – K1, P2 – rep to the end of the row.
- Row 2: (WS) – K2, P1 – rep to the end of the row.
Rep rows 1 and 2 until you have worked 8 inches from the cast-on edge, ending with a WS row.
Decrease:
- Row 1: K1, P2tog – rep to the end of the row.
- Row 2: K1, P1 – rep to the end of the row.
- Row 3: K2tog – rep to the end of the row.
- Row 4: Purl – rep to the end of the row.
- Row 5: K2tog – rep to the end of the row.
- Row 6: Purl – rep to the end of the row.
Cut the yarn and leave a long tail of around 15 inches.
Thread through the remaining stitches and pull up tight.
Teen/Adult Small
Cast on 63 sts
- Row 1: (RS) – P1, K2 – rep to the end of the row.
- Row 2: (WS) – P2, K1 – rep to the end of the row.
Rep rows 1 and 2 until the piece measures 3 inches from the cast-on edge, ending with a WS row.
Knitting the main body of the hat
- Row 1: (RS) – K1, P2 – rep to the end of the row.
- Row 2: (WS) – K2, P1 – rep to the end of the row.
Rep rows 1 and 2 until you have worked 9 inches from the cast-on edge, ending with a WS row.
Decrease:
- Row 1: K1, P2tog – rep to the end of the row.
- Row 2: K1, P1 – rep to the end of the row.
- Row 3: K2tog – rep to the end of the row.
- Row 4: Purl – rep to the end of the row.
- Row 5: K2tog – rep to the end of the row.
- Row 6: Purl – rep to the end of the row.
Cut the yarn and leave a long tail of around 15 inches.
Thread through the remaining stitches and pull up tight.
Adult Medium
Cast on 72 sts
- Row 1: (RS) – P1, K2 – rep to the end of the row.
- Row 2: (WS) – P2, K1 – rep to the end of the row.
Rep rows 1 and 2 until the piece measures 3 inches from the cast-on edge, ending with a WS row.
Knitting the main body of the hat
- Row 1: (RS) – K1, P2 – rep to the end of the row.
- Row 2: (WS) – K2, P1 – rep to the end of the row.
Rep rows 1 and 2 until you have worked 10 inches from the cast-on edge, ending with a WS row.
Decrease:
- Row 1: K1, P2tog – rep to the end of the row.
- Row 2: K1, P1 – rep to the end of the row.
- Row 3: K2tog – rep to the end of the row.
- Row 4: Purl – rep to the end of the row.
- Row 5: K2tog – rep to the end of the row.
- Row 6: Purl – rep to the end of the row.
Cut the yarn and leave a long tail of around 15 inches.
Thread through the remaining stitches and pull up tight.
Adult Large
Cast on 81 sts
- Row 1: (RS) – P1, K2 – rep to the end of the row.
- Row 2: (WS) – P2, K1 – rep to the end of the row.
Rep rows 1 and 2 until the piece measures 3 inches from the cast-on edge, ending with a WS row.
Knitting the main body of the hat
- Row 1: (RS) – K1, P2 – rep to the end of the row.
- Row 2: (WS) – K2, P1 – rep to the end of the row.
Rep rows 1 and 2 until you have worked 11 inches from the cast-on edge, ending with a WS row.
Decrease:
- Row 1: K1, P2tog – rep to the end of the row.
- Row 2: K1, P1 – rep to the end of the row.
- Row 3: K2tog – rep to the end of the row.
- Row 4: Purl – rep to the end of the row.
- Row 5: K2tog – rep to the end of the row.
- Row 6: Purl – rep to the end of the row.
Cut the yarn and leave a long tail of around 15 inches.
Thread through the remaining stitches and pull up tight.
Making Up
The last step is sewing the two edges of the beanie together.
I used a seaming technique called the mattress stitch – The Mattress Stitch – How To Seam Knitting
This allows you to create an invisible seam in your knitting so you don’t see where the edges meet.
To do this, you (see the tutorial above for help):
- Place the edges together – line them up.
- Start at the top of the hat, with the right sides facing you.
- Thread your needle and secure the top of the hat first with a stitch.
- Then, start to push the needle through the first stitch on one side of the fabric edge.
- Then, move over to the other side and push your needle through the first stitch.
- Pull them together and continue to seam, picking up an edge stitch on one side and again on the other as you go.
- You can pick up stitches every one bar or two bars on the edges – this is up to you. I generally pick up every 2 bars.
- Just be careful that what you do to one side of the knitting should also be done on the other side to keep them even.
- When you come to the brim of the hat, you need to turn this over – so the right sides are facing you to seam.
- This is so you get an invisible seam on the right sides of the knitted fabric.
- When you have finished seaming, secure your yarn on the inside of the hat and weave in any loose ends.
- Your hat is now ready to wear.

FAQs
Is this hat pattern good for beginners?
Yes, this is a great hat pattern for beginner knitters.
The hat is knit flat on straight needles, so you don’t need to learn circular knitting before you begin.
You will use knit and purl stitches, then simple decreases to shape the crown of the hat.
Can you knit a beanie with two straight needles?
Yes, you can knit a beanie with two straight needles.
This pattern is worked flat in rows, then seamed at the back when you finish knitting.
It’s a lovely option if you only have straight needles or if you prefer not to knit in the round.
How many stitches do you cast on for a hat?
The number of stitches you cast on depends on the size you want to make.
For this pattern, you will cast on:
- 33 sts for baby 0–3 months.
- 42 sts for baby 3–12 months.
- 48 sts for toddler.
- 57 sts for child.
- 63 sts for teen / adult small.
- 72 sts for adult medium.
- 81 sts for adult large.
What size needles do I use?
For this pattern, use 6 mm / US 10 straight knitting needles.
If your gauge is different, you may need to adjust your needle size.
How much yarn do I need for a hat?
You will need around 48–106 yds of bulky / chunky yarn, depending on the size you are making.
The smallest baby size uses around 48 yds, and the adult large size uses around 106 yds.
How long should I knit before decreasing?
For the adult medium size shown in the tutorial, knit until the piece measures 10 inches from the cast-on edge, then begin the decrease rows.
The length before decreasing changes by size, so check the written instructions for the size you are making.
How do you seam a hat knitted flat?
A hat knitted flat is seamed by bringing the two side edges together and sewing them with a yarn needle.
Mattress stitch is a good choice because it creates a neat, nearly invisible seam.
When you reach the folded brim, turn the brim so the right side is facing you as you seam. This keeps the seam neat when the brim is folded up.
Can I knit this hat with circular needles instead?
This pattern is written for straight needles and is worked flat.
If you prefer to knit in the round, you may want to use a hat pattern written specifically for circular needles.
You can find my beginner hat pattern for circular needles linked further down the page.
Can I use DK yarn for this pattern?
This pattern is written for bulky / chunky / 12 ply yarn.
DK yarn is much thinner, so it would change the gauge and the finished size of the hat.
If you want to use DK yarn, I recommend choosing a hat pattern written specifically for DK yarn, or making a gauge swatch and recalculating the stitch counts and row lengths.
Is there a printable PDF version?
Yes, the full free pattern is written out on this page.
If you would like a clean, ad-free version to print or save, you can purchase the printable PDF pattern in my shop.
The PDF includes all seven sizes and step-by-step photographs.
Helpful Beginner Knitting Tutorials
This pattern is great for any beginner knitters.
For anyone new to knitting, it is a great way to learn the basics.
- Knitting cast-on methods
- Knitting Lessons
- How to cast on knitting
- How to cast off knitting for total beginners (step by step)
- How to knit garter stitch
- How to knit the purl stitch (for beginners + a video tutorial)
- How to knit stockinette stitch (for beginners)
- How to read knitting patterns for beginners
- Knitting abbreviations and terms (US and UK)
- How to knit rib stitch patterns (1×1 and 2×2 ribbing)
- How to knit two stitches together – K2tog

Straight Needles vs Circular Needles
If you’re wondering whether you should knit your hat on straight needles or circular needles, here’s a quick guide.
| Choose this straight-needle hat pattern if… | Try a circular needle hat pattern if… |
| You are a beginner knitter. | You want to learn to knit in the round. |
| You only have straight needles. | You prefer a seamless hat. |
| You don’t want to use double-pointed needles. | You are comfortable using circular needles. |
| You like knitting flat in rows. | You want to avoid sewing a back seam. |
| You want a simple first beanie project. | You want to practice magic loop or DPNs for decreases. |
Both methods can make beautiful hats.
This pattern is ideal if you want a simple, beginner-friendly hat knitted flat on two straight needles.
Next, Learn To Knit A Hat In The Round
Once you feel comfortable knitting a hat flat, you may also be ready to try another method: knitting a hat in the round.
This is a great next step because it allows you to create a seamless hat using circular needles.
My beginner hat pattern, worked with circular needles, also includes a step-by-step photo tutorial, so it’s easy to follow if you’re ready to try circular knitting.
This pattern has a step-by-step photo tutorial to show you how to knit your first hat in the round – How To Knit A Hat With Circular Needles
Share Your Finished Hat
I love seeing your finished projects.
If you enjoyed making this easy hat, I’d love to see yours on Instagram. Tag me @handylittleme so I can take a look.
You can also find Handy Little Me on Facebook, Ravelry, Pinterest, YouTube, and more.
Happy knitting!
More Patterns You May Be Interested In
- How To Knit A Baby Hat (Straight Needles)
- Ribbed Beanie Knitting Pattern (Unisex Mariner’s Hat)
- 20 Temperature Blanket Patterns (The Ultimate Guide)
- 31 Free Baby Blanket Knitting Patterns (Easy Knit Blankets)
- How To Knit Baby Booties (Step-By-Step)
- Knitted Dog Sweater Pattern (3 Sizes)
- 12 Simple Knitting Stitches For Beginners
- Free Knitted Dishcloth Patterns
- 37+ Patterns To Use Up Your Yarn Stash (Small Projects)
- Free Dog Sweater Knitting Pattern (Straight Needles)
- Super Easy Corner To Corner Baby Blanket Pattern (Knit)
- Easy Baby Sweater Knitting Pattern For Beginners
- Pumpkin Knitting Pattern (Beginner Friendly!)
- 8 Cable Stitch Knitting Patterns
- How To Knit – A Complete Beginner’s Guide
- Free Knitted Heart Pattern (Easy + Quick Project)
- 20+ Fall Oversized Knits (Sweater Knitting Patterns)


Hello! Love the pattern and the colour, the yarn is really beautiful. I have the same WAK petite wool yarn and was hoping to make a hat for my husband using this pattern, but I unfortunately only have us 11 needles instead of the 10 stated in the pattern. Would it still be possible to follow the pattern or do I need to adapt it in any way? Thank you!
Hello Hailey, Yes, you can use the US 11 needles and make the hat following the same pattern, but I would suggest casting on 66 stitches because the size will be larger if you cast on the suggested 72sts for this pattern.
The number of the cast on sts needs to be dividable by 3 – so 63 or 66 stitches.
I hope that helps!
Louise 🙂
Hi Louise! Thanks so much for this pattern. If I use 11 needles and 150 g wool with the same pattern, will the hat knit up to fit a larger head? I keep trying to find a flat knitting pattern to make a hat for my husband – my hats come out too small for his head. I am a newbie and don’t know how to size up yet. Any help is appreciated!
Hello Jess,
You could try using one needle size up to get a larger size.
I hope that helps,
Louise
Hello! I love the way your hat looks! I am looking at making one for my cousin but she has an 18 inch head is that too small for this? Or would it still work? I was also curious what the point of a darning needles is?
Thank you!
Hello Jules,
I think the hat should still fit, it has a stretch because of the ribbing so will fit up to a head size of around 22-26 inches in circumference.
The darning needle/yarn needle is used to seam the hat closed.
I hope that helps!
Louise
Thank you for the lovely pattern. Our winter has started so I am going to knit one for my husband.
Hello Susan,
Thanks so much for your kind words, I’m so happy you like the pattern.
I hope your husband will like the hat!
Happy knitting,
Louise
I was wondering if you can adapt other hat patterns knitted on a circular needle to this style on straight needles?
Hello Dia,
Yes, other patterns knit in the round can normally be converted to being knit flat with seaming.
In some of my other patterns, I have instructions for both – like the kid’s beanie hat pattern.
Thanks,
Louise
is there a pattern that i can use to knit a toddler hat for my niece??
Hello Katie,
I have this pattern for a toddler beanie – https://www.handylittleme.com/kids-beanie-knitting-pattern/
And this one for a baby hat – https://www.handylittleme.com/flat-knit-baby-hat-pattern/
I hope that helps!
Louise
Hi can I use 5mm straight needles?
Hello Rica,
The pattern needs 6mm (US 10) knitting needles.
Thanks,
Louise
Do you have a matching pattern for a baby/toddler hat or know the possible amount of stitches needed to downsize?
Thanks!!
Hello Julie,
I don’t have a matching child’s hat pattern for this hat, but you could try this Mariner’s hat pattern which has baby and child sizes – https://www.handylittleme.com/mariners-hat-pattern/
Or the Irish Moss Stitch hat which also has a range of sizes – https://www.handylittleme.com/irish-moss-stitch-hat-pattern/
I hope that helps!
Louise
Did the mans hat the blue one with the three colours. Loved thanks so much.
Hello Diane,
Thanks so much for your feedback, I’m so happy you enjoyed the pattern 🙂
Louise
Lol, I haven’t knit in years but I was a little bored today so I sized it down and made it for my cat (which he obviously loved). That being said the instructions were really easy to follow and gave me something simple to do today so thank you.
Hello Gertrude,
I was smiling that you made the hat for your cat!
I would love to see a photo – if you are on IG tag @handylittleme or drop a photo in the HLM Facebook Group here – https://www.facebook.com/groups/handylittlemecommunity/
Happy Knitting,
Louise 😉
Hello Louise
Thank you for your pattern, I have knitted the hat for my husband’s birthday using a West Yorkshire Spinners pure wool (Kerry Hill and Blue Leicester breed). My hubby is a Yorkshire man and Kerry is just across the border from where we live now in rural Shropshire. I am knitting at night to keep my mind off Covid and the current lockdown. It is such a relaxing thing to do. I am going to attempt your fingerless gloves pattern now.
Best wishes
Leena
Hello Leena,
I am so happy that you are enjoying the patterns.
Knitting is a great way to keep your mind and hands occupied while giving you a sense of calm, I too love to knit or crochet on an evening and switch off my mind to everything else!
I hope you enjoy the fingerless mittens pattern,
Louise
Hi Louise,
Thank you for the pattern. I’m a very beginner & fell in love with this hat. Bought the 10″ needles & bulky yarn.
I can’t wait to get started, but I’m confused about casting 72 Sts,, I’m thinking that is the width, but I know I’m wrong. Sorry I feel so dumb. Help
Hello Adele,
Yes, you cast on 72 sts – you are knitting this hat flat so you are making the full width of the hat and then will seam it when you are finished.
The pattern is step by step, so if you follow the tutorial, you will start to see how this will work out.
I hope that helps,
Louise
Hi Louise, Love this pattern, hoping I will be able to knit it correctly . I bought the 10″ needles but they were too short to cast on 72 stitches, so I sent for 16″ length. My question is I don’t know how to figure the tail length I need to make this hat.
Thank You,
Hello Adele, the needle size you need to make the hat is 6mm (US 10) this is the size of the knitting needle, not the needle length or the cable length if you are using circulars.
If you want to use circular needles to knit the hat then yes you would need a 16″ cable length.
For the cast on – you will need around 35-40 inches perhaps for the yarn length.
I hope that helps!
Louise
Hi! I’m planning to make this hat with the petite wool for my next project. I’m currently working on a different pattern hat with the same wool, and I feel like it’s fuzzing (not sure if that’s the right word) a lot, so it doesn’t look nearly as clean and neat as your picture of the hat. I haven’t been undoing and redoing my work, so I don’t think I’m manipulating the yarn too much. I was wondering if you had that issue with the petite wool at all, or if you had any suggestions for remedying it. Thanks!
Hello Margaret,
I don’t have this issue when I’m knitting with it but I do if I use it for seaming – If I use it for that I have to keep twisting it so that the fibers stay together.
When knitting though it stays together with a little fuzzing (pilling?).
I think it’s just the way the wool is because it’s 100% Peruvian wool, so it just naturally has that texture/quality about it.
Sorry I couldn’t be more help!
Louise
Hi, thanks for this great pattern! This is only my second ever knitting project. I’m up to the end where it says to leave a long tail, but should I have cast off first? Or do I get a needle and go through the remaining stitches that are on the needle? Sorry if that’s a silly question, I’m very much still a beginner with knitting. Thanks! 🙂
Hello Kalysha,
Yes – you should leave a tail of around 15 inches, thread the length of yarn into your darning needle first, then thread through the remaining sts and pull up tight.
This is the instruction in step 3 of the step-by-step pattern.
You can them start to sem your hat – instructions for that in step 4.
I hope that helps and happy knitting!
Louise
Thanks for the pattern! I had a great time knitting it up for my hubby. I now want to make a similar one for my father in law but he’s got a bigger head! How many cast on stitches should I add on?
Hello Eeching,
You could try casting on 82 sts?
Let me know how it goes!
Louise
Thanks Louise. I’m thinking an additional 10 stitches could be a bit too many. If i go down to 78, would that work? Sorry for the many questions! Still a newbie but love your patterns! About to start on the fingerless mittens as well.
Hello Eeching,
You could try casting on 78 or 80sts because of the ribbing pattern.
I hope that helps!
Louise
I loved the result of this beanie but there is no way the measurements are for an adult head. Definitely going to be remaking this in a larger version but be warned!
Hello Violet,
The beanie fits both my own head and my husband’s head and we are both adults with pretty average adult head sizes.
So it does fit an adult head size – with an average circumference of around 22-26 inches.
As it says in the instructions.
It would be easy enough to increase the size – perhaps you can cast on 80sts or more.
Happy knitting!
Louise
Hi Louise, I love this pattern. I’m really new to knitting but have managed to do it with no problems but I’ve now thread the yarn through the top stitches and pulled it tight and need some help please.
Do I now remove the needle? Do I have to see those top stitches together or just start the seam at the first stitches excluding the ones I’ve pulled tight? Thanks so much xx
Hello Rachel,
Yes, you keep the yarn in the needle after you have pulled up the remaining stitches.
Then you will seam the opening closed, using the mattress stitch for best results.
This is an invisible seam.
Start seaming next to where you have pulled the stitches tight.
You can learn more about seaming the hat closed here – https://www.youtube.com/watch?v=RqEvwXICTds&t=1s
I hope that helps!
Louise
I wanted to make a few hats for my family, but I’m having to do it on a tight budget, so I wanted to know if I could adapt this pattern to be done with worsted weight yarn as I have a lot of that so I could practice before the techniques without ruining my more expensive yarn.
Hello Autumn Rain,
You can see a similar pattern in Aran/Worsted/10 Ply yarn here – https://www.handylittleme.com/mariners-hat-pattern/
Happy knitting!
Louise
Hello! I have accidentally knit 5 inches of brim rather than 3 (absentmindedly carried on forgetting that it need only be 3 inches!) Should I now move to the next step of the pattern and follow it as written from there, or will I need to make some other kinds of amendments? I’m assuming if I carry on with the pattern from here I might just have a bit of a wider brim but I’m a newbie knitter so wanted to check if anyone had any advice 🙂
Hello Marie,
I would probably pull it out (frog it – rip it) back to 3 inches.
Unless you want the brim to be 5 inches – this may be a bit long…
You can pull it out, back to 3 inches, and continue on from there.
I hope that helps!
Louise
Hello! This is my first time knitting so I am still trying to figure things out. When you say end with a WS row for the brim, does that mean have the last row you knit is a WS row or does it mean have the next row you knit is a WS row? Thanks!
Hello Abby,
To end on a WS row – this means that the last row you knit should be a wrong side row.
The next row as you continue will be on a right side row.
I hope that helps!
Louise
This is lovely and I wish I had found this sooner on my knitting journey! Are you able to help me with what the decrease should be if I am ribbing 2×2? Thanks in advance!
Hello Hannah,
There is another hat pattern in 2×2 ribbing here that may help you with the decreases – https://www.handylittleme.com/easy-beginner-hat-knitting-pattern/
I hope that helps!
Louise
Hi! When you say “ending with a WS row” you mean that the last row I knit should be the wrong side and then my first row of the next step should be starting with the right side? Thank you!!!
Hello Isabell,
Yes that is correct.
Thanks,
Louise
Hello from UK!
I’m not a ‘beginner’ knitter but I’ve a problem with the needle size. Converting 6 mm/US size 10 from a chart tells me to use UK size 4. On the size 4 needles I already have it tells me they are US 6 (no clue if that means 6 mm!!). Not sure if I should be using UK size 4 or UK size 6. Hope my question makes sense? So looking forward to making this hat!
Best wishes, Jan
Hi Jan,
For this hat you want 6 mm needles. That’s US 10 and old UK size 4.
If your needle says US 6, that’s 4.0 mm—much smaller—so it isn’t the same as UK 4.
Tip: when in doubt, trust the mm size (or pop the needle through a gauge checker).
And if your swatch comes out a bit tight/loose, adjust up or down a needle size to meet gauge.
Hope that clears it up—can’t wait to see your hat!
Best wishes,
Louise
Hi I love the pattern, it’s very easy to follow
just confused about the yarn you used, you say bulky but to me it looks like a UK – DK
Hi Laura, thank you! So glad the pattern’s easy to follow.
The hat is written for bulky/chunky (US #5, UK “Chunky”) yarn.
Photos can sometimes look slimmer, but the gauge is for chunky.
I hope that helps!
Louise