Kids Beanie Hat Pattern (Adorable & Easy DIY)
THIS ARTICLE CONTAINS AFFILIATE LINKS THAT SUPPORT HANDY LITTLE ME CONTENT AND FREE PATTERNS.This adorable kids’ beanie hat pattern is the perfect pattern for a beginner knitter.
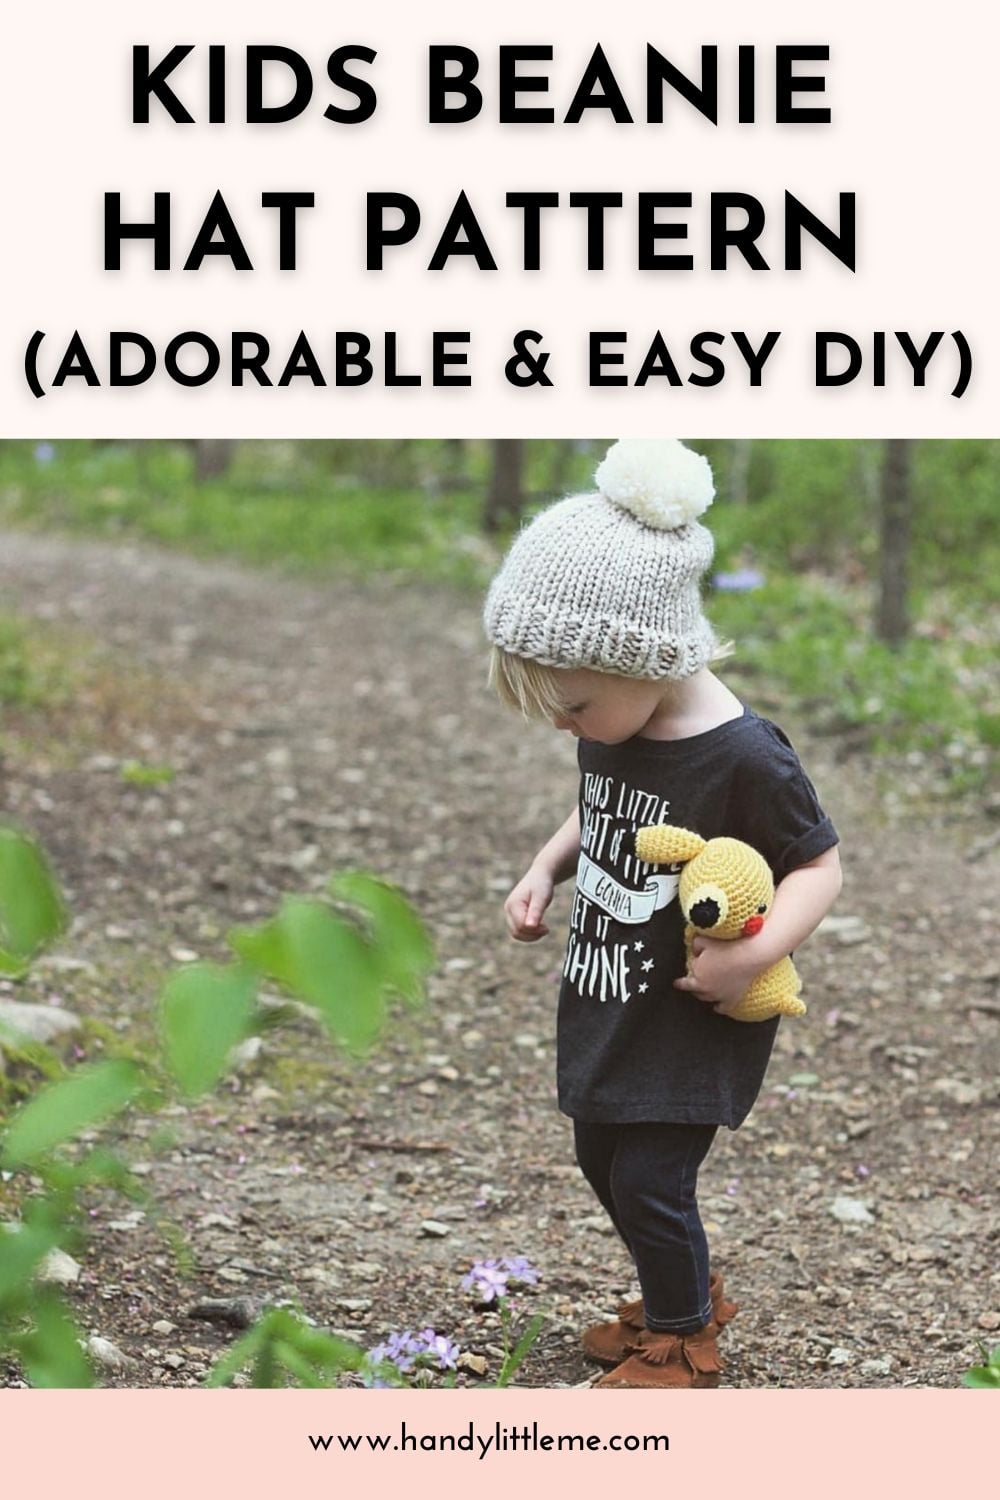
The simple beanie hat is a basic hat your little one will love wearing, almost as much as you’ll love seeing them in it.
Please scroll down to view the free pattern, or grab a printer-friendly, ad-free PDF in my shop here.

Kids Hat Knitting Pattern – Easy Level
The kid’s hat pattern is easy to follow, there are two options for you, knitting in the round or knitting the hat flat.
The hat uses basic stitches—knit and purl —to create ribbing, then uses stockinette stitch for the main body of the hat.
I made the hat with super-bulky/super-chunky/14-ply yarn, which knits up fast!
You can even complete this hat during one movie.
Related Post: How To Knit A Hat For Complete Beginners (+ Video Tutorial)
Knitting The Hat – What You Need To Know
If you’re a beginner, this pattern is a great way to learn shaping with easy decreases.
New to knitting? Knitting the hat flat on two needles is usually the simplest place to start.
If you’ve got a little more experience, you might prefer knitting the hat in the round.
Want a step-by-step on working in the round? Check out this guide: How To Knit A Hat With Circular Needles.
How many stitches do you cast on for a child’s beanie?
For this pattern, you will cast on 30 stitches for a baby and 34 stitches for a toddler.
You could even cast on 36 stitches for a child and 38 for a teen.
The Needles
- I used 10 mm (US 15) knitting needles.
- If you are knitting in the round, you need 16-inch circular needles to accommodate the number of stitches.
The Yarn
- I used 1 x skein YarnArt Alpine Maxi in Grey 334 for the hat with a coordinating color for the pom-pom.
- This yarn is a wool/acrylic blend and very soft to the touch.
- You can substitute this yarn with any super bulky/super chunky/14-ply yarn.
- A good substitute is Lion Brand Wool-Ease Thick and Quick.

Kids Beanie Hat Pattern
Purchase the inexpensive, ad-free, PDF printable pattern in my shop here.
Notes
Skill Level – Easy
The hat is a quick knit in super bulky yarn, and the simple design makes for a relaxing and enjoyable knit.
This easy hat could be made in red for a Christmas hat that little kids will look super cute wearing!
Copyright Info
- Please do not copy, sell, redistribute, or republish this pattern.
- If you wish to share this pattern, link to the pattern page only.
- You may sell items produced using this pattern.
- Do NOT use copyrighted photos for your product listing.
- For the copyright T&C, please read my Terms of Use.
Size Information
Gauge – 8 sts / 12 rows – 10cm (4″)
Size – baby 14″ / toddler 16″
The Supplies You Need
Yarn
- Yarn – 1 x skein YarnArt Alpine Maxi in Grey 334
- Content: 30% Alpaca Wool, 10% Wool, 60% Acrylic
- Ball Weight: 150 g (5.3 oz)
- Yarn Length: 120 m (131 yd)
- Scraps for the pom pom
- Yarn substitute – Lion Brand Wool-Ease Thick and Quick.
- Any super bulky/super chunky/14-ply yarn
- Yarn Weight Guide (+ Conversion Chart)
Needles
- Knitting needles – 10mm (US 15)
- In the round – 10mm (US 15) 16″ circular knitting needles
- You may also need 10.00mm (US 15) double-pointed knitting needles to complete the decreases if you are working in the round.
Notions
Other Tools
Abbreviations
Knitting Abbreviations And Terms (US And UK)
- Approx – Approximately
- Beg – Begin(ning)
- Cont – Continue(ing)
- DPN’s – Double pointed needles
- K – Knit
- K2tog – Knit next 2 stitches together
- P – Purl
- PM – Place marker
- Rem – Remaining
- Rep – Repeat
- Rnd(s) – Round(s)
- St(s) – Stitch(es)
- St, St – Stockinette stitch – work one row knit, one-row purl
- 1×1 ribbing – *K1, P1 – rep to the end of the row or round.
Pattern Instructions
Knit in the round (on circular needles):
- Cast on – 30 sts (baby) / 34 sts (toddler), pm and join in the round, being careful not to twist sts.
- Round 1 – Knit to the end of the round.
- Round 2 – K1, P1 (rib) to end of round – complete a further 5 rounds of ribbing.
- Round 7 – Knit to the end of the round.
- Repeat round 7 – (10 / 12 times).
- Decrease for the crown as follows – (You may need to use the DPNs now)
- K1 then K2tog repeat to 1st before the end of the round, K1 (16, 18) sts.
- Knit to the end of the round.
- K1 then k2tog, repeat to 2 / 1 sts before the end of the round.
- Knit to the end of the round.
- Cut yarn and pull tight to secure.
- Sew in all ends.
- Make a pom pom (or use faux fur pompoms) and stitch it on the top of the hat.
Knit flat (on straight needles):
- Cast on – 30 sts (baby) / 34 sts (toddler).
- Row 1 – K1, P1 (rib) to the end of the row.
- Continue to work in 1 x 1 ribbing for a further 4 rows of ribbing.
- Row 5 – Knit to the end of the row.
- Row 6 – Purl to the end of the row.
- Repeat rows 5 and 6 – (10 / 12) times (ending with a purl row).
- Decrease for the crown as follows –
- K1 then K2tog repeat to 1st st, before the end of the row, K1 (16, 18) sts.
- Purl to the end of the row.
- K1 then k2tog, repeat to 2 / 1 sts before the end of the row.
- Purl to the end of the row.
- Cut yarn and pull tight to secure.
- Seam the edges using an invisible seam.
- Sew in all ends.
- Make a pom pom (or use faux fur pompoms) and stitch it on the top of the hat.
Share your work with us…
I love seeing your finished projects on social media.
If you enjoyed making the hat, I’d love to see yours on Instagram, tag me @handylittleme.
If you are on Facebook, stop over to the handylittleme Facebook group and share a photo.
I’d love to see your work.
Happy Knitting!
Helpful Resources
This pattern is great for any beginner knitters.
- Knitting cast-on methods
- Knitting Lessons
- How to cast on knitting
- How to cast off knitting for total beginners (step by step)
- How to knit garter stitch
- How to knit the purl stitch (for beginners + a video tutorial)
- How to knit stockinette stitch (for beginners)
- How to read knitting patterns for beginners
- Knitting abbreviations and terms (US and UK)
- How to knit rib stitch patterns (1×1 and 2×2 ribbing)
- How to kit two stitches together – K2tog
- How to join knitting in the round with circular knitting needles
Take a look here for more free knitting patterns.

More Patterns You May Be Interested In…
- 20 Temperature Blanket Patterns (The Ultimate Guide)
- 31 Free Baby Blanket Knitting Patterns (Easy Knit Blankets)
- How To Knit Baby Booties (Step-By-Step)
- How to Knit – A Complete Beginner’s Guide
- Knitted Dog Sweater Pattern (3 Sizes)
- 12 Simple Knitting Stitches For Beginners
- Free Knitted Dishcloth Patterns
- 37+ Patterns To Use Up Your Yarn Stash (Small Projects)
- Free Dog Sweater Knitting Pattern (Straight Needles)
- Super Easy Corner To Corner Baby Blanket Pattern (Knit)
- Easy Baby Sweater Knitting Pattern For Beginners
- How To Knit A Baby Hat (Straight Needles)
- 21 Free Knitting Patterns For Children (Easy Knits)
- Striped Kid’s Cowl Knitting Pattern
- Spring Knits For Kids
- Kids Cowl Free Knitting Pattern
- Fall Knits For Kids That You Will Love!
- 25 Free Hat Knitting Patterns For A Toddler
- Easy To Make Little Girl Knitting Patterns

Hi! I absolutely love the picture of this hat, and I’m trying to make it for my daughter. I’m a little confused about the repeat row though. If I’m supposed to do the K1 then K2tog repeat across the hat, it’s impossible to do it 12 times like the pattern says. Can you help me?
Hello! Can you tell me which row you are on? Thanks 🙂
I just realized what I was doing wrong! I was on the wrong row! Thank you for making me look at the the row numbers correctly! I’m on row 7 and somehow didn’t realize that I needed to repeat that row instead of the decrease row.
Hello, ok no worries, if you need any other help with the pattern, just let me know. You can email me – handylittleme@gmail.com or use the contact form on the site. Thanks and happy knitting! 🙂
Hello,
Would this fit a 5 year old?
Hello, the hat size in the pattern is for a baby or toddler – for a child of 5yrs – you would have to increase the stitches you cast on so that the circumference is about 20-21 inches. You could increase the cast on stitches to 36 or 38 and measure to see. Thanks for visiting the blog and if you have any other questions, please email handylittleme@gmail.com.
How much yarn do I need to complete this beanie hat !
I’m going to do it youth size.
Thanks
Hello, I used 1 skein for the hat and some leftovers/scrap yarn for the pom. I used a large clover pom maker – 3 3/8 inch for the pom. I hope that helps and thanks for visiting! 🙂
Next question. I’m on step 9
K1 then K2tog, repeat to 2/1 sits before the end of row ?
Kinda got that but then step 10
K2, K1, K2, K1, K 2. What does that mean ?
Right now I have 10 stitches on the needle.
Thanks for your help
Hello, in round 9 – the 2/1 sts refers to the size – because it depends on if you cast on 30/34 sts for the size you want. In the next round, you may have 10 sts if you made it for the larger size – and originally cast on 34 sts. You can knit those two stitches and then finish the hat. I hope that helps and thanks for visiting! 🙂
Hi, I was wondering what step 10 means? I knitted the larger size, so have 10 stitches left. I also knitted on 2 needles instead of in the round – beginner and didn’t want to get too complicated! (so am up to a row of purls) thanks!
Hello, in step 10, if you are knitting flat and not in the round, change the knits to purls and you should be okay! So row 10 would be – P2, P1 to thend of the row – then P1 for the last stitch. I hope that helps! Thanks for visiting 🙂 Louise
Thanks for the reply! Does that mean purl 2 together, then a single stitch, then 2 together etc? Sorry, am new to all of this!
Hello Lisa, in row 9 – you do the decreases by K2tog – knitting two stitches together. In row 10 – you are purling 2 stitches, purling 1 stitch and repeating that. You are not decreasing again on this row. I hope that helps! 🙂
Thanks for the pattern! I have a question about step 10 – K2, K1, K2, K1, K2… is this the same as just knitting the whole row?
Hello! yes, it is – thanks for pointing that out – yes you should knit all of row 10. Thanks for visiting! 🙂
Hi, my son is 6. Will 34 cast on fit him? (In another hat, I cast on as much as 72.)
Hello Elly, I would think that 34 sts will fit the head of a 6 year old if you use super bulky yarn and the recommended needle size in the pattern. If you were going to use a different weight of yarn matched with different sized needles, then you would need to cast on extra stitches. I hope that helps! 🙂
Hi! For step 7 on straight needles, do I repeat rows 5-6 ten times each or five times each for a total of 10 rows? Also, is step 9 actual two steps (a row with the decrease and then a row of knit)? Thanks! This is a great hat, I’m very new to knitting so I’m just a little confused!
Hello Alyson, for step 7 on straight needles – yes you repeat rows 5 and 6 10 times for the smaller sized hat and 12 times for the larger sized hat. Step 9 – K1 then K2tog repeat to 1st st before the end of the row, K1 (16, 18) sts – means that you K1, K2tog to the last st, then knit that last stitch. I hope that helps! 🙂
I am very new to knitting…I’m using circular needles and for step 5 it says, “repeat round 7 10/12 times” Does that mean I continue to knit 12x? (I used 34 sts.) Eek, hope that makes sense.
Thanks!
Hello Rae,
If you cast on 34 sts, you will rep round 7 – 12 times.
The latter number in the instructions is for the larger size.
I hope that helps!
Louise
Hello,
Thanks so much for this pattern. I love the look of the hat. I’m a bit confused. (I’m a beginner, but you’ll probably guess that by my problem!) my 1×1 rib at the start of the pattern is looking like moss stitch. Do you know what I’m doing wrong?
Any advice, much appreciated!
Thank you
Rosie
Hello Rosie,
When you knit the 1×1 ribbing – you K1, P1 to the end of the row or round.
Then on the next row or round you repeat this – you will K1, P1 again on top of the stitches you just knit.
So you are knitting the knit stitches and purling the purls.
I hope that helps!
Louise
Hi Louise,
I love this pattern and am wanting to share it with some high school girls learning to knit and making hats for St. Jude’s.
So, for a youth size, what would be the instructions for knitting in the round (steps 1, 5,7, & 9.) and knitting flat (steps 1,6, 8, & 10)?
Thanks!
Nancy
Hello Nancy,
To knit a hat in the round you can see this pattern here – https://www.handylittleme.com/beginner-hat-knitting-pattern/
To knit a hat flat, you can see this pattern here – https://www.handylittleme.com/how-to-knit-a-hat/
I hope that helps!
Louise
Thank you so much for all the Lovely knitting patterns you have shared over this Christmas Holidays!! I am new to your webpage and Facebook. You have already helped me a few times. I have learned so much with your tutorials… casting off with a stretch. Thank you for sharing your knowledge so much.
Darline
Hi Darline,
Thank you so much for your kind and thoughtful comment!
I’m thrilled to hear that you’ve been enjoying the patterns and tutorials, and that they’ve been helpful to you.
It’s wonderful to know that you’re learning new techniques, like stretchy cast-offs—well done!
I’m so glad to have you as part of the community, and I hope you continue to find inspiration and support here.
If you ever have any questions or need help, don’t hesitate to reach out.
Happy knitting and warm wishes,
Louise 😊
This is as simple as I’ve found for little beginner me- thank you!! You’ve clarified in the comments “K1 then K2tog repeat to 1st st before the end of the row, K1 (16, 18) sts – means that you K1, K2tog to the last st, then knit that last stitch.”
Just wanted to confirm that means K1, k2tog, k2tog, k2tog…….k2tog, k1?
On flat needles.
Then, purl an entire (slightly smaller) row, then on the second decrease row, k1, k2tog, k2tog etc. until you are 2/1 stitches from end, then knit BOTH of those stitches (k1, k1) for the larger hat?
Hi there Brooke! Thank you so much for your lovely comment—I’m really happy to hear this pattern feels beginner-friendly for you! 😊
You’re absolutely right with your understanding of the decrease row on flat needles:
👉 Yes, you would repeat K1, K2tog, K2tog… across the row, and then finish with K1 as the very last stitch.
So it goes like this:
K1, K2tog, K2tog, K2tog… until 1 stitch remains, then K1.
Then you purl the next row as usual.
On the second decrease row, it’s a very similar setup—
K1, K2tog, K2tog… until 2 stitches remain, and then for the larger hat size, you knit both of those last 2 stitches (K2).
You’re doing great for a beginner—keep going, and enjoy making your beanie! 🧶✨ Let me know if you have any more questions along the way.
Hi Louise, I’m having real difficulty sourcing a 10mm circular and double pointed needles.
I can buy 6mm easily.
What would I need to change if I were to use this size?
Thanks.
Hi,
I would recommend taking a look at KnitPro / Knit Picks, as they usually have 10 mm circular needles available.
I hope that helps!
Louise