Free Dog Sweater Knitting Pattern (Straight Needles)
THIS ARTICLE CONTAINS AFFILIATE LINKS THAT SUPPORT HANDY LITTLE ME CONTENT AND FREE PATTERNS.This dog sweater knitting pattern is made in one piece and knit flat on straight knitting needles.
It has an interesting stitch pattern and a turtleneck to keep your dog warm.
You can make this sweater for a small dog, medium-sized dog, or large dog; the measurements are listed below in the pattern information.
The full pattern is free below, or you can purchase the ad-free printable PDF here.

An Easy Dog Jumper To Make
This is an easy pattern for those of you who are at the advanced beginner level, and the techniques you will need to know are casting on, casting off, knitting, purling, and slipping stitches.
There are also increases and decreases to shape the sweater.
As it has been knit in one piece, there is seaming to join the underside of the sweater together.

The yarn I used
I made the dog sweater for my best friend using DK – double knitting yarn- light worsted/8 ply yarn.
I used La Mia Just Wool in Green (LT005) 50g/116m/100% recycled wool.
You can purchase this yarn from Hobium Yarns.
Any double knitting (DK)/light worsted/8 ply yarn will be okay for this pattern (lots of choice from LoveCrafts).

How To Knit The Grid Stitch
The stitch pattern used in this sweater is called the grid stitch.
It is worked in a 4-row pattern repeated as follows:
- Row 1: K1, (*P1, K1) rep from * to end.
- Row 2: P1, (*K1, P1) rep from * to end.
- Row 3: Knit to end.
- Row 4: Knit to end.
This gives the sweater an interesting texture.
The collar is worked in 1 x 1 ribbing to create the turtle neck.

Helpful Resources
This pattern is great for any advanced beginner knitters.
- Knitting cast-on methods
- Knitting Lessons
- How to cast on knitting
- How to cast off knitting for total beginners (step by step)
- How to knit garter stitch
- How to knit the purl stitch (for beginners + a video tutorial)
- How to knit stockinette stitch (for beginners)
- How to read knitting patterns for beginners
- Knitting abbreviations and terms (US and UK)
- How to knit rib stitch

Dog Sweater Knitting Pattern – Straight Needles
Notes
Skill Level – Easy (advanced beginners)
This adorable sweater is the best thing for your dog to wear for extra warmth.
Please note that if you want to add a lead hole to your sweater, you can do a 3-stitch cast-off at the base of the neck.
Copyright Info
- Please do not copy, sell, redistribute, or republish this pattern.
- If you wish to share this pattern, link to the pattern page only.
- You may sell items produced using this pattern.
- In all product listings, please credit Handy Little Me (Louise Bollanos) as the designer.
- Do NOT use copyrighted photos for your product listing.
- For the copyright T&C, please read my Terms of Use.
Size Information
Gauge – 19 sts and 30 rows in 4 inches.
Size / Measurements
The instructions are for all sizes.
The first set of numbers applies to the small size, the second set to the medium size, and the third to the large size.
Width – S – 14 to 18 inches / M – 20 to 24 inches / L – 26 to 30 inches.
Length excluding the collar – S – 14 inches / M – 17 inches / L – 20 inches.
The Supplies You Need
Yarn
- Any Double Knitting (DK)/Light Worsted/8 Ply Yarn.
- Lightweight yarn 03.
- 2, 3, 4 x 50g – La Mia Just Wool in shade LT005 (Green) – 1.76 oz/116m/126yd.
Needles
- Pair 4mm (US 6) knitting needles (if using circulars to knit flat – use a 20″ cable).
- Spare needle or stitch holder to hold spare stitches.
Notions
- Tape measure
- Darning needle
- Scissors
- Stitch holder

Abbreviations
Knitting Abbreviations And Terms (US And UK)
- Cont – Continue
- Foll – Following
- Inc – Increase
- K – Knit
- K3tog – Knit the next 3 stitches together
- M1 – Make one stitch
- P – Purl
- Psso – Pass slipped stitch over
- P3tog – Purl the next 3 stitches together
- M1p – pick up loop lying between needles and purl into the back of it
- Rem – Remaining
- Rep – Repeat
- Sl – slip
- St (s) – Stitch (es)
- Tbl – Through back of loops
- 1 x 1 ribbing – *K1, P1 – rep from * to end of row
Print + Stitch
Purchase the ad-free PDF pattern
Want a clean, printable version of this pattern? You can purchase the ad-free PDF in my shop. It’s perfect for printing, saving to your device, and making without distractions.
Pattern Instructions
Cast on 47, 59, 71 sts.
- Row 1: K1, (*P1, K1) rep from * to end.
- Row 2: P1, (*K1, P1) rep from * to end.
- Row 3: Knit to end.
- Row 4: Knit to end.
These 4 rows form the pattern.
Rep them twice more, then keep the continuity of the pattern, inc as follows:
- Row 1: K1, M1, P1, *K1, P1 – rep from * to last st, M1, K1.
- Row 2: P2, K1, *P1, K1 – rep from * to last 2 sts, P2.
- Rows 3 and 4: Knit to end.
- Row 5: K1, m1p, K1, *P1, K1 – rep from * to last stitch, m1p, K1.
- Row 6: P1, *K1, P1 – Rep from * to end of row.
- Rows 7 and 8 – Knit to end.
Rep these 8 rows twice more for the small size, once more for the medium size, and once more for the large size.
- Next 2 rows: As 1st and 2nd inc rows.
- Next row: K1, M1, K to last st, M1, K1.
- Next row: Knit to end.
Rep last 4 rows 2, 5, 6 times more.
For medium and large sizes:
- Next row: As 1st inc row.
- Next row: P1, M1, P1, *K1, P1 – rep from * to last st, M1, P1.
- Next 2 rows: K1, M1, K to last st, M1, K1.
For large size only: Rep last 4 rows twice more.
For all sizes:
Work the 1st to 4th original pattern rows 6, 7, 7 times more on these 71, 99, 131 sts, then divide sts for back and under sections as follows:
*Please note – work in 1 x 1 ribbing – where stated to work in rib.
Next row: Rib 11, 17, 23 sts, cast off 3, 3, 5 sts, rib until there are 43, 59, 75 sts on right-hand needle after the cast-off group, cast off the next 3, 3, 5 sts, rib to end.
Next row: Rib 11, 17, 23 sts, turn, leaving rem sts on a stitch holder or spare needle, cont only on the first set of sts for the under section.
Work 20, 28, 32 rows in pattern, finishing with a 2nd rib row.
Break off yarn and leave sts on a st holder or spare needle.
With the wrong side of work facing you, join yarn to the inner end of sts on the spare needle/st holder and rib 43, 59, 75 sts, turn, leaving rem sts on the spare needle/st holder.

Work 20, 28, 32 rows in the pattern on these sts, for the back, then break off yarn and leave sts on a stitch holder or spare needle.
With the wrong side of work facing you, join yarn to the inner end of sts on spare needle/st holder and rib to the end.
Work 21, 29, 33 rows in pattern, finishing with a K row, then turn and cast on 3, 3, 5 sts, turn again and K the 43, 59, 75 sts of back, turn and cast on 3, 3, 5 sts, turn again and K the 11, 17, 23 sts from st holder/spare needle.
K 1 row over all sts.

Now shape the work:
For the small size:
- Row 1: *Rib 9, P3tog – rep from * twice, rib 23, *P3tog, rib 9 – rep from * twice.
- Row 2: Rib to end.
- Row 3: K8, sl 1, K2tog, Psso, K7, K3tog,K21, sl 1, K2tog, Psso, K7, K3tog, K8.
- Row 4: Knit to end.
- Row 5: Rib 7, P3tog, rib 5, P3tog, rib 19, P3tog, rib 5, P3tog, rib 7.
- Row 6: Rib to end.
- Row 7: K6, sl 1, K2tog, Psso, K3, K3tog, K17, sl 1, K2tog, Psso, K3, K3tog, K6. (39 sts)
For the medium size:
- Row 1: Rib 15, P3tog, rib 13, P3tog, rib 31, P3tog, rib 13, P3tog, rib 15.
- Row 2: Rib to end.
- Row 3: Knit to end.
- Row 4: K14, K3tog, K11, K3tog, tbl, K29, K3tog, K11, K3tog,tbl, K14.
- Rows 5 and 6: Rib to end.
- Row 7: K13, sl 1, K2tog, Psso, K9, K3tog, K27, sl 1, K2tog, Psso, K9, K3tog, K13.
- Row 8: Knit to end.
- Row 9: Rib to end.
- Row 10: Rib 12, P3tog, rib 7, P3tog, rib 25, P3tog, rib 7, P3tog, rib 12.
- Row 11: K the rem 67 sts.

For the large size:
- Row 1: Rib 23, P3tog, rib 17, P3tog, rib 39, P3tog, rib 17, P3tog, rib 23.
- Row 2: Rib to end.
- Rows 3 and 4: Knit to end.
- Row 5: Rib 22, sl 1, K2tog, Psso, rib 15, K3tog, rib 37, sl 1, K2tog, Psso, rib 15, K3tog, rib 22.
- Rep 2nd, 3rd and 4th shaping rows once.
- Row 9: Rib 21, P3tog, rib 13, P3tog, rib 35, P3tog, rib 13, P3tog, rib 21.
- Rep 2nd, 3rd and 4th shaping rows once.
- Row 13: Rib 20, sl 1, k2tog, Psso, rib 11, K3tog, rib 33, sl 1, K2tog, Psso, rib 11, K3tog, rib 20.
- Rep 2nd and 3rd shaping rows once on rem 99 sts.
For all sizes:
- Next row: K 2, 2, 4 sts, *M1, K7 – rep from * to last 2, 2, 4 sts, M1, K 2, 2, 4 sts. (45, 77, 113) sts.
- Row 1: K1, *P1, K1 – rep from * to end.
- Row 2: P1, *K1, P1 – rep from * to end.
Rep these two rib rows for 4, 5, 6 inches.
Cast off very loosely in rib (go up a needle size is necessary).
Sew in any loose ends.

Making Up
Join the collar and under sections along the straight-row ends, reversing the seam at the neck edge for the collar.
I used the mattress stitch to sew the sides together, as this gave a nice, invisible seam.

More Dog Sweaters
For more dog sweater knitting patterns, you may be interested in this post, which features a roundup of 20 fall dog sweaters – 20 Beautiful Fall Dog Sweater Knitting Patterns
You may also like these free knitting patterns for dog sweaters (choose your next project right here!):
- Cable Knit Dog Sweater Pattern
- Dog Jumper Knitting Pattern – Rainbow Stripes
- Knitted Dog Sweater Pattern – 3 Sizes
- Dog Sweater Knitting Pattern | Mischief Managed
- Puppy Sweater Knitting Pattern (XS Puppy)
- Dog Sweater Knitting Pattern
- Baby Yoda Pattern – Dog Sweater
- Christmas Dog Sweater
- Dog Christmas Hat Pattern
- Aran Dog Sweater Knitting Pattern
- Christmas Puppy Sweater Knitting Pattern
- Knitted Bow Tie (Free Stash Busting Knitting Pattern)
- Free Lucky Pup Dog Scarf Knitting Pattern
- Elf Dog Sweater Knitting Pattern (Free in 3 Sizes)
- Christmas Elf Dog Bandana Knitting Pattern (4 Sizes)
Grab The Inexpensive PDF Pattern In Other Languages
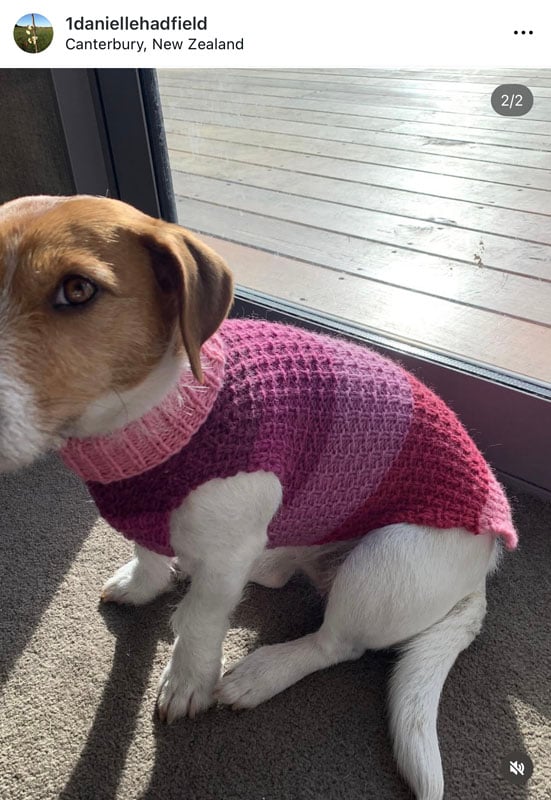
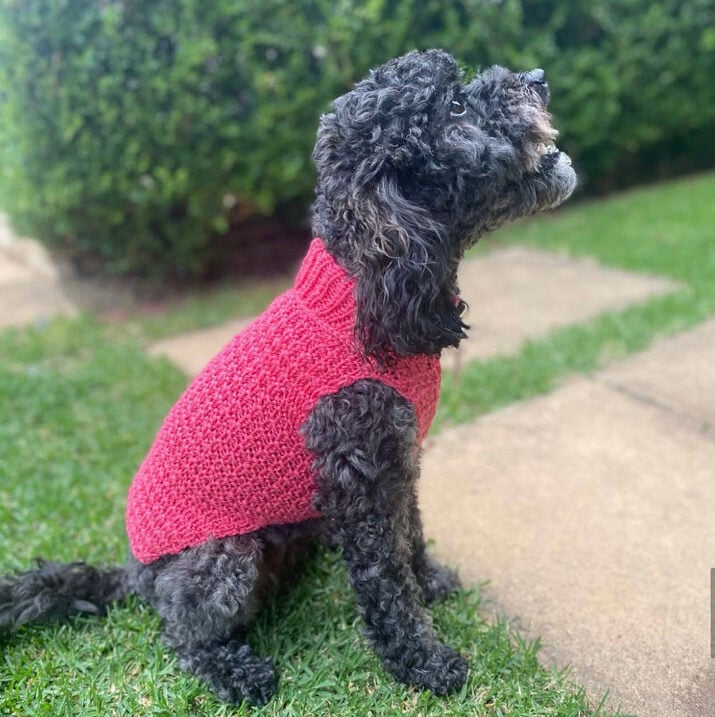
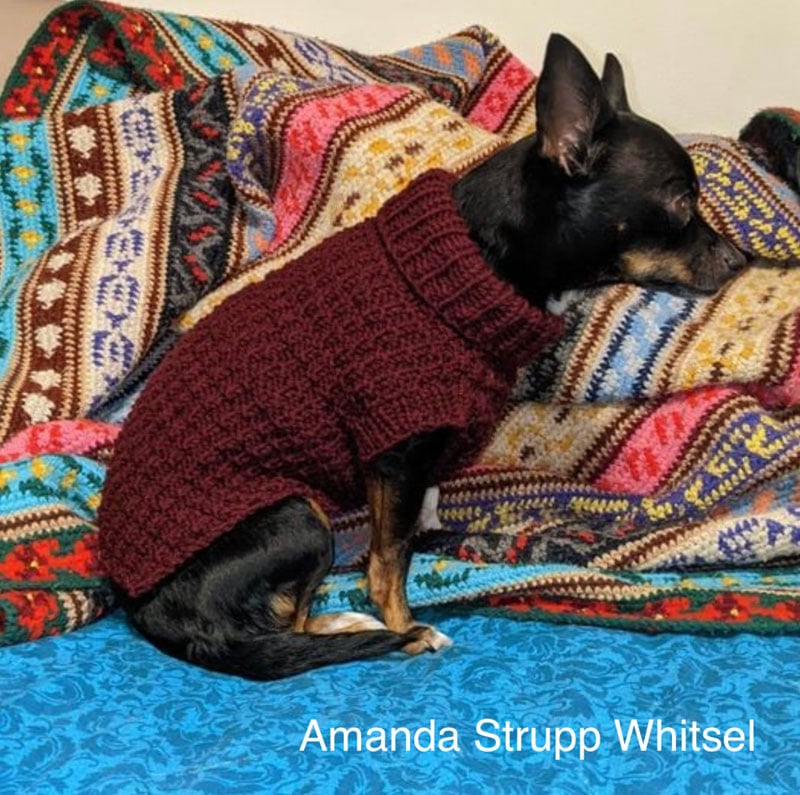
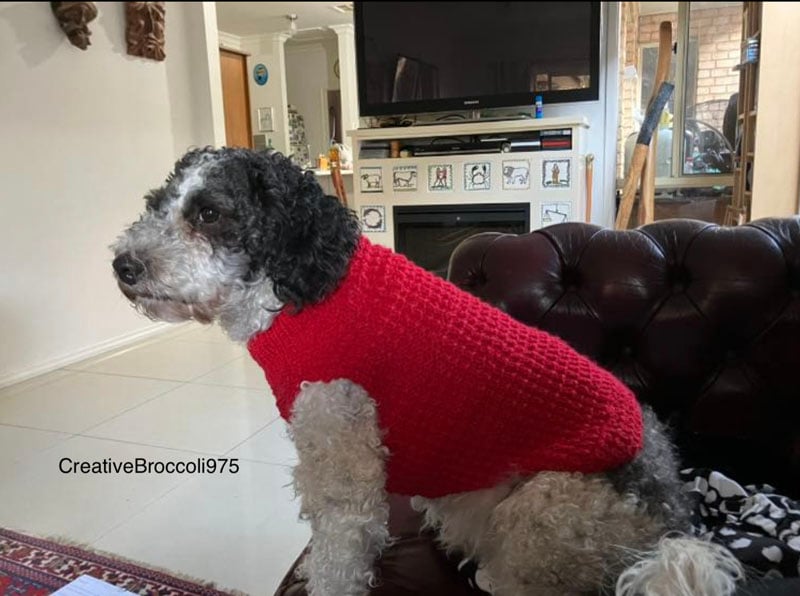
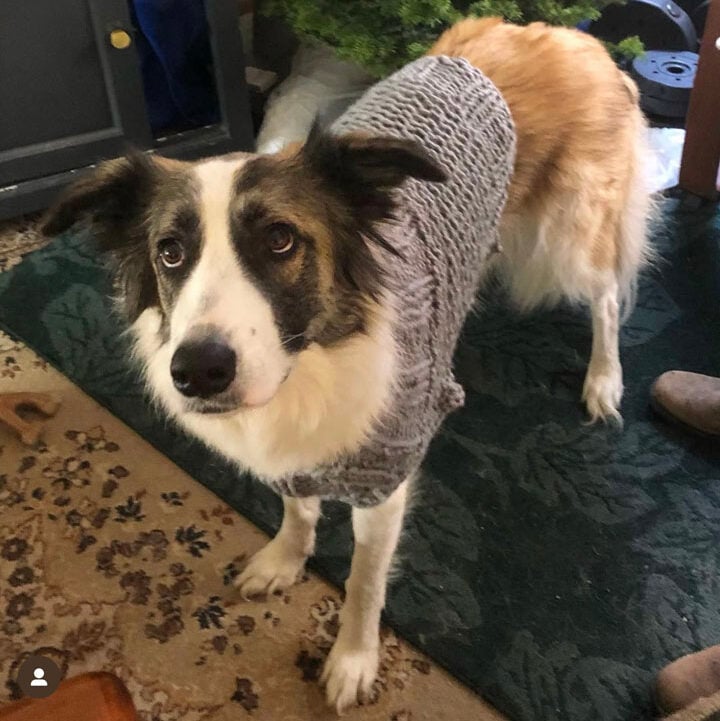
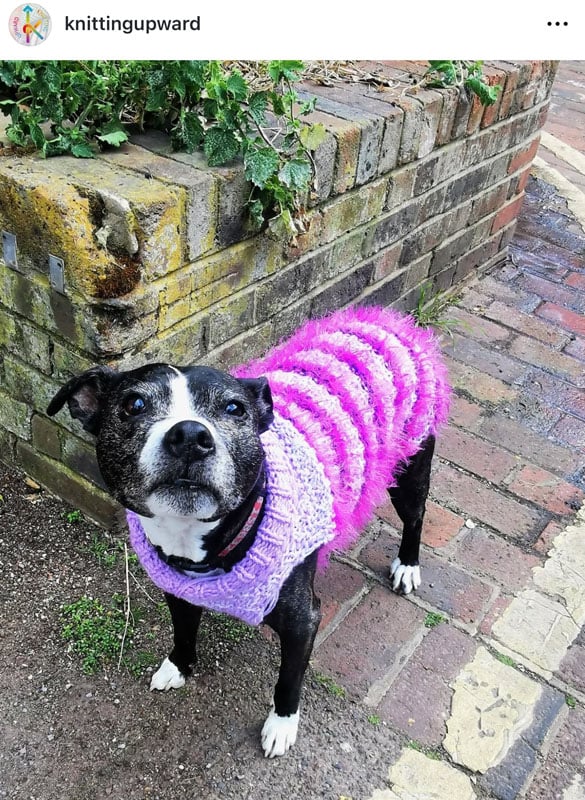
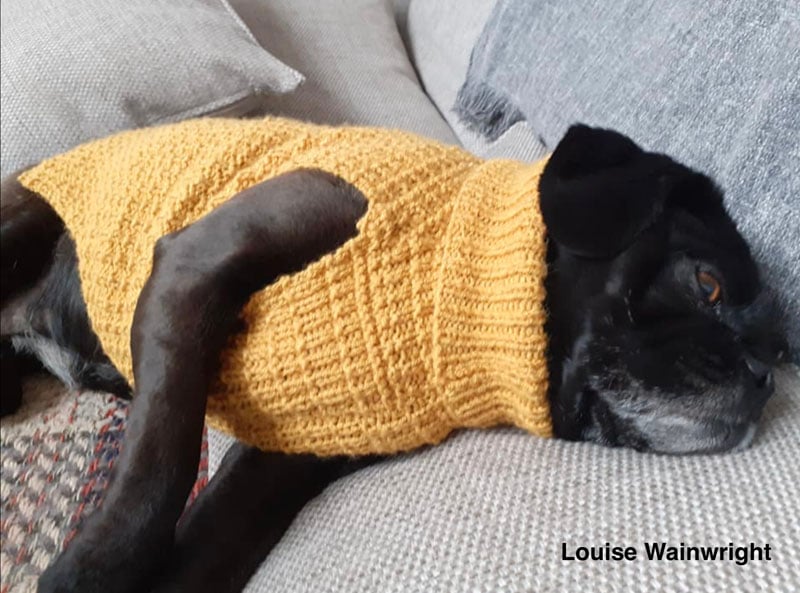
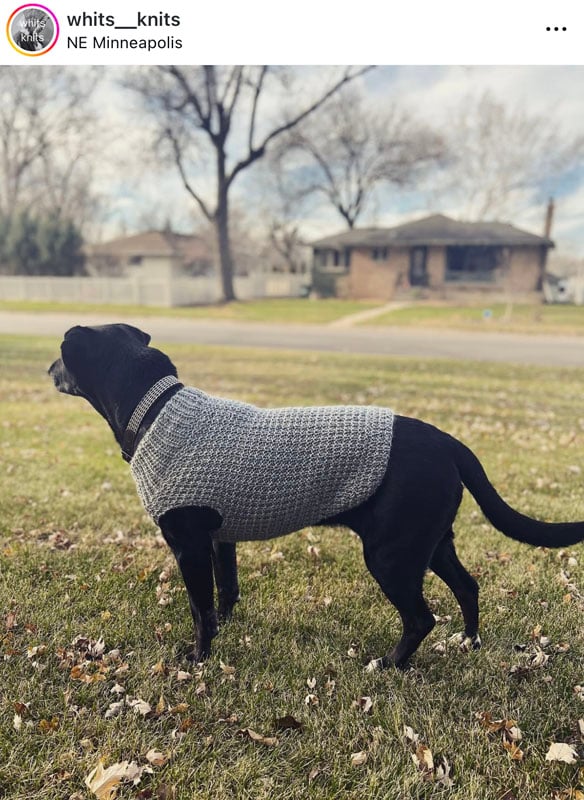
Knitted by Our Community
See how knitters have brought this pattern to life with their own yarn choices and style.
Could you share your work with us?
I love seeing your finished projects on social media.
If you enjoyed making the dog sweater, I’d love to see yours on Instagram, tag me @handylittleme.
If you are on Facebook, stop over to the handylittleme Facebook group and share a photo.
I’d love to see your work.
Happy Knitting!
More Free Patterns
- How To Knit A Hat For Complete Beginners (+ Video Tutorial)
- 20 Temperature Blanket Patterns (The Ultimate Guide)
- How To Knit A Hat With Circular Needles (Step-By-Step)
- 31 Free Baby Blanket Knitting Patterns (Easy Knit Blankets)
- How To Knit Baby Booties (Step-By-Step)
- 12 Simple Knitting Stitches For Beginners
- Free Knitted Dishcloth Patterns
- Free Dog Hat Knitting Pattern (Bobble Hat With Ear Holes)
- 37+ Patterns To Use Up Your Yarn Stash (Small Projects)
- Super Easy Corner To Corner Baby Blanket Pattern (Knit)
- Easy Baby Sweater Knitting Pattern For Beginners
- How To Knit A Baby Hat (Straight Needles)
- Pumpkin Knitting Pattern (Beginner Friendly!)
- 8 Cable Stitch Knitting Patterns
- Free Knitted Heart Pattern (Easy + Quick Project)
- 20+ Fall Oversized Knits (Sweater Knitting Patterns)
- Ribbed Beanie Knitting Pattern (Unisex Mariner’s Hat)
Such an adorable sweater, and your model is a cutie too! (Smile).
Thank you for explaining everything thoroughly so that this semi-newbie knitter can follow.
Hello Lyn, thank you so much for your kind words, I’m really happy that you like the dog sweater and I hope you enjoy making it! 🙂
Thankyou so much for this little dog sweater!! I’ve just knitted my first one and will have to make more! It’s just too cute my pomeranian loves it. I’ve also tried your striped one and I love it too!! Would love to try some new dog sweater patterns on straight needles! I’m only a beginner and these patterns are amazing. I truly cant tell you how much I love them!
Hello Danielle, thank you so much for your kind words, I’m so happy that you enjoyed the patterns! 🙂
I have more dog sweaters coming soon, you can follow on Facebook etc/sign up for the newsletter if you haven’t already to see when they are released.
You can also share photos of your dog wearing his (or her) sweater in the Handy Little Me Facebook group or by adding the hashtag #handylittleme on insta.
Happy knitting!
Louise 🙂
Thank you for the pattern! It is one that I feel that I can actually knit! Normally the little holes for the legs puts me off, but I’m going to have a go as your instructions make sense to me! 🙂
Hello Jo, thanks so much for your comment, I’m so happy you are going to knit the dog sweater 🙂
Enjoy!
Louise
I am going to try the dogs coat when I finish what I am doing
Hi Sheila, that’s great, I hope you enjoy making it 🙂
I just finished the dog sweater for my dog turned outlovely do you have a pattern for a xx large dog I will do one for my son thank you
Hello Shiela, I’m so happy that you liked the pattern! 🙂
For now, I only have the sizes going up to large, I don’t have any for an extra-large dog.
That is something I can try to work on in the future to add.
Thanks so much for your comment and for visiting the site,
Happy Knitting!
Louise
This pattern is beautiful! Thank you for the simple instructions.
I’ve just finished knitting one in small for my papillion. Unfortunately it doesnt fit her but she is a bit taller and longer than the average papillion tends to be.
The pattern is so quick and easy I’ll have another go at the medium 🙂
Hello Janice,
Thanks so much for your kind words, I’m so happy you like the pattern.
The medium may be better – you can adapt the length if you need to make it longer.
Happy knitting!
Louise
Thank you for this pattern! This was so easy to follow and my puppy loves her new sweater. You made it easy and fun to pick up knitting again.
Hello Deb,
I’m so happy you enjoyed this pattern and that your puppy loves her sweater.
Happy knitting!
Louise
Hello, after row 8 when it says “rep these 8 rows (twice, once, once) more” – what does that mean? Does it mean that we repeat the 8 rows four times?
Hello Ellie,
This depends on the size you are making – you will repeat the 8 rows twice more for the small size, once more for the medium size and once more for the large size.
I hope that helps!
Louise 🙂
Oh! Thank you so much. I’m a newbie but am loving this pattern. Thanks again.
Sorry but I’m still confused. If I’m knitting a medium, would I repeat the rows twice and then an additional once? Large would be twice plus once plus once? Sorry newbie. Thanks!
Hello Sue,
If you are making the medium you will rep the 8 rows once more.
The pattern instructions – “rep these 8 rows (twice, once, once) more”
This means if you are making the small size you rep the 8 rows twice more only, for the medium size once more only and for the large size once more only.
I hope that helps!
Louise
I am making the size medium for my dog and I am confused about how many stitches I should have on at the widest point? I think it says 99 but then there are more increases before I get to where it says that. So I feel like it’s more. Any help would be greatly appreciated!!
Hello Jill,
Yes – you will have 99 sts after all of the increases and repeated increases up to where you will divide the stitches for the back and under section.
There are not more stitches than that for the medium size.
Perhaps you increased too many times up to that point?
I just counted through and it is 99 for the medium size.
Maybe double check where you made the icreases?
You can email me if you need more help.
Thanks,
Louise
Hi Louise and thank you so much for this pattern!!!! The instructions are very clear and the variation of stitches give such a beautiful texture especially when using a single color. I actually received a special request you may want to add – to have a hole for the ring on the dog’s collar to stick through to attach a leash! I did a 3 stitch cast off at the base of the neck and it worked perfectly!
Hello Heather,
I’m so happy you like the pattern and that is a great suggestion!
I haven’t been adding in dog collar holes in my recent dog sweater patterns – mainly because my dog wears a harness but I know that many people do attach the leash to their dog’s collar.
A harness has been the best thing I ever bought for Jason, he used to pull me a lot when we walked and with the harness, he is 100% better and more chilled.
It also has a handle on the back, so if I need to I can move him without feeling like I’m strangling him.
I will add a note into the pattern.
Thanks,
Louise
Help! I have a stupid ?
When you say “rep these 8 rows (twice, once, once) more.”
For the large does it mean to do the 8 rows twice then once and once more? Or do i just do the 8 rows once?
Thank you anyone for the help! Love this pattern…making for my granddogger💗
Hello Jeanette,
If you are making the large size you will repeat the 8 rows once more.
I hope that helps!
Louise
Thank you for responding so quickly.
I have never been so happy to undo incorrect work…and start over. Ha ha
I will submit a finished photo😀
Help stupid question,
Work 20, 28, 32 rows in pattern, finishing with a 2nd rib row.
I’m not sure what this means, do I knit the rows 1-4 in original pattern for 28 rows and then my last row (29) is a rib row?
Any help would be great.
Thanks
Liz
Hello Liz,
Yes – you would work rows 1-4 in the grid stitch pattern for your size (28 rows) and then finish on a second rib row – so the last row you work has to be row 2 of the grid stitch pattern.
The last row is row 28. This will be the rib row 2 that you end on.
Then you will break the yarn and leave those sts on a spare holder or cable.
I hope that helps!
Louise
Love the pattern so far, thanks so much for it! I’m making a small, and am starting at ” work the 1st to 4th original pattern…71 stitches. I only have 63? Trying to figure it out but getting nowhere. Any ideas? Thanks
Hello Rho,
Have you checked through to make sure that you completed all of the increases?
If you need more help, please contact me via the contact page in the main menu.
Thanks!
Louise
Question re -measurements, is that all the way round the dogs widest part, or just over it’s back please?
Thank you
Caroline
Hello Caroline,
The width measurement is for the width around the dogs back and chest – the circumference/width of the body.
The length is from neck to back excluding the collar.
I hope that helps!
Louise
Hi love this pattern when you say k1 m1 is that into knit stitch or do you m1 in 2 st
Hello Jessie,
K1, M1 – means to K1 stitch and then make one stitch.
The make-one is performed in between two stitches, with the bar between the stitches.
You pick up that bar and create a stitch in the fabric.
I hope that helps!
Louise
Thank you I kind of figured it out but thank you for the response I’m trying to knit jumpers for 2 dachshund having a hard time finding a pattern using 2. Straight needles giving yours a go adjusting a few things .merry Christmas and a happy new year
Hi, Where it says next 2 rows: as 1st and 2nd inc rows. The inc rows part, am I increasing the 1st and 2nd rows by 1 stitch?
Thanks in advance
Hello Lauren,
Where it says: Next 2 rows: As 1st and 2nd inc rows.
You will repeat these two rows –
Row 1: K1, M1, P1, *K1, P1 – rep from * to last st, M1, K1.
Row 2: P2, K1, *P1, K1 – rep from * to last 2 sts, P2.
I hope that helps!
Louise
Hi Louise,
Thank you, I realised what it meant about 5 mins after asking the question! Typical.
I do have another question though,
After you leave the sts on a stitch holder, where it says to join yarn to the inner end of sts. Is that the blunt end of the needle?
Hello Lauren,
You need to rejoin the yarn to the end where you are going to knit next – because you will work along that section to rib the sts.
I hope that helps 🙂
Louise
To make the sweater longer, do I just repeat the 4 row pattern after all the increases until the desired length then continue onto the shaping for the front? I need it for a rather long dog, 27.5” in length please?
Thank you
Hello Mrs Miah,
Yes, to make it longer just keep going repeating the grid stitch pattern until you have the length you desire before shaping.
That should be easy to alter, as you can continue with the pattern after that without making any further adjustments.
I hope that helps and happy knitting!
Louise
I put this aside a week ago in despair. I did a gauge swatch, but it still looks enormous. And I’ve come to the point where I should have 131 sts, but I have 121. I thought it’d be a snap after making my first mittens , but I’m dazed and confused.
Hello Debra,
You may need to go through and check that you completed all of the increases in the pattern?
You could use a highlighter to mark out all of the increases for your size.
And maybe for the tension – try going down a needle size if it is too large?
I hope that helps!
Louise
Hi,
What size sweater is your model wearing? Finding it hard to decide what size to knit for my medium golden doodle.
Thanks😊
Hello Lisa,
My dog is wearing the large size in the photographs.
The measurements are in the pattern info if you need them.
I hope that helps!
Louise
Could you please tell me how many balls of wool I would need in 8 ply for a medium size dog. Thank you
Hello Sally,
For the medium size, you will need 3 x 50g/116m/126yds balls of yarn in DK/8ply.
The yarn info is in the pattern underneath the ‘Yarn’ section.
I hope that helps!
Louise
Hello,
I’m a bit confused with this pattern as I am a total newb. This might be a dumb question but for the collar of the coat do I just use the grid stitch, or should I use a rib stitch? If so how long should the collar of the coat be?
Hello Emma,
Yes, the collar is in 1×1 ribbing only – but it depends on the size as to how long it will be.
As you can see in the pattern you follow different instructions for the small, medium, and large sizes.
The last section says this:
For all sizes:
Next row: K 2, 2, 4 sts, *M1, K7 – rep from * to last 2, 2, 4 sts, M1, K 2, 2, 4 sts. (45, 77, 113) sts.
Row 1: K1, *P1, K1 – rep from * to end.
Row 2: P1, *K1, P1 – rep from * to end.
Rep these two rib rows for 4, 5, 6 inches.
So you work in 1×1 rib for 4″ (small) 5″ (medium) or 6″ (large).
I hope that helps!
Louise
Thank you so much for sharing this pattern. I’ve really enjoyed it so far. I do have a question though. What do you mean by “break off yarn.” Does that mean to cut it? If so, how do I continue the project and join the yarn for the next section?
Any guidance is very much appreciated!
Hello Branda,
Yes, to break the yarn is to cut the yarn.
When you rejoin it, you can thread the yarn through a darning needle and through the first loop on the needle – of the next section.
You can leave this hanging loose or tie it to secure it (to that first loop).
Then you can continue to knit.
I hope that helps!
Louise
That was very helpful, thanks so much!
Can I knit the stockinette stitch instead of the grid pattern?
Hello Theresa,
Yes, you could change the stitch pattern to stockinette stitch instead of the grid stitch.
I hope that helps!
Louise
Thank you for the pattern, I am looking forward to knitting it. I have a question, where is the collar in the pattern?
Hello Lisa,
The collar section is near the end of the pattern where it says this:
Rep these two rib rows for 4,5,6 inches.
I hope that helps!
Louise
I am going to knit up this beautiful sweater for my son’s large dog. Can you tell me please if the gauge is in stockinette stitch or the pattern stitch?
Hello Muriel,
The gauge is measured in the grid stitch pattern.
I hope you enjoy the pattern 🙂
Louise
I have made this for my mothers poochi (poodle/chihuahua) and she loves it thank you for being so generous as to allowing us access to this for free
Hello Karen,
I’m so happy you enjoyed the pattern 🙂
Thanks,
Louise
Loving the dog sweater pattern. I am going to start this today. Thank you. Marion
Hi, thank you so much for this lovely pattern.
The photos were very helpful. My Maltese X was right on the border btw small and medium size, so I made the medium and was glad I did as it is just right. Thanks again.
Thank you so much!! I used a really chunky wool and 10 mm needles while using the small size dog guide (my dogs a medium) and it is just perfect. First time ever using stitch holders, casting off and back on and your instructions were wonderful 🧶
Hello Helen,
I am so happy you enjoyed the pattern 🙂
Good to hear the yarn weight change worked out for you.
Happy knitting!
Louise
Hi! I’m planning on making this but had two questions:
– is the width measurement referring to chest girth? Or the width of the garment when it’s laid flat?
– when you say dk yarn, does that mean you use two strands together as you knit?
Thanks!
Hello Emily,
The width measurement is the chest girth.
DK yarn is the referring to the yarn weight – you only use a single strand of DK yarn for this project.
If you look on a yarn shop website (Like Love Crafts) and look at DK/light worsted/8-Ply this will show you the type of yarn that would be good for this project.
I hope that helps!
Louise
Thank you!!
I love this pattern – can’t wait to try it. I have a question. I’m making this for my niece-in-law’s dog. She wanted it to look like a watermelon. So I was thinking of changing colors to reflect stripes of lighter green and then reddish color on his tummy.
Do you estimate that I would still use about 100 grams of DK for the primary green?
THank you.
Hello Bridget,
Yes, you would need the same amount of yarn for the project as given in the pattern, even if you decide to do stripes, etc.
I hope that helps,
Louise
What do you mean by “width” in the size? Are you referring to the circumference of his neck, or is a measurement somewhere else on his body? Thank you for a lovely pattern, can’t wait to give it a go!
Sharon
Hello Sharon,
The width refers to the circumference of the body.
The first set of numbers applies to the small size, the second set to the medium size, and the third to the large size.
Width – S – 14 to 18 inches / M – 20 – 24 inches / L – 26-30 inches.
My dog in the photos is a large dog – he weighs around 30 kilos and wears a large size as his body circumference is at the widest point (the chest area) about 30 inches.
I hope that helps.
Louise
Hi–when shaping the pattern, the medium size says this:
Row 4: K14, K3tog, K11, K3tog, tbl, K29, K3tog, K11, K3tog,tbl, K14.
Is the “tbl” for the K3tog or for the K29 (or K14). I’m not sure when I’m supposed to knit thru the backloop. Thanks!
Hello JC,
You knit three together through the back loops.
I hope that helps!
Louise
Is there a way I can make this sweater shorter? I have an English Bulldog, so he needs the large size for his girth, but he isn’t 20″ long. I thought I could just start with casting on 83 stitches, but I wasn’t sure how that would alter the rest of the pattern.
Hello McKenna,
You can adjust the length by – measuring the length from your dogs neck to the end of his back where you think it should comfortably end.
Check that measurement to see if the small or medium size is close and then knit the length for the size and cast on the amount of sts for the large size.
It will take a little adjusting with the math.
You are knitting from the bottom up – so you can easily adjust the length this way.
I hope that helps,
Louise
Please help! I have no idea what this part means:
Next row: K 2, 2, 4 sts, *M1, K7 – rep from * to last 2, 2, 4 sts, M1, K 2, 2, 4 sts.
Knit 2 the what does the 2 mean and the 4 stitches?
Thanks!
Hello Kshav,
Those numbers refer to the size you are making, if you are making the small size, you would knit 2, then *M1, K7, etc.
The smallest size is first, then the medium and then the large.
This article may help you – https://www.handylittleme.com/how-to-read-knitting-patterns/
I hope that helps,
Louise
Do you have a pattern for xs dogs?
Hello Connie,
I don’t have the numbers for XS dogs for this pattern but I do have an XS puppy sweater pattern here – https://www.handylittleme.com/free-knitting-pattern-for-a-puppy-sweater/
Happy knitting!
Louise
Hi,I am knitting the small size dog sweater, only a beginner and not sure what to do when I get to this. Is this the m1k and m1p rows I need to knit? Thanks
Next 2 rows: As 1st and 2nd inc rows.
Hello Sharon,
The 1st and 2nd increase rows are these rows…
Row 1: K1, M1, P1, *K1, P1 – rep from * to last st, M1, K1.
Row 2: P2, K1, *P1, K1 – rep from * to last 2 sts, P2.
I hope that helps,
Louise
It is not clear to me how much yarn I need to knit this dog sweater. Do I need one of these’s list below or do I need all of the yarn and how much?
Yarn
Any Double Knitting (DK)/Light Worsted/8 Ply Yarn.
Lightweight yarn 03.
2, 3, 4 x 50g – La Mia Just Wool in shade LT005 (Green) – 1.76 oz/116m/126yd.
Hello Linda,
Thank you for reaching out!
For this dog sweater, you’ll need only one of the listed options, not all of them.
The specific amount depends on the size you’re knitting.
Here’s a quick guide:
Small size: 2 x 50g balls of DK/light worsted yarn
Medium size: 3 x 50g balls of DK/light worsted yarn
Large size: 4 x 50g balls of DK/light worsted yarn
Using La Mia Just Wool in shade LT005 (Green) as suggested, each 50g ball covers approximately 116 meters (126 yards).
If you’re making a larger size or modifying the pattern, it’s always a good idea to have a bit extra, just in case.
Happy knitting!
Louise
A quick query. Is your tension square knitted in the grid stitch or another stitch? I tried stocking stitch but have too many stitches though the length is OK.
I’m, looking forward to knitting the jumper for my mini schnauzer.
Thanks
Hello,
This is in the stitch pattern – grid stitch.
Happy knitting!
Louise
This sweater looks SO GOOD on my little guy! It’s a bit big, but we’re okay with that. Directions are spot on! Thank you for sharing this design!
hi -making my first dog sweater and I’m confused when I read this: For large size only: Rep last 4 rows twice more? Am I using the last four rows from the list of 8 that I started with? So essential that’s row 5,6, 7,8 ? repeat these rows 4 times? I’m making a large. thank you.
Hi! You’re on the right track. For the Large size, “Rep last 4 rows twice more” means repeat the four rows you just worked two additional times.
Next row: As 1st inc row.
Next row: P1, M1, P1, *K1, P1 – rep from * to last st, M1, P1.
Next 2 rows: K1, M1, K to last st, M1, K1.
I hope that helps! 😊
Hi. I had a quick question. On the M1 and M1ps are they left or right leaning? Or is it more just a general abbreviation for add a stitch however. Thanks!
Hi Michael,
In this pattern, M1 and M1P are used as closed increases—the lean isn’t critical.
My simple default is:
M1 (on a knit row): work it as M1L — lift the bar front-to-back and knit through the back loop (no hole).
M1P (on a purl row): lift the bar back-to-front and purl through the back loop.
If you prefer perfect symmetry at edges, you can mirror them (M1R on one side, M1L on the other), but using the left-leaning versions throughout will look great and keep things easy. 😊
Warmly,
Louise
I really am enjoying this pattern! So well written and steps are fun to do. I am doing in a variegated yarn that is brown, gray, and cream for my sweet dog. His name is Kiyo.
Thank you!
Thanks so much, Sheri — I’m really happy you’re enjoying the pattern and that it’s feeling fun to work through!
That variegated yarn sounds gorgeous (brown, gray, and cream is such a cozy combo), and I love that you’re making it for your sweet dog — Kiyo is the cutest name. 🥹
If you feel like sharing a photo when you’re done (or even mid-progress), I’d love to see how the colors are working up!
Louise