Dog Jumper Knitting Pattern – Rainbow Stripes
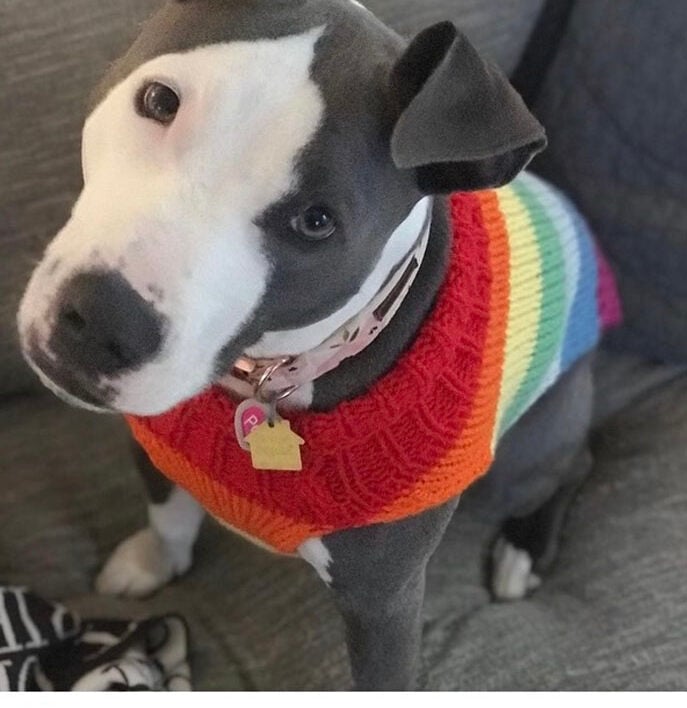
THIS ARTICLE CONTAINS AFFILIATE LINKS THAT SUPPORT HANDY LITTLE ME CONTENT AND FREE PATTERNS.In this pattern post, I want to share with you a very colorful dog jumper knitting pattern with rainbow stripes.
This bright sweater will make anyone you pass on your daily walks smile.
Made in rainbow stripes, you can knit this dog jumper in any color you like!
Scroll down for the free pattern or you can grab your printer-friendly ad-free PDF here.

An Easy-Level Knitting Pattern
This is an easy pattern for those of you who are advanced beginner level, and the techniques you will need to know are knit, purl, k2tog, and m1.
Using mainly knit and purl stitches, it will also introduce you to decreasing and shaping.
The dog sweater has added ribbed sleeves and ribbed edging on the back piece to help it to lay flat when worn.
You may also like these easy-level dog sweater patterns:
- Dog Sweater Knitting Pattern
- Dog Sweater Knitting Pattern (Straight Needles)
- Knitted Dog Sweater Pattern – 3 Sizes
- Cable Knit Dog Sweater Pattern
- Aran Dog Sweater Knitting Pattern
- Christmas Puppy Sweater Knitting Pattern
- Free Lucky Pup Dog Scarf Knitting Pattern
- Elf Dog Sweater Knitting Pattern (Free in 3 Sizes)
- Christmas Elf Dog Bandana Knitting Pattern (4 Sizes)
*Please scroll down to see the free pattern*

The Yarn I Used To Make The Rainbow Sweater
I made the rainbow-striped sweater using a bulky weight (05) yarn – Paintbox Yarns Simply Chunky from Love Crafts.
This meant the dog sweater was knit up quite quickly on size 6.5mm (US 10) needles.
I selected an assortment of rainbow colors but used their Raspberry Pink which I had left over in my stash as opposed to buying the more suitable Pansy Purple color they have.
Any bulky weight yarn 05 (chunky) will be okay for this pattern.

Resources and tutorials you may find helpful in following this pattern:
This pattern is great for any advanced beginner knitters.
- Knitting cast-on methods
- Knitting Lessons
- How to cast on knitting
- How to cast off knitting for total beginners (step by step)
- How to knit garter stitch
- How to knit the purl stitch (for beginners + a video tutorial)
- How to knit stockinette stitch (for beginners)
- How to read knitting patterns for beginners
- Knitting abbreviations and terms (US and UK)
- How to knit rib stitch.
- How to knit two stitches together – K2tog
- How to change colors in knitting (easy stripes)

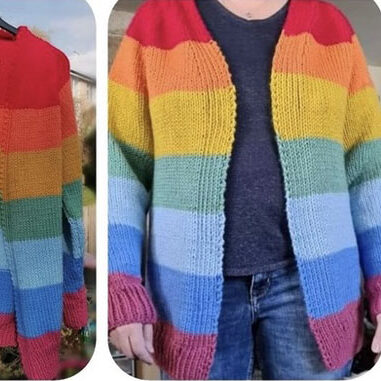
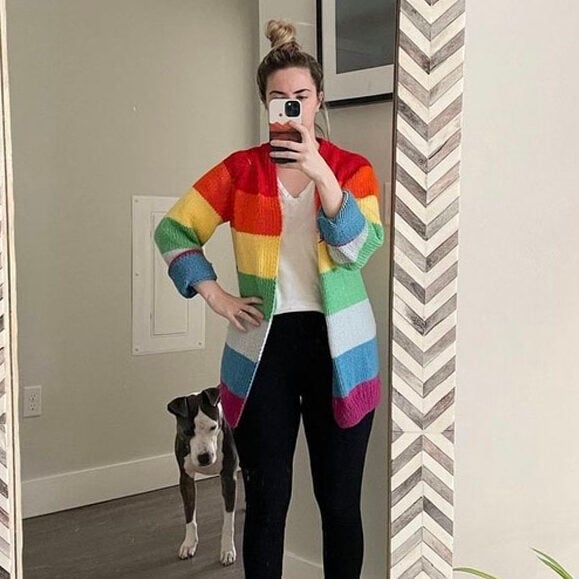
Make A Matching Rainbow Cardigan
This rainbow dog sweater is wonderful for your dog to wear while walking around your local area.
There is a matching rainbow cardigan knitting pattern available to make in five sizes: S / M / L / 1L / 2X.
The dog sweater is knit in the same yarn and on the same size needles as the cardigan.
View the free rainbow cardigan knitting pattern here. – Rainbow Cardigan Knitting Pattern (5 Sizes)

Dog Jumper Knitting Pattern – Rainbow Stripes
Grab your inexpensive ad-free, PDF printable pattern in my shop here.
Grab 12 dog sweater patterns in my discounted bundle here!
The dog sweater knits up quickly in chunky/bulky yarn, and the simple design makes for a relaxing and enjoyable knit.
Copyright Info
- Please do not copy, sell, redistribute, or republish this pattern.
- If you wish to share this pattern, link to the pattern page only.
- You may sell items produced using this pattern.
- Do NOT use copyrighted photos for your product listing.
- For the copyright T&C please read my Terms of Use.
Shop The Printable
Pattern PDF Here
Pattern Notes
- The pattern is written for all sizes, starting with the small size – with changes for different sizes listed in all necessary places.
- To follow the pattern more easily, circle or highlight all numbers for your size before beginning.
- The yarn color is changed to make stripes.
- Work each color in your given row count for your size.
Skill Level – Easy
Measurements + Size
- S/M/L
- Length excluding collar – Small – 14” / Medium – 16” / Large – 18”
- Chest at the widest part – Small – 8” / Medium – 10” / Large – 12”
Gauge – 4 inches/10 cm = 14 stitches in 18 rows of st st.

The Supplies You Need…
Yarn
Paintbox Yarns Simply Chunky / 100% Acrylic, 100g (3.5oz), Chunky/Bulky/12 ply yarn weight.
- Rose Red – 313
- Blood Orange – 319
- Daffodil Yellow – 321
- Slate Green – 326
- Light Blue – 304
- Dolphin Blue – 336
- Raspberry Pink – 343
For the following sizes you will need approx:
- Small – 1 x each color – 50g (350g)
- Medium – 1 x each color – 50g (350g)
- Large – 1 x each color – 100g (700g)
Chunky/bulky/12 ply – Yarn Weight Guide (+ Conversion Chart)
Needles
- 6.5mm (US 10.5) knitting needles – straight or circular with a 40″/100cm cable.
- A 16″ or 20″ cable may be needed for the sleeves.
- Spare needle or stitch holder to hold spare stitches.
Notions
- Tape measure
- Darning needle
- Scissors
- Stitch markers
- Stitch holder

Abbreviations / Knitting Abbreviations And Terms (US And UK) List
- Beg = begin(ning)(s)
- Cont = continue
- K = knit
- K2tog = knit 2 stitches together
- M1 = make one stitch
- P = purl
- Rep = repeat
- RS = right side
- St(s) = stitch(es)
- St st = stockinette stitch
- WS = wrong side
Stitch Explanations
- M1 (make 1) An increase worked by lifting the horizontal strand lying between needles and placing it onto the left needle. Knit this new stitch through the back loop – 1 st increased.

Dog Sweater Pattern
- Yarn A – Red
- Yarn B – Orange
- Yarn C – Yellow
- Yarn D – Green
- Yarn E – Light Blue
- Yarn F – Blue
- Yarn G – Purple
Start at the collar edge.
Using Yarn A – Cast on 48 sts (S) 58 sts (M) 68sts (L)
- Row 1: (RS of collar/WS of coat) *K1, P1: rep to end.
- Row 2: (WS of collar/RS of coat) K the knit sts and P the purls sts to the end of the row.
- Rep row 2 until the collar measures 5 (5.5/6) inches ending with RS of the collar facing for next row.
- Next row: (RS of collar/WS of coat) Rib 11, M1K, rib to end.
Divide for Back and Belly.
- Row 1 (RS of coat) K 37(47/57) sts for the back of the sweater and work on these sts only.
- Leave rem 12 sts on a holder for the belly.
- Row 2: Purl
- Row 3: Knit
- Row 4: Purl
- Change to Yarn B
- Next row (RS): Knit
- Next Row (WS): Purl
- Rep the last 2 rows to form stockinette stitch, cont to work in Yarn B (in st st) for a further 8 (10/12) rows.
- Change to Yarn C and cont in st st for 10 (12/14) rows.
- Change to Yarn D and cont in st st for 10 (12/14) rows.
- Change to Yarn E and cont in st st for 10 (12/14) rows.
- Change to Yarn F and cont in st st for 10 (12/14) rows.
- Change to Yarn G
- The back of the coat should measure 12 (14/16) inches from the start of the st st – ending with the RS facing for the next row.
- Row 1: Knit
- Row 2: *K1, P1 – rep from * to last st, K1.
- Row 3: K the knit sts and P the purl sts to the end of the row.
- Cont in rib until rib measures 2 (2.5/2.5) inches ending with the RS facing for the next row.
- Cast off loosely in rib.
- Sew ends not required into their own color.
Belly (Large Size Only)
With RS facing, join Yarn A to the 12 sts on the holder.
Beg with a K row – work 4 rows in st st.
Change to Yarn B – work 2 rows in st st.
- Row 7 (RS): K1, M1K, knit to last st, M1K, K1. (14 sts)
- Row 8: P
- Row 9: K
- Row 10 (WS): P1, M1P, purl to last st, M1P, P1. (16 sts)
- Row 11: K
- Row 12: P
- Row 13: Rep row 7. (18 sts)
- Row 14: P
- Row 15: Rep row 7. (20 sts)
- Row 16: P
- Row 17: Rep row 7. (22 sts)
- Row 18: P
- Change to Yarn C
- Row 19: K
- Row 20: P
- Row 21: Rep row 7. (24 sts)
- Row 22: P
- Row 23: Rep row 7. (26 sts)
- Row 24: P
- Row 25: K
- Row 26: P
- Row 27: Rep row 7. (28 sts)
- Row 28: P
- Row 29: K
- Row 30: P
- Row 31: Rep row 7. (30 sts)
- Row 32: P
- Change to Yarn D
- Row 33:
- Row 34: P
- Row 35: Rep row 7. (32 sts)
- Row 36: P
- Row 37: Rep row 7. (34 sts)
- Row 38: P
- Row 39: Work in rib – *K1, P1* to the end of the row
- Cont to work in 1×1 rib for 7 more rows.
- Cast off loosely in rib.
- The total length of the belly from the beg of st st – 10.5 inches.
Belly (Medium Size Only)
With RS facing, join Yarn A to the 12 sts on the holder.
Beg with a K row – work 4 rows in st st.
Change to Yarn B – work 2 rows in st st.
- Row 7 (RS): K1, M1K, knit to last st, M1K, K1. (14 sts)
- Row 8: P
- Row 9: K
- Row 10 (WS): P1, M1P, purl to last st, M1P, P1. (16 sts)
- Row 11: K
- Row 12: P
- Rows 13 -16: Cont in st st for 4 more rows and then change to Yarn C.
- Row 17: Rep row 7. (18 sts)
- Row 18: P
- Row 19: Rep row 7. (20 sts)
- Row 20: P
- Row 21: Rep row 7. (22 sts)
- Row 22: P
- Row 23: Rep row 7. (24 sts)
- Row 24: P
- Row 25: Rep row 7. (26 sts)
- Row 26: P
- Row 27: Rep row 7. (28 sts)
- Row 28: P
- Change to Yarn D
- Row 29: Rep row 7. (30 sts)
- Row 30: P
- Row 31: Rep row 7. (32 sts)
- Row 32: P
- Row 33: K
- Row 34: P
- Row 35: Work in rib – *K1, P1* to the end of the row
- Cont to work in 1×1 rib for 5 more rows.
- Cast off loosely in rib.
- The total length of the belly from the beg of st st – 9 inches.
Belly (Small Size Only)
With RS facing, join Yarn A to the 12 sts on the holder.
Beg with a K row – work 4 rows in st st.
Change to Yarn B – work 2 rows in st st.
- Row 7 (RS): K1, M1K, knit to last st, M1K, K1. (14 sts)
- Row 8: P
- Row 9: K
- Row 10 (WS): P1, M1P, purl to last st, M1P, P1. (16 sts)
- Row 11: K
- Row 12: P
- Rows 13 -14: Cont in st st for 2 more rows and then change to Yarn C.
- Rows 15-16 – Cont in st st for 2 rows.
- Row 17: Rep row 7. (18 sts)
- Row 18: P
- Row 19: Rep row 7. (20 sts)
- Row 20: P
- Row 21: Rep row 7. (22 sts)
- Row 22: P
- Row 23: Rep row 7. (24 sts)
- Row 24: P
- Change to Yarn D
- Row 25: Rep row 7. (26 sts)
- Row 26: P
- Row 27: Rep row 7. (28 sts)
- Row 28: P
- Row 29: Work in rib – *K1, P1* to the end of the row.
- Cont to work in 1×1 rib for 5 more rows.
- Cast off loosely in rib.
- The total length of the belly from the beg of st st – 7.5 inches.
Making Up
- Sew in all loose ends on the back and the belly.
- Using the mattress stitch, seam the ribbed neck with the wrong side facing you so that when turning the collar over, you will see a neat edge.
- Seam the red ribbed collar and the red yarn in stocking stitch on either side of where the armholes start.
- I would also suggest stitching the ribbed collar into place with a few stitches in red yarn, as this tends to roll up when your dog runs.
- Then seam the section on either side that is in green yarn.
- This should be half st st and half rib.
- This leaves two large openings for the front legs to fit through.


The Sleeves
*You may want to use a 16” or 20” cable for this section*
- Choose one of the armholes – then with Yarn A pick up and knit 34 (40/46) sts
- You will join in the round and work in rib.
- Round 1: *K1, P1 – rep from * to the end of the round.
- Round 2: K the knits and P the purls.
- Rep round 2 – work in 1×1 rib for 3 more rounds.
- Cast off loosely in rib.
- Sew in any loose ends.
- Rep for the other sleeve.

The side borders on the back of the sweater.
- On one side of the back edge of the sweater – With Yarn A pick up and knit 32 (36/40) sts.
- Row 1: *K1, P1 – rep from * to the end of the row.
- Round 2: K the knits and P the purls.
- Rep round 2 – work in 1×1 rib for 3 more rows.
- Cast off loosely in rib.
- Rep for the other side border.
- Seam the top of the red ribbing to the ribbed section of Yarn D (green) on either side.
- Sew in any loose ends.

Knitted by Our Community
See how knitters have brought this pattern to life with their own yarn choices and style.

Share your work with us…
I love seeing your finished projects
If you enjoyed making the jumper, I’d love to see yours on Instagram, be sure to tag me @handylittleme or hashtag #handylittleme.
If you are on Facebook, stop over to the handylittleme Facebook group and share a photo!
I’d love to see your work.
Happy Knitting!
More Patterns You May Be Interested In…
- How To Knit A Hat For Complete Beginners (+ Video Tutorial)
- 20 Temperature Blanket Patterns (The Ultimate Guide)
- How To Knit A Hat With Circular Needles (Step-By-Step)
- 31 Free Baby Blanket Knitting Patterns (Easy Knit Blankets)
- How To Knit Baby Booties (Step-By-Step)
- 12 Simple Knitting Stitches For Beginners
- Christmas Dog Sweater Knitting Pattern
- How to Knit – A Complete Beginner’s Guide
- 37+ Patterns To Use Up Your Yarn Stash (Small Projects)
- Super Easy Corner To Corner Baby Blanket Pattern (Knit)
- Easy Baby Sweater Knitting Pattern For Beginners
- How To Knit A Baby Hat (Straight Needles)
- Pumpkin Knitting Pattern (Beginner Friendly!)
- 8 Cable Stitch Knitting Patterns
- Free Knitted Heart Pattern (Easy + Quick Project)
- 20+ Fall Oversized Knits (Sweater Knitting Patterns)
- Ribbed Beanie Knitting Pattern (Unisex Mariner’s Hat)
- Free Dog Hat Knitting Pattern (Bobble Hat With Ear Holes)
This is gorgeous as usual 😊
What size did you do for the dog in the picture please . As if like to do this, I’ve already done your striped one. Thanks
Hello Amanda, thank you!
I made the large size for Jason, he is between a medium and large size in measurements, but the large fit him better.
I hope that helps!
Louise
I love this sweater and would love to try it but my dog, a boxer, is larger in length and chest. Should I double for xl?
Hello Jenn, if you look at the large sweater measurements against your dog, you could cast on 78sts or 88sts to make the sweater in XL.
Then for the belly increases instead of leaving 12 sts on the stitch holder for the start of the belly, you could leave 24sts (if you cast on 88).
Then increase for the extra width to more than 34sts – say 38 sts or 40 sts depending on how wide your dog’s chest is.
I hope that helps 🙂
Louise
Hello Louise,
Thank you for sharing this pattern. The sweater looks gorgeous. I have an English Setter. Her chest measures 31.5” and her length is 23.5”. I guess even size L would be too small for her. Can you please help me out?
Thank you
Hello Oya,
I can suggest that you increase the cast on stitches and measure/check against your dog.
The large size is 18″ in length – you can measure the length of your dogs back up to the neck and divide the stripes/rows for the stripes in that number.
So instead of 14 rows per stripe for the large – you may need to work something like 20 rows or more.
For the width – you would have to measure your dog and use that number to help you to cast on more stitches.
The chest at the widest point for the large size is 12 inches lying flat – so you would need to cast on more than 57 sts – perhaps even 77sts.
You would have to check the knitting against your dog as you work to custom make it for her size.
I hope that helps!
Louise
Hi
is there a video that shows how this jumper goes together I have knitted the first piece that is back and belly and cant for the life of me figure out how it goes together many thanks. help
Hello Jenny,
I don’t have a video but there are images in the pattern post in the ‘making up’ bit that will help you to see how to stitch it together.
The instructions talk you through how to do it step by step.
There is only one piece for the sweater and then you can add the sleeves later if you want to.
I hope that helps,
Louise
I Love this
Hi Kay, so happy you like it!
Louise
Hi, I love the rainbow jacket for the dog, but my dogs are bigger than the large size. One especially is about 20-25 kg. Would it be easy to add on some stitches for her. Thanks.
Hello April,
My dog in the photos is wearing the large size and he was around 26/27 kilos then (he’s 29 now).
The large-size sweater fits him ok.
You could add extra stitches if you wish, to the front and back pieces to make the sweater wider but it will stretch.
I hope that helps!
Louise