Cardigan Knitting Pattern (Fall Comfort)
THIS ARTICLE CONTAINS AFFILIATE LINKS THAT SUPPORT HANDY LITTLE ME CONTENT AND FREE PATTERNS.In this post, you will see an easy cardigan knitting pattern.
This cardigan is really soft and comforting, due to the drape and fit.
Scroll down to view the free pattern or you can grab your printer-friendly ad-free PDF here.

An Easy-Level Knitting Pattern
This is an easy pattern for those of you who are advanced beginner level, using mainly knit and purl stitches, it also has simple increases and decreases for shaping.
This pure comfort cardigan is wonderful for the fall/winter months when there is a chill in the air or a storm is coming over.
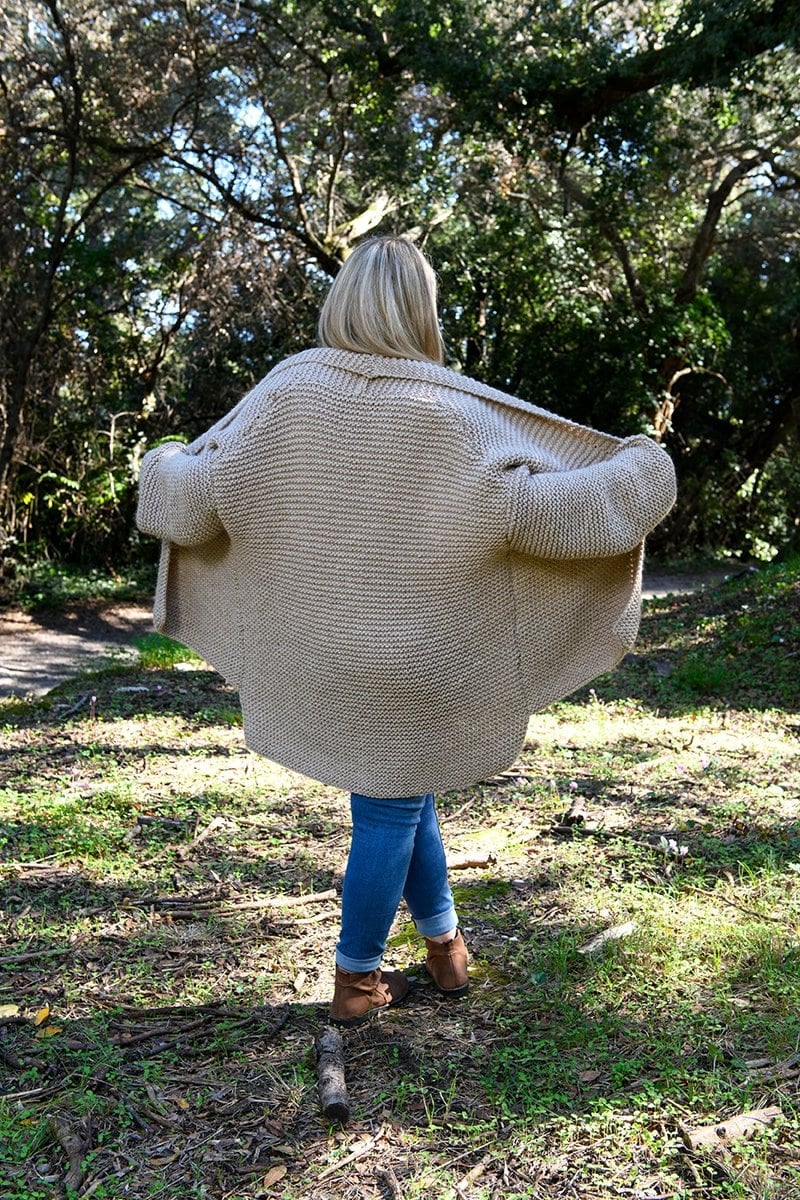
It’s baggy and cozy, it wraps around you and somehow, you feel comforted just wearing it!

Resources And Tutorials That Will Help You To Knit This Cardigan
To make the cardigan you mainly need to know how to knit and purl.
You will be creating the main knitted fabric of the piece in garter stitch (knitting every row), working from the bottom up, and the selvedge edges are where you need to do a purl stitch.
The purl stitches are also used when you create the collar and front bands that are on the left and right fronts.
If you are new to knitting and still finding your feet with all of the knitting terms and abbreviations, you can find some tutorials and information here;
- Knitting cast-on methods
- Knitting Lessons
- How to cast on knitting
- HHow to cast off knitting for total beginners (step by step)
- How to knit garter stitch
- How to knit the purl stitch (for beginners + a video tutorial)
- How to knit stockinette stitch (for beginners)
- How to read knitting patterns for beginners
- Knitting abbreviations and terms (US and UK)

Why Is This Cardigan So Easy To Knit?
- It uses only knit and purl stitches.
- It works up quickly as you will use 8 mm (US size 11) needles and bulky/chunky/12-ply yarn.
- Has minimal shaping and a loose baggy fit.
- The shaping is clear and simple to understand.
- All of the pieces are knit flat (even though I used circular needles to accommodate the number of stitches).
- There are no cuffs, hem, rib stitches, or button band.
- The cardigan is knit with bulky weight yarn to make it a quick knit and easy for beginners.

Cardigan Knitting Pattern {Fall Comfort}
Grab your inexpensive ad-free, PDF printable pattern in my shop here.
Notes
Please read the notes section of the pattern below before starting to knit.
The pattern is written for all sizes starting with the small size – with changes for different sizes listed in all necessary places.
To follow the pattern more easily, circle or highlight all numbers pertaining to your size before beginning.
Further Notes
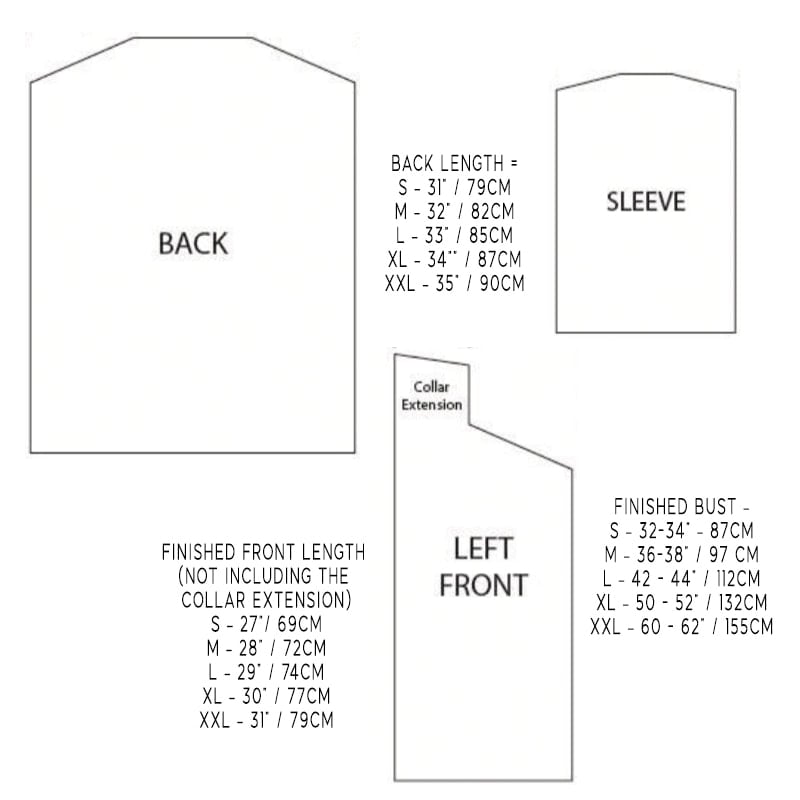
- The cardigan is made from 5 pieces – a back panel, 2 front panels, and 2 sleeves.
- Circular needles are used because there are many stitches, work back and forth on those needles, and do not join in the round for any piece.
- Each row of each piece begins with a slip stitch and ends with a purl stitch for any selvedge.
- Selvedge stitches create a neat edge for seaming.
- You can slip as if to knit or to purl, whichever you prefer.
- The back piece is about 5 inches (13cm) longer than the front pieces.

Skill Level – Easy
Gauge – 10 x 10 cm /4 x 4 inches = 12 sts and 24 rows in garter stitch.
You may wish to make a gauge swatch before starting.
Copyright Info
- Please do not copy, sell, redistribute, or republish this pattern.
- If you wish to share this pattern, link to the pattern page only.
- You may sell items produced using this pattern.
- Do NOT use copyrighted photos for your product listing.
- For the copyright T&C please read my Terms of Use.

Size Information
There are 5 sizes available – small, medium, large, XL, and XXL.
In the photographs, I am wearing the medium size for a UK size 10/12 / US size 6/8, I could have made a smaller size for a better fit.
The sizes are for the following sizes – (Please Note – If you want a more fitted cardigan I would suggest sizing down by one size).
S / M / L / XL / XXL
Finished Bust Circumference
- S – 32-34” – 87cm
- M – 36-38” / 97 cm
- L – 42 – 44” / 112cm
- XL – 50 – 52” / 132cm
- XXL – 60 – 62” / 155cm
Finished Back Length
- S – 31” / 79cm
- M – 32” / 82cm
- L – 33” / 85cm
- XL – 34”” / 87cm
- XXL – 35” / 90cm
Finished Front Length (not including the collar extension)
- S – 27”/ 69cm
- M – 28” / 72cm
- L – 29” / 74cm
- XL – 30” / 77cm
- XXL – 31” / 79cm

The Supplies You Need
Yarn
- The Petite Wool From We Are Knitters (each ball is 100g/153 yds/140m)
- Color – Spotted beige.
- This is a chunky/bulky yarn/12-ply yarn.
- For the following sizes you will need;
- Small – 7 – 100g (700g/1,071yds/980m)
- Medium – 8 – 100g (800g/1,224yds/1,120m)
- Large – 9 – 100g (900g/1,377yds/1,260m)
- XL – 10 – 100g (1000g/1,530yds/1,400m)
- XXL – 11 – 100g (1100g/yds1,683/1,540m)
- Yarn Weight Guide (+ Conversion Chart)
Needles
- 8 mm (US 11) knitting needles – if using circulars – with a 40cm cable
Notions
- Tape measure
- Darning needle
- Scissors
- Stitch markers

Abbreviations
- Beg – beginning
- K – knit
- K2tog – knit two stitches together
- P – purl
- PM – place marker
- Rem – remaining
- Rep – repeat
- RS – right side
- Sl – slip
- St(s) – stitch (es)
- WS – wrong side
Pattern Instructions
Back Piece
- Cast on – 57 (75, 93, 111, 129) sts
- Row 1 (RS) – Sl 1 (selvedge), K to last st, p1 (selvedge).
- Rep row one until the back piece measures – from the beginning: 23”/59cm ( 24”/61cm, 25”/64cm, 26”/67cm, 27”/69cm)
- End with a WS row as the last row you work.
Shape the shoulders
- Cast off 1 (2, 3, 4, 5) sts at the beg of the next 8 (10, 12, 14, 16) rows. 49 (55, 57, 55, 49) sts.
- Cast off 2 sts (S/M) 3 sts (L/XL/XXL) at the beg of the next 12 (10, 8, 6, 4) rows. 25 (35, 33, 37, 37) sts.
- Cast off.

Left Front
- Cast on 33 (39, 51, 57, 69) sts.
- Row 1 (RS): Sl 1, P6, PM, K to last st, p1.
- Row 2 (WS): Sl 1, K to last 7 sts, (slide marker) p 6 sts, p1.
- Rep the last two rows, cont to slip marker as you come to it.
- Continue to work pattern as established until the piece measures: 20”/51cm (20.5”/52cm, 21”/53.5cm, 21.5”/54.5cm, 22”/56cm) from beg, end with a RS row as the last row you work.
Shape Shoulder
- Row 1: (WS) cast off 1 (2, 3, 4, 5) sts, then work in the pattern as established.
- Row 2: Work in a pattern as established at the end of the row. 32 (37, 48, 53, 64) sts.
- Rep rows 1 and 2 a further 3 (4, 5, 6, 7) times more. 29 (29, 33, 29, 29) sts.
- Next row: Cast off 3 sts, work in pattern as established to the end of the row – (26, 26, 30, 26, 26) sts.
- Next Row: Work even in pattern as established.
- Rep the last two rows: 3 (3, 3, 2, 1) more times. 17 (17, 21, 20, 23) sts.
Collar Extension
- Cont in pattern as established, slipping the first st and purling the last st for selvedges for about 3.5”/9cm (4”/10cm, 4”/10cm, 4¼ / 11 cm, 4 ¼ / 11 cm), ending with a RS row as the last row you work.
- Next row (WS): Cast off 5 (6, 7, 7, 8) sts then work in the pattern as established to the end of the row. 12 (11, 14, 13, 15) sts.
- Next row: Work even in pattern as established.
- Rep the last two rows once more.
- Cast off rem: 7 (5, 7, 6, 7) sts.

Right Front
- Cast on 33 (39, 51, 57, 69) sts.
- Row 1 (RS): Sl 1, K to last 7 st, PM, p6, p1.
- Row 2 (WS): Sl 1, p6, slip marker, k to last st, p1.
- Rep the last two rows, cont to slip marker as you come to it.
- Continue to work pattern as established until the piece measures: 20”/51cm (20.5”/52cm, 21”/53.5cm, 21.5”/54.5, 22”/56cm) from beg, end with a WS row as the last row you work (not the collar end).
Shape Shoulder
- Row 1: (RS) cast off 1, (2, 3, 4, 5) sts, then work pattern as established to end of row. 32 (37, 48, 53, 64) sts.
- Row 2: Work in pattern as established.
- Rep rows 1 and 2 a further 3 (4, 5, 6, 7) times more. 29 (29, 33, 29, 29) sts.
- Next row: Cast off 3 sts, and work in the pattern as established to the end of the row. 26 (26, 30, 26, 26) sts.
- Next Row: Work even in pattern as established.
- Rep the last two rows: 3 (3, 3, 2, 1) more times. 17 (17, 21, 20, 23) sts.
Collar Extension
- Cont in pattern as established, slipping the first st and purling the last st for selvedges for about 3.5”/9cm (4”/10cm, 4”/10cm, 4 ¼ / 11 cm, 4 ¼ / 11 cm), ending with a WS row as the last row you work.
- Next row: Cast off 5 (6, 7, 7, 8) sts then work in the pattern as established to the end of the row. 12 (11, 14, 13, 15) sts.
- Next row: Work even in pattern as established.
- Rep the last two rows once more.
- Cast off rem: 7 (5, 7, 6, 7) sts.

Sleeves (Make 2)
- Cast on 39 (45, 51, 57, 63) sts.
- Row 1: sl 1 (selvedge), k to last st, p1 (selvedge).
- Rep row 1 until the piece measures: 15.5”/40cm (16”/41cm, 16.5”/42cm, 16.5”/42cm, 15.5”/39.5cm) from beg.
Shape cap – top of sleeve:
- Rows 1-5: Bind off: S – 4sts / M – 5sts.
- Rows 1-6: L – 6sts / XL – 7sts / XXL – 8sts.
- Work in pattern as established to end of row – S = 19 sts / M = 20 sts in row 5 / L / XL / XXL: 15 sts in row 6.
- Cast off.

Finishing/Making Up
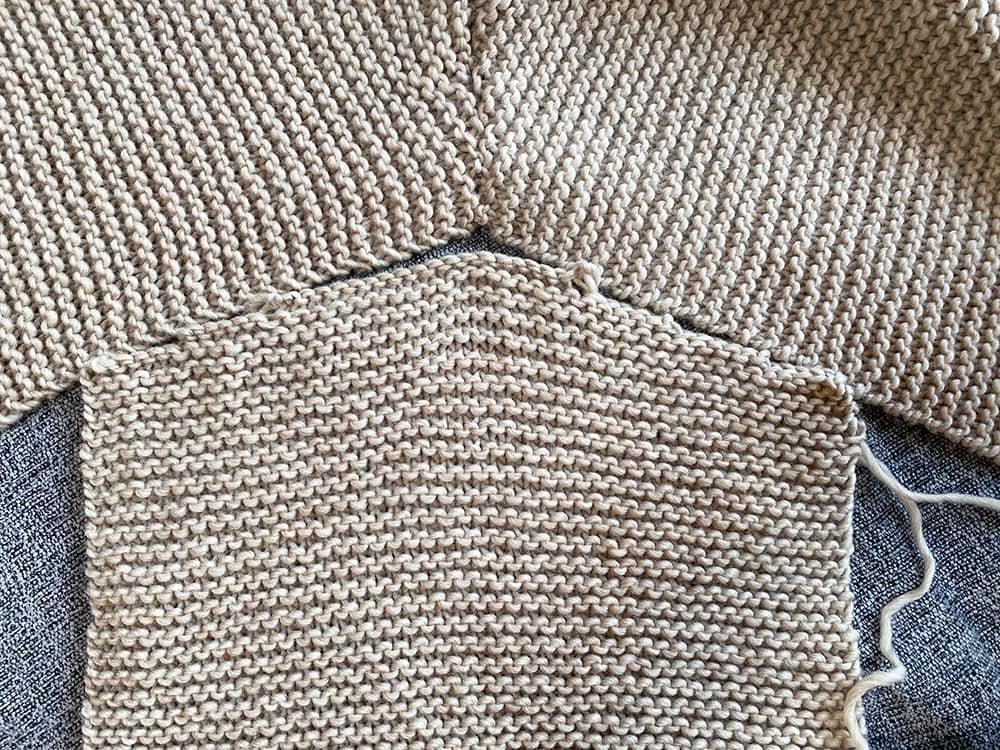
- Sew shoulder seams – lie the pieces out on a large surface and align the fronts onto the back piece.
- Match up the shoulders and seam using the mattress stitch, once you have done this the next steps should seem easier to follow.
- Place markers on the side edges of the back and fronts, about:
- S – 5”/13cm / M – 5.5”/14cm / L – 6”/15cm / XL – 7”/17cm / XXL – 7.5”/19cm, below shoulder seams.
- Sew side and sleeve seams, leaving the lower 4 inches of the back piece un-sewn – you can see in the photographs, that the back piece is longer than the fronts.
- TIP – Place markers 4 inches from the edge on the back piece and lay your fronts on top to match up for seaming.
- Sew the ends of collar extensions together (the ends first with the mattress stitch) and stitch the edge of the collar extension to the back of the neck.
- You can see something similar in the making up of this cardigan pattern here – Cardigan Knitting Pattern (Stay Home + Be Cozy). This also has neck extensions that are seamed in the same way.
- Use a simple whip stitch seam for garter stitch sections, or your preferred seaming method – you can also use the mattress stitch. – Mattress Stitch – How To Seam Knitting
- Weave in loose ends.

More Free Knitting Patterns
You may also like this Chunky Cardigan Knitting Pattern or this Irish Moss Stitch Cardigan Knitting Pattern.
You can see more cardigan knitting patterns here. – Sweaters + Cardigans
Share your work with us…
I love seeing your finished projects on social media.
If you enjoyed making the cardigan, I’d love to see yours on Instagram, be sure to tag me @handylittleme.
I’d love to see your work.
Happy Knitting!
More Patterns You May Be Interested In…
- How To Knit A Hat For Complete Beginners (+ Video Tutorial)
- 20 Temperature Blanket Patterns (The Ultimate Guide)
- How To Knit A Hat With Circular Needles (Step-By-Step)
- 31 Free Baby Blanket Knitting Patterns (Easy Knit Blankets)
- Forest Haze Sweater Knitting Pattern
- Knitted Dog Sweater Pattern (3 Sizes)
- 12 Simple Knitting Stitches For Beginners
- 31 Cardigan Knitting Patterns (Free + Easy Ideas)
- 37+ Patterns To Use Up Your Yarn Stash (Small Projects)
- Free Dog Sweater Knitting Pattern (Straight Needles)
- Super Easy Corner To Corner Baby Blanket Pattern (Knit)
- Easy Baby Sweater Knitting Pattern For Beginners
- How To Knit A Baby Hat (Straight Needles)
- Pumpkin Knitting Pattern (Beginner Friendly!)
- 8 Cable Stitch Knitting Patterns
- 47+ Modern Knitting Patterns For Fall
- Free Knitted Heart Pattern (Easy + Quick Project)
- 20+ Fall Oversized Knits (Sweater Knitting Patterns)
- Ribbed Beanie Knitting Pattern (Unisex Mariner’s Hat)
- Circular Knitting: Bottom-Up Sweater Knit In The Round


