Chunky Cardigan Knitting Pattern
THIS ARTICLE CONTAINS AFFILIATE LINKS THAT SUPPORT HANDY LITTLE ME CONTENT AND FREE PATTERNS.This chunky cardigan knitting pattern is an easy knit for anyone who is looking to make their first garment.
Knit only in garter stitch, the cardigan has simple shaping through increases and decreases.
The full pattern is free below, or you can purchase the ad-free printable PDF here.

Chunky Cardigan Pattern
Skill Level – Easy
Notes
This chunky cardigan knitting pattern is an easy knit for anyone who is looking to make their first garment.
Knit only in garter stitch, the cardigan has simple shaping through increases and decreases.
This is an oversized, super bulky knit that will keep you cozy in the coldest of months!
Copyright Info
- Please do not copy, sell, redistribute, or republish this pattern.
- If you wish to share this pattern, link to the pattern page only.
- You may sell items produced using this pattern.
- Do NOT use the copyrighted photos for your product listing.
- Please give pattern credit to Louise Bollanos or tag @handylittleme.

Size Information
Gauge – 9 sts and 18 rows, to 10 x 10 cm/4×4 inches in garter stitch using size 10mm (US 15) knitting needles.
- S (Small), M (Medium), L (Large)
- The first number of stitches is for the small size, and the following numbers in brackets are for the medium and large sizes.
- For example – cast on 27 – S / 29 -M / 31 -L sts.
To fit sizes
- Small – 34 – 36 inches / 86 – 91 cm.
- Medium – 38 – 40 inches / 97 – 102 cm.
- Large – 42 – 44 inches / 107 – 112 cm.
Actual Measurement – Approx
- 50 inches/127cm.
- 54 inches/138cm.
- 58 inches/148cm.
Side seam – All sizes = 16 inches/41cm.
Length
- Small – 30 inches/77 cm.
- Medium – 31 inches/79cm.
- Large – 32 inches/82cm.
Sleeve Seam with the cuff turned back = 16.25 inches/41.5cm.
The Supplies You Need
Yarn
- 9 (10, 11) balls of Lion Brand Wool-Ease Thick and Quick Yarn (170g/106yds/97m) in Graphite (151).
- Total yardage – S – 954 / M – 1,060 / L – 1, 166
- Total meters – S – 873 / M – 970 / L – 1,067
- Total grams – S – 1,530 / M – 1,700 / 1,870
- Yarn weight – Super Bulky 06/Super Chunky/18-20 ply
- Yarn Weight Guide (+ Conversion Chart)
Needles
Notions
- Tape measure
- Darning needle
- Scissors
- Stitch markers
Print + Stitch
Purchase the ad-free PDF pattern
Want a clean, printable version of this pattern? You can purchase the ad-free PDF in my shop. It’s perfect for printing, saving to your device, and making without distractions.
Abbreviations
- Alt – Alternate
- Beg – Beginning
- CO – Cast on
- Cont – Continue
- Foll – Following
- Garter st – Knit every row
- K – Knit
- M1 – Make one stitch (increase)
- K2tog – Knit two stitches together (decrease)
- Sts – Stitches
- Rep – Repeat
- RS – Right side
- WS – Wrong side
- W+T – Wrap and turn – Short row shaping
Cardigan Pattern Instructions
Pattern Notes
- The pattern is written for all sizes, starting with the small size, with changes for different sizes listed in all necessary places.
- To follow the pattern more easily, circle or highlight all numbers pertaining to your size before beginning.
- The cardigan is worked in 5 pieces: Back, 2 Fronts, and 2 Sleeves.
- Each piece is worked in garter stitch from the lower edge upwards.
- A circular needle can be used to accommodate the number of stitches.
- If you use circular needles, work back and forth as if working on straight needles.
- You can add more rows to make the length of the cardigan longer or fewer rows to make it shorter.

Back
- Cast on 50 (54, 58) sts and beg with a wrong side row work 69 rows in garter stitch.
- Mark each end of the last row with a stitch marker for the side seams.
- Work in garter stitch for a further 44 (46, 48) rows.
Shape the shoulders
- Cast off 4 (4, 3) sts at the beg of each of the next 2 rows.
- 3 (4, 3) sts at the beg of each of the following 2 rows.
- Then cast off 3 (3, 4) sts at the beg of each of the next 8 rows.
- Cast off the rem 12 (14, 14) sts.
Left Front
- Cast on 27 (29, 31) sts and beg with a wrong side row, work 59 rows in garter stitch.
Shape the collar
- Row 1 – K to last 3 sts, M1, K3. 28 (30, 32) sts.
- Rows 2-8 – Work a further 7 rows in garter stitch.
- Row 9 – Rep row 1.
- Row 10 – K 1 row.
- Mark the end of the last row – to show the end of the side seam.
- Rows 11-16 – Work a further 6 rows in garter stitch.
- Row 17 – K to last 3 sts, M1, K3.
- Rows 18-24 – Work a further 7 rows in garter st.
- Rep the last 8 rows (17-24) twice more, then row 1 again. 33 (35, 37) sts.
- Work a further 2 (4, 6) rows in garter stitch, ending with a RS row.
Shape the extra length on the collar
- 1st and 2nd turning rows: K10, for 1st row, W+T, then K to end for 2nd row.
- Work 2 rows in garter stitch across all sts.
- Rep the last 4 rows 3 times more.
- Work 3 rows in garter st.
Shape the shoulder
- Cast off 4 (4, 3) sts at the beg of the next row.
- Cast off 3 (4, 3) sts on the foll alternate row, then 3 (3, 4) sts on the next 4 alternate rows. 14 (15, 15) sts.
- Work a further 7 (9, 9) rows in garter st for the back of the neck extension.
- Cast off.
Right Front
- Cast on 27 (29, 31) sts and beg with a wrong side row work 59 rows in garter stitch.
To shape the collar
- Row 1 – K3, M1, K to end of the row.
- Rows 2 – 8 – Work 7 rows in garter st.
- Row 9 – Rep row 1.
- Row 10 – K 1 row.
- Mark the beg of the last row – to show the end of the side seam.
- Rows 11 -16 – Work a further 6 rows in garter st.
- Row 17 – K3, M1, K to end of row.
- Rows 18 – 24 – Work a further 7 rows in garter st.
- Rep the last 8 rows twice more and then row 1 again – 33 (35, 37) sts.
- Work a further 3 (5, 7) rows ending with a WS row.
Shape the extra length on the collar
- 1st and 2nd turning rows: K10, for 1st row, W+T, then K to end for 2nd row.
- Work 2 rows in garter stitch across all sts.
- Rep the last 4 rows 3 times more.
- Work a further 3 rows in garter st.
Shape the shoulder
- Cast off 4 (4, 3) sts at the beg of the next row.
- 3 (4, 3) sts on the foll alternate row, then 3 (3, 4) sts on the next 4 alternate rows – 14, (15, 15) sts.
- Work a further 6 (8, 8) rows in garter st for the back of the neck extension.
- Cast off.
Sleeves (Make 2)
- Cast on 24 (26, 28) sts and beg with a RS row work 32 rows in garter st.
- Cont in garter st and taking extra sts into garter st as they occur – inc 1 st at each end of the next row and the 8th foll 6th rows. 42 (44, 46) sts.
- Work a further 3 rows in garter st.
- Cast off
Notes on the sleeves…
Where the instructions say – Continue in garter stitch and taking extra stitches into garter stitch as they occur- inc 1 st at each end of the next row and the 8th foll 6th rows.
To clarify, this means that you need to work 6 rows of increases 8 times.
So on the next row, you will work the increase, then you will work 6 rows and make the increase on the next 6th row, repeating that 7 more times. (8 times in total).
For example, if you were knitting the small size, you will have 24 sts on your needle, and you will knit 32 rows in garter stitch, then…
You make the increases – one at each end – on the next row – (26 sts)
Then again on the next 6th row (28) and again 7 more times on that 6th row – (total sts = 42)
There will be 6 rows worked 8 times.
With the 2 sts added on the 6th row.
You are increasing 1 st at each end of the row – so that’s 2 sts.
Making Up
- Join the shoulder seams.
- Stitch the back neck extensions across the back of the neck, joining the cast-on and cast-off edges together with an invisible seam.
- Stitch the cast-off edge of the sleeves between the markers on the back and front.
- Join the sleeve seams, reversing the seam for approximately 14 rows at the lower edge to fold back. (Both sleeves will have turned-over cuffs)
- Join the side seams.
- Fold the collar and cuffs over to the right side.

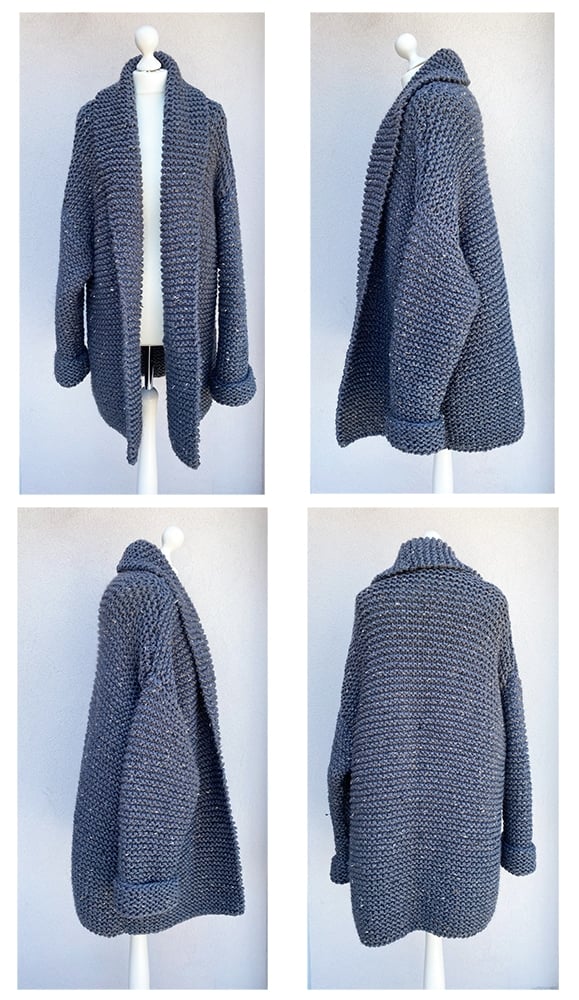
The Oversized Knit Cardigan Trend
Oversized cardigans are back year after year – and why not?!
They are comfy, cozy, and perfect for wearing around the house or when you are out and about.
Better than wearing an actual blanket in cold weather, oversized cardigans can be worn with anything from sweats to jeans.

Make Your Own Oversized Cardigan
The chunky, oversized, cozy cardigan was knit with Lion Brand Wool-Ease Thick and Quick yarn in the color graphite.
It has three sizes: small, medium, and large.
This cardigan is pretty and has a drape,y oversized fit.
I would recommend sticking to your size and not sizing up, or it will probably be huge on you!

A Cozy Long Cardigan Sweater
The long cardigan sweater pattern uses garter stitch in a really simple way to create the body of the fabric.
Through basic techniques, increases and decreases, you will shape the back panel, the front panels, and the collar.
The separate pieces are knitted flat and then seamed together to create the garment.

A Chunky Knit Cardigan For Advanced Beginner Knitters
As well as being super comfy to wear, this chunky knitted cardigan pattern is a great project for any advanced knitters looking for something to make for themselves on a weekend.
Knit with super bulky yarn and big needles, this cardi is a quick knit.
The cardigan is really warm and can be worn around the house in cold weather, for collecting firewood, or wherever else you want to go.

A Long Cardigan That Can Easily Be Adjusted
I wanted to make this cardigan in a dark color, choosing to make the length long so that it was really cozy and comfy to lounge around in.
Lying on the sofa, drinking coffee, knitting, and watching Netflix with the fire on is made even better when you are wearing something that wraps you up like a blanket!
You could adjust the length, as you may want the cardigan to be shorter or longer, depending on your height.
This would mean working more or fewer rows for the back piece, left front, and right front.

FAQ
How do you wear a chunky knitted cardigan?
Wearing a chunky knitted cardigan can be both stylish and cozy. Here are some tips on how to insert chunky knitted cardigans into your everyday outfits.:
Choose the Right Fit: Make sure the cardigan fits well. It should be loose and have a nice drape but not overly baggy. You want it to look intentionally oversized rather than just too big.
Layering: Layering is key when it comes to chunky knits. Wear a simple, fitted top underneath to balance the volume of the hand-knit cardigan. A basic t-shirt, a graphic tee, a tank top, or a slim-fitting sweater can work well.
Pair with Slim Bottoms: To avoid looking overwhelmed by the chunkiness of the casual cardigan, pair it with slim or fitted bottoms. Skinny jeans, leggings, or a pencil skirt can create a nice contrast.
Accessorize: Consider adding accessories like a belt to define your waist if the classic cardigan is long. Scarves or statement jewelry can also enhance the overall look.
Choose the Right Length: Pay attention to the length of the cardigan. If it’s a longer style, it can work well with leggings or skinny jeans. Shorter styles can be paired with a variety of bottoms.
Experiment with Colors: Play with color combinations. A neutral simple cardigan can be versatile and easy to style, but don’t be afraid to try bold colors to make a statement.
Footwear: Depending on the occasion, you can pair your chunky cardigan with different types of footwear. Boots, ankle boots, or even sneakers can complement the casual, cozy vibe.
Roll or Push Up Sleeves: If the sleeves are too long, consider rolling or pushing them up slightly. This adds a casual touch and prevents the sleeves from overwhelming your hands.
Tuck it In or Leave it Open: Depending on the style of the cardigan, you can experiment with tucking it into your bottoms for a more polished look or leaving it open for a relaxed vibe.
Experiment with Textures: Mix and match textures for a more interesting outfit. For example, pair your chunky knit cardigan with leather leggings or a silk skirt.
Learn more about how to wear your knit in this blog post here – How To Wear Your Knits This Fall

Can a beginner knit a cardigan?
Yes, a knitting beginner can absolutely knit a cardigan with the right approach.
Opt for a straightforward pattern tailored for beginners, focusing on basic stitches like knit and purl and minimal shaping.
Choose a yarn that’s easy to work with and aligns with the pattern’s recommendations. Prioritize understanding the pattern by reading it thoroughly and practicing any unfamiliar stitches.
Break the project into manageable sections, starting with the back panel and then progressing to the front panels, sleeves, and finishing touches.
Focus on keeping the correct tension throughout the project.
Remember, every knitter starts somewhere, so enjoy the knitting process of creating your own cozy cardigan.
If you are an absolute beginner, check out this knitting guide here – How to Knit – A Complete Beginner’s Guide
How much yarn do you need to knit a cardigan?
The amount of yarn needed to knit a cardigan can vary widely based on several factors, including the size of the cardigan, the pattern, the gauge of your knitting, and the type of yarn you choose.
Here are some general guidelines:
- Pattern Requirements:
- Always check the pattern you’re using for specific yarn requirements. Patterns typically provide information on the recommended yarn weight, yardage, and other details.
- Yarn Weight:
- The weight of the yarn (e.g., fingering weight yarn, worsted weight yarn, bulky weight yarn, super chunky yarn) will significantly impact the amount needed. Bulkier yarns generally require less yardage than finer ones.
- Cardigan Size:
- Larger sizes will naturally require more yarn. Be sure to consider your own measurements and choose a size that fits comfortably.
- Gauge Swatch:
- Knit a gauge swatch using the chosen yarn and needles to ensure your stitch and row counts match the pattern. This will help you estimate how much yarn you’ll use per inch or centimeter and adjust accordingly.
- Length and Style:
- The length of the cardigan and its style (e.g., cropped, hip-length, knee-length) will affect the yarn requirements. Longer and more oversized designs generally require more yarn.
- Additional Elements:
- If your cardigan has additional features like cables, lace, or a textured pattern, these can also impact the amount of yarn needed.
- Yarn Skein Information:
- Yarn skeins typically include information on yardage. Multiply the yardage per skein by the number of skeins recommended in the pattern to estimate the total yardage required.
Learn everything about yarn weights here – Yarn Weight Guide {+ Conversion Chart}
Learn everything about yarn fibers here – Yarn Types Explained: A Guide To Different Fibers
To get a precise estimate, carefully read the pattern and consult the recommended yarn.
If you’re making adjustments to the pattern, consider consulting with a knowledgeable source or using a yarn calculator to determine the amount of yarn needed for your specific modifications.

More Free Knitting Patterns
- Oversized Chunky Knit Sweater Pattern
- Chunky Turtleneck Sweater Knitting Pattern
- Cardigan Knitting Pattern (Fall Comfort)
- Pom Pom Scarf Knitting Pattern
- Chunky Cable Knit Sweater Pattern
- Rainbow Cardigan Knitting Pattern (5 Sizes)
- Cardigan Knitting Pattern (Stay Home + Be Cozy)
- Irish Moss Stitch Cardigan Knitting Pattern
- Forest Haze Sweater Knitting Pattern
- Circular Knitting: Bottom-Up Sweater Knit In The Round
- How To Knit A Hat For Complete Beginners (+ Video Tutorial)
- 31 Cardigan Knitting Patterns (Free + Easy Ideas)
Share Your Make
If you enjoyed making the cardigan, I’d love to see yours on Instagram, tag me @handylittleme.
If you are on Facebook, visit the Handylittleme Facebook group, and share a photo.
I’d love to see your work.
Happy Knitting!
More Sweaters + Cardigans
More chunky knits for you to make for fall/winter.


Hi Louise, you say befor shaping is this before the extra length on the collar?
Tks
Hello Samantha, before shaping is when you knit up to shaping the collar on the fronts and on the back piece before you start to shape the shoulders. I hope that helps! 🙂
Hi, Thank you for the beautiful pattern, I completed it and trying to sew everything together. Could not
Follow the neck extension sewing together. Is there a video of yours available. Also, can I use crochet stitch
And join all pcs or needle?
Once again, I want to thank you for this pattern, I made it for my Grand daughter.
Hello Kasthuri,
The neck extension needs to be stitched up at the back of the neck.
You will see those two seams at the very top of each front piece when you have seamed up your fronts to the back.
There is an image in the post to show you what that looks like with the collar turned up.
You will seam the neck extensions with the neat edge on top, so when the collar lies flat you only see the right side/neat edge.
You can crochet the pieces together if you wish, some people have done this with success. Others prefer to use the mattress stitch.
I hope that helps and thanks so much for your kind words, I’m happy you enjoyed the pattern.
Louise 🙂
I am finishing up the last sleeve. THIS has been a joy to knit. Question about blocking. Do you suggest blocking? I am using the Lion’s Brand Thick and Quick yarn. If you suggest it – do it before or after I put it all together? What do you usually do?
Hello Cindy, I didn’t block the cardigan, as I felt like it didn’t need it.
With the wool ease thick and quick I would have thought it wouldn’t need blocking as it will have quite a nice heavy drape without it.
But – if you think it needs it, then yes do it.
If you want to do it I would probably block before stitching the pieces together.
I hope that helps and I’m so happy you enjoyed the pattern!
Louise
Thanks! Just looking for permission to not do it either! It does not appear to need it. no curling up at edges and all seems to come out the same size.
I have another question regarding stitching up the sleeve seam. You say
in the instructions “Join sleeve seams, reversing seam for approx 14 rows at lower edge for fold back.”
Not sure what reversing seam means? I had planned on just stitching the whole seam and folding the sleeve back for a cuff? Thanks for being there to help us!
Hello Cindy,
Reversing the seam means that when you get to where you want to fold the cuff over – you need to seam from the other side.
This is because when you fold the cuff over you will see a neat seam.
If you don’t do that – you will see the inside seam edge on the right side.
I hope that makes sense!
Louise 🙂
Thanks… it makes sense now.. appreciate it. Your patterns think of everything!
Hi Cindy, no worries, I hope you enjoy wearing your new cardigan!
If you are on Facebook – you can drop a photo in the Handy Little Me Facebook group 🙂
Thanks,
Louise
I absolutely love this pattern and am very excited to make this sweater for myself and a friend of mine. I have a couple of questions first the type of yarn my friend wants it out of is a bulky yarn but it’s 270g how many balls of it will I need to make the large size? I have 12 and am hoping that is enough. Secondly I don’t have size 9 knitting needles and can’t find them anywhere that isn’t crazy expensive. Could you do this pattern with the size 8 and just add a little more rows and stitches to make it bigger or should I try and just get the size 9 needles?
Hello Riley,
To make this pattern as it is – you would have to use the needle sizes stated in the pattern.
If you only use size 8mm (US 11) needles, you will have a tighter knit fabric and the cardigan will not be as oversized or long.
If you want to use that needle size matched with the bulky yarn – you will need around 1,870-2000g for the large size, possibly more, as I have not made the cardigan using this weight of yarn and the smaller needle size.
Let me know how it goes!
Louise
On the sleeves now knitted the first 32 rows. Not sure how to interpret the rest of sleeve patters. Do I knit an extra stitch at end of 8th row or 6th row ?
Hello Linda,
You will increase 1 st at each end of the next row and the 8 following 6th rows – so you will increase on the 6th row – every 8 rows.
For example, if you are making the medium size (starting with 26 sts), you will work that first increase row and add 2 sts (28 sts).
Then you will knit 6 rows and on the 6th row add 2 sts = 30sts
Next, you will knit another 6 rows, and on the 6th row add 2 sts = 32 sts
You will repeat until you have 44 sts in total on the needle.
So you will have worked those 6 rows 8 times.
I hope that helps!
Louise
Hello Louise,
thank you so much for this pattern. Please could you explain what wrap and turn means? Many thanks
Simone
Hello Simone,
You can see a tutorial on how to wrap and turn here – https://www.handylittleme.com/how-to-knit-short-rows/
I hope that helps!
Louise
This pattern looks wonderful. However, I wear a size 3X and wonder how I would increase to fit me. You are so generous with your patterns. Thanks so much.
Hello Marcia,
At the moment I only have the sizes available that are already in the pattern.
I would have to grade for more sizes and can add that to my to-do list for the future.
Sorry, I am unable to do that right now.
Thanks,
Louise
Hello Louise,
Thank you for your lovely patterns. I have just finished a crean ‘stay at home’ and I love it 🙂
My question is can this cardigan be completed in stocking stitch or will affect the sizing/fit if I do?
Many thanks in advance,
Sue
Hello Sue,
I’m so happy you enjoyed the stay home cardigan pattern.
You could try this one in stocking stitch but you would most likely have a lot of curling on the edges – you would have to have some sort of border in garter stitch to prevent that.
Happy knitting!
Louise
I want the cardigan to be long as shown in your photos. Having knitted the back to the 69 rows, and have marked for the sleeves, the length is only 36cm. My tension is correct and I appreciate that the sleeves sit low in the design but I’m not confident about the current 36cm length will produce the longer effect. What is the cm length to the armhole marker to gain longer cardigan ie How many rows were used for the cardigan as per the photos 69 or #?
Hi Jeanette,
Thank you for your question and for giving the chunky cardigan pattern a try! 😊
The cardigan in the photos is designed to have an oversized and longer fit. If you’re using the same yarn as in the pattern (a super bulky weight yarn), keep in mind that the weight of the yarn makes the cardigan hang lower when worn, which contributes to its length.
The cardigan seen in the photos had 69 rows knit, then armhole markers placed before working more rows for the chosen size (the model wears a small size).
The sleeves are set lower on this design.
Happy knitting! 🧶
Louise