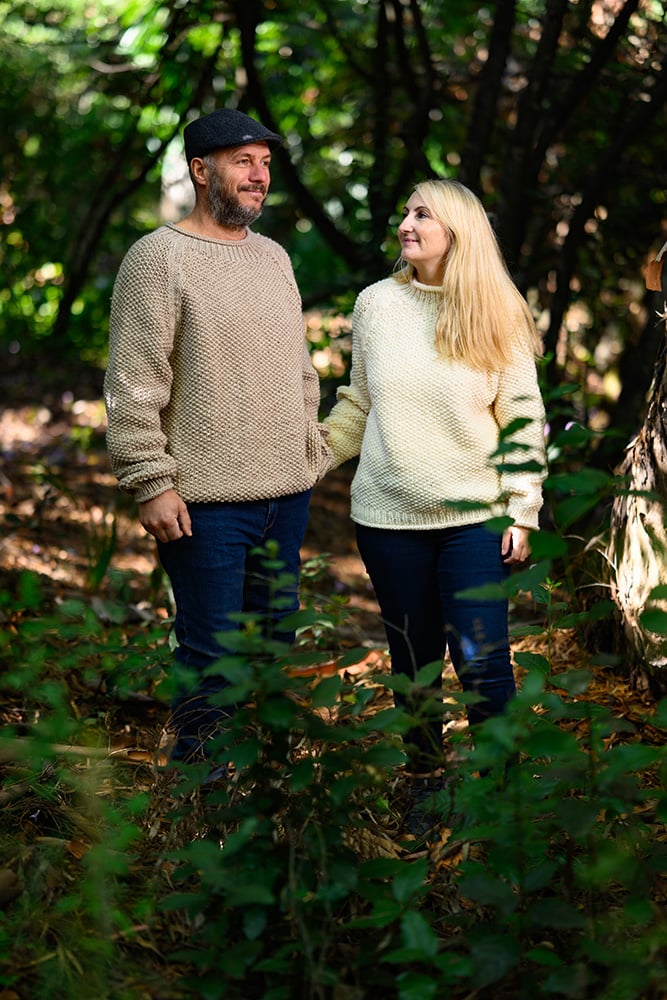
Cozy Cottage Moss Stitch Sweater Knitting Pattern (Women’s)
THIS ARTICLE CONTAINS AFFILIATE LINKS THAT SUPPORT HANDY LITTLE ME CONTENT AND FREE PATTERNS.In this blog post, you will see the Cozy Cottage Moss Stitch Sweater Knitting Pattern.
As the temperatures drop and the days grow shorter, there’s nothing quite like curling up in a warm, hand-knit sweater.
Designed for comfort and style, this sweater is the perfect addition to your winter wardrobe.
Whether lounging by the fire with a cup of tea or heading out for a brisk walk in the crisp air, this sweater has you covered!
The full pattern is free below, or you can purchase the ad-free printable PDF here.

The Inspiration Behind The Design
The Cozy Cottage Moss Stitch Sweater is inspired by the charm and warmth of rustic cottages nestled in snowy landscapes.
Think roaring fireplaces, soft blankets, and the serene quiet of a winter morning. The moss stitch texture mimics the natural, organic patterns found in nature, while the raglan construction ensures a flattering and comfortable fit.
This sweater was created to evoke feelings of coziness and nostalgia, making it a timeless piece you’ll reach for again and again.

What Makes It Special?
- Bulky Yarn for Maximum Warmth: The Cozy Cottage Sweater is knit with a bulky-weight yarn that not only keeps you warm but also knits up quickly. It’s the ideal project for those who want instant gratification without sacrificing quality or style.
- Moss Stitch Texture: The all-over moss stitch pattern gives the sweater its unique, textured look. This stitch adds depth and dimension while maintaining a classic and versatile design.
- Raglan Sleeves for a Flattering Fit: The raglan construction ensures a comfortable fit across the shoulders, providing ease of movement and a polished silhouette. Whether worn alone or layered, it’s a sweater that works for any occasion.
- Timeless Design: With its simple yet sophisticated style, the Cozy Cottage Sweater transcends trends. It’s a piece you can wear year after year, pairing effortlessly with jeans, leggings, or even skirts.

The Design Details That Make It Unique
This cozy moss stitch sweater knit is designed to suit a variety of body types, thanks to its thoughtful construction.
- The raglan shaping ensures that the arm holes are comfortable and functional, allowing for ease of movement.
- The back panel and front sections come together seamlessly at the side seams, creating a polished finish and a flattering silhouette.
- The stitch count is carefully calculated to maintain symmetry and balance, while the increase rows shape the yoke and give structure to the sweater.
- The neck opening is perfectly proportioned for everyday wear, offering comfort without compromising style.
- The bottom ribbing and sleeve cuffs add a refined touch, ensuring the sweater fits snugly where it matters most.
- Meanwhile, the bottom of the sweater is designed to drape naturally, creating a cozy yet polished look that works for any occasion.

Styling The Cozy Cottage Moss Stitch Sweater
This sweater is as versatile as it is cozy.
Here are a few ways to style it:
- Casual Comfort: Pair it with your favorite jeans and ankle boots for a relaxed, everyday look.
- Layered Luxe: Wear it over a collared shirt and add a statement necklace for a chic, layered outfit.
- Cozy at Home: Team it with leggings and fuzzy socks for the ultimate loungewear ensemble.

The Cozy Cottage Moss Stitch Sweater Knitting Pattern
Skill Level – Easy (Advanced beginner)
There’s something magical about wearing a garment you’ve made with your own two hands.
Knitting your own Cozy Cottage Moss Stitch Sweater allows you to choose the perfect yarn and color to suit your style.
Plus, it’s a rewarding project that you’ll be proud to show off.
Whether you’re an experienced knitter or new to garment knitting, this pattern offers the perfect balance of simplicity and interest.
Copyright Info
- Please do not copy, sell, redistribute, or republish this pattern.
- If you wish to share this sweater knitting pattern, please provide a link to the pattern page only.
- You may sell items produced using this pattern.
- Do NOT use the copyrighted photos for your product listing.
- For the copyright T&C, please read my Terms of Use.
Size Information
- Adult/Woman
- S (M, L, XL)
To fit bust size as follows:
- S – 32 inches/81.28 cm
- M – 36 inches/91.44 cm
- L – 40 inches/101.6 cm
- XL – 44 inches/111.76 cm
In the photographs, the model is wearing a small size.
The pattern is written for all sizes, starting with the small size, with changes for different sizes listed in all necessary places.
To make following the pattern easier, circle or highlight all numbers related to your size before beginning.
Gauge – 12 sts x 20 rows = 4×4 inches /10×10 cm of moss stitch – with the larger needles/ 8 mm (US 11) needles.
Measurements
Length (Straight – Shoulder to hem)
- S – 29.5 inches/ 74.93 cm
- M – 30 inches/ 76.2 cm
- L – 30.5 inches/ 77.47 cm
- XL – 31 inches/ 78.74 cm
Sleeve Length (Underarm to cuff)
- S – 16 inches/ 40.64 cm
- M – 16.5 inches/ 41.91 cm
- L – 17 inches/ 43.18 cm
- XL – 17.5 inches/ 44.45 cm
Cuff (Around)
- S – 10 inches/ 25.4 cm
- M – 10 inches/ 25.4 cm
- L – 11 inches/ 27.94 cm
- XL – 11 inches/ 27.94 cm

Pattern Notes
- The sweater is worked in 4 pieces: Back, Front, and 2 Sleeves.
- Each piece is worked in moss stitch from the lower edge upwards, beginning with a ribbed lower band.
- Circular needles are used to accommodate the number of stitches.
- Work back and forth on the circular needle as if working on straight needles.

The Supplies You Need
Yarn
- Bulky/Chunky/12 Ply yarn.
- We Are Knitters – The Petite Wool (100g/153 yds/140m) in Natural x 7, (7, 8, 9) balls.
- Learn how to substitute yarn here – How To Substitute Yarn In A Knitting Pattern
Knitting Needles
- 6 mm (US 10) knitting needles.
- 8 mm (US 11) knitting needles.
- I used my set of interchangeable circular needles as there were many stitches to cast on, and it was easier to use the cables.
- I also used spare cables with end caps to hold spare stitches when needed.
Notions
- Scissors.
- Darning needle, yarn needle, or tapestry needle.
- Tape measure.
- Stitch holders x 3 and/or spare cables with end caps.

Knitting Abbreviations
- Beg – Beginning
- CO – Cast on
- Cont – Continue(ing)
- Dec – Decrease
- Foll – Following
- K – Knit
- K2tog – Knit the next two stitches together
- KFB – Knit into the front and back of the stitch to increase
- P – Purl
- P2tog – Purl the next two stitches together
- P2togtbl – Purl the next two stitches together through the back loop
- Rem – Remaining
- Rep – Repeat
- RS – Right side
- SSK – Slip, slip, knit
- St(s) – Stitch(es)
- WS – Wrong side
Stitch Pattern Notes 1×1 Ribbing
1 x 1 ribbing = K1, P1 (It is obtained by alternating knit and purl stitches in one row and “knitting by pattern” in every next row.
This means that we make a knit stitch when the previous row stitch looks like V and make a purl stitch when the previous looks like a bump.)
Cast On: even number of stitches.
- Row 1 (RS): (k1, p1) till the end of the row.
- Row 2 (WS): (k1, p1) till the end of the row.
Repeat these two rows.
Stitch Pattern Notes Moss Stitch
Moss stitch knitting is a common, easy stitch pattern in knitting.
It is made by alternating knit stitches and purl stitches within a row and between rows.
It is called moss stitch because the stitches create little bumps that may look like the surface of moss.
Moss stitch is identical on both sides and lies flat.
Moss stitch with an even number of stitches…
- Row 1 (Right Side): *Knit 1, purl 1; repeat from * to end of row.
- Row 2 (Wrong Side): *Purl 1, knit 1; repeat from * to end of row.
- Repeat Rows 1-2 for Moss Stitch.
Moss stitch with an odd number of stitches…
- Row 1 (Right Side): *Knit 1, purl 1; repeat from * to end of the row to the last stitch and then Knit 1.
- Repeat Row 1 for Moss Stitch.
Moss Stitch Sweater Pattern Notes
- In this sweater pattern, we start the main body section with a P1, K1 row because the previous row was in 1×1 ribbing for the lower band/cuff.
- When stated, it says to work in patt, which means to continue working in moss stitch.
- When you make any increases or decreases, adjust the pattern accordingly to create new patterns in moss stitch.
Print + Stitch
Purchase the ad-free PDF pattern
Want a clean, printable version of this pattern? You can purchase the ad-free PDF in my shop. It’s perfect for printing, saving to your device, and making without distractions.
Cozy Cottage Moss Stitch Sweater Knitting Pattern Instructions
Back
With 6 mm (US 10) knitting needles CO 64 (68, 76, 82) sts.
Lower Band
- Row 1: Knit
- Row 2: Purl
Work rows 1 and 2 once more.
Work in 1 x 1 ribbing until the piece measures 3 inches from the CO edge.
Main Section
Change to 8 mm (US 11) knitting needles.
- Row 1 (RS): P1, K1 to the end of the row.
- Row 2 (WS): K1, P1 to the end of the row.
Cont to work in moss stitch, repeating rows 1 and 2 until the piece measures 15.5 (16, 16.5, 16.5, 17) inches from the CO edge, ending with a WS row.
Shape Raglan
Rows 1 and 2: Cast off 2, (2, 2, 4) sts at beg of the next 2 rows. 60 (64, 72, 74)sts.
Row 3: K2, SSK, work in moss stitch patt to the last 4 sts K2tog, K2.
Row 4: P3, work in moss stitch patt to the last 3 sts, P3.
Row 5: K3, work in moss stitch patt to the last 3 sts, K3.
Row 6: P2, P2tog, work in moss stitch patt to the last 4 sts P2togtbl, P2.
Row 7: K3, work in moss stitch patt to the last 3 sts, K3.
Row 8: P3, work in moss stitch patt to the last 3 sts, P3.
Row 9: K2, SSK, work in moss stitch patt to the last 4 sts K2tog, K2.
Cont to dec 1 st at each end of every foll 3rd row (repeating rows 4-9) until 32 (34, 36, 36) sts remain.
Leave these sts on a spare needle/stitch holder or cable with end caps.

Front
With 6 mm (US 10) knitting needles CO 64 (68, 76, 82) sts.
Lower Band
- Row 1: Knit
- Row 2: Purl
Work rows 1 and 2 once more.
Work in 1 x 1 ribbing until the piece measures 3 inches from the CO edge.
Main Section
Change to 8 mm (US 11) knitting needles.
- Row 1 (RS): P1, K1 to the end of the row.
- Row 2 (WS): K1, P1 to the end of the row.
Cont to work in moss stitch, repeating rows 1 and 2 until the piece measures 15.5 (16, 16.5, 16.5, 17) inches from the CO edge, ending with a WS row.
Shape Raglan
- Rows 1 and 2: Cast off 2, (2, 2, 4) sts at beg of next 2 rows. 60 (64, 72, 74)sts.
- Row 3: K2, SSK, work in moss stitch patt to the last 4 sts K2tog, K2.
- Row 4: P3, work in moss stitch patt to the last 3 sts, P3.
- Row 5: K3, work in moss stitch patt to the last 3 sts, K3.
- Row 6: P2, P2tog, work in moss stitch patt to the last 4 sts P2togtbl, P2.
- Row 7: K3, work in moss stitch patt to the last 3 sts, K3.
- Row 8: P3, work in moss stitch patt to the last 3 sts, P3.
- Row 9: K2, SSK, work in moss stitch patt to the last 4 sts K2tog, K2.
- Cont to dec 1 st at each end of every foll 3rd row (repeating rows 4-9) until 32 (34, 36, 36) sts remain.
Shape Raglan Continued
- On the next RS row, work 11 sts in patt, then place the central 10, (12, 14, 14) sts for the neck onto a stitch holder, then place the remaining 11 sts onto another stitch holder.
- There will be 11 sts on either side of the neck.
- Each side of the neck will now be worked separately.
Shape Neck
Keeping the raglan shaping correct, P2togtbl, K2tog, at neck edge of foll RS row, K2tog at neck edge of next RS row, then cast off the rem 5 sts at neck edge of foll RS row.
With RS of work facing you – place the 11 sts from the st holder onto the needles and rejoin the yarn for the other side of the neck.
Reverse the shaping as follows:
- K2tog, P2tog, and work in patt to the end of the row.
- Work in patt to the end of the row.
- P2tog, work in patt to the end of the row.
- Work in patt to the end of the row.
- Cast off 5 sts.

Left Sleeve
With 6 mm (US 10) knitting needles CO 32 (34, 36, 38) sts.
Lower Band
- Row 1: Knit
- Row 2: Purl
Work rows 1 and 2 once more.
Work in 1 x 1 ribbing until the piece measures 3 inches from the CO edge.
Main Section
Change to 8 mm (US 11) knitting needles.
- Row 1 (RS): P1, K1 to the end of the row.
- Row 2 (WS): K1, P1 to the end of the row.
- Cont to rep rows 1 and 2, working in moss stitch until the piece measures 4.5 inches from the CO edge, ending with a WS row.
Shape Sleeves
Row 1 (RS): (still working in moss stitch) KFB into the first and last stitch of the row. (2 sts increased)
Rep row 1 (increasing 2 sts) on every foll 10th (8th, 8th, 6th) row, 6 (8, 8, 10) more times. 46 (52, 54, 60) sts.
Cont to work in patt until sleeve measures 17 (17.5, 18, 18.5) inches from the CO edge.
*At this point, check that you are happy with the length of the sleeves – they should start just below the underarm.
If you need to make them longer, work more rows, but if you prefer a shorter sleeve you may need to pull out (frog) a few rows.
Shape Raglan
- Rows 1 and 2: Cast off 2 (2, 3, 4) sts at the beg of the next 2 rows.
- Row 3: K2, SSK, work in moss stitch patt to the last 4 sts K2tog, K2.
- Row 4: P3, work in moss stitch patt to the last 3 sts, P3.
- Row 5: K3, work in moss stitch patt to the last 3 sts, K3.
- Row 6: P2, P2tog, work in moss stitch patt to the last 4 sts P2togtbl, P2.
- Row 7: K3, work in moss stitch patt to the last 3 sts, K3.
- Row 8: P3, work in moss stitch patt to the last 3 sts, P3.
- Row 9: K2, SSK, work in moss stitch patt to the last 4 sts K2tog, K2.
- Cont to dec 1 st at each end of every foll 3rd row (repeating rows 4-9) until 12 sts remain.
- Cast off 6 sts – Work in patt to the end of the row.
- Work in patt to the end of the row.
- Cast off rem 6 sts.
Right Sleeve
Work as for the left sleeve until you have 12 sts left on the needle.
Shape Raglan
- Work in patt for 6 sts, cast off the rem 6 sts, break yarn, and secure.
- Rejoin the yarn to the first stitch and work in patt to the end of the row.
- Cast off rem 6 sts.

Making Up/Finishing
You can find a mattress stitch tutorial here: Mattress Stitch Tutorial
Tip
It’s best to work on a large surface (like a dining table or desk) so you can lay the pieces out flat and see where you will be seaming.
Step 1
Seam the back right raglan sleeve seam using the mattress stitch. Make sure the right sides are facing you.
Step 2
Join the right sleeve seam to the front raglan seam using the mattress stitch.
Make sure the right sides are facing you.
Step 3
Join the left raglan sleeve seam to the front raglan seam using the mattress stitch.
Make sure the right sides are facing you.
Step 4
Leave the left-back raglan seam open for now.
With the RS of the work facing you, use the 6 mm (US 10) knitting needles and do the following:
- Leave the left-back raglan seam open for now.
- With the RS of the work facing you, use the 6 mm (US 10) knitting needles and do the following:
- Pick up and knit 14 (16, 18, 20) sts from the side front neck edge and top of the sleeve.
- Then work in the moss stitch pattern across the 10 (12, 14, 14) sts from the stitch holder at the center front.
- Then, pick up and K 14 (16, 18, 20) sts from the side front neck edge and top of the sleeve.
- Finally, work in the moss stitch pattern across the 32 (34, 36, 36) sts from the pare stitch holder at the back.
Work in 1 x 1 ribbing (K1, P1) for 2.5 inches, ending with a WS row.
Next row – Knit
Next row – Purl
Repeat the last two rows once more.
Cast off.
Step 5
Join the remaining back raglan seam and continue up the neck ribbing (reversing the seam for the st-st 4 rows, so it looks neat when curled over).
Step 6
Join side and sleeve seams using the mattress stitch.
Remember to reverse the seam for the st-st 4 rows on the lower bands and cuffs, so it looks neat when the edge is curled over.
Then, you can weave in any leftover loose ends.
I also like to use a lint roller to clean the garment afterward in case of any fluff, pet hair, etc!

Share Your Make
I love seeing your finished projects on social media.
If you enjoyed making the Cozy Cottage Moss Stitch Sweater Knitting Pattern, I’d love to see yours on Instagram, tag me @handylittleme or #handylittleme to be featured.
If you are on Facebook, visit the handylittleme Facebook group and share a photo.
Let’s celebrate the joy of handmade knitwear together.
So, grab your needles and your favorite bulky yarn, and let’s get knitting.
The Cozy Cottage Sweater is waiting to become your new favorite winter staple.
Happy Knitting!
Make The Men’s Version Too!
Love this texture? Pair it with the coordinating Cozy Cabin Moss Stitch Sweater (Men’s) for a matching set.
Same classic moss stitch, a relaxed, easy-to-wear fit, and sizes for a comfortable, custom knit—perfect for gifting or twinning on chilly weekends.
View the free version of the pattern with ads here: Men’s Moss Stitch Sweater Pattern | Cozy Cabin
Grab the ad-free PDF in my shop here.
More Patterns You May Be Interested In…
- Oversized Chunky Knit Sweater Pattern
- Circular Knitting: Bottom-Up Sweater Knit In The Round
- Forest Haze Sweater Knitting Pattern
- Chunky Cardigan Knitting Pattern
- How To Knit A Hat For Complete Beginners (+ Video Tutorial)
- 20 Temperature Blanket Patterns (The Ultimate Guide)
- How To Knit A Hat With Circular Needles (Step-By-Step)
- 31 Free Baby Blanket Knitting Patterns (Easy Knit Blankets)
- Chunky Cable Knit Sweater Pattern
- 3O Free Easy Fall Knitting Projects For Beginners
- 37+ Patterns To Use Up Your Yarn Stash (Small Projects)
- Free Dog Sweater Knitting Pattern (Straight Needles)
- Super Easy Corner To Corner Baby Blanket Pattern (Knit)
- Easy Baby Sweater Knitting Pattern For Beginners
- How To Knit A Baby Hat (Straight Needles)
- Pumpkin Knitting Pattern (Beginner Friendly!)
- 20+ Fall Oversized Knits (Sweater Knitting Patterns)
- Ribbed Beanie Knitting Pattern (Unisex Mariner’s Hat)
- How to Knit – A Complete Beginner’s Guide
Now how to make one in a blue tweed, a red with stripes and green great design thanks for the share of your great work and design. Perfect for all those cold fall winter days. In the right fiber it would work for Spring as well.
Hi Sandra,
Thank you so much for your kind words! I’m thrilled you love the design and have so many creative color ideas—blue tweed, red with stripes, and green all sound fantastic!
You’re absolutely right that choosing the right fiber can make this sweater perfect for any season, even Spring.
If you decide to try any of those variations, I’d love to hear how they turn out! Happy knitting, and stay cozy on those chilly fall and winter days. 😊
Best wishes,
Louise