The Bernie Sanders Mittens Pattern (Quick Knit)
THIS ARTICLE CONTAINS AFFILIATE LINKS THAT SUPPORT HANDY LITTLE ME CONTENT AND FREE PATTERNS.This Bernie knitted mittens pattern was inspired by those worn by Bernie Sanders at Joe Biden’s Presidential Inauguration on January 20, 2021.
You have probably seen the photos of the Fair Isle mittens he wore already and the Bernie memes that followed.
This is an excellent project for anyone who loves working with more than one color yarn and knitting in the round using the magic loop technique,
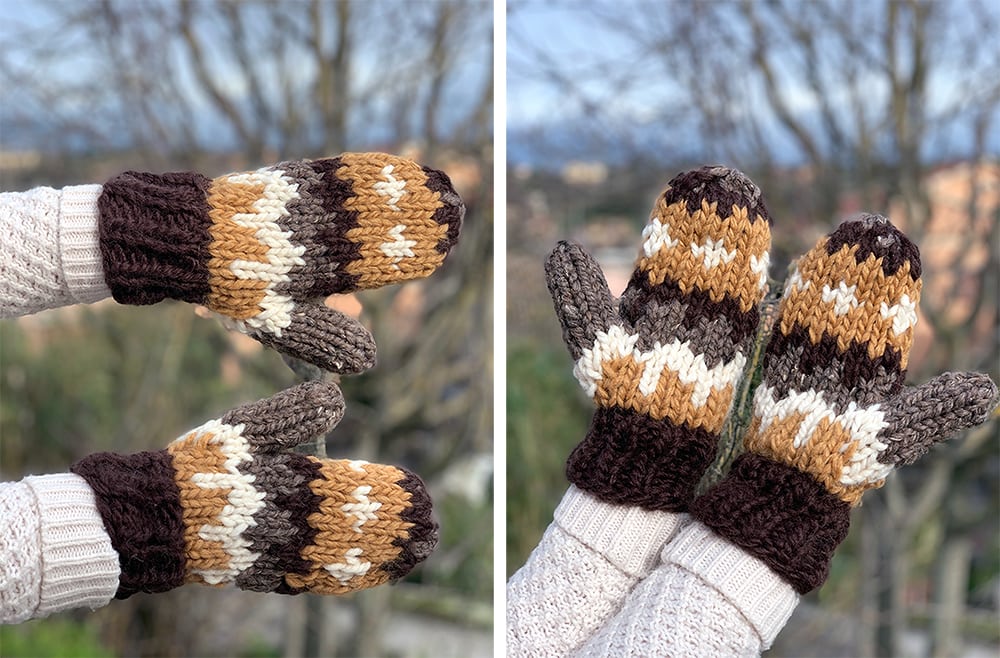
These mittens use four colors and are a really quick-knit project; I made two in around 2-3 hours.
Scroll down to view the free pattern, or purchase a printer-friendly, ad-free PDF here.

Mitten Pattern
The super-chunky mittens are easy to make with intermediate knitters in mind.
Using the knit stitch and purl stitches, you will create ribbing for the cuff, knit in the round using stranded knitting (four colors), and it will also introduce you to decreasing and shaping.
The pattern and the color chart below will help you to create your mittens in no time at all, ready to wear in just a few hours!

The Yarn + Needles I Used…
I raided my yarn stash for this project and used the colors I had that was most fitting.
I made the mittens using Lion Brand Wool-Ease Thick and Quick yarn in the colors Fisherman and Barley (yarn weight – super bulky/super chunky/14 ply).
I also used Lion Brand New Basic 175 in the colors Camel and Espresso. These yarns were knitted with 3 strands together to make the super bulky weight.
The New Basic yarn has been discontinued, so you could substitute it with any yarn that is super bulky/super chunky/14-ply yarn.
Bernat Softee Chunky, Paintbox yarns wool mix super chunky, and Rowan Big Wool all have dark brown and camel shades.
I knit them on size 10 mm (US 15) 16″ circular needles, so there was no seaming involved, just a few loose ends to sew in at the end.
You could use 9″ circulars if you wish, as using the 16″ or 20″ circulars means that you will have to use the magic loop technique.

Resources and tutorials you may find helpful in following this pattern:
This grumpy chic mittens pattern is great for any intermediate knitters.
- Knitting cast-on methods
- Knitting Lessons
- How to cast on knitting
- How to cast off knitting for total beginners (step by step)
- How to knit garter stitch
- How to knit the purl stitch (for beginners + a video tutorial)
- How to knit stockinette stitch (for beginners)
- How to read knitting patterns for beginners
- Knitting abbreviations and terms (US and UK)
- How to knit rib stitch patterns (1×1 and 2×2 ribbing)
- How to join knitting in the round with circular knitting needles
The Bernie Knitted Mittens Pattern
Purchase the printable, ad-free pattern here.
The pattern PDf that is for sale in my shop features the pattern with the color chart.
If you like these mittens, you may also like these patterns:
- Easy Mittens Knitting Pattern
- Snow Mountain Mittens Pattern
- Fuzzy Knit Mittens Pattern (Soft + Cozy)
Skill Level – Intermediate
Notes
Make super chunky knitted mittens to keep your hands warm and toasty this winter!
This free knitting pattern is a really quick knit project, you can use colors that are close to the original pattern or, choose your own choices from your yarn stash.
There is a video tutorial to help you knit the thumb gusset of a mitten over on my YouTube channel here.
Copyright Info
- Please do not copy, sell, redistribute, or republish this pattern.
- If you wish to share this pattern, link to the pattern page only for pattern credit.
- You may sell items produced using this pattern.
- Do NOT use the copyrighted photos for your product listing.
- For the copyright T&C, please read my Terms of Use.
Size Information
Adult medium
Finished measurements – laying flat and unstretched =
- 8 inches Circumference.
- 10 inches long, including the cuff.
Gauge – 10 sts and 14 rounds = 4 inches/10 cm in Stockinette stitch
The Supplies You Need…
Yarn
- Yarn A – Dark Brown – 1 Skein of Lion Brand New Basic 175 (126) Espresso
- Yarn B – Camel – 1 Skein of Lion Brand New Basic 175 (124) Camel
- Yarn C – Fisherman – 1 skein of Lion Brand Wool-Ease Thick and Quick.
- Yarn D – Barley – 1 skein of Lion Brand Wool-Ease Thick and Quick.
- You don’t need a full skein of each color – 50-70g of each will be enough.
- Super bulky weight (06)/Super chunky/14-ply yarn.
- The New Basic yarn (Yarns A + B) was knit with 3 strands together to make the yarn super bulky weight.
- Yarn weight guide
Needle Size
- Set of 10.00 mm (US 15) 16″ circulars
- Or a set of 10 mm (US 15) 20″ circulars.
- Please note you may need to learn the magic loop technique. (View tutorial – Magic loop knitting | step by step)
Notions
Abbreviations
Knitting Abbreviations And Terms (US And UK)
- Approx – Approximately
- Beg – Begin(ning)
- CO – Cast on
- K – Knit
- K2tog – Knit the next two stitches together
- M1 – Make one stitch
- P – Purl
- PM – Place marker
- Rem – Remaining
- Rep – Repeat
- Rnd(s) – Round(s)
- SM – Slip marker
- St(s) – Stitch(es)

Bernie’s Mittens Pattern Instructions
(Make 2 the same)
Cuff
- Yarn A – With 10 mm (US 15) 16″ circular knitting needles CO 18sts.
- PM and Join in the round – being careful not to twist sts.
- 1st round – K1, P1 to the end of the round.
- Rep 1st round – Cont to work in 1×1 ribbing for 2 inches.
- If you are working on the chart – the color chart begins here:
- (Rnd 1) Next round – *K8, M1, K1* – then rep from * to * one more time (2 sts increased = 20sts).
- (Rnds 2+3) Change to Yarn B – K 2 rounds.
- (Rnd 4) Next round – *K1 Yarn C, K2 Yarn B* Rep from * to * to the last st, K1 Yarn B.
Thumb Increase
- (Rnd 5) *K1 Yarn C, K2 Yarn B* Rep from * to * twice more (for 9 sts), PM, M1 in Yarn B, K1 in Yarn C, M1 in Yarn B, PM, *K2 Yarn B, K1 Yarn C* rep from * to * to end of the round (for 10 sts). (2 sts increases = 22sts)
- (Rnd 6) K1 Yarn C, K1 Yarn B, K3 Yarn C, K1 Yarn B, K1 Yarn C, K2 Yarn B, K3 Yarn C, K2 Yarn B, K1 Yarn C, K1 Yarn B, K3 yarn C, K1 Yarn B, K1 Yarn C, K1 Yarn B. (Slipping markers)
- (Rnd 7) In Yarn C only – K9, SM, M1, K3, M1, SM, K10. (2 sts increased = 24 sts)
- (Rnd 8) *K3 Yarn C, K1 Yarn D* rep from * to * to the end of the round. (Slipping markers)
- (Rnd 9) K1 Yarn D, K1 Yarn C, K3 Yarn D, K1 yarn C, K3 Yarn D (9sts), SM, M1 in Yarn C, K1 Yarn C, K3 Yarn D, K1 Yarn C, M1 in Yarn C, SM, K3 Yarn D, K1 yarn C, K3 Yarn D, K1 Yarn C, K2 Yarn D. (2 sts increases = 26 sts)
- (Rnd 10) In Yarn D only – K 1 round. (Slipping markers)
- (Rnd 11) K2 Yarn D, K1 Yarn A, K2 Yarn D, K1 Yarn A, K2 Yarn D, K1 Yarn A (9sts), remove the marker and place 7 sts onto a stitch holder, remove next marker, CO 1 st with Yarn D, K1 st Yarn D, K1 st Yarn A, K2 Yarn D, K1 Yarn A, K2 Yarn D, K1 Yarn A, K2 Yarn D. (20 sts)

Body
You will now work 12 rounds as follows for the body:
- (Rnd 12) *K1 Yarn D, K2 Yarn A* rep from * to * to the last st, K1 Yarn A.
- (Rnd 13) K1 round in Yarn A only.
- (Rnd 14) *K1 Yarn B, K1 Yarn A* rep from * to * to the end of the round.
- (Rnd 15) K 1 round in Yarn B only.
- (Rnd 16) K 1 round in Yarn B only.
- (Rnd 17) K1 Yarn B, K1 Yarn C, *K3 Yarn B, K1 yarn C* rep from * to last 2 sts, K2 Yarn B.
- (Rnd 18) *K3 Yarn C, K1 Yarn B* Rep from * to * to end of the round.
- (Rnd 19) K1 Yarn B, K1 Yarn C, *K3 Yarn B, K1 Yarn C* Rep from * to * to last 2 sts, K2 Yarn B.
- (Rnd 20) K 1 round in Yarn B only.
- (Rnd 21) K 1 round in Yarn B only.
- (Rnd 22) *K1 Yarn B, K1 Yarn A* rep from * to * to the end of the round.
- (Rnd 23) K 1 round in Yarn A only.
Decrease
- (Rnd 24) K2tog Yarn A, K1 Yarn A, K1 Yarn D, K3 Yarn A, K1 Yarn D, K2tog Yarn A, K2tog Yarn A, K1 Yarn D, K3 Yarn A, K1 Yarn D, K1 Yarn A, K2tog Yarn A. (16sts)
- (Rnd 25) K2tog Yarn A, K3 Yarn D, K1 Yarn A, K2tog Yarn A, K2tog Yarn A, K1 Yarn A, K3 Yarn D, K2tog Yarn A. (12 sts)
- (Rnd 26) In Yarn D only – *K2tog, K2, K2tog* rep to the end of the round. (8 sts)
- Cut yarn and leave a long tail – about 8/9 inches; weave that tail through the rem sts and pull up tight at the top of the mitten.
- Secure and weave in any loose ends.
Thumb
- Place the 7 sts on the stitch holder onto the needles.
- In Yarn D – Pick up and knit one st from the CO edge.
- Place a stitch marker under the picked-up stitch to mark the beg of the round.
- In Yarn D only – Knit 8 rounds.
- To decrease the thumb – *K2tog* to the end of the round.
- Cut a tail of yarn, weave through the remaining stitches, and pull up tight to close.
- Secure and weave in any loose ends.

Finishing
- Turn the mitten inside out and use the yarn from near the picked-up stitch to close the gap near the base of the thumb.
- Weave in any other loose ends.
- Repeat the pattern for the second mitten.
Tip
If you see that you have maybe used the wrong color stitch somewhere in the work – you can stitch over the V shape of the stitch with the correct color.
This is a quick fix so that you don’t have to pull the work out (frog) to knit again.
Color Chart

Should You Knit Stranded Knitting In The Round Inside Out?
Knitting stranded colorwork (also known as Fair Isle knitting) in the round inside out is a technique known as “purl-side out” or “wrong side out” knitting.
While it’s not the traditional method, some knitters find it helpful or more comfortable to knit stranded colorwork in this manner.
The reason some knitters prefer to work stranded colorwork inside out is that it allows them to keep the main color (usually the background color) facing them at all times.
This can make it easier to manage the tension of the yarns and to ensure that the floats (strands of yarn) between color changes are neither too tight nor too loose.
However, it’s worth noting that knitting stranded colorwork inside out may require some adjustment to your usual knitting techniques and may feel a bit awkward at first, especially if you’re used to working in the traditional manner.
Additionally, patterns written for stranded colorwork typically assume that you’re knitting the right side out, so you may need to adapt the pattern instructions accordingly.
Ultimately, whether you choose to knit stranded colorwork inside out or right side out depends on your personal preference and what feels most comfortable and intuitive to you as a knitter.
Experiment with both methods to see which one works best for you and helps you achieve the results you desire in your colorwork projects.
Related Post: 21 Fair Isle Knitting Patterns
What Mittens Did Bernie Sanders Wear?
Bernie Sanders, an American politician, became the subject of widespread attention during the 2021 presidential inauguration when he was photographed sitting cross-legged, wearing a parka and a pair of handmade mittens.
The mittens were a notable part of his attire, and they quickly became a meme on social media.
The mittens were handmade by Jen Ellis, a Vermont schoolteacher and craftsperson.
She made the mittens from repurposed wool sweaters and lined them with fleece made from recycled plastic bottles.
The mittens were characterized by their unique design, which featured a patterned exterior with a variety of colors and a distinctive, cozy look.
The popularity of Bernie Sanders’ mittens led to widespread interest in Jen Ellis’ work and the story behind the mittens’ creation.
The mittens’ unexpected prominence also sparked conversations about sustainable fashion and the importance of supporting local artisans and crafters.
Share Your Work With Us…
I love seeing your finished projects on social media.
If you enjoyed making Bernie’s iconic mittens, I’d love to see yours on Instagram, be sure to tag me @handylittleme or #handylittleme.
If you are on Facebook, stop over to the handylittleme Facebook group and share a photo.
I’d love to see your work.
You can also find me on Ravelry, Etsy, and Pinterest.
Happy knitting!
More Patterns You May Be Interested In…
- How To Knit A Hat For Complete Beginners (+ Video Tutorial)
- 20 Temperature Blanket Patterns (The Ultimate Guide)
- How To Knit A Hat With Circular Needles (Step-By-Step)
- 31 Free Baby Blanket Knitting Patterns (Easy Knit Blankets)
- How To Knit Baby Booties (Step-By-Step)
- Knitted Dog Sweater Pattern (3 Sizes)
- 12 Simple Knitting Stitches For Beginners
- Free Knitted Dishcloth Patterns
- 37+ Patterns To Use Up Your Yarn Stash (Small Projects)
- Free Dog Sweater Knitting Pattern (Straight Needles)
- Super Easy Corner To Corner Baby Blanket Pattern (Knit)
- Easy Baby Sweater Knitting Pattern For Beginners
- How To Knit A Baby Hat (Straight Needles)
- Pumpkin Knitting Pattern (Beginner Friendly!)
- 8 Cable Stitch Knitting Patterns
- How to Knit – A Complete Beginner’s Guide
- Free Knitted Heart Pattern (Easy + Quick Project)
- 20+ Fall Oversized Knits (Sweater Knitting Patterns)
- Ribbed Beanie Knitting Pattern (Unisex Mariner’s Hat)
Can you just used dpns?
Hello,
Yes, you can use DPNs if you wish instead of the circulars.
Happy knitting!
Louise
love love the mitts i will attempt them
Hello Ruth,
I hope you enjoy the pattern!
Louise
I bought the Bernie Mittens pattern. Fyi: The Lion Brand New Basic Espresso and Camel yarns are both discontinued. What would I use instead? Please let me know. Thank you.
Emilee
Hello Emilee,
You could substitute those two colours with another two colours that are similar in the same yarn weight.
Bernat Softee Chunky, Paintbox yarns wool mix super chunky and Rowan Big Wool all have dark browns and camel shades.
Any super bulky/super chunky/14 ply yarn can be used.
I hope that helps!
Louise
Love this pattern!! i just need help on the thumb!! It’s just not making sense to me. I’m stuck. I’m sure I’m making it harder than it is, but I’m hung up on it and I can’t get it figured out. I have the 7 stitches on my needles…..then I need help. Do you have a video tutorial on this? Thank you so much!
Hello Kylie,
Sorry, I don’t have a video for that – it is something I will add to my to-do list.
If you have the 7sts on your needles, divide them 4 on one and 3 on the other, and then pick up and knit 1 st from the co edge.
Next – you can place a stitch marker at the start of the round and continue on from there.
You have to use the magic loop because there are only a few stitches.
I hope that helps!
Louise
Do you have a video showing how to work with different colours of yarn?
Hello Deb,
No sorry, I don’t have a video to help with this pattern, I made it quickly over about 3 days, that I didn’t have time to get any videos ready.
Perhaps you could research into stranded knitting as a technique and see if that can help you?
Louise
I need to close the gap by my thumb, however it is a loose mess. What can I do, what did I do? I can send a picture? Let me know where. Help!
Hello Deb,
It sounds like you need to put in a couple of stitches at the base of the thumb to close the gap there.
If you have loose ends from the colour changes around the base of the thumb, pull them and weave them in securely, so that the stitches on the right side of the work look neat.
I hope that helps!
Louise
Hi,
Love the pattern!!! Just wondering how do I size up if I want to make for an adult man?
Thank you,
LC
Hello Linda,
To size up for a man, you could try casting on an extra 2 or 4 sts but you would have to work out the colour pattern from there, possibly make the thumb wider and longer and adjust the decreases.
So it would need some working out!
Let me know how it goes,
Louise
Please if you can help me out. I just started knitting this mitten and so far it is going well. But I am wondering if I knit both mittens the same for the right and left hand. I am almost done the first mitten. If you would please advise. Thank you.
Donna
Hello Donna,
Yes, both mittens are knit the same.
When you wear them there is no difference, they look the same front and back.
I hope that helps!
Louise
I am interested in both pairs of mittens, Bernie and the easy mitten, however both seem to be in the round. I am not too keen knitting in the round. My questions can I knit on straight needles as well or will this cause confusion? Thanks for any help given. P S this will be my first time ever at attempting to knit mittens.
Hi Belinda,
Thank you so much for your comment.
At the moment, I only have the pattern instructions written for knitting the mittens in the round, so I don’t have a straight-needle version available.
If this is your first time making mittens, knitting in the round may actually be the easiest way to follow the pattern as written, without having to make any changes for seaming or shaping.
I hope that helps, and best of luck with your first pair of mittens!
Warm wishes,
Louise