Men’s Aran Sweater Knitting Pattern
THIS ARTICLE CONTAINS AFFILIATE LINKS THAT SUPPORT HANDY LITTLE ME CONTENT AND FREE PATTERNS.In this post, you will see a men’s Aran sweater knitting pattern.
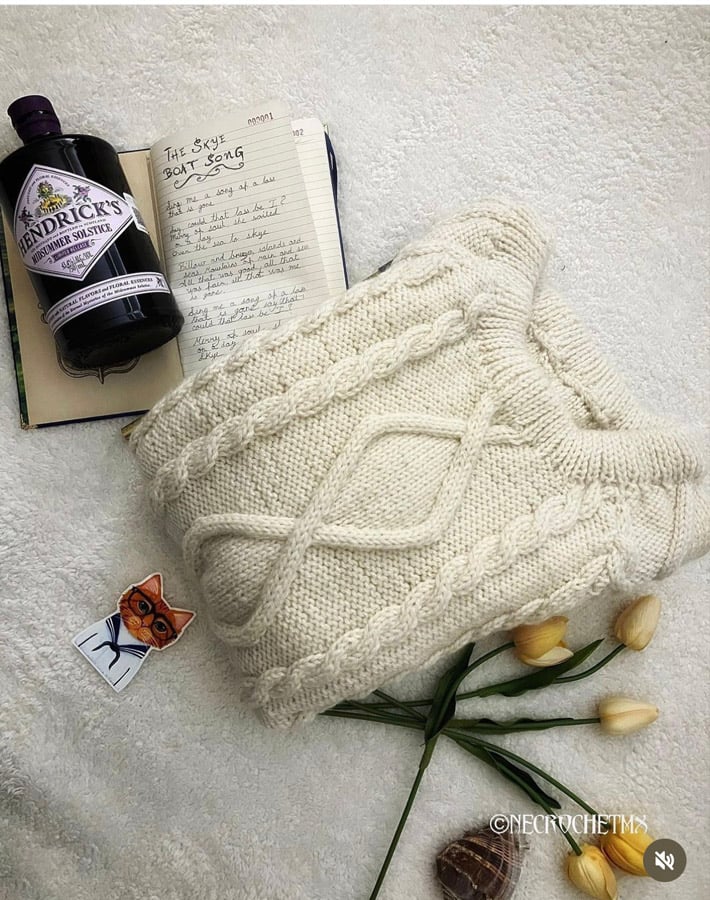
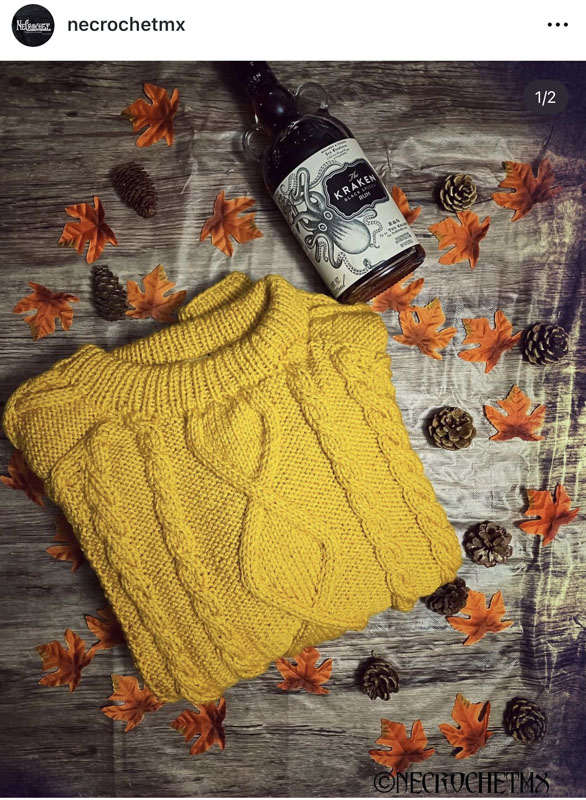
This classic cable-knit jumper is inspired by traditional fisherman sweaters and features diamond cables, simple cable twists, moss stitch texture, ribbed lower bands, raglan sleeves, and a ribbed neckband.
The full pattern is free to read below, or you can purchase the ad-free printable PDF if you’d like a clean copy to print, save, and work from offline.
This men’s Aran sweater pattern is a timeless knit for autumn and winter, whether you’re making it for yourself, as a meaningful handmade gift, or for someone who loves traditional cable knitwear.

Purchase The Ad-Free Printable PDF Pattern
The full pattern is free to read on this page.
If you would prefer a beautifully formatted, ad-free copy, you can purchase the printable PDF pattern in my shop.
The PDF is perfect if you want to print the pattern, save it to your device, or keep a clean copy in your knitting folder while you work through the sweater.
Grab The Ad-Free Printable PDF Pattern Here
Quick Pattern Facts
| Detail | Information |
| Pattern | Men’s Aran sweater / fisherman sweater |
| Skill level | Intermediate |
| Sizes included | To fit chest 34, 36, 38, 40, 42, 44 in |
| Yarn weight | Worsted weight / medium #4 / aran weight |
| Yarn used | Lion Brand Wool-Ease in Natural Heather |
| Needles | 4 mm / US 6 and 5 mm / US 8 knitting needles |
| Construction | Worked flat in four pieces, then seamed |
| Sleeves | Raglan sleeves |
| Main stitches | Diamond cable, cable twists, moss stitch, ribbing |
| PDF option | Ad-free printable PDF available in the shop |
About This Men’s Aran Sweater Pattern
This men’s Aran sweater knitting pattern is a classic cable knit jumper with a timeless fisherman sweater look.
The design features an intricate cable panel on the front, back, and sleeves, with ribbed lower bands, ribbed cuffs, and a ribbed collar.
Instead of a honeycomb cable, this design uses a diamond cable as the main feature.
Alongside the central diamond cable, there are simple cable twists, often associated with fisherman’s ropes, and moss stitch borders for added texture.
The result is a warm, textured, traditional-style sweater that can be worn year after year.

Is This Pattern Right For You?
This pattern is best for intermediate knitters or confident advanced beginners who are ready to work with cable stitches, shaping, ribbing, and seaming.
You should be comfortable with:
- Knit and purl stitches
- 1 x 1 ribbing
- Moss stitch / seed stitch
- Basic increases and decreases
- Working cable stitches
- Reading pattern abbreviations
- Working flat in pieces
- Seaming knitted pieces together
- Picking up stitches for the neckline
The sweater is worked flat in four pieces: back, front, and two sleeves.
The pieces are then seamed together, and the neckline is picked up and knitted after joining.
If you are new to cables, take your time with the abbreviations and video tutorials before starting the main pattern.
Sizes Included
This pattern is written for adult sizes and can be made for men or women.
To Fit Chest Size
- 34 inches / 86 cm
- 36 inches / 91 cm
- 38 inches / 97 cm
- 40 inches / 102 cm
- 42 inches / 107 cm
- 44 inches / 112 cm
Actual Finished Measurement
- 38.5 inches / 98 cm
- 40 inches / 102 cm
- 43.75 inches / 111 cm
- 45.25 inches / 115 cm
- 47.25 inches / 120 cm
- 48.75 inches / 124 cm
Full Length
- 27.25 inches / 69 cm
- 27.25 inches / 69 cm
- 28.25 inches / 72 cm
- 28.25 inches / 72 cm
- 29.25 inches / 74 cm
- 29.25 inches / 74 cm
Sleeve Length
- 17.25 inches / 44 cm
- 17.75 inches / 45 cm
- 18 inches / 46 cm
- 19 inches / 48 cm
- 19 inches / 48 cm
- 19 inches / 48 cm
Please note: the sleeve length is adjustable.
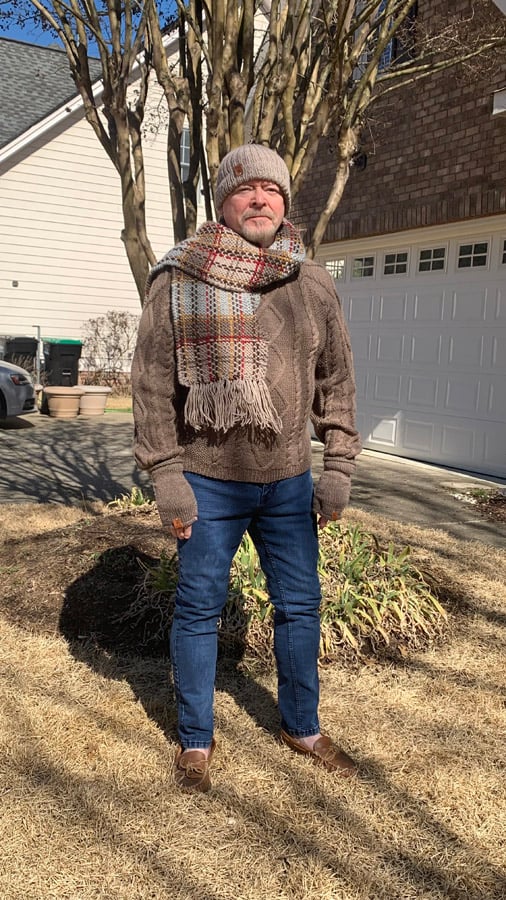
In the photographs, the model is wearing a size 42 inches / 107 cm.
The pattern is written for all sizes, starting with the smallest size, with changes for larger sizes listed in parentheses.
To follow the pattern more easily, circle or highlight all numbers for your chosen size before you begin.
Gauge
18 sts x 24 rows = 4×4 inches /10×10 cm over moss stitch – with the 5 mm (US 8) needles.

Supplies Needed
Yarn
I made the sweater using Lion Brand Wool-Ease in the color Natural Heather.
This is a worsted weight / medium #4 yarn and is made from 80% acrylic and 20% wool.
You will need:
- Lion Brand Wool-Ease – (85g/197 yds/180m) in Natural Heather
- 6, (7, 7, 8, 8, 9) balls
- Approx: 1,182 (1,379, 1,379, 1,576, 1,576, 1,773) yards
- Approx: 1,080 (1,260, 1,260, 1,440, 1,440, 1,620) meters
You can substitute another worsted weight, medium #4, or aran weight yarn that matches the gauge.
Always make a gauge swatch before starting, especially if you are substituting yarn.
Needles
You will need:
I used interchangeable circular needles because there are many stitches to cast on, and it was easier to hold the weight of the work.
You will work back and forth on the circular needles as if working on straight needles.
You may also find spare cables with end caps useful for holding stitches when needed.
Notions
You will also need:
- Tape measure
- Darning needle
- Scissors
- Stitch holders x 3 or spare cables with end caps

Construction Notes
This men’s Aran sweater is worked flat in four pieces:
- Back
- Front
- Sleeve 1
- Sleeve 2
Each piece is worked from the lower edge upwards, beginning with a ribbed lower band.
The sweater has raglan sleeves, which means each sleeve extends toward the collar and creates a diagonal seam from the underarm to the neckline.
Once the pieces are complete, they are seamed together using mattress stitch.
The neckline is created by picking up stitches after the main pieces are joined, then knitting in 1 x 1 ribbing to create the neckband.

The Design Inspiration
This fisherman knit sweater design was inspired by an Aran knit sweater seen worn by actor Graham McTavish in the TV show Men In Kilts.
Although this type of sweater is usually associated with Aran Island knitwear rather than Scottish clans, Aran-style sweaters have sometimes been worn with a kilt.
The main feature of this design is the diamond cable panel, with simple cable twists on either side and moss stitch borders for texture.
The finished sweater has a classic, heritage-inspired look while still being practical, wearable, and warm.

Where Do Aran Sweaters Come From?
This type of sweater design is also known as a fisherman’s sweater.
Aran sweaters originated in the Aran Islands, off the west coast of Ireland.
Traditionally, these sweaters were knitted in sheep’s wool in a natural color such as off-white or cream.
They were often made for island men who worked as fishermen and farmers, with the wool helping to provide warmth and protection in difficult weather.
Today, Aran sweaters are loved for their texture, heritage, cable patterns, and timeless style.
A Symbol Of Traditional Irish Sweaters
Traditional Aran sweaters are known for their beautiful stitch patterns and rich symbolism.
Many knitters have used Irish knitwear as inspiration because of the warmth, comfort, texture, and meaning these pieces can bring.
A hand-knit Aran sweater makes a meaningful project because it combines practical warmth with traditional stitch design.
Whether you are knitting this for yourself or as a gift, the texture and heritage of the design give it a classic look that can be worn for years.

What Do The Stitches In Aran Knitting Represent?
The most commonly seen stitch pattern in an Aran sweater is the cable, which has many variations.
Cable stitches are often said to symbolize fishermen’s ropes and are commonly worked in vertical columns.
Lattice or basket stitches are associated with the fisherman’s basket and are said to represent hopes of safety and good luck while at sea.
The diamond stitch represents the shapes of fishing net mesh and is often seen as a traditional symbol of wealth and good fortune.
Moss stitch is said to symbolize abundance and growth. In this design, moss stitch is used on either side of each main cable panel to add texture and balance.
Related Post: 12 Traditional Irish Aran Knitting Stitches And Meanings
How To Wear An Aran Sweater
A fisherman sweater is a timeless design that can be worn again and again during autumn and winter.
Wear it with jeans, boots, and a beanie or cap for an easy cold-weather outfit.
The finished sweater is warm, cozy, and practical, with a classic look that works well for everyday wear.
It’s the kind of knit that feels at home on countryside walks, winter weekends, and chilly days when you want something comfortable but still special.

Helpful Resources
This pattern is great for intermediate knitters.
If you need help with any of the techniques, these tutorials may be useful:
- Knitting cast-on methods
- Knitting Lessons
- How to cast on knitting
- How to cast off knitting for total beginners (step by step)
- How to knit garter stitch
- How to knit the purl stitch (for beginners + a video tutorial)
- How to knit stockinette stitch (for beginners)
- How to read knitting patterns for beginners
- Knitting abbreviations and terms (US and UK)
- How to knit rib stitch patterns (1×1 and 2×2 ribbing)
- KFB knitting – How to make an increase
- How to knit two stitches together (K2tog)
- 8 Cable Stitch Knitting Patterns

Men’s Aran Sweater Knitting Pattern
Grab your inexpensive, ad-free, PDF printable pattern in my shop here.
Grab The Men’s Pattern Bundle Here With 10 Patterns
Notes
Skill Level – Intermediate
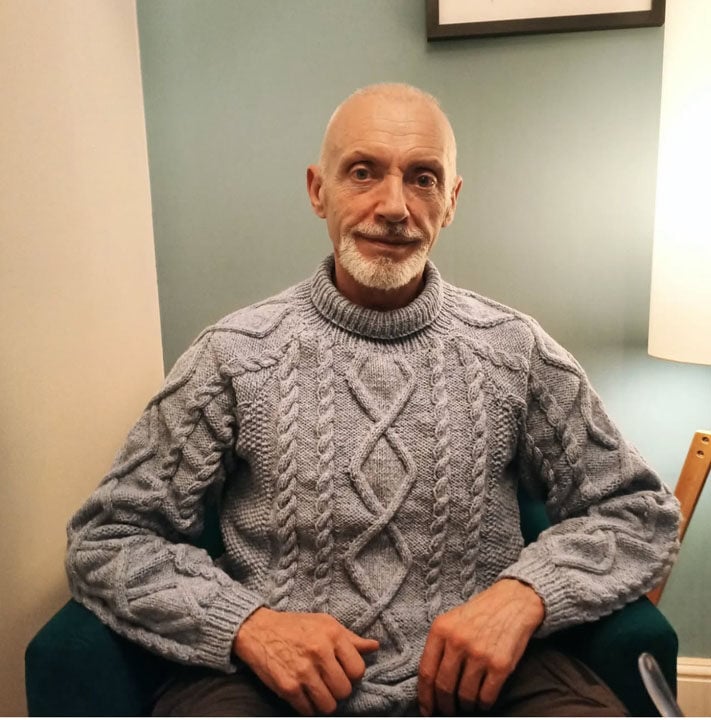
This Aran sweater knitting pattern creates a classic cable knit sweater that is warm, textured, and timeless.
The sweater features an intricate cable design on the front, back, and sleeves, with ribbed lower bands, ribbed cuffs, and a ribbed collar.
Please note: this pattern was updated in May 2025.
Related Post: Outlander Men’s Knits
Copyright Info
- Please do not copy, sell, redistribute, or republish this pattern.
- If you wish to share this pattern, please provide a link to the pattern page only.
- You may sell items produced using this pattern.
- Do NOT use the copyrighted photos for your product listing.
- For the copyright T&C, please read my Terms of Use.

Abbreviations
- Beg = Beginning
- CO = Cast on
- Cont = Continue(ing)
- Dec = Decrease
- Foll = Following
- Inc = Increase (normally with KFB)
- KFB = Knit into the front and back of the stitch
- K = Knit
- K2tog = Knit the next two stitches together
- K3tog = Knit the next three stitches together
- M1PL = Make one stitch purlwise left
- P = Purl
- P2tog = Purl the next two stitches together
- PM = Place marker
- PSSO = Pass slipped stitch over
- Rem = Remaining
- Rep = Repeat
- RS = Right side
- SL = Slip one stitch
- SSK = Slip, slip, knit
- St(s) = Stitch(es)
- SM = Slip marker
- WS = Wrong side
- Work each stitch in the manner it presents = This means to work each stitch as it faces you – you will knit the knit stitches and purl the purls.
Cable Stitch Abbreviations
- C4B – (cable 4 back) – slip 2 stitches onto the cable needle and hold at the back of the work, knit 2, then knit the 2 stitches from the cable needle.
- C6B – (cable 6 back) – slip 3 stitches onto the cable needle and hold at the back of the work, knit 3, then knit the 3 stitches from the cable needle.
- C4L – Cable 4 left by slipping the next 3 sts to the front on cable needle, K1, K3 from the cable needle.
- C4R – Cable 4 right by slipping the next st to the back on the cable needle, K3, K1 from the cable needle.
- C4LP – Cross 4 left by slipping the next 3 sts to the front on the cable needle, P1, K3 from the cable needle.
- C4RP – Cross 4 right by slipping the next st to back on the cable needle, K3, P1 from the cable needle.
Print + Stitch
Purchase the ad-free PDF pattern
The beautifully formatted, printable PDF is perfect if you’d like to work offline or keep a clean copy of the pattern to use again later.
Video Tutorials
Learn how to C4R and C4L here.
Learn how to C4LP and C4RP here.
Stitch Pattern Notes
1 x 1 ribbing
K1, P1 (It is obtained by alternating knit and purl stitches in one row and “knitting by pattern” in every next row.
This means that we make a knit stitch when the previous row stitch looks like V and make a purl stitch when the previous looks like a bump.)
Cast On: even number of stitches.
- Row 1 (RS): (k1, p1) till the end of the row.
- Row 2 (WS): (k1, p1) till the end of the row.
Repeat these two rows.
Moss Stitch
British Moss Stitch / Seed Stitch requires you to alternate knit and purl stitches row-by-row.
For an odd number of cast-on stitches, you simply start the next row with the stitch you ended with on the previous row.
Be careful if you end on a knit stitch and start on a purl stitch; you’ll end up creating a rib stitch pattern.
Cast on an even number of stitches (multiples of two).
1st Row: * k1, p1, repeat from * to end.
2nd Row: * p1, k1, repeat from * to end.
Continue repeating rows 1 – 2 until you have completed your desired number of rows.
Men’s Cable Knit Sweater Pattern
Back
With 4 mm (US 6) knitting needles, CO 86 (90, 98, 102, 106, 110) sts.
Work in 1 x 1 ribbing until the piece measures 2 inches from the CO edge.
Change to 5 mm (US 8) knitting needles and proceed as follows;
Foundation Row 1 (RS): *P1, K1 – rep from * 9 (11, 15, 17, 19, 21) sts, PM, P4, K6, P4, PM, P2, K4, P2, PM, P9, K6, P9, PM, P2, K4, P2, PM, P4, K6, P4, PM, *K1, P1 – rep from * 9 (11, 15, 17, 19, 21) sts to end.
Foundation Row 2 (WS): *K1, P1 – rep from * 9 (11, 15, 17, 19, 21) sts, SM, K4, P6, K4, SM, K2, P4, K2, SM, K9, P6, K9, SM, K2, P4, K2, SM, K4, P6, K4, SM, *P1, K1 – rep from * 9 (11, 15, 17, 19, 21) sts to end.
Now, you will continue in the following cable pattern:
- Row 1 (RS): P1, K1 to marker, SM, P4, C6B, P4, SM, P2, C4B, P2, SM, P9, C6B, P9, SM, P2, C4B, P2, SM, P4, C6B, P4, SM, K1, P1 to end.
- Row 2 (WS): Work in moss stitch (K1, P1) to the first marker, SM, then work each stitch in the manner it presents, slipping the markers until you get to the final marker, SM, and work in moss stitch (P1, K1) to end.
- Row 3: P1, K1 to marker, SM, P4, K6, P4, SM, P2, K4, P2, SM, P8, C4R, C4L, P8, SM, P2, K4, P2, SM, P4, K6, P4, SM, K1, P1 to end.
- Row 4: Rep Row 2.
- Row 5: P1, K1 to marker, SM, P4, K6, P4, SM, P2, K4, P2, SM, P7, C4R, K2, C4L, P7, SM, P2, K4, P2, SM, P4, K6, P4, SM, K1, P1 to end.
- Row 6: Rep Row 2.
- Row 7: P1, K1 to marker, SM, P4, C6B, P4, SM, P2, C4B, P2, SM, P6, C4R, K4, C4L, P6, SM, P2, C4B, P2, SM, P4, C6B, P4, SM, K1, P1 to end.
- Row 8: Rep Row 2.
- Row 9: P1, K1 to marker, SM, P4, K6, P4, SM, P2, K4, P2, SM, P5, C4R, K6, C4L, P5, SM, P2, K4, P2, SM, P4, K6, P4, SM, K1, P1 to end.
- Row 10: Rep Row 2.
- Row 11: P1, K1 to marker, SM, P4, K6, P4, SM, P2, K4, P2, SM, P4, C4R, K8, C4L, P4, SM, P2, K4, P2, SM, P4, K6, P4, SM, K1, P1 to end.
- Row 12: Rep Row 2.
- Row 13: P1, K1 to marker, SM, P4, C6B, P4, SM, P2, C4B, P2, SM, P3, C4R, K10, C4L, P3, SM, P2, C4B, P2, SM, P4, C6B, P4, SM, K1, P1 to end.
- Row 14: Rep Row 2.
- Row 15: P1, K1 to marker, SM, P4, K6, P4, SM, P2, K4, P2, SM, P2, C4R, K12, C4L, P2, SM, P2, K4, P2, SM, P4, K6, P4, SM, K1, P1 to end.
- Row 16: Rep Row 2.
- Row 17: P1, K1 to marker, SM, P4, K6, P4, SM, P2, K4, P2, SM, P2, C4LP, K12, C4RP, P2, SM, P2, K4, P2, SM, P4, K6, P4, SM, K1, P1 to end.
- Row 18: Rep Row 2.
- Row 19: P1, K1 to marker, SM, P4, C6B, P4, SM, P2, C4B, P2, SM, P3, C4LP, K10, C4RP, P3, SM, P2, C4B, P2, SM, P4, C6B, P4, SM, K1, P1 to end.
- Row 20: Rep Row 2.
- Row 21: P1, K1 to marker, SM, P4, K6, P4, SM, P2, K4, P2, SM, P4, C4LP, K8, C4RP, P4, SM, P2, K4, P2, SM, P4, K6, P4, SM, K1, P1 to end.
- Row 22: Rep Row 2.
- Row 23: P1, K1 to marker, SM, P4, K6, P4, SM, P2, K4, P2, SM, P5, C4LP, K6, C4RP, P5, SM, P2, K4, P2, SM, P4, K6, P4, SM, K1, P1 to end.
- Row 24: Rep Row 2.
- Row 25: P1, K1 to marker, SM, P4, C6B, P4, SM, P2, C4B, P2, SM, P6, C4LP, K4, C4RP, P6, SM, P2, C4B, P2, SM, P4, C6B, P4, SM, K1, P1 to end.
- Row 26: Rep Row 2.
- Row 27: P1, K1 to marker, SM, P4, K6, P4, SM, P2, K4, P2, SM, P7, C4LP, K2, C4RP, P7, SM, P2, K4, P2, SM, P4, K6, P4, SM, K1, P1 to end.
- Row 28: Rep Row 2.
- Row 29: P1, K1 to marker, SM, P4, K6, P4, SM, P2, K4, P2, SM, P8, C4LP, C4RP, P8, SM, P2, K4, P2, SM, P4, K6, P4, SM, K1, P1 to end.
- Row 30: Rep Row 2.
Rows 1-30 form the cable pattern; rep those rows until your back piece measures 17.25 (17, 17.25, 17, 17.25, 17) inches, ending with a WS row.
Shape Raglan
Still working in the cable pattern as established…
- Row 1 (RS): Cast off 4 (4, 5, 5, 6, 6) sts at beg of the row, work in patt to the end of the row. 82 (86, 93, 97, 100, 104) sts.
- Row 2 (WS): Cast off 4 (4, 5, 5, 6, 6) sts at beg of the row, work in patt to the end of the row. 78 (82, 88, 92, 94, 98) sts.
- Row 3 (RS): K1, SSK, work in patt to the last 3 sts K2tog, K1.
- Row 4 (WS): P2, work in patt to the last 2 sts, P2.
Repeat rows 3 and 4 working in the established pattern and forming new patterns as the stitches decline until you have 32 (34, 36, 38, 40, 42) sts left.
Leave these rem sts on a spare needle/stitch holder or cable with end caps.

Front
Work as given for back until you have 48 (50, 52, 54, 56, 58) sts.
Shape Neck
Next Row (RS): K1, SSK, work in patt for 11 sts, leave rem 34 (36, 38, 40, 42, 44) sts on a stitch holder.
Working on these 13 sts only, proceed as follows:
Next row: (WS): P1, P2tog, patt to last 2 sts P2.
Work 4 rows, dec 1 st at the raglan edge as before in every row, AT THE SAME TIME, dec 1 st at neck edge in every row.
Next Row: K1, SL, K2tog, PSSO.
Next Row: P2tog. Fasten off.
With the right side facing work on the rem 34 (36, 38, 40, 42, 44) sts, slip 20 (22, 24, 26, 28, 30) sts onto a stitch holder, rejoin the yarn to the rem 14 sts and work in patt to the last 3 sts, dec 1 stitch at the raglan edge as before, K2tog, K1.
Next Row (WS): Work in patt to the last 3 sts at the neck edge, P2tog, P1.
Work 4 rows, dec 1 st at neck edge in every row AT THE SAME TIME dec 1 st at the raglan edge as before in every row.
Next Row: K3tog, k1.
Next Row: P2tog. Fasten off.

Sleeves (Make 2 The Same)
With 4 mm (US 6) knitting needles CO 38 (38, 42, 42, 46, 46) sts.
Work in 1 x 1 ribbing until the piece measures 2 inches from the CO edge, ending with a RS row.
Next row: Rib 3 (3, 5, 5, 7, 7), (M1PL, Rib 1) 32 times, Rib 3 (3, 5, 5, 7, 7). 70 (70, 74, 74, 78, 78) sts.
Change to 5 mm (US 8) knitting needles and proceed as follows:
- Row 1 (RS): Work in moss stitch for 1 (1, 3, 3, 5, 5) sts, PM, P4, C6B, P4, PM, P2, C4B, P2, PM, P9, C6B, P9, PM, P2, C4B, P2, PM, P4, C6B, P4, PM, work in moss stitch for 1 (1, 3, 3, 5, 5) sts.
- Row 2 (WS): Work in moss stitch for 1 (1, 3, 3, 5, 5) sts to marker, SM, K4, P6, K4, SM, K2, P4, K2, SM, K9, P6, K9, SM, K2, P4, K2, SM, K4, P6, K4, SM, work in moss stitch for 1 (1, 3, 3, 5, 5) sts.
- Row 3: Work in moss stitch for 1 (1, 3, 3, 5, 5) sts to marker, SM, P4, K6, P4, SM, P2, K4, P2, SM, P8, C4R, C4L, P8, SM, P2, K4, P2, SM, P4, K6, P4, SM, work in moss stitch for 1 (1, 3, 3, 5, 5) sts.
- Row 4: Rep Row 2.
Keeping continuity of patt set (following the original cable pattern for the back piece) and working the moss st patt set at the beg and end of each row.
Starting with the 5th row you will now increase.
Row 5: Inc 1 st at each end of next row (working in cable patt as established).
Cont to increase 1 st at each end of every foll 8th (6th, 6th, 6th, 4th, 4th) row to 82 (84, 90, 92, 94, 96)sts. Make new moss st patts at either side of the main cable patt as you increase.
Cont without shaping until the sleeve measures 17.25 (17.5, 18, 19, 19, 19) inches or the length required, ending with a WS row.
*Please note – you can adjust the sleeve length here to make it longer or shorter according to your own preferences.
Shape Raglan
Cast off 4 (4, 5, 5, 6, 6) sts in patt at beg of next 2 rows. 74 (76, 80, 82, 82, 84) sts.
Row 1 (RS): K1, SSK, work in patt to the last 3 sts K2tog, K1.
Row 2 (WS): P2, work in patt to the last 2 sts, P2.
Cont to work rows 1 and 2 until you have 28 sts on the needle.
Leave the rem 28 sts on a st holder.


Making Up / Finishing
Seaming Tutorial
You can find a mattress stitch tutorial here – The Mattress Stitch – How To Seam Knitting
Tip
It’s best to work on a large surface (like a dining table or desk) so you can lay the pieces out flat and see where you will be seaming.
Blocking
I would recommend blocking the pieces before seaming or after, but blocking will make sure the size is correct.
Related Post: Blocking Knits – How To Block Knitting Guide
Step 1
Seam the back right raglan sleeve seam using the mattress stitch. Make sure the right sides are facing you.
Step 2
Join the right sleeve seam to the front raglan seam using the mattress stitch.
Make sure the right sides are facing you.
Step 3
Join the left raglan sleeve seam to the front raglan seam using the mattress stitch.
Make sure the right sides are facing you.
Step 4
Leave the left-back raglan seam open for now.
With the RS of work facing you, use the 4mm (US 6) knitting needles and do the following:
Work across the 28sts left on the st holder at the top left sleeve as follows: (K1, K2tog) 9 times, K1, pick up and knit 6 sts evenly along the left side of neck, work across 20 (22, 24, 26, 28, 30)sts left on the stitch holder at front of the neck as follows: K1 (2, 3, 0, 1, 2), K2tog, (K2, K2tog) 4 (4, 4, 6, 6, 6) times, K1 (2, 3, 0, 1, 2), pick up and knit 6 sts evenly along the right side of neck, work across the 28 sts left on the st holder at the top right of the sleeve as follows: (K1, K2tog) 9 times, K1 and work across 32 (34, 36, 38, 40, 42) sts left on the stitch holder at the back of the neck as follows: K3 (4, 5, 2, 3, 4), K2tog, (K2, K2tog) 6 (6, 6, 8, 8, 8)times, K3 (4, 5, 2, 3, 4). 92 (96, 100, 100, 104, 108) sts.
Please note the neck is now worked back and forth – not joined in the round.
Work in 1 x 1 ribbing (K1, P1) for 4 inches (or your desired length), ending with a WS row.
Cast off.
Step 5
Join rem back raglan seam and cont up the neck ribbing (reversing the seam for the rem half, so it looks neat when turned over).
Step 6
Fold neck ribbing in half to WS and catch down loosely on the WS. This creates a folded-over collar (crew neck) with a neat edge.
Step 7
Join side and sleeve seams using the mattress stitch.
Then, you can weave in any leftover loose ends.
I also like to use a lint roller to clean the garment afterward in case of any fluff, pet hair, etc.
Frequently Asked Questions
Is this men’s Aran sweater pattern free?
Yes, the full men’s Aran sweater knitting pattern is free to read on this page.
If you would prefer a clean, ad-free copy to print or save, you can purchase the printable PDF pattern in my shop.
What skill level is this Aran sweater knitting pattern?
This pattern is best for intermediate knitters.
It includes cable stitches, moss stitch, ribbing, shaping, seaming, and picking up stitches for the neckline.
What yarn do I need for this men’s Aran sweater?
The sample sweater was made using Lion Brand Wool-Ease in Natural Heather.
This is a worsted weight / medium #4 yarn made from 80% acrylic and 20% wool.
You can substitute another worsted weight, medium #4, or aran weight yarn if you can match the gauge.
What needle size do I need?
You will need 4 mm / US 6 and 5 mm / US 8 knitting needles.
You will also need a cable needle for the cable stitch patterns.
Circular needles are helpful because there are many stitches to hold, but the sweater is worked back and forth as if using straight needles.
What sizes are included?
The pattern includes sizes to fit chest 34, 36, 38, 40, 42, and 44 inches.
The actual finished measurements range from 38.5 inches to 48.75 inches.
Is this sweater worked flat or in the round?
This sweater is worked flat in four pieces: back, front, and two sleeves.
The pieces are then seamed together, and the neckline is picked up and knitted after joining.
Does this pattern use cable stitches?
Yes, this sweater uses several cable stitch patterns.
The main design feature is a diamond cable panel, with simple cable twists and moss stitch texture.
What is the difference between an Aran sweater and a fisherman sweater?
An Aran sweater is a traditional cable knit sweater associated with the Aran Islands.
A fisherman sweater is a similar style of warm, textured sweater often linked with working fishermen and coastal knitwear.
The terms are often used together because both styles feature classic cable stitch patterns, texture, and practical warmth.
Can I knit this Aran sweater for women too?
Yes, this sweater can be knitted for men or women.
Choose the size based on chest measurement and the amount of ease you would like in the finished sweater.

Grab The Inexpensive PDF Pattern In Other Languages
The PDF pattern is also available in other languages.
Knitted Aran Sweater Patterns
If you enjoy knitting Aran sweaters, you may also like these patterns in the shop:
- Stormbraid Sweater Knitting Pattern – Men’s Aran Cable Sweater (PDF)
- Fisherman Sweater Knitting Pattern
Knitted by Our Community
See how knitters have brought this pattern to life with their own yarn choices and style.
Could you share your work with us?
I love seeing your finished projects!
If you enjoyed making the sweater, I’d love to see yours on Instagram, tag me @handylittleme or #handylittleme to be featured.
If you are on Facebook, stop over to the handylittleme Facebook group and share a photo.
I’d love to see your work.
More Patterns You May Be Interested In…
- Aran Dog Sweater Knitting Pattern
- 17 Free Aran Knitting Patterns
- How To Knit A Hat For Complete Beginners (+ Video Tutorial)
- 27 Men’s Knitted Scarf Patterns
- How To Knit A Hat With Circular Needles (Step-By-Step)
- 31 Free Baby Blanket Knitting Patterns (Easy Knit Blankets)
- How To Knit Baby Booties (Step-By-Step)
- Knitted Dog Sweater Pattern (3 Sizes)
- 12 Simple Knitting Stitches For Beginners
- Free Knitted Dishcloth Patterns
- How to Knit – A Complete Beginner’s Guide
- 37+ Patterns To Use Up Your Yarn Stash (Small Projects)
- Free Dog Sweater Knitting Pattern (Straight Needles)
- Super Easy Corner To Corner Baby Blanket Pattern (Knit)
- Easy Baby Sweater Knitting Pattern For Beginners
- How To Knit A Baby Hat (Straight Needles)
- Pumpkin Knitting Pattern (Beginner Friendly!)
- 30 Free Men’s Sweater Knitting Patterns
- 20+ Fall Oversized Knits (Sweater Knitting Patterns)
- Ribbed Beanie Knitting Pattern (Unisex Mariner’s Hat)
Grab The Ad-Free Printable Pattern Here


Is there a mistake about needle sizes in the pattern? In the section about sizes needed, you indicate only 4.5mm or US7, and 5mm (US 8) needles, but in the body of the pattern, you say to begin the ribbing for the back on 4mm (US 6) needles. I’d usually use a needle for the ribbing that’s two sizes smaller than that for the body. Which should I plan to use, a US 7 or a US 6?
Thanks.
Hello Lynn,
Yes, the needle size for the ribbing (lower bands/cuffs and neck) should be 4 mm/US 6.
But even if you did use the 4.5mm/US 7 it would be ok, there is not a huge amount of difference as it is for the ribbing only.
If you wish to use an even smaller needle size to make the ribbing tighter, that is up to you.
The main body of the sweater was knit with 5mm/US 8 needles.
Thanks,
Louise
This is my first time trying to knit a cable sweater and I’m not sure how to decrease without it messing up the cable pattern. Am I supposed to decrease 1 at each end of the wrong side and knit all the knits and purl all the purls?
Hello Gabrielle,
Yes, that is correct, on the decreases for the raglan shaping, on the WS rows, you will decrease the outer edges and then work each stitch in the manner it presents (in the pattern) so knit the knit stitches and purl the purls.
You only continue to cable on the right-side rows.
As the cables decrease you will see them tapering off and your stitches will on the RS will change also (when there are not enough, and you can no longer cable).
I hope that helps!
Louise
Im having trouble working the raglan shaping as shown in the pattern. The only decrease I see in the two alternating rows (3 RS and 4 WS) for shaping is a single stitch (k2tog) at the end of row 3. These instructions are not shaping symmetrically. Am I misunderstanding the instructions? How should I be working these rows? Please advise!
Hi Karen,
Thanks so much for your message and for working on the Men’s Aran Sweater!
You’re absolutely right to take a closer look at the raglan shaping—and I’m happy to clarify.
The good news is that the decreases are already balanced in the pattern:
Row 3 (RS): K1, SSK, work in pattern to last 3 sts, K2tog, K1.
This row decreases two stitches total—one at each end—creating symmetrical shaping along the raglan lines.
The SSK (left-leaning decrease) at the beginning and the K2tog (right-leaning decrease) at the end ensure a mirrored look that slopes evenly on both sides.
Row 4 (WS) is worked without decreases (straight), allowing the shaping to happen only on alternate RS rows.
Warm wishes and happy knitting,
Louise
Thanks for clarifying raglan rows 3 and 4. I misunderstood the SSK stitch entirely. And thanks again for the quick response!
Hi Louise,
I love this sweater and I am truly enjoying it, but I am about to start the front and I am a bit confused. Am I only casting on (50) stitches or (90) as it says work as given for the BACK until you have (50) stitches.
and Am I to assume that I follow the back instructions for the front until I come to a the (shape neck) the same as ( shape raglan) instructions?
I just want to be clear before i begin so I don’t have to take it apart .
Thanks!
Hi Eryhn,
Thank you so much for your kind words about the sweater pattern!
I’m thrilled to hear you’re enjoying it so far.
Let me help clarify the instructions for the front to ensure you’re on the right track:
Casting on stitches for the front:
The front starts with the same cast-on number as the back (90 stitches).
The reference to “work as given for the BACK until you have (50) stitches” refers to the point after shaping (decreasing) as you work toward the armholes and raglan shaping.
You don’t cast on 50 stitches—you’ll work down to that number during the decreases.
Working the front:
Yes, you’ll follow the back instructions for the front up to the point where you shape the neck.
From there, you’ll follow the instructions under “Shape Neck” instead of continuing with the back instructions.
The raglan shaping will still be worked, but it will integrate with the neck shaping to create the correct shape for the front.
I hope that clears things up!
Happy knitting!
Louise
I’m having a hard time determining what size each number means. I understand that they go from smallest to largest (in parentheses) but what sizes do they relate to? Is 86 cast on sts size XS or S? What is each number of cast ons related to size? Seems like there are a lot of sizes!
Hi there Janet, thanks for your question!
Yes, you’re right—each number listed in parentheses corresponds to a different garment size, starting from the smallest (XS) and moving up to the largest.
For the cast-on numbers, the first number outside the parentheses is for the XS size, and each number inside the parentheses relates to the next size up. So for example:
86 cast-on stitches = XS
The next number (e.g., 94) = S
Then 102 = M
110 = L
118 = XL
And so on…
The pattern is written this way to accommodate multiple sizes in one set of instructions.
A great tip is to highlight or circle all numbers for your chosen size before you begin—that way, it’s easier to follow along without confusion.
If you’re ever unsure about what size to make, you can also check the finished measurements listed in the pattern and compare them to a sweater that fits well.
Hope that helps, and happy knitting!
Louise
Hi Louise, Maybe I’m over thinking it I’m wondering if I should cast on with the long tail method? My tail and my working yarn would end up both on the right. What I’m trying to figure out is the first row would be the wrong side and the second row the right side? Or do I have it all wrong? Help please!
Hi Catherine! 😊
Thank you for your question—you’re not overthinking at all!
Yes, you can definitely use the long tail cast-on method for this pattern. When you do, both your tail and working yarn will end up on the right-hand side of your needle, which is completely normal.
In this pattern, the first row worked after casting on should be the right side (RS)—the front of the sweater.
Then, the next row would be the wrong side (WS), or the back.
That’s how I’ve worked it in the pattern, and it ensures the pattern stitches appear correctly on the front.
So to clarify:
Row 1 (after casting on) = Right Side (RS)
Row 2 = Wrong Side (WS)
Hope this helps! 😊
Happy knitting!
Louise
Hi Louise! Just started on the sleeves and wanted to clarify something – do the increases every 4 rows all happen across the same side (the left side)? Is that right? Or do the increases happen symmetrically?
Hi Charlotte!
Great question—and you’re right to double-check before powering on. The sleeve increases are worked symmetrically: increase one stitch at each end of the increase rows (so two stitches total per increase row), not all on the same side. After the first increase row, keep increasing at both edges every 8th/6th/4th row (depending on size) while maintaining the cable panel and growing the moss-stitch panels at the sides.
You’ll see this in the pattern here:
“Inc 1 st at each end of next row…” then
“Cont to increase 1 st at each end of every foll 8th (6th, 6th, 6th, 4th, 4th) row…” and
“Make new moss st patt(s) at either side…” (which also hints the shaping is mirrored).
I hope that helps,
Happy knitting!
Louise
Hi Louise I am loving making my husband his first Aran sweater, and my first ever cabling. The front and back are made (few tiny mistakes we won’t talk about!) I’ve just started the Raglan sleeves but the M1PL, Rib 1 is completely throwing me, am I ribbing the stitch in the manner it presents, hence I will be increasing naturally on the purl stitch? Sorry to sound silly but first time I’ve ever come across this and need to get it right, hard when you are a lefty too! thanks Sue 😊 p.s. will share when it is made x
Hi Sue,
Yes, that’s right – after the M1PL, just continue to rib 1 in the manner the stitches present.
So if the new stitch sits as a purl stitch, you would purl it as part of the rib.
In that sleeve setup row, you are increasing across the ribbing so that the stitches grow evenly before moving into the cable pattern.
The important thing is to keep the 1 x 1 rib flowing correctly after each increase.
So for (M1PL, Rib 1):
make 1 stitch purlwise left
then work the next stitch in rib as it presents
You’re doing great, especially for a first cable sweater – and I’d love to see it when it’s finished!