Fraser’s Ridge Outlander Shawl Pattern
THIS ARTICLE CONTAINS AFFILIATE LINKS THAT SUPPORT HANDY LITTLE ME CONTENT AND FREE PATTERNS.The Fraser’s Ridge Outlander Shawl Pattern is inspired by the beautiful green Sontag-style shawl worn by Claire Fraser in Outlander Season 5.
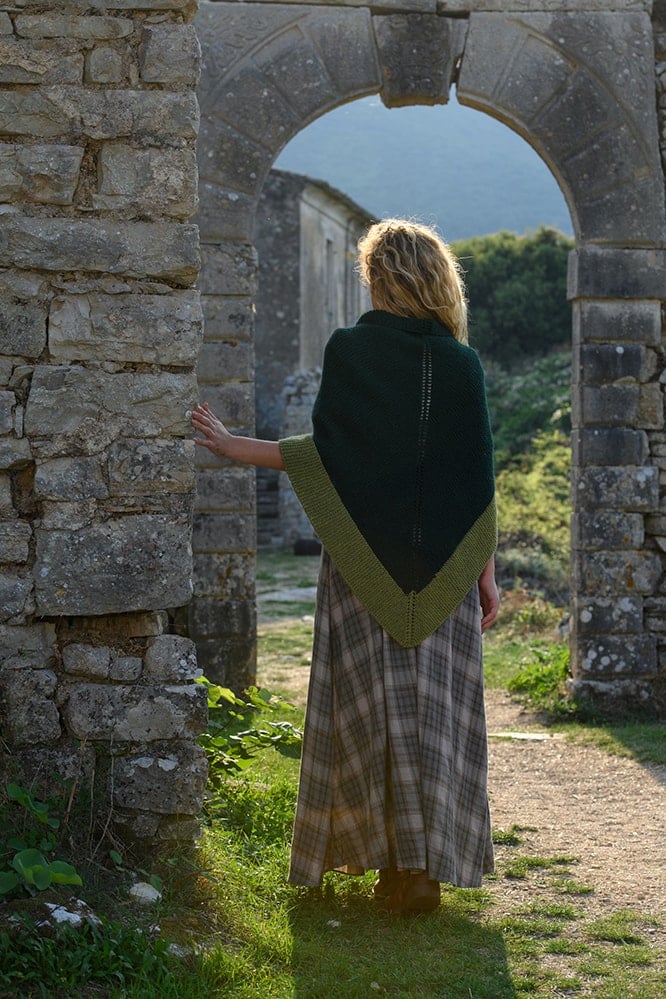
This large triangle shawl has a rustic, wrapped shape with a contrasting striped border, making it perfect for layering over dresses, sweaters, or everyday cold-weather outfits.
It has that practical, old-world feel seen throughout Claire’s wardrobe, while still being a wearable knit you can style again and again.
Worked mainly in garter stitch, this shawl is a relaxing project with a little extra challenge from the colorwork border.
You will use two shades of green to create a design similar to the one seen in the show, but you can easily choose your own colors to make a shawl that suits your wardrobe.
The full pattern is free below, or you can purchase the ad-free printable PDF here.

About The Fraser’s Ridge Shawl
This shawl was inspired by the green Sontag shawl worn by Claire Fraser in Outlander Season 5, from the opening credits through the season.
The design features a large triangular shape with a contrasting-color border, giving it a wrapped, practical look often seen in historical shawls.
It can be tied around the waist or worn loosely around the shoulders, making it a cozy and versatile piece for cooler days.
I chose shades from the Cascade 220 yarn palette to create a similar green-toned look, but this pattern would also work beautifully in browns, greys, blues, or any earthy colors you love.

Before You Get Started
Before you begin, take a moment to read through the full pattern so you understand how the shawl is shaped and where the color changes occur.
This is an intermediate knitting pattern, mainly because you will be working with more than one color using the intarsia technique.
- The shawl itself is worked back and forth in garter stitch, but the contrasting border means you will need to manage separate balls of yarn and keep the color sections neat as you knit.
- You may find it helpful to wind Yarn A into two separate balls before starting the colorwork section.
- This allows you to work the lighter green on both edges of the shawl while using Yarn B for the center section.
- Circular needles are recommended, not because the shawl is worked in the round, but because there will be many stitches on the needles as the triangle grows.
- A long cable will make the project much easier to manage.
- You can also adjust the finished size as you knit.
- The larger you make the shawl, the easier it will be to wrap around your body and tie at the back.
Fraser’s Ridge Outlander Shawl Pattern
Skill Level – Intermediate
Size Information
Please note – these sizes are just a rough guide. You can knit this shawl until it is comfortable for you to wear – test it against yourself to see if you want to make the length shorter or longer before dividing the sections.
The smallest sizes will result in the shawl meeting in the middle of your waist; the larger sizes will allow you to wrap the shawl around your body and tie it at the back of your waist.
- M – Width tip to tip – 80 inches/203 cm.
- M – Length – top to bottom = 35 inches/89 cm.
- You can add more or fewer stitches to adjust the size.
- Add fewer by – 40 stitches and more by + 40 sts.
- Where you can adjust the size is noted in the pattern.
Gauge
10 x 10 cm/4 x 4 inches = 16 sts and 30 rows in garter stitch.

Materials
Yarn
- Yarn A – Cascade 220 – Turtle 2452 100g/220yards x 1.5 (S) x 2 (M) 2.5 (L/XL) x 3+ (XL/XXL) Yarn B – Cascade 220 – Forest Heather 9447 100g/220yards x 3.5 (S) 4 (M) x 4.5 (L/XL) x 5+ (XL/XXL)
- Yarn weight – Medium Weight 04/Worsted/Aran/10 Ply.
Yarn notes
- Please note that the skeins of yarn for Yarn A must be made into two balls.
- This is because of the intarsia technique used in the pattern; you will have to attach one ball at one end of the work and the other at the other end as you knit.
Yarn Substitutes
- Knit Picks – Wool of The Andes Worsted
- Cascade yarns – Cascade 220 Merino
- Berroco – Lanas
- Knit Picks – Simply Wool Worsted
- Mirasol Yarn – Huni
- Filcolana – Peruvian Highland Wool
- Evoke Hand-Dyed Yarn – Woolganic Australian Organic Wool Hand-dyed
Needles
- 5 mm (US 8) Knitting needles.
- I used my interchangeable circular needles on a 100cm/40′′ cable as there were many stitches.
- I did not join in the round to knit.
- Spare cable (100cm/40″) with two end caps (to hold sts).
Notions
- Tape measure
- Darning needle
- Scissors
- Stitch markers
- Stitch holder (or spare cable with end caps to hold sts)

Abbreviations
Knitting Abbreviations And Terms (US And UK)
- Beg – beginning
- Cont – continue
- Foll – following
- K – knit
- K2tog – knit the next 2 stitches together
- YO – yarn over needle
- PM – place marker
- SM – slip marker
- Rem – remaining
- Rep – repeat
- RS -right side
- WS – wrong side
Print & Stitch
Purchase the ad-free PDF pattern
Want a clean, printable version of this pattern? You can purchase the ad-free PDF in my shop. It’s perfect for printing, saving to your device, and making without distractions.
Pattern Instructions
- Yarn A – Turtle (Light green)
- Yarn B – Forest Heather (Dark green)
With Yarn A – Cast on 3 sts.
- Row 1: Knit.
- Row 2: K1, YO, PM, K1, YO, K1. (5 sts)
- Row 3: K to end slipping marker.
- Row 4: K to marker, YO, SM, K1, YO, K to end.
- Rep rows 3 and 4 until there are 35 sts, ending with a WS row.
In the next stage, you will join Yarn B.
- Row 1 (RS): Cont to knit with Yarn A, K16, add in Yarn B from the backside and K1 stitch before the marker, YO, SM, K1, YO, K1, attach the second ball of Yarn A, K to end.
- Row 2 (WS): Knit the row, slipping the marker and maintaining the color pattern.
- Row 3: With Yarn A, K16, With yarn B K to marker, YO, SM, K1, YO, K to color change, K to end in Yarn A.
- Row 4: Rep row 2.
- Rep rows 3 and 4 until there are 162 (S) 202 sts (M) 242 (L) 282 (XL) on the needle.
- (The M size is seen in the photos).
*This is where you can adjust the size.
- If you stop at 162 sts, this will be an S – small size.
- If you stop at 202 sts, this will be the M – medium size.
- If you want to make the L size, you will need approximately 242 sts.
- For the XL/XXL size, you will need approx 282+ sts.
- You can add fewer or more stitches to adjust the size.
- Add fewer by – 40 stitches and more by + 40 sts.
- You can adjust the stitches according to your size.
- The larger the shawl, the easier it will be to tie behind your back.
Finish the right section
Row 1: K to 5 sts before the center spine marker (maintaining the color pattern), K2tog, PM, K1, K2tog (remove center marker).
Place the rem sts (the left side) on a stitch holder or spare cable with caps.
Turn the shawl to continue working on the right section.
- Row 2: K to the end of the row, maintaining the color pattern.
- Row 3: K to 2 sts before the marker, K2tog, SM, K2, turn.
- Row 4: rep row 2.
- Rep rows 3 and 4 until you have 14 (16, 18, 20) sts left.
Now you will continue to decrease the right section, maintaining the color pattern as you knit, until you have 3 sts left on the needle:
- Row 1: K to last 4 sts, K2tog, SM, K2.
- Row 2: K to end, maintaining the color pattern.
- Row 3: K to last 3 sts, K2tog (remove marker), k1.
- Row 4: Rep row 2.
- Row 5: K to last 2 sts, K2tog.
- Row 6: Rep row 2.
- Row 7: K to last 2 sts, K2tog.
- Row 8: Rep row 2.
- Row 9: K to last 4 sts, K2tog, K2.
- Row 10: Rep row 2.
- Rep rows 9 and 10 until you have 4 sts left, K1, K2tog, K1.
- Cast off the remaining 3 sts.
Finish the left section
Place sts from the spare cable or stitch holder onto the working needles/cable.
Start at the center spine and join Yarn B to the first st.
- Row 1: With Yarn, K2, PM, K to the end of the row, maintaining the color pattern.
- Row 2: K until 2 sts before the marker (maintaining color pattern), K2tog, SM, K2.
- Row 3: K to the end of the row, maintaining the color pattern.
- Rep rows 2 and 3 until you have 14 (16, 18, 20) sts left.
Now you will continue to decrease the left section, maintaining the color pattern as you knit, until you have 3 sts left on the needle:
- Row 1: K to 2 sts before marker – K2tog, SM, K2.
- Row 2: K to end, slipping the marker and maintaining the color pattern.
- Row 3: K to last 3 sts before marker – K2tog, remove the marker, K1.
- Row 4: K to end, maintaining the color pattern.
- Row 5: K to last 2 sts, K2tog.
- Row 6: Rep row 4.
- Row 7: K to last 4 sts, K2tog, K2.
- Row 8: Rep row 4. Rep rows 7 and 8 until 3 sts remain.
- Cast off.
- Weave in all loose ends.
Extension ties
You may want to make 2 long knitted ties that can be stitched to the corners of your shawl to help you tie it behind your waist and keep it secure.
For the ties (Make 2)
- Use Yarn B and Cast on 3 sts.
- Knit every row until the length of the tie measures 12 inches.
- Cast off.
This can be made longer or shorter.
Stitch to the corner points of the shawl.

Share Your Make
I love seeing your finished projects.
If you enjoyed making the beret, I’d love to see yours on Instagram, tag me @handylittleme or #handylittleme.
I’d love to see your work!

Frequently Asked Questions
This pattern is best suited to intermediate knitters or confident advanced beginners. The shawl is worked mostly in garter stitch, but you will need to know how to increase with yarn overs, decrease with K2tog, and change colors using the intarsia method.
A Sontag shawl is a traditional triangular or wrap-style shawl that can be worn around the shoulders and crossed or tied around the waist. This style was practical, warm, and easy to wear, which makes it perfect for a Claire Fraser-inspired knit.
No, you can use any colors you like. Green shades give the shawl a similar look to Claire’s shawl in Outlander, but earthy browns, soft greys, deep blues, or natural wool shades would also work beautifully.
This pattern uses medium-weight yarn, also known as worsted, aran, or 10 ply yarn. Cascade 220 is used for the sample, but you can substitute another yarn with a similar weight and gauge.
Because of the intarsia colorwork section, Yarn A is used on both sides of the shawl. Splitting Yarn A into two balls makes it easier to work each edge without carrying the yarn across the back of the project.
No, the shawl is worked flat, back and forth in rows. Circular needles are recommended because they give you enough space to hold the large number of stitches as the shawl grows.
Yes, the size is adjustable. You can stop earlier for a smaller shawl or continue increasing for a larger wrap. The pattern notes where you can adjust the stitch count, and the larger sizes will be easier to tie around the waist.
Blocking is recommended, especially for a large shawl like this. It will help even out the stitches, open up the shape, and give the finished shawl a neater look.
Yes, you may sell finished items made from this pattern, but please credit Handy Little Me as the designer. The written pattern itself may not be copied, sold, redistributed, or republished.
You can use the free pattern on this page, or purchase the inexpensive ad-free PDF printable version from the Handy Little Me shop.

More Outlander Knitting Patterns
If you enjoy knitting pieces inspired by Claire Fraser’s wardrobe, you may also like the other designs in my Outlander pattern collection.
There are shawls, scarves, mittens, arm warmers, and other rustic knits inspired by both Claire and Brianna throughout the series.
These patterns are perfect if you love historical-style accessories, cozy layering pieces, and textured knits with a Highland feel.
You can browse the full Outlander Pattern Library for more free knitting patterns, or view the Outlander Pattern Collection Ebooks in my shop.
Popular Patterns
- Jenny’s Shawl Knitting Pattern (Outlander Knit)
- Outlander Cowl Knitting Pattern (Claire Season 1)
- Journeycake Sontag Shawl Knitting Pattern
- Outlander Claire’s Cable Knit Wrist Warmers
- Beret Knitting Pattern (Beginner Friendly!)
- Outlander Brianna Fingerless Gloves Pattern
- Sassenach Tassel Shawl Knitting Pattern
- Fringe Shawl Knitting Pattern (Snow And Ashes)
- Outlander Capelet Knitting Pattern
- Highland Forest Shawl Knitting Pattern
- Outlander Shawl Pattern (Clare Fraser Shawl)
- Outlander Scarf | Brianna Fraser Pattern
- The Outlander Pattern Library
- Outlander Patterns {Beginner + Intermediate}