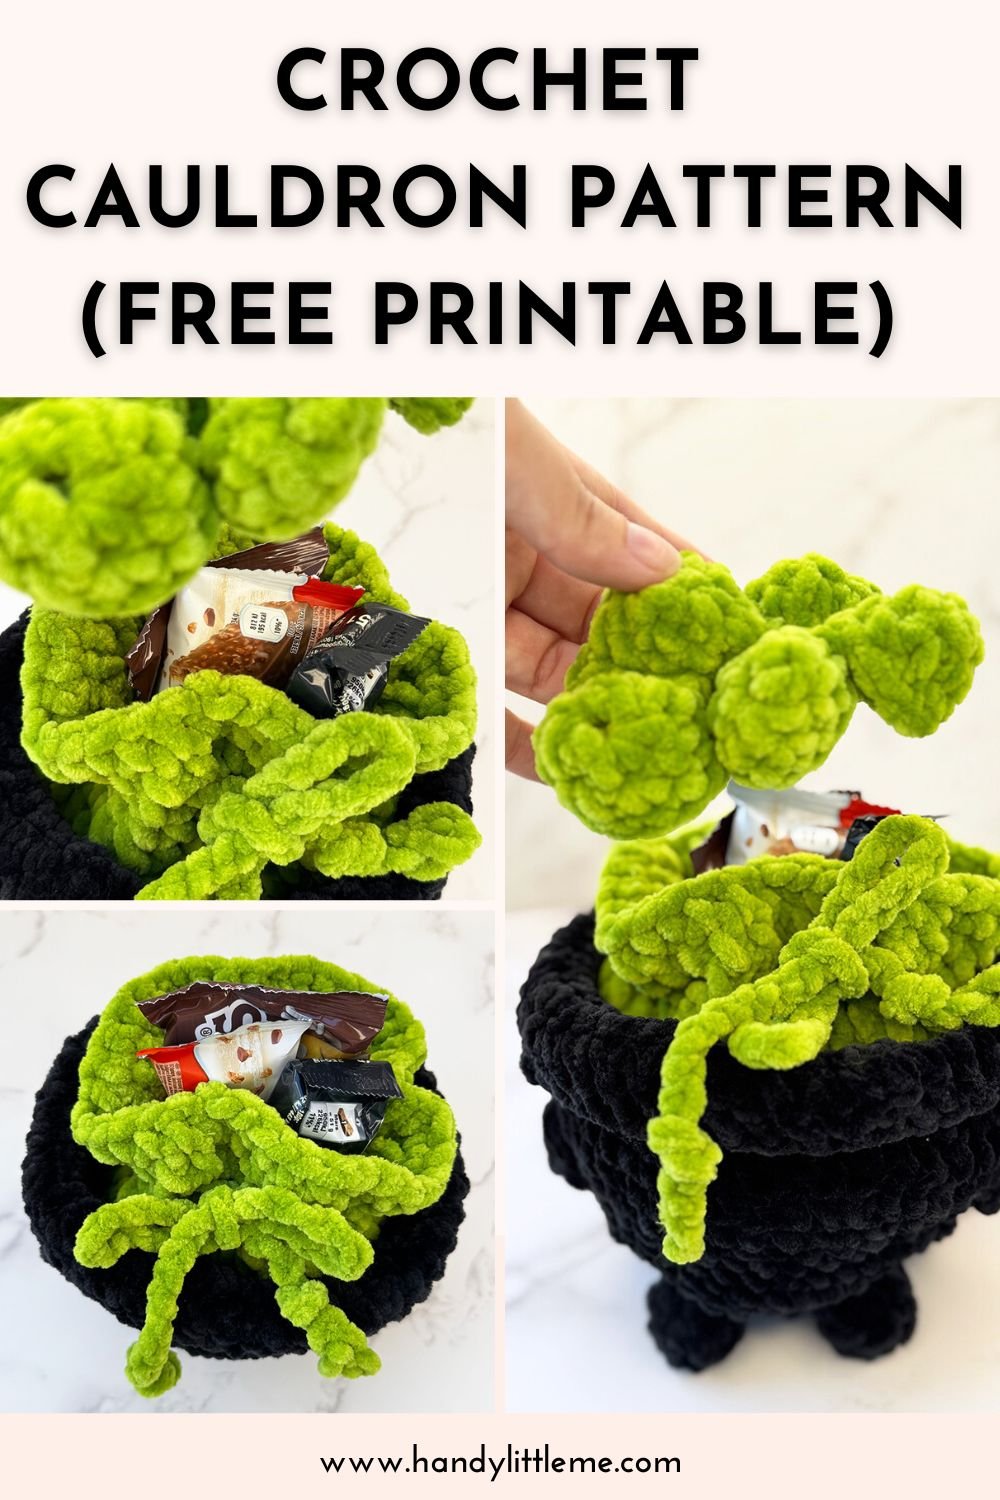
Crochet Cauldron Pattern (Free Printable)
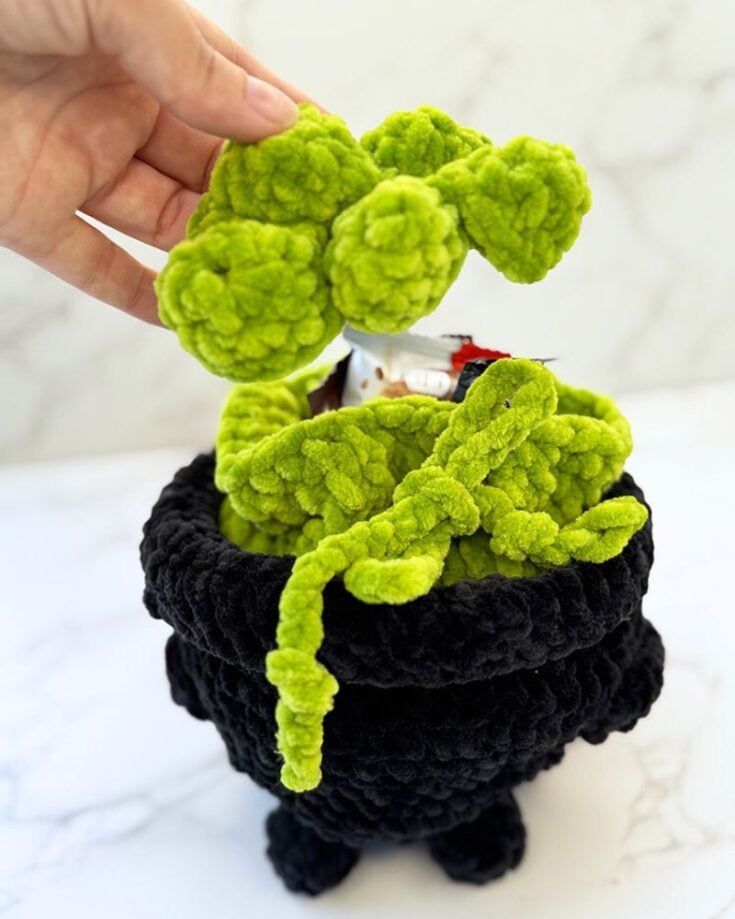
THIS ARTICLE CONTAINS AFFILIATE LINKS THAT SUPPORT HANDY LITTLE ME CONTENT AND FREE PATTERNS.A cozy little crochet cauldron for Halloween treats, tabletop décor, or spooky storage!
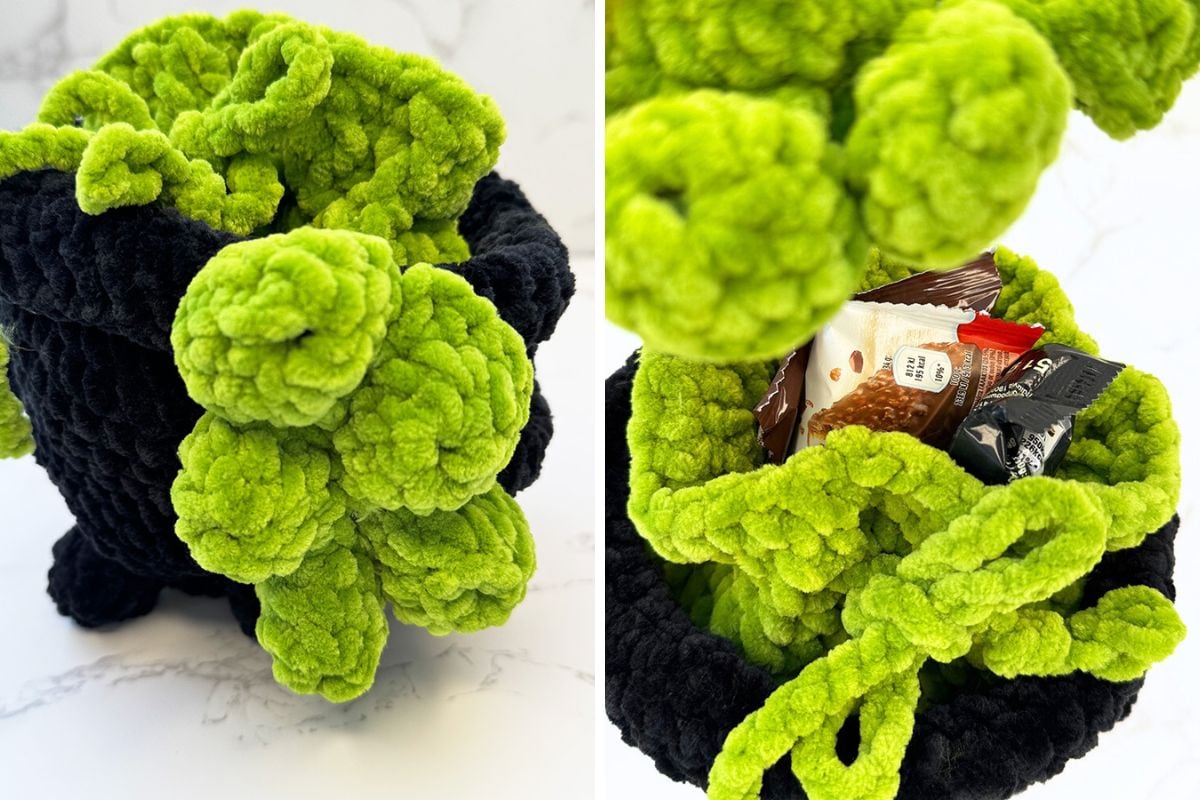
This soft, sturdy basket works up quickly in plush chenille and includes a removable drawstring liner (great if you’ll pop sweets inside).
The rounded “belly,” tiny feet, ear-style handles, and optional bobbles at the lip of the cauldron make it extra cute.
This tutorial follows the friendly, step-by-step format you’re used to—perfect if you like clear stitches, photos, and checkable stitch counts as you go.
We’ll work in continuous rounds for most sections and keep the fabric firm for structure.
Before You Get Started
Here are a few handy things to know:
- Use a slightly smaller hook than usual for chenille to keep the fabric firm and your cauldron standing tall.
- Keep a stitch marker in the first stitch of each round; the body is worked in spirals.
- For the neatest shape, avoid over-stuffing the feet.
- Not sure about decreases? An invisible decrease (inv-dec) works beautifully anywhere the pattern says dec.
- New to magic rings? The MR (magic ring) starts your base without a hole.
- TIP: Tie a small knot at the end of short chenille tails and weave securely; chenille can be slippery.
Tools/Materials Needed
- Yarn – Basket: Wolans Bunny Baby (chenille)/or Himalaya Dolphin Baby, ~90–120 g (1 ball usually enough; add more for lid or lots of bubbles) in black.
- Yarn – Liner: More chenille in a contrast color (green).
- Check here for yarn alternatives.
- Hook: 4.5 mm / US 7.
- Notions: stitch marker, tapestry needle, scissors.
- A small amount of stuffing/polyfil for the cauldron feet.
- Optional: short craft cord or ribbon for the drawstring.
Finished Size & Gauge
Finished size (as written)
- Basket: ~14 cm (5.5 in) base diameter; ~13–15 cm (5–6 in) tall
- Liner: fits neatly inside and cinches closed
Gauge (not critical): ~14 single crochet (sc) = 10 cm and 14 rows = 10 cm in tight sc, worked in the round with Bunny Baby/Himalaya Dolphin Baby and a 4.5 mm/US 7 hook. Aim for a firm fabric.
Abbreviations (US)
- ch = chain
- MR = magic ring
- sc = single crochet
- inc = 2 sc in same st
- dec = sc2tog (or inv-dec)
- sl st / slst = slip stitch
- BLO = back loop only
- FLO = front loop only
- st(s) = stitch(es)
- rnd = round
- hdc = half double crochet
Notes
- Work in a continuous spiral unless stated; place a marker in the first st of each rnd.
- Using BLO for the first round of the sides creates a crisp base edge.
- Chenille may shed—weave (sewing) tails securely and leave short ends inside.
- “Right side” faces out throughout the basket body.
- Keep an eye on the stitch count after shaping rounds for a tidy silhouette.
- Where the pattern says dec, you can use a regular sc2tog or an invisible decrease for cleaner shaping.

How To Crochet The Cauldron (Step-By-Step)
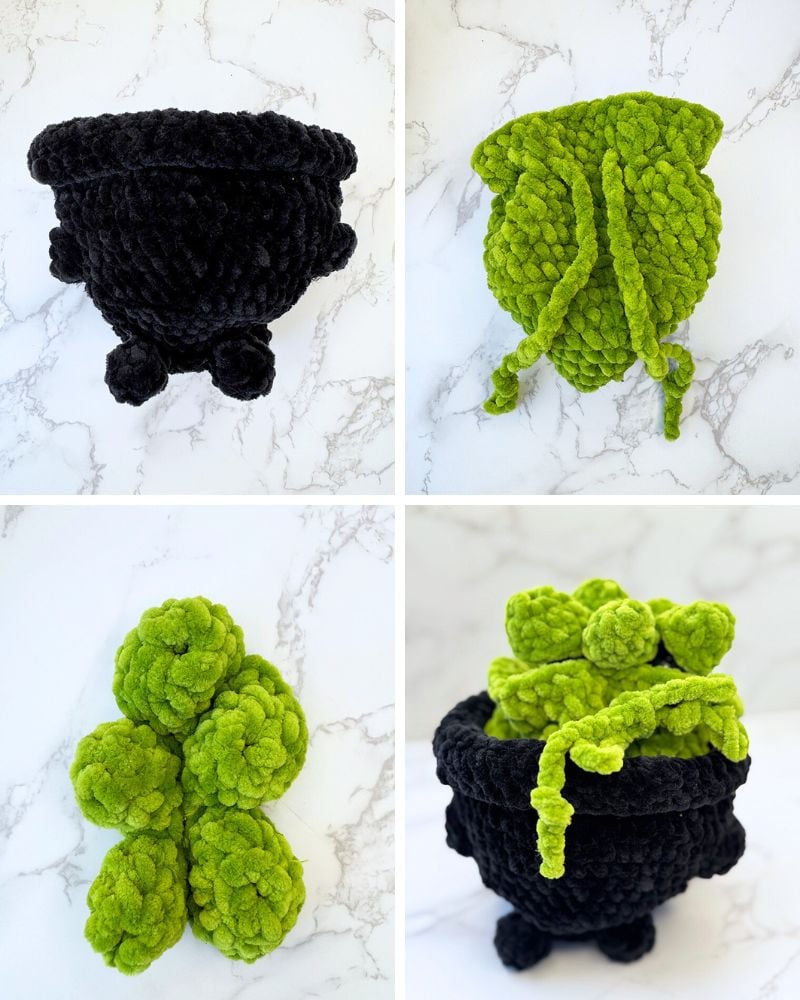
A) Cauldron Base & Body (main color, black)
Base
- Rnd 1: MR, 6 sc into ring (6).
- Rnd 2: inc around (12).
- Rnd 3: (sc, inc) x6 (18).
- Rnd 4: (2 sc, inc) x6 (24).
- Rnd 5: (3 sc, inc) x6 (30).
- Rnd 6: (4 sc, inc) x6 (36).
- Rnd 7: (5 sc, inc) x6 (42).
- Rnd 8: (6 sc, inc) x6 (48).
Turn-up round
- Rnd 9: BLO sc around (48) — this creates a sharp corner for the right side of the base.
Lower walls
- Rnd 10–11: sc around (48).
Belly increases
- Rnd 12: (7 sc, inc) x6 (54).
- Rnd 13: (8 sc, inc) x6 (60).
Belly depth
- Rnd 14–16: sc around (60). (Want it taller? Add 1–2 extra plain rnds here.)
Taper toward rim
- Rnd 17: (8 sc, dec) x6 (54).
- Rnd 18: (7 sc, dec) x6 (48).
- Rnd 19: sc around (48).
Rim / rolled lip
- Rnd 20: FLO hdc around (48) — forms a gentle rolled lip of the cauldron.
- Rnd 21: sc around; sl st to first to join. Fasten off and weave in ends.
Tip: If your edge flares, a light steam block (hover only) helps. Shape by hand while warm.
B) Cauldron Feet (make 4)
Make small nubs and sew to the base edge at three evenly spaced points.
With black yarn:
- Rnd 1: MR, 5 sc (5)
- Rnd 2: (sc, inc) x2, sc (7)
- Rnd 3: sc around (7)
Stuff lightly with the tail (or leave unstuffed for squat feet). Fasten off, leaving a long tail. - Sewing: Stitch each foot along the outer edge of the base (just under the BLO ridge) at ~120° apart so the cauldron stands level.
C) Side Handles (make 2)
With black yarn:
- Row 1: ch 8, sc in 2nd ch from hook and across (7)
- Row 2: ch 1, turn, sc across (7). Fasten off, leaving tails for sewing.
Attach: Sew one handle per side just below the rim, shaping like a little ear/loop.
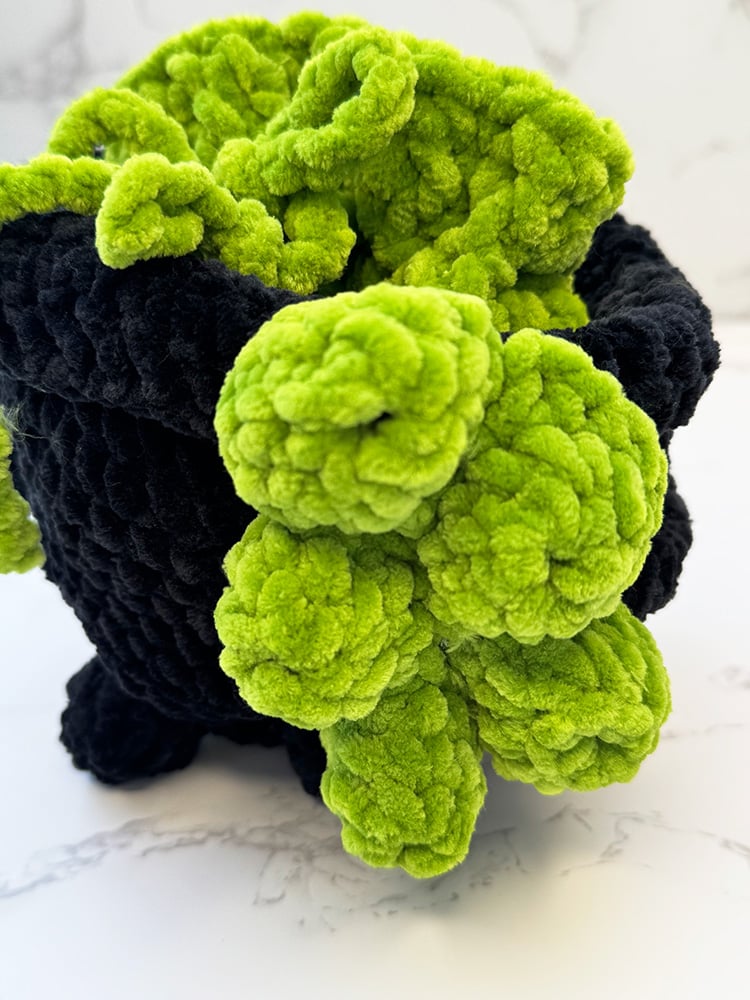
D) “Bubbles” (optional)
Make a few bright green/purple bubbles to perch at the rim.
You can also use a small bobble st if you prefer a textured dot.
Tiny bubble:
- Rnd 1: MR, 6 sc; sl st to join, fasten off, leave a tail to sew.
Medium bubble:
- Rnd 1: MR, 6 sc (6)
- Rnd 2: inc around (12)
- Rnd 3: sc around (12); sl st, fasten off, leave tail to sew.
Arrange and stitch bubbles (or use a safety pin if you want to be able to move them) at the rim so they peek over the edge.
I created five medium bubbles and stitched them together to make a lid that can also be pinned to the side of the cauldron.
E) Removable Drawstring Liner
Sizing note: The liner base mirrors the basket’s early rounds, so it nests nicely.
Plush liner in green (Bunny Baby, 4.5 mm)
- Rnd 1: MR, 6 sc (6)
- Rnd 2: inc around (12)
- Rnd 3: (sc, inc) x6 (18)
- Rnd 4: (2 sc, inc) x6 (24)
- Rnd 5: (3 sc, inc) x6 (30)
- Rnd 6: (4 sc, inc) x6 (36)
- Rnd 7: (5 sc, inc) x6 (42)
- Rnd 8: (6 sc, inc) x6 (48)
- Rnd 9: BLO sc around (48)
- Rnd 10–13: sc around (48) — add/subtract rounds for height
Eyelet & Top
- Rnd 14: (sc, ch 1, sk 1) around — work the repeat 24× to stay even.
- Rnd 15–16: sc around, placing 1 sc in each sc and 1 sc into each ch-1 space (48).
Fasten off and weave in.
Drawstring: ch ~70–80; fasten off. Weave through eyelets, pull both strands of yarn to cinch, and knot the ends.
Adjusting Size
- Wider base / bigger crochet cauldron: Add more increase rounds to the base (keep adding 6 sts per rnd: 54, 60, 66…). Mirror those counts in the belly: increase up to your max, work a few plain rounds, then decrease back down to your rim count.
- Taller: Add extra plain rounds before tapering.
- Snugger liner: Stop the liner 1 round earlier than the basket height or switch to cotton.
Optional Lid (quick add-on)
With basket yarn, crochet a flat circle to 42–48 sts (to match the inner rim), then 1 rnd sc even.
Add a small bubble or bobble st as a handle at center.
Set on top after cinching the liner for a witchy look.
Assembly & Finishing Tips
- Sew feet first (check it stands level), then handles, then bubbles.
- If the rim flares, lightly steam (hover only) and shape. Chenille relaxes easily.
- For extra structure, place a thin cardboard/plastic circle under the liner at the bottom (remove before washing).
- To avoid gaps on decreases, use an invisible decrease wherever you see dec.
- Keep an eye on stitch count after shaping rounds to keep the silhouette smooth.
- If joining any parts, sl st neatly and weave ends on the right side only when they’ll be covered by the liner.

FAQs & Extra Tips
Q: Can I use a different yarn?
A: Yes! Any super-soft bulky chenille works for the basket.
Just match the hook to get a firm fabric.
Q: My base is ruffling or cupping—help!
A: Check your stitch count each rnd.
Ruffling = too many inc; cupping = too few inc or too tight tension.
Adjust by adding or removing one increase rnd.
Q: How do I keep joins invisible?
A: Because most sections are in spirals, you won’t have joins.
Where you do join, finish with a clean sl st and seamless join.
For shaping, use invisible decrease.
Q: Can I add more texture?
A: Absolutely—sprinkle a few bobble st clusters or surface slip-stitch lines around the body for a “bubbling brew” effect.
Q: Is this beginner-friendly?
A: Yes. The stitches are basic (sc, inc, dec, ch), with optional embellishments.
Take it step by step and watch your loops—don’t pull chenille too hard.
Grab all 7 of my Halloween Crochet Patterns here…

Free Printable
Want to keep this tutorial handy while you crochet? Grab the free printable version of the pattern below!
Whether you’re curled up on the couch or crafting on the go, this easy-to-follow card makes it simple to work through each round at your own pace.
Crochet Cauldron Pattern
Beginner-friendly crochet cauldron pattern: sturdy chenille body, cute feet and handles, plus a washable drawstring liner.
*For all photographs, please refer to the blog post.
Free Printable.
Materials
- Yarn – Basket: Wolans Bunny Baby (chenille)/Himalaya Dolphin Baby ~90–120 g (1 ball usually enough; add more for lid or lots of bubbles) in black.
- Yarn – Liner: More chenille in a contrast color (green).
- Check here for yarn alternatives.
Tools
- Hook: 4.5 mm / US 7.
- Notions: stitch marker, tapestry needle, scissors.
- A small amount of stuffing/polyfil for the cauldron feet.
- Optional: short craft cord or ribbon for the drawstring.
Instructions
A) Cauldron Base & Body (main color, black)
Base
- Rnd 1: MR, 6 sc into ring (6).
- Rnd 2: inc around (12).
- Rnd 3: (sc, inc) x6 (18).
- Rnd 4: (2 sc, inc) x6 (24).
- Rnd 5: (3 sc, inc) x6 (30).
- Rnd 6: (4 sc, inc) x6 (36).
- Rnd 7: (5 sc, inc) x6 (42).
- Rnd 8: (6 sc, inc) x6 (48).
Turn-up round
- Rnd 9: BLO sc around (48) — this creates a sharp corner for the right side of the base.
Lower walls
- Rnd 10–11: sc around (48).
Belly increases
- Rnd 12: (7 sc, inc) x6 (54).
- Rnd 13: (8 sc, inc) x6 (60).
Belly depth
- Rnd 14–16: sc around (60). (Want it taller? Add 1–2 extra plain rnds here.)
Taper toward rim
- Rnd 17: (8 sc, dec) x6 (54).
- Rnd 18: (7 sc, dec) x6 (48).
- Rnd 19: sc around (48).
Rim / rolled lip
- Rnd 20: FLO hdc around (48) — forms a gentle rolled lip of the cauldron.
- Rnd 21: sc around; sl st to first to join. Fasten off and weave in ends.
Tip: If your edge flares, a light steam block (hover only) helps. Shape by hand while warm.
B) Cauldron Feet (make 4)
Make small nubs and sew to the base edge at three evenly spaced points.
With black yarn:
- Rnd 1: MR, 5 sc (5)
- Rnd 2: (sc, inc) x2, sc (7)
- Rnd 3: sc around (7)Stuff lightly with the tail (or leave unstuffed for squat feet). Fasten off, leaving a long tail.
- Sewing: Stitch each foot along the outer edge of the base (just under the BLO ridge) at ~120° apart so the cauldron stands level.
C) Side Handles (make 2)
With black yarn:
- Row 1: ch 8, sc in 2nd ch from hook and across (7)
- Row 2: ch 1, turn, sc across (7). Fasten off, leaving tails for sewing.
- Attach: Sew one handle per side just below the rim, shaping like a little ear/loop.
D) “Bubbles” (optional)
Make a few bright green/purple bubbles to perch at the rim.
You can also use a small bobble st if you prefer a textured dot.
Tiny bubble:
- Rnd 1: MR, 6 sc; sl st to join, fasten off, leave a tail to sew.
Medium bubble:
- Rnd 1: MR, 6 sc (6)
- Rnd 2: inc around (12)
- Rnd 3: sc around (12); sl st, fasten off, leave tail to sew.
Arrange and stitch bubbles (or use a safety pin if you want to be able to move them) at the rim so they peek over the edge.
I created five medium bubbles and stitched them together to make a lid that can also be pinned to the side of the cauldron.
E) Removable Drawstring Liner / Washable Pouch
Sizing note: The liner base mirrors the basket’s early rounds, so it nests nicely.
Plush liner in green (Bunny Baby, 4.5 mm)
- Rnd 1: MR, 6 sc (6)
- Rnd 2: inc around (12)
- Rnd 3: (sc, inc) x6 (18)
- Rnd 4: (2 sc, inc) x6 (24)
- Rnd 5: (3 sc, inc) x6 (30)
- Rnd 6: (4 sc, inc) x6 (36)
- Rnd 7: (5 sc, inc) x6 (42)
- Rnd 8: (6 sc, inc) x6 (48)
- Rnd 9: BLO sc around (48)
- Rnd 10–13: sc around (48) — add/subtract rounds for height
Eyelet & Top
- Rnd 14: (sc, ch 1, sk 1) around — work the repeat 24× to stay even.
- Rnd 15–16: sc around, placing 1 sc in each sc and 1 sc into each ch-1 space (48).
- Fasten off and weave in.
Drawstring: ch ~70–80; fasten off. Weave through eyelets, pull both strands of yarn to cinch, and knot the ends.
Adjusting Size
- Wider base / bigger cauldron: Add more increase rounds to the base (keep adding 6 sts per rnd: 54, 60, 66…). Mirror those counts in the belly: increase up to your max, work a few plain rounds, then decrease back down to your rim count.
- Taller: Add extra plain rounds before tapering.
- Snugger liner: Stop the liner 1 round earlier than the basket height or switch to cotton.
Optional Lid (quick add-on)
With basket yarn, crochet a flat circle to 42–48 sts (to match the inner rim), then 1 rnd sc even.
Add a small bubble or bobble st as a handle at center.
Set on top after cinching the liner for a witchy look.
Assembly & Finishing Tips
- Sew feet first (check it stands level), then handles, then bubbles.
- If the rim flares, lightly steam (hover only) and shape. Chenille relaxes easily.
- For extra structure, place a thin cardboard/plastic circle under the liner at the bottom (remove before washing).
- To avoid gaps on decreases, use an invisible decrease wherever you see dec.
- Keep an eye on stitch count after shaping rounds to keep the silhouette smooth.
- If joining any parts, sl st neatly and weave ends on the right side only when they’ll be covered by the liner.
Notes
Notes
- Work in a continuous spiral unless stated; place a marker in the first st of each rnd.
- Using BLO for the first round of the sides creates a crisp base edge.
- Chenille may shed—weave (sewing) tails securely and leave short ends inside.
- “Right side” faces out throughout the basket body.
- Keep an eye on the stitch count after shaping rounds for a tidy silhouette.
- Where the pattern says dec, you can use a regular sc2tog or an invisible decrease for cleaner shaping.
Finished Size & Gauge
Finished size (as written)
- Basket: ~14 cm (5.5 in) base diameter; ~13–15 cm (5–6 in) tall
- Liner: fits neatly inside and cinches closed
Gauge (not critical): ~14 single crochet (sc) = 10 cm and 14 rows = 10 cm in tight sc, worked in the round with Bunny Baby/Himalaya Dolphin Baby and a 4.5 mm/US 7 hook. Aim for a firm fabric.
Abbreviations (US)
- ch = chain
- MR = magic ring
- sc = single crochet
- inc = 2 sc in same st
- dec = sc2tog (or inv-dec)
- sl st / slst = slip stitch
- BLO = back loop only
- FLO = front loop only
- st(s) = stitch(es)
- rnd = round
- hdc = half double crochet
Recommended Products
As an Amazon Associate and member of other affiliate programs, I earn from qualifying purchases.

Share Your Work
Love this pattern? Share your make on Instagram, fave it on Ravelry, or offer finished cauldrons in your small Etsy shop (credit Handy Little Me).
Tag me on Instagram @handylittleme or use #handylittleme to show off your makes.
Join the Handy Little Me Facebook Group to share photos, ask questions, and connect with other makers.
Happy crocheting!
Want More Free Crochet Patterns?
- Crochet Mini Witch Hat Pattern (Free Printable)
- Crochet Ghost (Free Printable)
- Eyeball Crochet Coaster Pattern (Free Printable)
- Crochet Halloween Garland (Free Printable)
- Crochet Pumpkin Coaster (Free Printable)
- The Best Crochet Halloween Costumes For Babies
- Crochet Ribbing Tutorial
- Crochet Witch Hat (Free Pattern)
- Pumpkin Crochet Pattern (Free, Easy + Adorable)
- Free Crochet Pumpkin Pattern For Beginners
- Crochet Pumpkin {Single Crochet Ribbing}
- Crochet Acorn Garland Free Pattern (Fall Decor)
- 41 Free Halloween Crochet Patterns (Cute + Spooky)
