Eyeball Crochet Coaster Pattern (Free Printable)
THIS ARTICLE CONTAINS AFFILIATE LINKS THAT SUPPORT HANDY LITTLE ME CONTENT AND FREE PATTERNS.If you love quirky Halloween patterns, this eyeball crochet coaster is a total crowd-pleaser—equal parts spooky and cute.
It works up fast in single crochet (sc) using scrap yarns, so it’s a perfect stashbuster.
Make a classic green iris color, go icy blue, warm brown, or whip up a whole set of rainbow crochet eyes for fun decor.
You can even scale the diameter with your crochet hook size or turn one into a matching keychain—so many variations from one free crochet pattern.

Before You Get Started
Here are a few things to know before you begin:
- Work in joined rounds or continuous rounds—both are fine. For continuous rounds, use a stitch marker and skip the slip stitch (see notes below).
- Keep your tension even. Too tight = domed coaster; too loose = wavy edge.
- Want a larger diameter? Go up a hook size or try acrylic yarn / worsted cotton.
- Add a tiny white knot on the pupil for a shiny eye highlight—it’s adorable.
Tools/Materials Needed
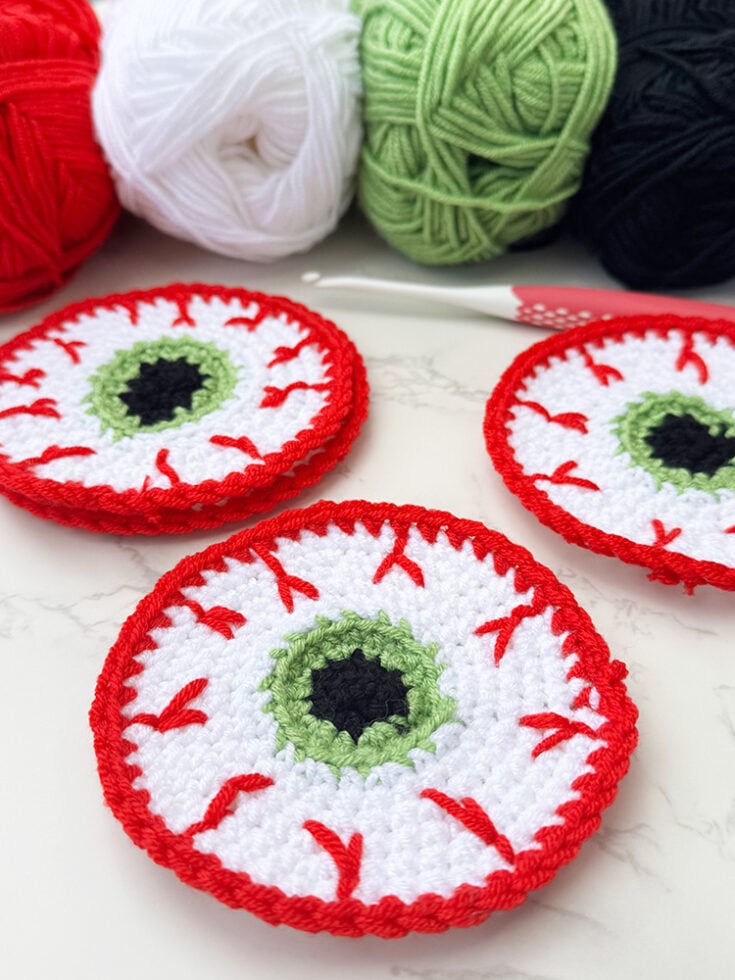
- DK yarn (stash/scrap is perfect):
- Yarn A – Black (pupil)
- Yarn B – Green (iris color) (or blue/brown)
- Yarn C – White (sclera)
- Yarn D – Red (veins)
- Optional: darker iris flecks
- Crochet hook: 4.0 mm (G/6) — go up/down a size to change diameter
- Tapestry needle & scissors
- Optional: steamer/blocking mat; thin cork or felt circle for backing
Finished Size: Approx 4–4.5 in / 10–11.5 cm across with G/6 hook and worsted cotton (slightly smaller in DK).

Abbreviations (US Terms) — with UK in [brackets]
- MR = magic ring
- ch = chain
- sl st = slip stitch
- sc = single crochet [dc]
- inc = increase (2 sc in same st) [2 dc in same st]
- dec = decrease [dc2tog] (not used in main pattern; see “invisible decrease” tip)
- inv dec = invisible decrease (work 2 sts together through front loops)
- BLO = back loop only
- st(s) = stitch(es)
- next st = next stitch
How To Crochet The Eyeball Coaster
This beginner-friendly free pattern uses mostly single crochet.
Rounds include stitch counts at the end of each round in (brackets).
Pattern Notes
- Worked in continuous rounds: You’re crocheting in a spiral—no joins. Pop a marker in the first stitch of the round and move it up as you go.
- Switching colors (cleanly): On the last yarn-over of your final sc in the old color, drop it, pick up the new color, and pull through. Then work the next stitch in the new color—no color blip!
- Jogless stripes in spirals: After changing colors, give the new yarn a gentle tug to level the “step.” For super neat changes, try a standing sc.
- Carry or cut? Short hops (pupil → iris → white): you can carry the unused yarn on the back. Longer gaps (adding red later): fasten off and rejoin.
- Keep it flat: Don’t pull carried strands too tight—tight floats = puckering.
- Weaving ends: Use a tapestry needle and weave in opposite directions for a tidy finish.

Pattern Instructions
Yarn/Color Key
Yarn A = Black • Yarn B = Green (iris) • Yarn C = White • Yarn D = Red
Center Pupil — Yarn A
Make 6 sc into a MR, join with a sl st. (6)
Round 1 — A
2 sc in each st around. (12)
Round 2 — change to Yarn B (iris)
*1 sc in next st, 2 sc in next st*; rep from * to end. (18)
Round 3 — B
1 sc in each st around. (18)
Round 4 — change to Yarn C (white), BLO
*1 sc in next st, 2 sc in next st*; rep from * to end. (27)
Round 5 — C
1 sc in each st around. (27)
Round 6 — C
*1 sc in next 2 sts, 2 sc in next st*; rep from * to end. (36)
Round 7 — C
1 sc in each st around. (36)
Round 8 — C
*1 sc in next 3 sts, 2 sc in next st*; rep from * to end. (45)
Round 9 — C
1 sc in each st around. (45)
Round 10 — change to Yarn D (red veins edge)
1 sc in each st around. (45)
Work 1 sl st in next st, fasten off, weave in all ends.
Finishing + Details
- Eye highlight: With white, make a tiny knot or 2–3 overcast stitches on the edge of the pupil.
- Iris texture (optional): With a darker shade of your iris color, add short surface slip stitch lines from pupil toward iris edge.
- Bloodshot veins: With red yarn, embroider a few surface sl st or loose backstitches on the white, branching once or twice. Keep them sparse so mugs sit flat.
- Blocking: Lightly steam and pat flat.
- Non-slip backing (optional): Glue or stitch a slightly smaller felt/cork circle to the wrong side.

FAQs & Tips
What yarn choice works best?
Cotton (DK or worsted) is ideal for coasters.
Acrylic yarn works too—just block to flatten.
How do I make an eyeball keychain?
Stop after Round 9 (or your preferred diameter), add fewer veins, then sew in a small split ring at the edge.
Instant keychain!
Joined vs continuous rounds?
Both work.
Continuous rounds avoid a visible seam—use a marker and consider an invisible decrease when shaping variations.
Can I resize the coaster?
Yes—change hook size or add/subtract increase rounds.
Always adjust the edging so the stitches stay flat.
UK terms?
This pattern is in US terms.
UK double crochet (dc) = US single crochet (sc).
See abbreviations above for quick conversion.
Grab all 7 of my Halloween Crochet Patterns here…
Free Printable
Want to keep this tutorial handy while you crochet? Grab the free printable version of the pattern below!
Whether you’re curled up on the couch or crafting on the go, this easy-to-follow card makes it simple to work through each round at your own pace.
Eyeball Crochet Coaster Pattern
Stitch a spooky-cute eyeball crochet coaster in continuous rounds using easy US terms—perfect for quick makes and stashbusting scraps.
Includes neat color-change tips, stitch counts at the end of each round, and simple finishing ideas for a flat, durable coaster.
Materials
- DK yarn (stash/scrap is perfect):
- Yarn A – Black (pupil)
- Yarn B – Green (iris color) (or blue/brown)
- Yarn C – White (sclera)
- Yarn D – Red (veins)
- Optional: darker iris flecks
Tools
- Crochet hook: 4.0 mm (G/6) — go up/down a size to change diameter
- Tapestry needle & scissors
- Optional: steamer/blocking mat; thin cork or felt circle for backing
Instructions
Pattern Notes
- Worked in continuous rounds: You’re crocheting in a spiral—no joins. Pop a marker in the first stitch of the round and move it up as you go.
- Switching colors (cleanly): On the last yarn-over of your final sc in the old color, drop it, pick up the new color, and pull through. Then work the next stitch in the new color—no color blip!
- Jogless stripes in spirals: After changing colors, give the new yarn a gentle tug to level the “step.” For super neat changes, try a standing sc.
- Carry or cut? Short hops (pupil → iris → white): you can carry the unused yarn on the back. Longer gaps (adding red later): fasten off and rejoin.
- Keep it flat: Don’t pull carried strands too tight—tight floats = puckering.
- Weaving ends: Use a tapestry needle and weave in opposite directions for a tidy finish.
Pattern Instructions
Yarn/Color Key: Yarn A = Black • Yarn B = Green (iris) • Yarn C = White • Yarn D = Red
- Center Pupil — Yarn A
- Make 6 sc into a MR, join with a sl st. (6)
- Round 1 — A2 sc in each st around. (12)
- Round 2 — change to Yarn B (iris) *1 sc in next st, 2 sc in next st*; rep from * to end. (18)
- Round 3 — B1 sc in each st around.(18)
- Round 4 — change to Yarn C (white), BLO*1 sc in next st, 2 sc in next st*; rep from * to end. (27)
- Round 5 — C1 sc in each st around.(27)
- Round 6 — C *1 sc in next 2 sts, 2 sc in next st*; rep from * to end. (36)
- Round 7 — C1 sc in each st around.(36)
- Round 8 — C *1 sc in next 3 sts, 2 sc in next st*; rep from * to end. (45)
- Round 9 — C1 sc in each st around.(45)
- Round 10 — change to Yarn D (red veins edge) 1 sc in each st around.(45)
- Work 1 sl st in next st, fasten off, weave in all ends.
Finishing + Details
- Eye highlight: With white, make a tiny knot or 2–3 overcast stitches on the edge of the pupil.
- Iris texture (optional): With a darker shade of your iris color, add short surface slip stitch lines from pupil toward iris edge.
- Bloodshot veins: With red yarn, embroider a few surface sl st or loose backstitches on the white, branching once or twice. Keep them sparse so mugs sit flat.
- Blocking: Lightly steam and pat flat.
- Non-slip backing (optional): Glue or stitch a slightly smaller felt/cork circle to the wrong side.
Notes
Finished Size: Approx 4–4.5 in / 10–11.5 cm across with G/6 hook and worsted cotton (slightly smaller in DK).
Abbreviations (US Terms) — with UK in [brackets]
- MR = magic ring
- ch = chain
- sl st = slip stitch
- sc = single crochet [dc]
- inc = increase (2 sc in same st) [2 dc in same st]
- dec = decrease [dc2tog] (not used in main pattern; see “invisible decrease” tip)
- inv dec = invisible decrease (work 2 sts together through front loops)
- BLO = back loop only
- st(s) = stitch(es)
- next st = next stitch
Recommended Products
As an Amazon Associate and member of other affiliate programs, I earn from qualifying purchases.


Share Your Work
Tag me on Instagram @handylittleme or use #handylittleme to show off your makes.
Join the Handy Little Me Facebook Group to share photos, ask questions, and connect with other makers.
Happy crocheting!
Want More Free Crochet Patterns?
- Crochet Mini Witch Hat Pattern (Free Printable)
- Crochet Cauldron Pattern (Free Printable)
- Crochet Ghost (Free Printable)
- Crochet Pumpkin Coaster (Free Printable)
- Crochet Halloween Garland (Free Printable)
- Crochet Ribbing Tutorial
- Crochet Witch Hat (Free Pattern)
- Pumpkin Crochet Pattern (Free, Easy + Adorable)
- Free Crochet Pumpkin Pattern For Beginners
- Crochet Pumpkin {Single Crochet Ribbing}
- Crochet Acorn Garland Free Pattern (Fall Decor)
- 41 Free Halloween Crochet Patterns (Cute + Spooky)
- The Best Crochet Halloween Costumes For Babies
- Crochet Granny Square Coaster Pattern (Free Printable)
- 30 Stylish Crochet Coaster Patterns (All Free!)
- Simple Circle Coaster Crochet Pattern (Free Printable)