Crochet Mini Witch Hat Pattern (Free Printable)
THIS ARTICLE CONTAINS AFFILIATE LINKS THAT SUPPORT HANDY LITTLE ME CONTENT AND FREE PATTERNS.Looking for a tiny dash of spooky-cute? This crochet mini witch hat pattern works up fast, uses scraps, and looks adorable on pets, dolls, costumes, or tucked into your Halloween décor.
If you’re new to crochet, don’t worry—the shaping is simple, the stitches are beginner-friendly, and you’ll make the whole hat in tidy continuous rounds so there are no seams to fuss over.
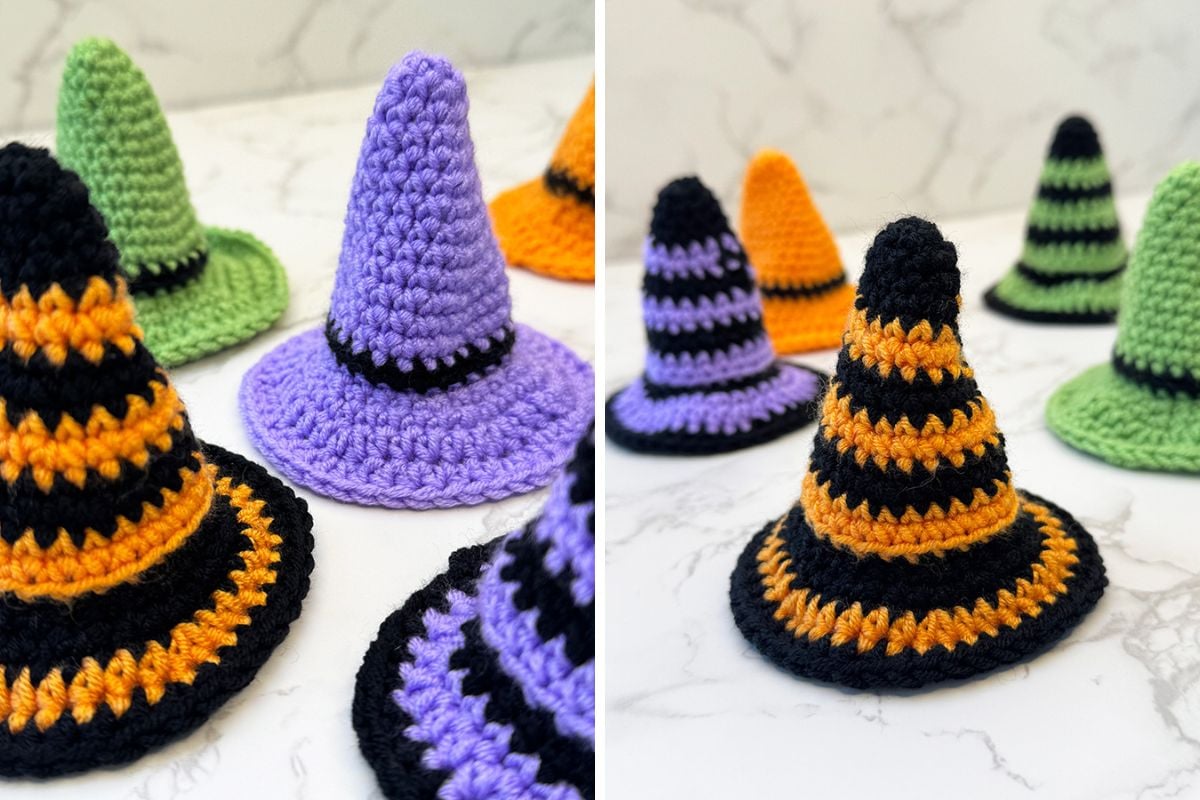
Think classic black (charcoal also looks chic) with a purple band—or play with stripes if you’re feeling fancy!
Before You Get Started
A few quick tips so your hat keeps its shape and charm:
- Gauge isn’t critical—just keep your tension firm so the cone stands up.
- Use a 4 mm/US G-6 hook and DK yarn; swap hook size to match your yarn choice.
- Move your stitch marker up as you go to keep track of the first st.
- Numbers in parentheses at the end of each round show stitch counts.
- You’ll work mostly in single crochet (sc) with simple inc (increases).
- Rounds are written as rnd in places for brevity.
- Note: You’ll create a ridge before the brim so it flares neatly.
- If your fabric curls or looks bumpy, that’s normal on the wrong side—blocking or light stiffener sorts it out.
Tools/Materials Needed
- DK weight yarn in black, purple, orange, or green (about 20–30g).
- Small amount of contrast for the band, plus a scrap of yellow/metallic for the optional buckle.
- 4 mm/US G-6 crochet hook.
- Tapestry needle & stitch marker.
- Optional: thin floral wire or pipe cleaner (for wired brim).

Abbreviations (US terms; UK in brackets)
- ch = chain
- sl st = slip stitch (UK ss) — also written slst
- sc = single crochet (UK dc)
- hdc = half double crochet (UK htr)
- inc = increase (2 sts in one st)
- BLO/FLO = back/front loop only (you’ll also see “front loop”)
- st(s) = stitch(es)
- MR = magic ring (also called magic circle)
- rnd = round
Worked in continuous rounds unless noted. Place a marker in the first st of each round and move it up as you go.
Size & Skill
- Skill level: Easy
- Size (as written): ~9–10 cm (3.5–4 in) tall; brim ~8–10 cm (3-4 in) across (varies with tension)

How To Crochet The Mini Witch Hat
Cone (Crown) — in black
R1: MR, 6 sc in ring (6)
R2: [sc, inc] x3 (9)
R3: sc around (9)
R4: [2 sc, inc] x3 (12)
R5: sc around (12)
R6: [3 sc, inc] x3 (15)
R7: sc around (15)
R8: [4 sc, inc] x3 (18)
R9: sc around (18)
R10: [5 sc, inc] x3 (21)
R11: sc around (21)
R12: [6 sc, inc] x3 (24)
R13–R14: sc around (24) — adds a bit of height
R15 (Ridge): BLO sc around (24). Sl st, fasten off.
That BLO row makes a tidy step so the brim can flare. You’ll use the FLO of R15 next.
Brim — join black to any front loop of R15
Work these rounds joined (join with sl st; ch 1 does not count as a stitch).
- Brim R1 (in FLO of R15): [sc 3, inc] x6 (30). Join.
- Brim R2: [sc 4, inc] x6 (36). Join.
- Brim R3: (switch to hdc) [hdc 5, inc] x6 (42). Join.
- Brim R4 (optional wider): [hdc 6, inc] x6 (48). Join.
- Finish: Sl st in next st, fasten off, weave in ends.
Optional wire edge: On the final brim round, hold the floral wire along the edge and crochet over it (keep tension even). Twist the wire ends and cover with a few extra stitches to hide.
Band & Buckle (Optional)
Band (contrast color):
Join yarn around the crown just above the ridge (any round between R13–R14 looks nice).
Ch 1, sc evenly around (aim for ~24 sts).
Join with sl st, fasten off, weave ends at the back.
Tiny buckle (yellow/metallic):
Ch 6, sl st to first ch to form a loop.
Ch 1, work 8 sc around the ring, sl st to first sc.
Pinch into a square and stitch to the band’s front.
No buckle? Tie on a slim ribbon bow for a sweet finish.

Striped Version (2-Round Alternating)
Color key:
Yarn A = black (main)
Yarn B = contrast (e.g., purple)
Cone (Rounds 1–15)
- R1–R4: Yarn A
- R5–R6: Yarn B
- R7–R8: Yarn A
- R9–R10: Yarn B
- R11–R12: Yarn A
- R13–R14: Yarn B
- R15 (ridge, BLO): Yarn B (keeps the ridge and brim transition crisp)
How to change colors cleanly (continuous rounds):
On the last stitch before a color change, complete the stitch with the new color on the final yarn-over (so the next stitch already shows the new color). Tug both tails gently to neaten. If you prefer a perfectly straight break in the stripe, end that round with a sl st, do an invisible finish, then start the next round with the new color in the next st.
Brim (Joined Rounds)
- Brim R1 (in FLO of R15): Yarn B
- Brim R2–R3: Yarn A
- Brim R4 (optional, wider): Yarn B
Carrying yarn: For short gaps, carry the unused color up the wrong side inside the cone; for the brim (joined rounds), it’s often neater to cut and rejoin.

Finishing & Stiffening (Optional)
- For extra structure, cut a card circle slightly smaller than the inside brim opening and slip it up into the cone (or glue it under the crown).
- Lightly brush the cone/brim with diluted PVA/fabric stiffener, shape, and let dry.
- To attach: sew to a hair clip, headband, or add elastic to tie under the chin (for pets/dolls).
- For a polished edge on joined rounds, use an invisible finish after the final join.
Adjustments
- Taller cone: Add more plain sc rounds before R15.
- Slimmer/pointier cone: Start with 4 sc in MR and follow the same increase logic (+3 per inc round).
- Wider brim: Add more brim rounds, continuing the +6 increases per round.
- Floppy brim: Use dc instead of hdc on later brim rounds.
- Color play: Add stripes to the cone or swap the band color.
FAQs & Extra Tips
- Do I need a specific gauge? Not really. Keep it firm so the hat stands—swap hook size if needed.
- Why does my ridge show? That’s the BLO row at R15—it’s meant to! It helps the brim flare cleanly.
- Which side is which? If you see a spiral and your fabric curls, that’s normal; consider it the wrong side and face it inward.
- Can I work in joined rounds for the cone? You can, but continuous rounds make the shaping smoother. Mark the first st every round.
- How do I count rounds? Check the end of each round for the number in parentheses—that’s your stitch count.
- Troubleshooting gaps at joins? Use a neat sl st into the next st, or finish with an invisible finish.
Grab all 7 of my Halloween Crochet Patterns here…
Free Printable
Want to keep this crochet mini witch hat pattern handy while you crochet?
Grab the free printable version of the pattern below!
Whether you’re curled up on the couch or taking your project on the go, this easy-to-follow card makes it simple to work through each round at your own pace.
Mini Witch Hat Crochet Pattern

Whip up a spooky-cute mini crochet witch hat using DK yarn and a 4 mm/US G-6 hook.
The cone is worked in continuous rounds for smooth shaping, with a neat ridge and flared brim.
Add a contrast band, buckle, or stripes—and finish with optional wire for structure.
Materials
- DK weight yarn in black, green, purple or orange (about 20–30 g)
- Small amount of contrast for band, plus a scrap of yellow/metallic for buckle (optional)
Tools
- 4 mm/US G-6 crochet hook
- Tapestry needle & stitch marker
- Optional: thin floral wire or pipe cleaner (for wired brim)
Instructions
How to Crochet the Mini Witch Hat
Worked in continuous rounds unless noted.
Place a marker in the first st of each round and move it up as you go.
Cone (Crown) — in black
- R1: MR, 6 sc in ring (6)
- R2: [sc, inc] x3 (9)
- R3: sc around (9)
- R4: [2 sc, inc] x3 (12)
- R5: sc around (12)
- R6: [3 sc, inc] x3 (15)
- R7: sc around (15)
- R8: [4 sc, inc] x3 (18)
- R9: sc around (18)
- R10: [5 sc, inc] x3 (21)
- R11: sc around (21)
- R12: [6 sc, inc] x3 (24)
- R13–R14: sc around (24) — adds a bit of height
- R15 (Ridge): BLO sc around (24). Sl st, fasten off.
That BLO row makes a tidy step so the brim can flare. You’ll use the FLO of R15 next.
Brim — join black to any front loop of R15
Work these rounds joined (join with sl st; ch 1 does not count as a stitch).
- Brim R1 (in FLO of R15): [sc 3, inc] x6 (30). Join.
- Brim R2: [sc 4, inc] x6 (36). Join.
- Brim R3: (switch to hdc) [hdc 5, inc] x6 (42). Join.
- Brim R4 (optional wider): [hdc 6, inc] x6 (48). Join.
- Finish: Sl st in next st, fasten off, weave in ends.
Optional wire edge: On the final brim round, hold floral wire along the edge and crochet over it (keep tension even).
Twist wire ends and cover with a few extra stitches to hide.
Band & Buckle (Optional)
Band (contrast color):
Join yarn around the crown just above the ridge (any round between R13–R14 looks nice).
Ch 1, sc evenly around (aim for ~24 sts).
Join with sl st, fasten off, weave ends at the back.
Tiny buckle (yellow/metallic):
Ch 6, sl st to first ch to form a loop.
Ch 1, work 8 sc around the ring, sl st to first sc.
Pinch into a square and stitch to the band’s front.
No buckle? Tie on a slim ribbon bow for a sweet finish.
Striped Version (2-Round Alternating)
Color key: Yarn A = black (main) / Yarn B = contrast (e.g., purple)
Cone (Rounds 1–15)
- R1–R4: Yarn A
- R5–R6: Yarn B
- R7–R8: Yarn A
- R9–R10: Yarn B
- R11–R12: Yarn A
- R13–R14: Yarn B
- R15 (ridge, BLO): Yarn B (keeps the ridge and brim transition crisp)
How to change colors cleanly (continuous rounds): On the last stitch before a color change, complete the stitch with the new color on the final yarn-over (so the next stitch already shows the new color).
Tug both tails gently to neaten. If you prefer a perfectly straight break in the stripe, end that round with a sl st, do an invisible finish, then start the next round with the new color in the next st.
Brim (Joined Rounds)
- Brim R1 (in FLO of R15): Yarn B
- Brim R2–R3: Yarn A
- Brim R4 (optional, wider): Yarn B
Carrying yarn: For short gaps, carry the unused color up the wrong side inside the cone; for the brim (joined rounds), it’s often neater to cut and rejoin.
Finishing & Stiffening (Optional)
- For extra structure, cut a card circle slightly smaller than the inside brim opening and slip it up into the cone (or glue it under the crown).
- Lightly brush the cone/brim with diluted PVA/fabric stiffener, shape, and let dry.
- To attach: sew to a hair clip, headband, or add elastic to tie under the chin (for pets/dolls).
- For a polished edge on joined rounds, use an invisible finish after the final join.
Adjustments
- Taller cone: Add more plain sc rounds before R15.
- Slimmer/pointier cone: Start with 4 sc in MR and follow the same increase logic (+3 per inc round).
- Wider brim: Add more brim rounds, continuing the +6 increases per round.
- Floppy brim: Use dc instead of hdc on later brim rounds.
- Color play: Add stripes to the cone or swap the band color.
Notes
Abbreviations (US terms; UK in brackets)
- ch = chain
- sl st = slip stitch (UK ss) — also written slst
- sc = single crochet (UK dc)
- hdc = half double crochet (UK htr)
- inc = increase (2 sts in one st)
- BLO/FLO = back/front loop only (you’ll also see “front loop”)
- st(s) = stitch(es)
- MR = magic ring (also called magic circle)
- rnd = round
Size & Skill
- Skill level: Easy
- Size (as written): ~9–10 cm (3.5–4 in) tall; brim ~8–10 cm (3-4 in) across (varies with tension)
Recommended Products
As an Amazon Associate and member of other affiliate programs, I earn from qualifying purchases.


Share & Use
This free pattern is for personal use only.
Please do not copy the full text elsewhere; copyright remains with the designer.
You may sell a few finished items locally—credit and link back are appreciated.
Tag me on Instagram @handylittleme or use #handylittleme to show off your makes.
Join the Handy Little Me Facebook Group to share photos, ask questions, and connect with other makers.
Happy crocheting!
Want More Free Crochet Patterns?
- Crochet Cauldron Pattern (Free Printable)
- Crochet Ghost (Free Printable)
- Crochet Witch Hat (Free Pattern)
- Eyeball Crochet Coaster Pattern (Free Printable)
- Crochet Halloween Garland (Free Printable)
- Crochet Pumpkin Coaster (Free Printable)
- Crochet Ghost (Free Printable)
- The Best Crochet Halloween Costumes For Babies
- Crochet Ribbing Tutorial
- Pumpkin Crochet Pattern (Free, Easy + Adorable)
- Free Crochet Pumpkin Pattern For Beginners
- Crochet Pumpkin {Single Crochet Ribbing}
- Crochet Acorn Garland Free Pattern (Fall Decor)
- 41 Free Halloween Crochet Patterns (Cute + Spooky)
