Crochet Halloween Garland (Free Printable)
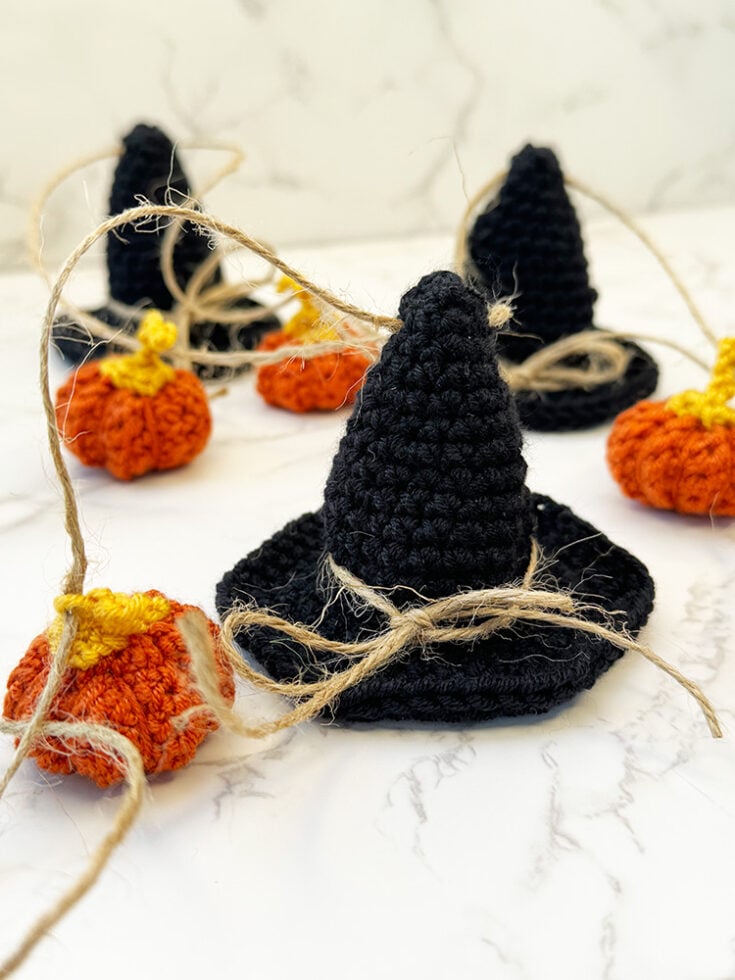
THIS ARTICLE CONTAINS AFFILIATE LINKS THAT SUPPORT HANDY LITTLE ME CONTENT AND FREE PATTERNS.Want a quick, cozy project to spook-ify your space? This crochet garland threads together mini black witch hats and little pumpkins on twine—perfect for mantels, doorways, shelves, or party bunting.
It’s beginner-friendly, uses small amounts of yarn you probably already have, and the motifs work up fast (hello, weekend make!).
Follow the step-by-step instructions below for each motif, then string everything into the cutest Halloween decoration.
This pattern walks you through the witch hat (cone + brim), a super-squishy ribbed pumpkin in orange, and simple finishing.
If you’re new to reading patterns, don’t worry—I call out stitches like sc, hdc, ch, and sl st as we go, with tips for neat edges and sturdy shapes.

Before You Get Started
A few handy notes:
- Skill level: Easy
- Gauge: Not critical—work firmly so shapes hold.
- Size (witch hat as written): ~9–10 cm (3.5–4 in) tall; brim ~12–14 cm (4.75–5.5 in) across (varies with tension).
- Make your garland as long as you like—repeat motifs until it fits your space.
- For a subtle sparkle, try a strand like Lion Brand Vanna’s Glamour for the hat band or buckle.
- Share your make on Instagram and tag me—I love seeing your bunting and garlands!
Tools/Materials
- Yarn(s):
- DK weight in black (~20–30 g) for hats
- DK in orange for pumpkins
- Hook: 4 mm/US G-6 crochet hook
- Notions: tapestry needle, stitch marker, twine/string or thin cord for the crochet garland.
- Optional shaping/stiffening: thin floral wire or pipe cleaner (brim), cardboard/plastic circle (6–7 cm) for crown, fabric/PVA stiffener.
- Optional display: mini sewing clips or pegs for hanging, or thread motifs directly onto twine.

Abbreviations (US terms; UK in brackets)
- ch = chain
- sl st = slip stitch
- sc = single crochet (UK dc)
- hdc = half double crochet (UK htr)
- inc = increase (2 sts in one st)
- BLO/FLO = back/front loop only
- st(s) = stitch(es)
- MR = magic ring
Notes:
- Worked in continuous rounds unless noted. Place a marker in the first st of each round and move it up.
- Keep tension firm for crisp edges and perky points.

Witch Hat: Step-By-Step (Cone + Brim)
Cone (Crown) — Yarn: black
- R1: MR, 6 sc in ring (6)
- R2: [sc, inc] x3 (9)
- R3: sc around (9)
- R4: [2 sc, inc] x3 (12)
- R5: sc around (12)
- R6: [3 sc, inc] x3 (15)
- R7: sc around (15)
- R8: [4 sc, inc] x3 (18)
- R9: sc around (18)
- R10: [5 sc, inc] x3 (21)
- R11: sc around (21)
- R12: [6 sc, inc] x3 (24)
- R13–R14: sc around (24) — adds a bit of height
- R15 (Ridge): BLO sc around (24). Sl st, fasten off.
The BLO round makes a neat ridge for the brim to flare from. You’ll use the front loops of R15 next.
Brim — Join black to any FLO of R15
Work these in joined rounds; join with sl st each round. Ch 1 does not count as a stitch.
- Brim R1 (in FLO of R15): [sc 3, inc] x6 (30). Join.
- Brim R2: [sc 4, inc] x6 (36). Join.
- Brim R3 (switch to hdc): [hdc 5, inc] x6 (42). Join.
- Brim R4 (optional wider): [hdc 6, inc] x6 (48). Join.
- Finish: Sl st in next st, fasten off, weave in ends.
Optional wire edge: Cut floral wire to brim circumference. On the final round, hold wire along the edge and crochet over it with even tension. Twist wire ends together and cover with a few extra sl st/sc to hide.
Optional twine band:
- Cut a length of twine and tie in a bow around the widest section of the hat (see the photos for reference).

Mini Pumpkin: Step-By-Step (Ribbed)
Yarn: DK in orange
- Foundation: ch 8.
- Row 1: 1 sc in 2nd ch from hook, sc across; ch 1, turn.
- Row 2: BLO sc to end; ch 1, turn.
- Repeat Row 2 until the piece measures ~4 in (≈10 cm).
- Join the ends: Fold in half; sc across through both layers to form a tube (or seam using the mattress stitch).
- Bottom gather: Break yarn, leaving a tail. With a needle, run a gathering stitch around one open edge; pull tight to close and secure. Turn the right side out.
- Stuff: Add fiberfill.
- Top gather: With a new tail, run stitches around the top opening; pull tight to close and secure.
- Shape segments: Cut a long length of yarn; thread from top through bottom and wrap around the pumpkin 4–6 times, cinching into grooves. Knot securely, adjust spacing, weave in ends.
Stem Base (ochre)
- Ch 2, turn.
- Row 1: 6 sc in 2nd ch from hook, sl st to close; fasten off and secure.
Stem (ochre)
- ch 4, fasten off (a cute nubby stem).
Making Up
- Stitch the stem base to the top center.
- Stitch the stem onto the base.
- Weave in ends. (Refer to photos if needed.)
Make the Garland (Assembly)
- Plan your spacing: Lay out motifs (e.g., hat, pumpkin, hat, pumpkin…) for even loops and balance.
- Stringing: Cut twine/cord to your desired length (add extra for tying).
- Attach motifs:
- Thread method: Use a needle to pass the twine through a few hidden loops at the back of each motif.
- Hanging method: Add a small ch loop behind the hat crown or pumpkin seam and thread onto twine.
- Secure: Add a tiny sewing stitch or sl st around the twine if a motif wants to slide.
- Display: Hang across mantels, shelves, or door frames. Add fairy lights, bats, or tiny ghosts for extra charm.

FAQs & Tips
How many motifs do I need?
For a standard mantel (~150–180 cm), try 5–7 pumpkins and 4–6 hats. Adjust to your own taste.
My hat brim curls—help!
Light blocking or a quick coat of fabric/PVA stiffener helps.
The optional wire edge also keeps brims flat and jaunty.
Can I change sizes?
Yes! Add/remove increase rounds in the cone or one extra hdc increase round in the brim.
For pumpkins, make the starting ch longer and the fabric wider.
Best yarns for this?
DK acrylic or blends hold shape well.
Add sparkle with Lion Brand Vanna’s Glamour for bands/buckles or speckled yarns for pumpkins.
What hook and mm size are you using?
A 4 mm hook (US G/6) for DK weight.
Go down a size if your fabric isn’t firm.
Do I need an exact gauge?
No—just keep it firm so the cone stands up and pumpkins keep their shape.
Can I make it kid-safe?
Skip wire edges; use sewn-on features.
Secure motifs tightly to the twine.
Grab all 7 of my Halloween Crochet Patterns here…

Free Printable
Want to keep this pattern handy while you crochet?
Grab the free printable version of the pattern below!
Whether you’re curled up on the couch or taking your project on the go, this easy-to-follow card makes it simple to work through each round at your own pace.
Crochet Halloween Garland
Crochet a Halloween garland with mini witch hats and pumpkins.
Beginner-friendly, quick makes, perfect for scrap yarn and festive home decor.
Materials
- DK weight in black (~20–30 g) for hats
- DK in orange for pumpkins
Tools
- Hook: 4 mm/US G-6 crochet hook
- Notions: tapestry needle, stitch marker, twine/string or thin cord for the crochet garland.
- Optional shaping/stiffening: thin floral wire or pipe cleaner (brim), cardboard/plastic circle (6–7 cm) for crown, fabric/PVA stiffener.
- Optional display: mini sewing clips or pegs for hanging, or thread motifs directly onto twine.
Instructions
Notes:
- Worked in continuous rounds unless noted. Place a marker in the first st of each round and move it up.
- Keep tension firm for crisp edges and perky points.
Witch Hat: Step-By-Step (Cone + Brim)
Cone (Crown) — Yarn: black
- R1:MR, 6 sc in ring (6)
- R2: [sc, inc] x3 (9)
- R3:sc around (9)
- R4: [2 sc, inc] x3 (12)
- R5:sc around (12)
- R6: [3 sc, inc] x3 (15)
- R7:sc around (15)
- R8: [4 sc, inc] x3 (18)
- R9:sc around (18)
- R10: [5 sc, inc] x3 (21)
- R11:sc around (21)
- R12: [6 sc, inc] x3 (24)
- R13–R14:sc around (24) — adds a bit of height
- R15 (Ridge):BLO sc around (24). Sl st, fasten off.
The BLO round makes a neat ridge for the brim to flare from. You’ll use the front loops of R15 next.
Brim — Join black to any FLO of R15
Work these in joined rounds; join with sl st each round. Ch 1 does not count as a stitch.
- Brim R1 (in FLO of R15): [sc 3, inc] x6 (30). Join.
- Brim R2: [sc 4, inc] x6 (36). Join.
- Brim R3 (switch to hdc): [hdc 5, inc] x6 (42). Join.
- Brim R4 (optional wider): [hdc 6, inc] x6 (48). Join.
- Finish: Sl st in next st, fasten off, weave in ends.
Optional wire edge: Cut floral wire to brim circumference. On the final round, hold wire along the edge and crochet over it with even tension. Twist wire ends together and cover with a few extra sl st/sc to hide.
Optional twine band:
- Cut a length of twine and tie in a bow around the widest section of the hat (see the photos for reference).
Mini Pumpkin: Step-By-Step (Ribbed)
Yarn: DK in orange
- Foundation:ch 8.
- Row 1: 1 sc in 2nd ch from hook, sc across; ch 1, turn.
- Row 2:BLO sc to end; ch 1, turn.
- Repeat Row 2 until the piece measures ~4 in (≈10 cm).
- Join the ends: Fold in half; sc across through both layers to form a tube (or seam using the mattress stitch).
- Bottom gather: Break yarn, leaving a tail. With a needle, run a gathering stitch around one open edge; pull tight to close and secure. Turn the right side out.
- Stuff: Add fiberfill.
- Top gather: With a new tail, run stitches around the top opening; pull tight to close and secure.
- Shape segments: Cut a long length of yarn; thread from top through bottom and wrap around the pumpkin 4–6 times, cinching into grooves. Knot securely, adjust spacing, weave in ends.
Stem Base (ochre)
- Ch 2, turn.
- Row 1: 6 sc in 2nd ch from hook, sl st to close; fasten off and secure.
Stem (ochre)
- ch 4, fasten off (a cute nubby stem).
Making Up
- Stitch the stem base to the top center.
- Stitch the stem onto the base.
- Weave in ends. (Refer to photos if needed.)
Make the Garland (Assembly)
- Plan your spacing: Lay out motifs (e.g., hat, pumpkin, hat, pumpkin…) for even loops and balance.
- Stringing: Cut twine/cord to your desired length (add extra for tying).
- Attach motifs:
- Thread method: Use a needle to pass the twine through a few hidden loops at the back of each motif.
- Hanging method: Add a small ch loop behind the hat crown or pumpkin seam and thread onto twine.
- Secure: Add a tiny sewing stitch or sl st around the twine if a motif wants to slide.
- Display: Hang across mantels, shelves, or door frames. Add fairy lights, bats, or tiny ghosts for extra charm.
Notes
Abbreviations (US terms; UK in brackets)
- ch = chain
- sl st = slip stitch
- sc = single crochet (UK dc)
- hdc = half double crochet (UK htr)
- inc = increase (2 sts in one st)
- BLO/FLO = back/front loop only
- st(s) = stitch(es)
- MR = magic ring
Recommended Products
As an Amazon Associate and member of other affiliate programs, I earn from qualifying purchases.


Share & Use
Enjoy your charming Halloween decoration—a cheerful mix of hats, little pumpkins, and cozy fall vibes.
This free pattern is for personal use only.
Please do not copy the full text elsewhere; copyright remains with the designer.
You may sell a few finished items locally—credit and link back are appreciated.
Tag me on Instagram @handylittleme or use #handylittleme to show off your makes.
Join the Handy Little Me Facebook Group to share photos, ask questions, and connect with other makers.
Happy crocheting!
Want More Free Crochet Patterns?
- Crochet Mini Witch Hat Pattern (Free Printable)
- Eyeball Crochet Coaster Pattern (Free Printable)
- Crochet Pumpkin Coaster (Free Printable)
- Crochet Ghost (Free Printable)
- Crochet Witch Hat (Free Pattern)
- Crochet Cauldron Pattern (Free Printable)
- The Best Crochet Halloween Costumes For Babies
- Crochet Ribbing Tutorial
- Pumpkin Crochet Pattern (Free, Easy + Adorable)
- Free Crochet Pumpkin Pattern For Beginners
- Crochet Pumpkin {Single Crochet Ribbing}
- Crochet Acorn Garland Free Pattern (Fall Decor)
- 41 Free Halloween Crochet Patterns (Cute + Spooky)