How To Crochet A Hat (Free Beginner Pattern)
THIS ARTICLE CONTAINS AFFILIATE LINKS THAT SUPPORT HANDY LITTLE ME CONTENT AND FREE PATTERNS.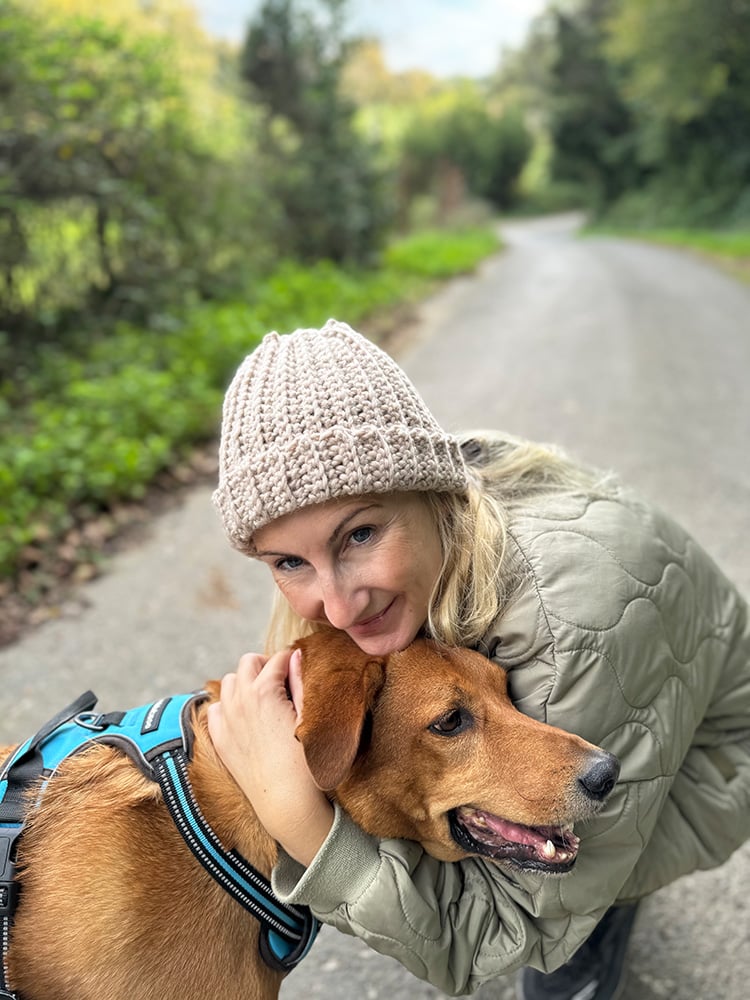
What You’ll Need
Yarn
- Bulky yarn works best for beginners. It’s easier to see your stitches, and the hat will work up quickly. Choose a soft yarn like acrylic, wool, or a blend.
- 1 Skein of The Petite Wool from We Are Knitters.
- Each ball is 100 GR. 153yds. 140 M. 100% Peruvian wool.
- The yarn weight is bulky weight yarn/chunky yarn/12 ply.
Crochet Hook
- The size of your hook should match your yarn.
- For bulky yarn, use a (US L-11) / 8 mm crochet hook.
Notions
- Scissors: To trim your yarn when finished.
- Tapestry Needle: To weave in the ends and sew the top of the hat closed if necessary.
- Measuring Tape: To check your gauge and hat size.
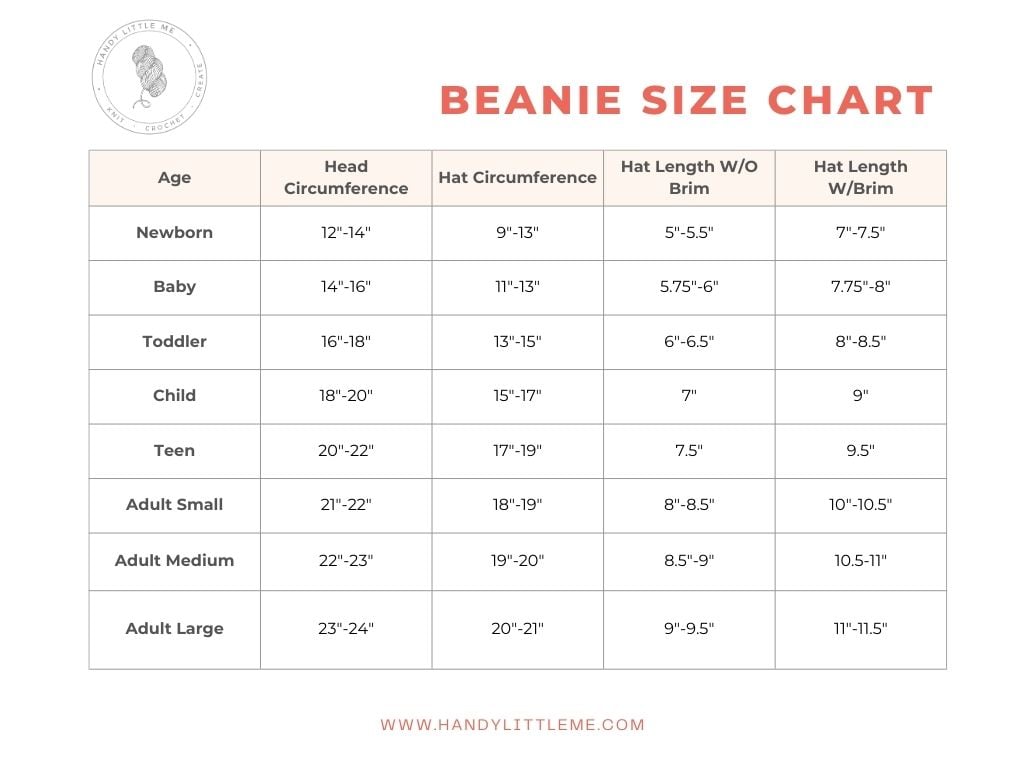
Size Information
- The numbers start with the smallest size; it’s best to highlight or circle the numbers for your size in the pattern.
- Head Circumference (in): The measurement of the wearer’s head.
- Hat Circumference (in): The width of the hat when laid flat (unstretched).
- Hat Length (in): Height of the finished beanie.
- Yarn Weight: Bulky yarn (weight category 5).
- Gauge: 12 sts and 16 rows in 4 × 4 inches / 10 x 10 cm in pattern.
Crochet Abbreviations
This pattern is written using US terms and abbreviations.
You can find a list of UK and US terms and abbreviations here.
- BLO – Back loop only
- CH – Chain
- Cont – Continue
- SC – Single crochet stitches
- Sc2tog – Single crochet decrease (single crochet two stitches together. Insert hook into stitch and draw up a loop. Insert hook into next stitch and draw up a loop. Yarn over, draw through all 3 loops on hook.)
- Rem – Remaining
- Rep – Repeat
- St(s) – Stitches
- SL ST – slip stitch
Pattern Notes
Before you start, decide on the type of hat you want to make.
The most common beginner hat style is a simple beanie.
In this guide, we’ll show you how to crochet a beanie flat, an easy method that creates a rectangle to be seamed.
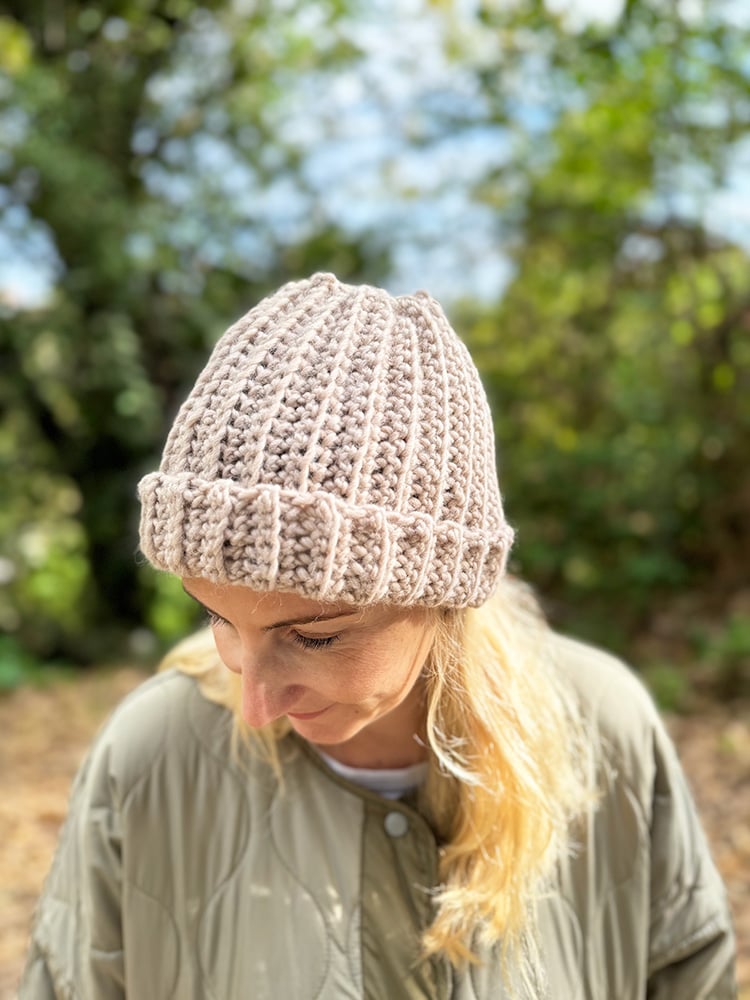
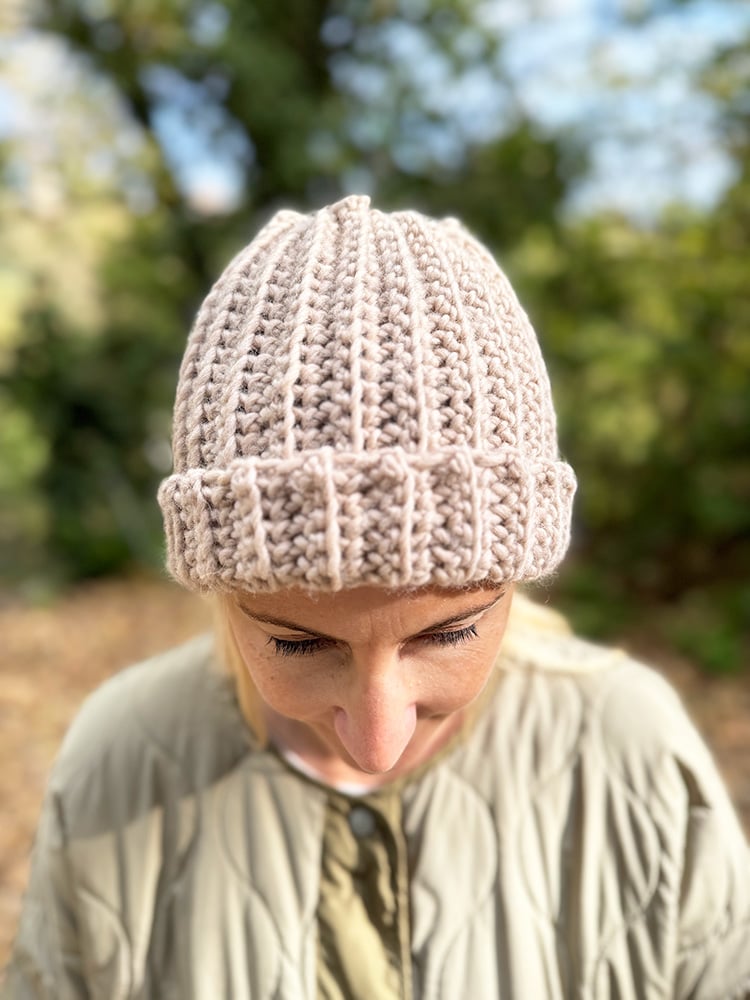
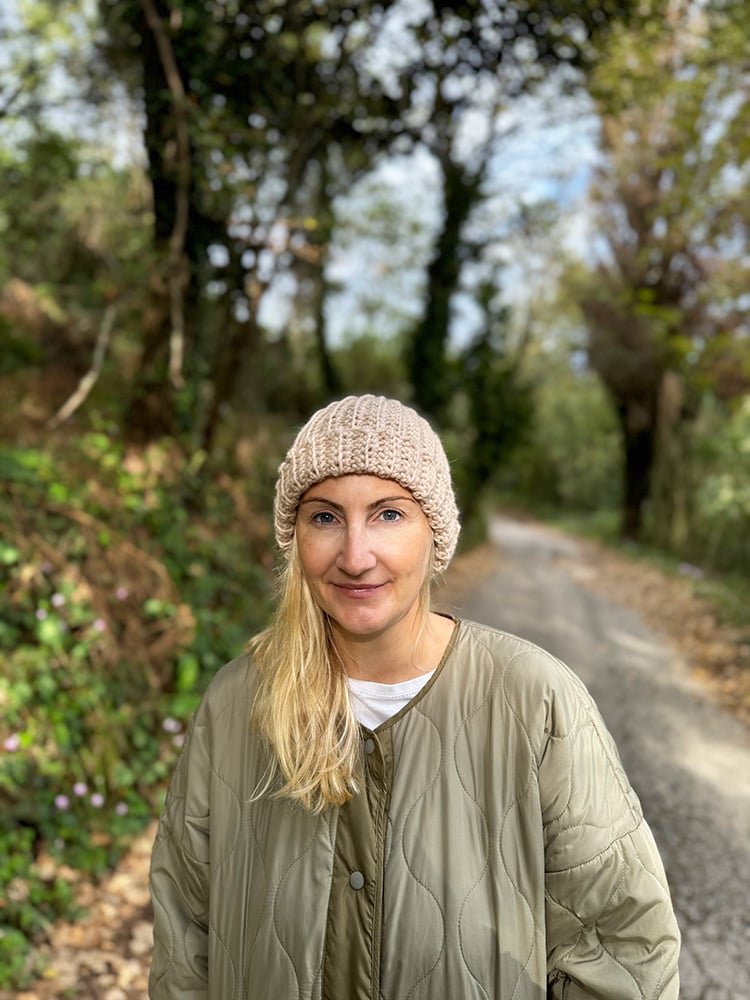
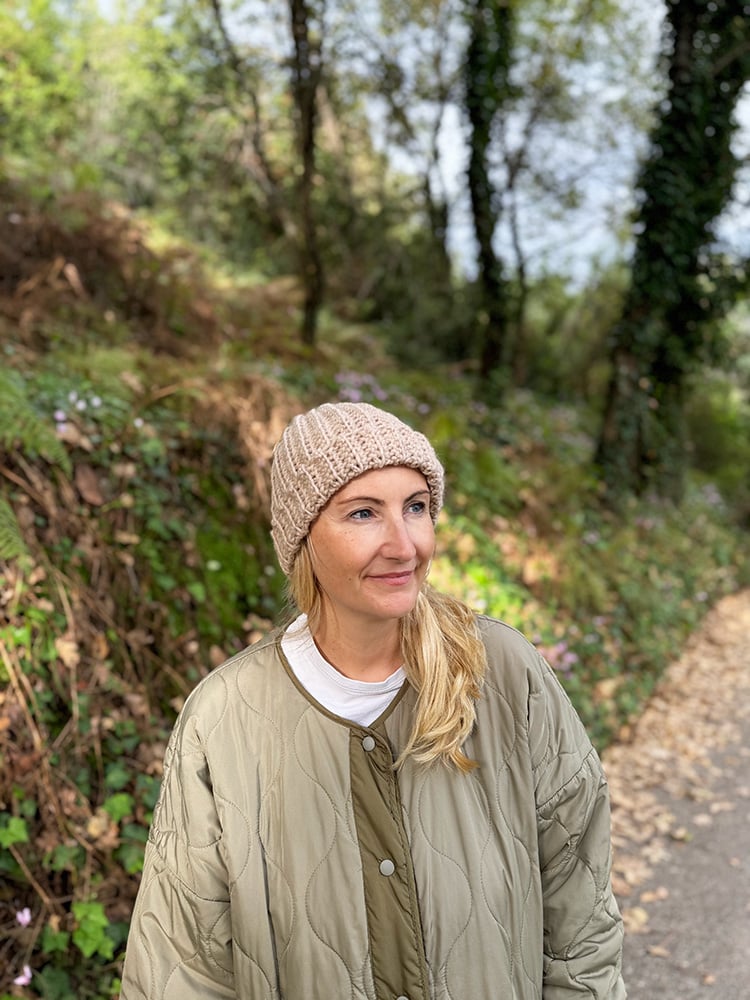
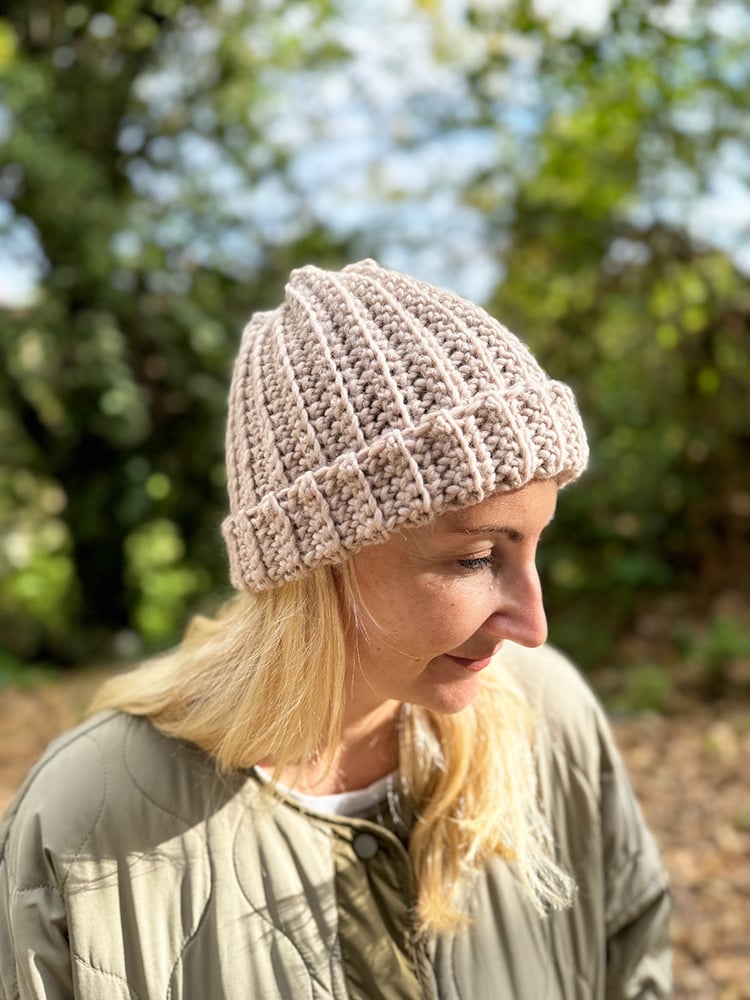
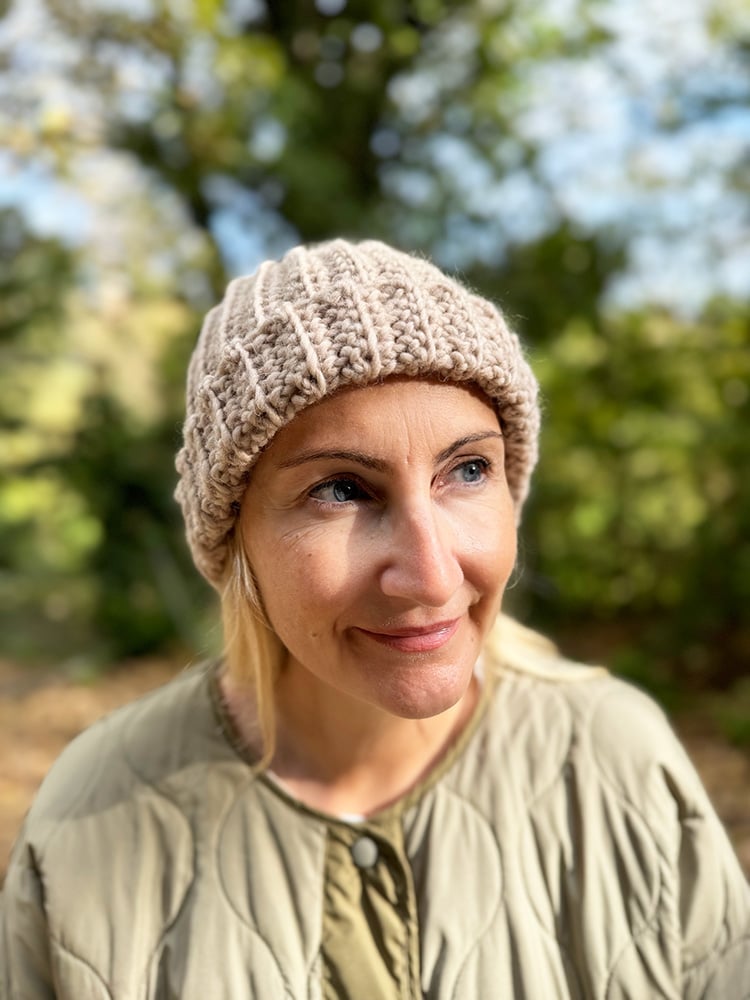
The hat in the tutorial photos below is an adult medium, but all sizes are listed, so you can make one for the whole family.
You can grab the ad-free printable PDF with all important photos in my shop here.
Pattern Instructions
Create a chain and choose your size
To begin, make a slipknot and create a chain (CH).
This chain is the foundation row of your project, which you will build on.
With your hook and yarn, you will chain 20 (22, 24, 26, 28, 28, 30, 32).
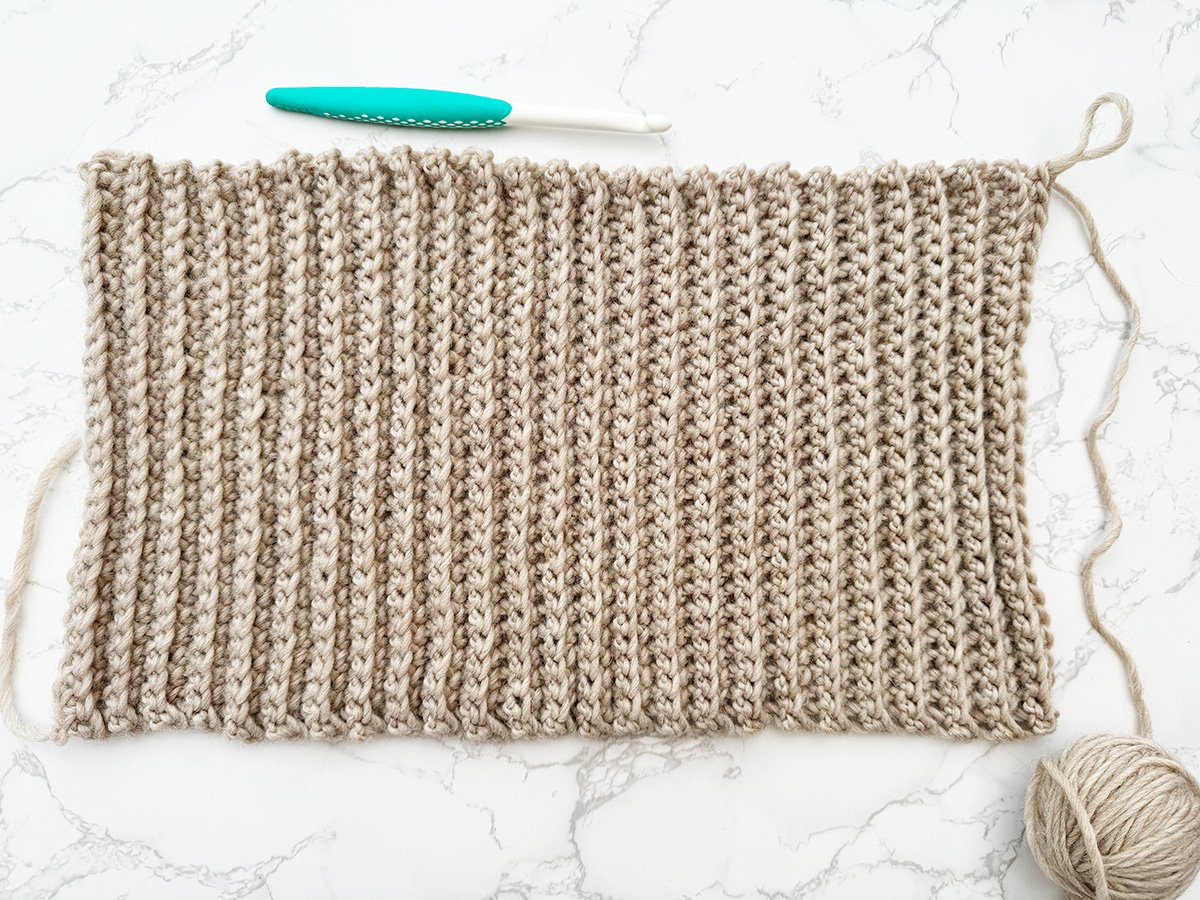
Work the ribbing for the main body of the hat
Row 1: For the first row, you will work 1 single crochet (SC) into the 2nd chain (CH) from the hook and in each chain (CH) to the end of the row and turn the work ready for row 2.
Row 2: Chain (CH) 1 stitch, then create 1 single crochet (SC) in each stitch (st) through the back loop (BLO), repeat this to the end of the row, and turn the work.
Repeat: Repeat row 2 until the work measures = 13″ (13″, 15″, 17″, 19″, 19″, 20″, 21″) in width. *Please note – refer to the chart for the size you are making for the head circumference.
*Do not cut the yarn, as you will use it to continue the next section.
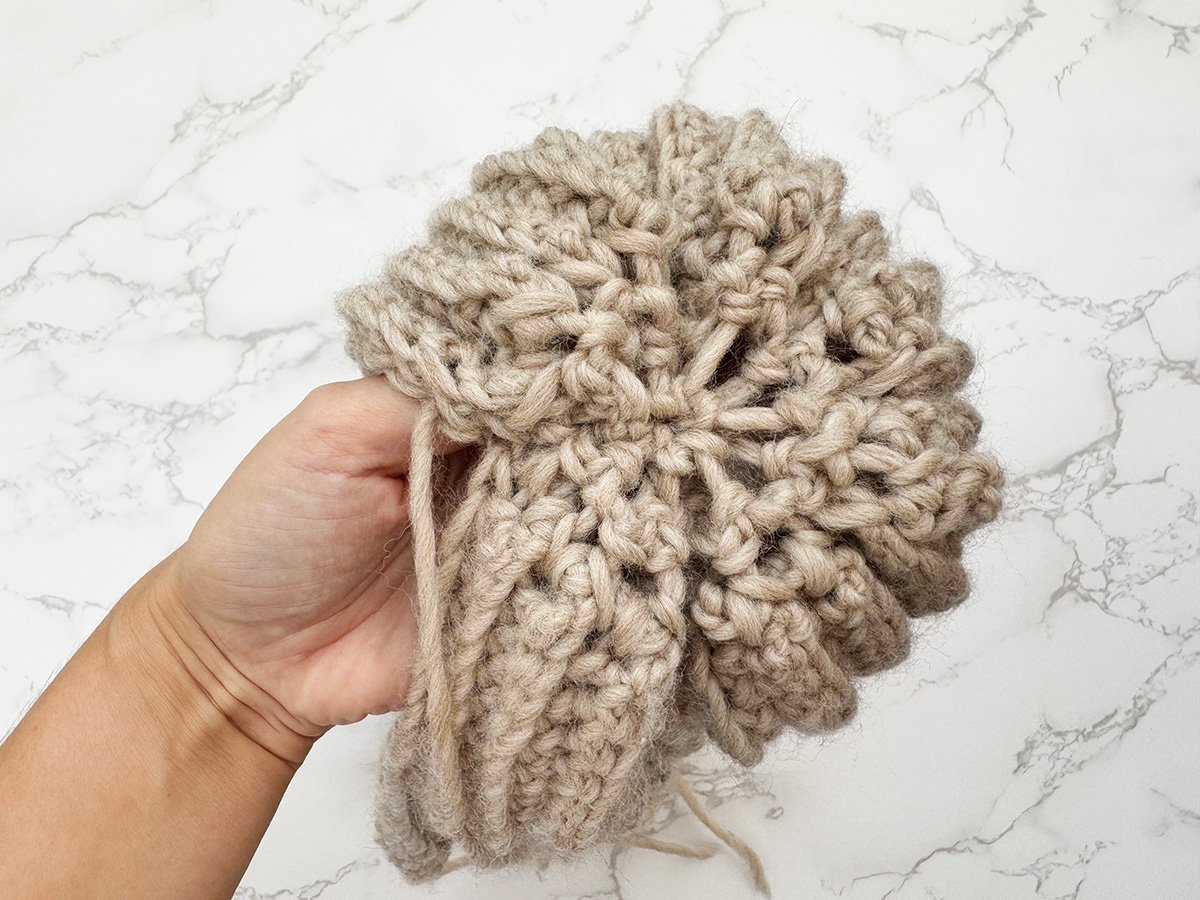
Decrease the top of the hat
You will now add a few sc decrease (sc2tog) rows to the top to shape the hat and avoid forming a bulky gathered crown.
Row 1: Ch 1, work sc2tog across the width edge of the hat, sl st to the first sc, and turn.
Repeat row 1 – once more for all sizes.
Once you have finished your rows of decreases, sl st into the final st and leave a long yarn tail for seaming.

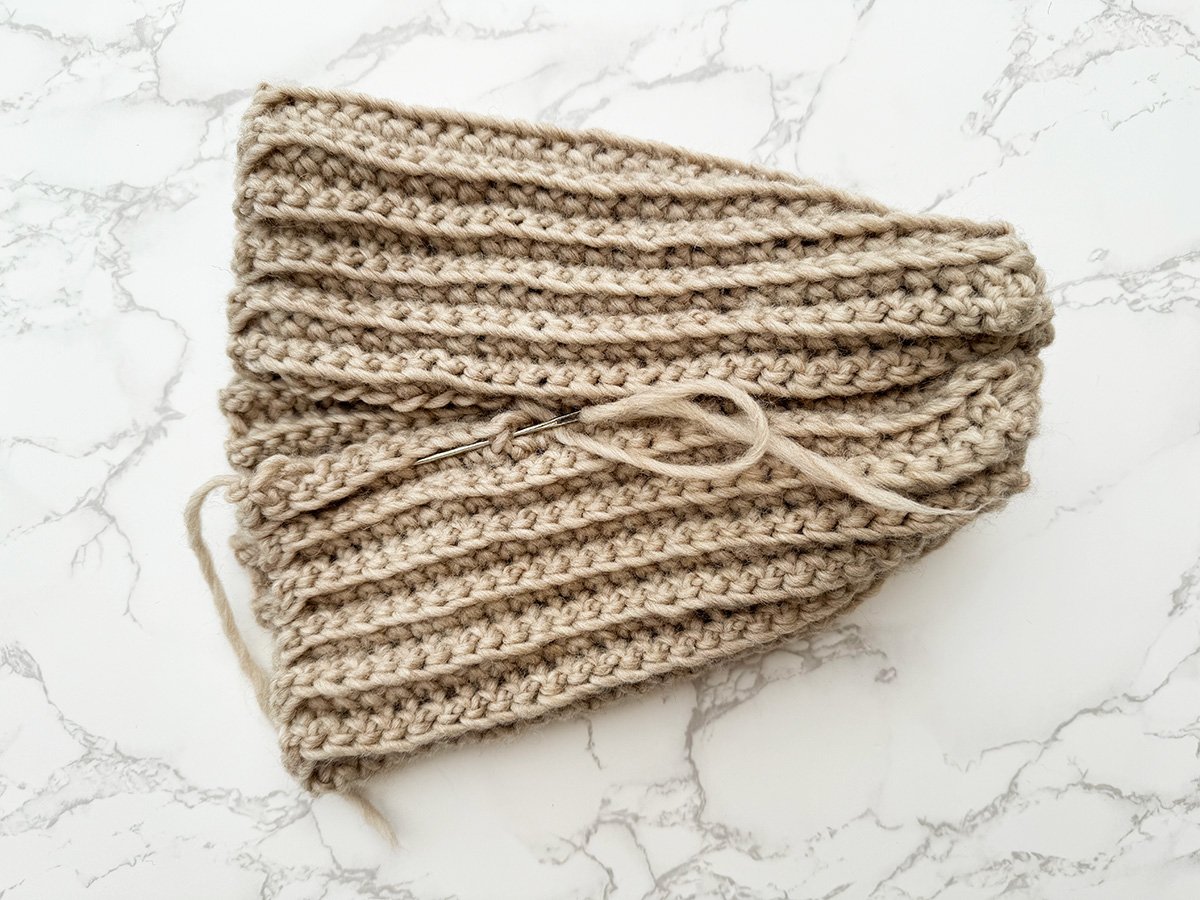
Close the top of the hat
Thread the yarn tail through your yarn needle and weave in and out of the last row of sc2tog.
Pull up tight to close the top of the hat.
Seam the edges together
Next, start seaming using the mattress stitch to create an invisible seam.
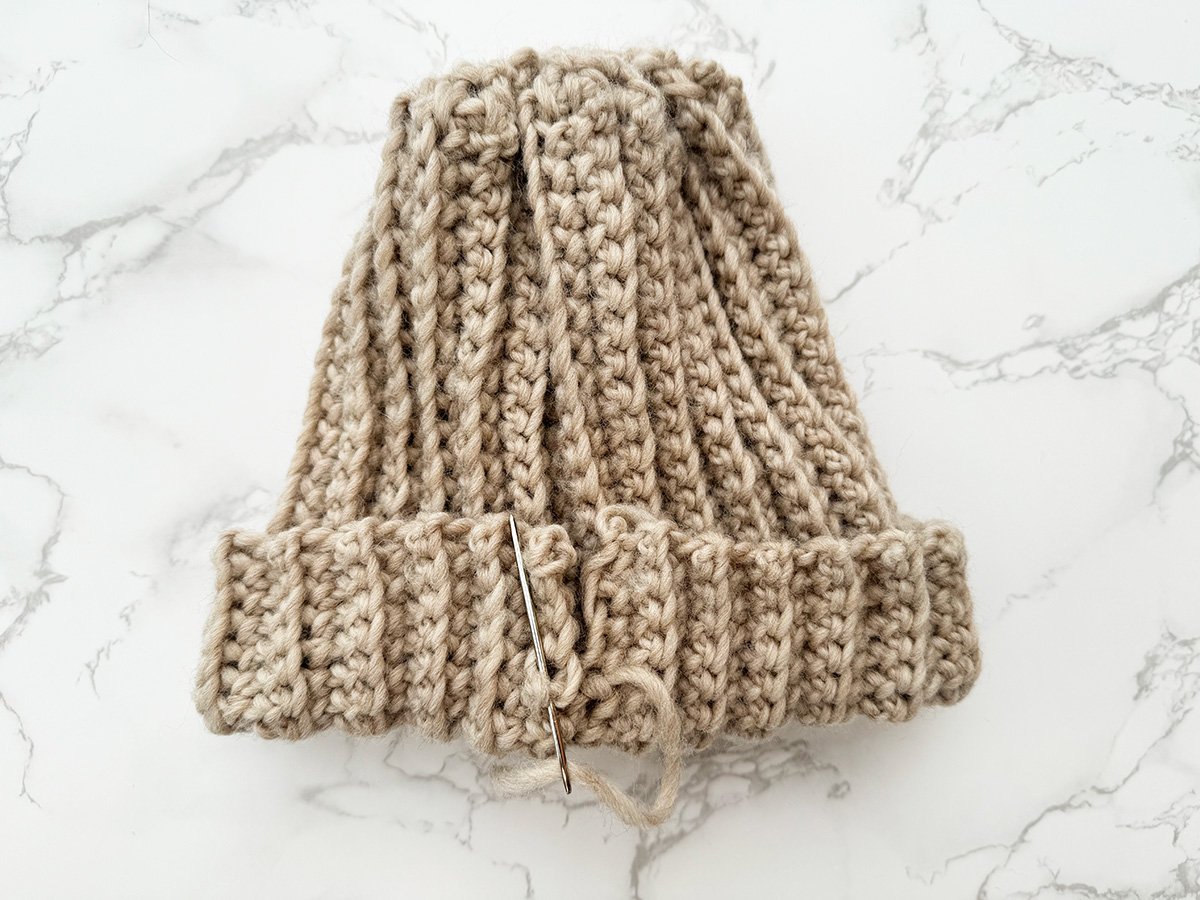
Turn up the brim and seam
Stop when you have 2″ left and turn the brim upwards, then seam the brim the same way with the right sides facing you.
Secure and weave in all loose ends.
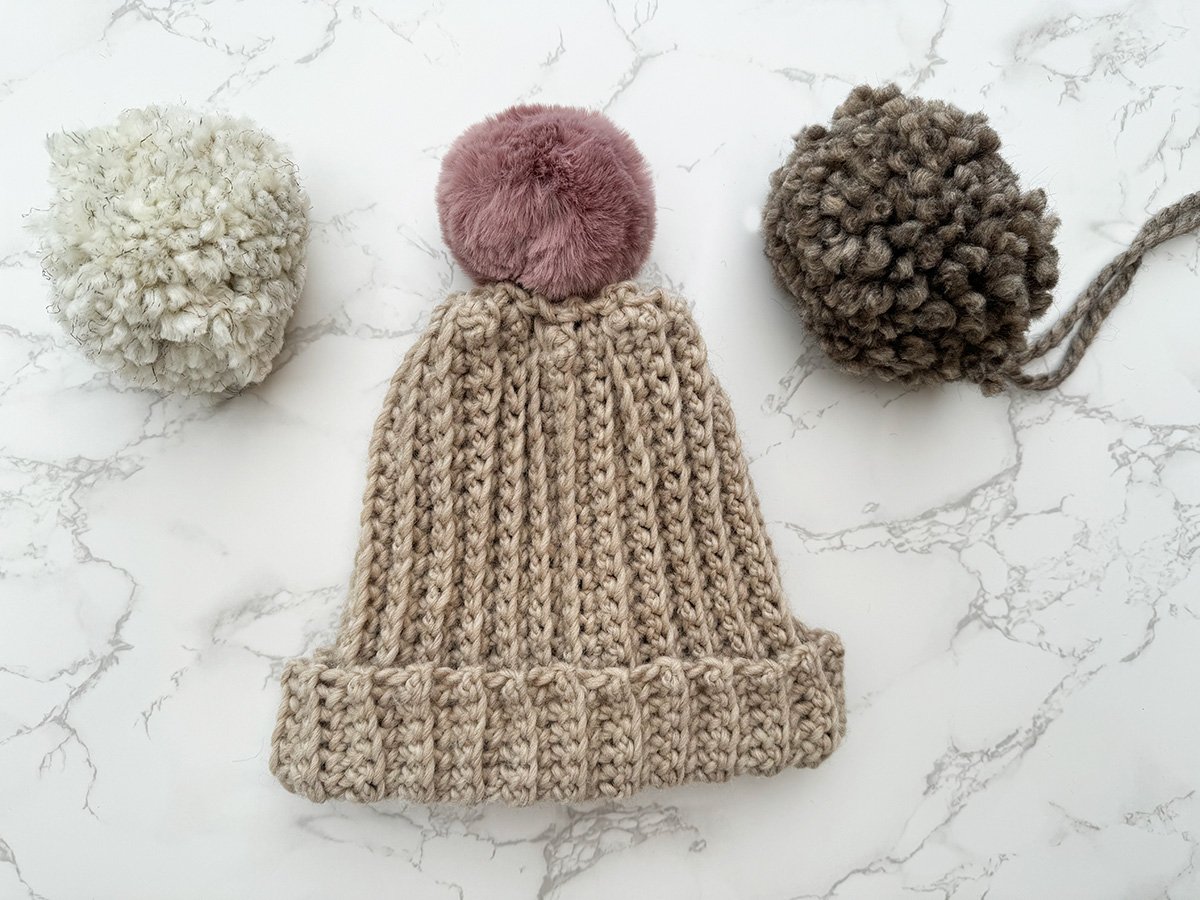
Optional – add a pom pom
If you want to add a fun touch, you can create a yarn pom-pom and sew it to the top of your hat.
There are many tutorials online to make pom-poms using a pom-pom maker, cardboard, or just your hand.
You may wish to add a faux fur pom pom instead.
Video Tutorial
In this crochet beanie video tutorial, you’ll learn how to create a stylish, cozy hat step-by-step, making it perfect for beginners and experienced crocheters alike.
Whether you’re making a beanie as a gift or for yourself, this tutorial will give you all the skills and confidence to crochet a beautiful hat you’ll love to wear or share!
Tips for Success:
- Check Your Gauge: Crochet a small sample swatch before you start to make sure your stitches match the pattern’s gauge. This will help you make a hat that fits.
- Yarn Substitutes: If you want to use different yarns, just remember that thicker yarns will work up faster and create a warmer hat, while thinner yarns will create a lighter hat.
Final Thoughts
Once you finish your first hat, you’ll be hooked!
Crocheting hats is a great way to practice your stitches, experiment with colors, and create personalized gifts.
As you get more comfortable with the basics, you can try more advanced patterns and techniques, like cables, colorwork, or textured stitches.
So grab your hook, pick out some yarn, and start crocheting your first hat today!
You’ll be amazed at what you can create with just a few basic stitches.
Happy crocheting!

Free Printable
Want to keep this tutorial handy while you crochet? Grab the free printable version of the pattern below!
Whether you’re curled up on the couch or crafting on the go, this easy-to-follow card makes it simple to work through each round at your own pace.
Free Crochet Hat Pattern

This free printable crochet hat pattern shows you how to crochet a simple chunky beanie from start to finish.
Ideal for beginners, it’s a handy, ad-free card you can print or view on your tablet while you crochet.
Materials
- Bulky yarn works best for beginners. It’s easier to see your stitches, and the hat will work up quickly. Choose a soft yarn like acrylic, wool, or a blend.
- 1 Skein of The Petite Wool from We Are Knitters.
- Use my code – MGM4VHHAT – for 10 off on your WAK yarn order.
- Each ball is 100 GR. 153yds. 140 M. 100% Peruvian wool.
- The yarn weight is bulky weight yarn/chunky yarn/12 ply.
Tools
- The size of your hook should match your yarn.
- For bulky yarn, use a (US L-11) / 8 mm crochet hook.
- Scissors: To trim your yarn when finished.
- Tapestry Needle: To weave in the ends and sew the top of the hat closed if necessary.
- Measuring Tape: To check your gauge and hat size.
Instructions
Create a chain and choose your size
To begin, make a slipknot and create a chain (CH).
This chain is the foundation row of your project, which you will build on.
With your hook and yarn, you will chain 20 (22, 24, 26, 28, 28, 30, 32).
Work the ribbing for the main body of the hat
Row 1: For the first row, you will work 1 single crochet (SC) into the 2nd chain (CH) from the hook and in each chain (CH) to the end of the row and turn the work ready for row 2.
Row 2: Chain (CH) 1 stitch, then create 1 single crochet (SC) in each stitch (st) through the back loop (BLO), repeat this to the end of the row, and turn the work.
Repeat: Repeat row 2 until the work measures = 13″ (13″, 15″, 17″, 19″, 19″, 20″, 21″) in width.
*Please note – refer to the chart for the size you are making for the head circumference.
*Do not cut the yarn, as you will use it to continue the next section.
Decrease the top of the hat
Youwill now add a few sc decrease (sc2tog) rows to the top to shape the hat and avoid forming a bulky gathered crown.
Row 1: Ch 1, work sc2tog across the width edge of the hat, sl st to the first sc, and turn.
Repeat row 1 – once more for all sizes.
Once you have finished your rows of decreases – sl st into the final st and leave a long yarn tail for seaming.
Close the top of the hat
Thread the yarn tail through your yarn needle and weave in and out of the last row of sc2tog.
Pull up tight to close the top of the hat.
Seam the edges together
Next, start seaming using the mattress stitch to create an invisible seam.
Turn up the brim and seam
Stop when you have 2″ left and turn the brim upwards, then seam the brim the same way with the right sides facing you.
Secure and weave in all loose ends.
Optional – add a pom pom
If you want to add a fun touch, you can create a yarn pom-pom and sew it to the top of your hat.
There are many tutorials online to make pom-poms using a pom-pom maker, cardboard, or just your hand.
You may wish to add a faux fur pom pom instead.
Notes
Size Information
- The numbers start with the smallest size; it’s best to highlight or circle the numbers for your size in the pattern.
- Head Circumference (in): The measurement of the wearer’s head.
- Hat Circumference (in): The width of the hat when laid flat (unstretched).
- Hat Length (in): Height of the finished beanie.
- Yarn Weight: Bulky yarn (weight category 5).
- Gauge: 12 sts and 16 rows in 4 × 4 inches / 10 x 10 cm in pattern.
Crochet Abbreviations
This pattern is written using US terms and abbreviations.
You can find a list of UK and US terms and abbreviations here.
- BLO – Back loop only
- CH – Chain
- Cont – Continue
- SC – Single crochet stitches
- Sc2tog – Single crochet decrease (single crochet two stitches together. Insert hook into stitch and draw up a loop. Insert hook into next stitch and draw up a loop. Yarn over, draw through all 3 loops on hook.)
- Rem – Remaining
- Rep – Repeat
- St(s) – Stitches
- SL ST – slip stitch
FAQ
What Is The Best Yarn For Chunky Beanies?
The best yarn for chunky beanies is typically bulky or super bulky weight yarn (category 5 or 6).
These yarns work up quickly and create thick, warm fabric perfect for cold weather.
Here are some great yarn choices for chunky beanies:
- Wool: Wool is a popular choice for warmth and elasticity. Merino wool, in particular, is soft and comfortable to wear, making it great for beanies.
- Example: Lion Brand Wool-Ease Thick & Quick.
- Acrylic: For those looking for an affordable, machine-washable option, acrylic yarn is a great choice. It’s soft and available in a wide variety of colors.
- Example: Bernat Softee Chunky or Red Heart Super Saver Chunky.
- Wool Blends: Wool blends combine the warmth of wool with the durability and ease of acrylic or other fibers. These yarns provide the best of both worlds.
- Example: We Are Knitters The Petite Wool or Knit Picks Wool of the Andes Bulky.
- Alpaca Blends: For a super-soft and luxurious feel, try an alpaca blend. These yarns are lightweight yet very warm, perfect for a cozy beanie.
- Example: Lion Brand Touch of Alpaca.
When choosing yarn for a chunky beanie, look for something soft, warm, and with good elasticity to ensure a comfortable fit and long-lasting wear.
Are Hats Easy To Crochet?
Yes, hats are generally considered easy to crochet, especially for beginners.
They often use basic stitches like single crochet, half double crochet, or double crochet stitches, making them a great project to practice these fundamental skills.
Additionally, many hat patterns are simple, such as working in the round or creating a flat piece that is later sewn together.
Hats also work up relatively quickly, so they offer a sense of accomplishment without a large time commitment.
Once you understand the basics, you can easily customize them with different sizes, yarns, and embellishments.
Related Baby Hats Post: Crochet Baby Hat
Is It Faster To Crochet Or Knit A Hat?
Crocheting a hat is generally faster than knitting one, especially when using basic stitches and bulky yarn.
This is because crochet stitches are typically larger and thicker, so the fabric works up more quickly.
In crochet, each stitch is completed in a single motion, and fewer stitches are needed to cover the same area compared to knitting.
Knitting is more intricate...
On the other hand, knitting produces a finer, more stretchy fabric, but it often takes longer since the stitches are smaller and more intricate, and each stitch requires two steps (moving the stitch from one needle to the other).
If speed is your priority, crocheting a hat is usually the quicker option.
Related post: Knit VS Crochet: Is it easier to knit or crochet?
How Hard Is It To Crochet A Bucket Hat?
Crocheting a bucket hat is moderately easy, making it an easy project for confident beginners.
The difficulty level depends on the pattern, but most bucket hats use simple crochet stitches like single crochet (SC) or double crochet (DC).
One of the main challenges lies in shaping the hat: you’ll need to create a flat circular base, then gradually shape the sides and finish with a wide brim.
Working in the round…
Bucket hats often involve working in rounds and increasing stitches to form the right shape, which requires attention to stitch counts to keep the structure even.
If you’re comfortable working in the round and can follow basic instructions for increasing and decreasing stitches, a bucket hat is definitely manageable.
Plus, it’s a fun and trendy project!
Related Post: Bucket Hat Crochet Pattern

How Long Does It Take To Crochet A Hat?
The time it takes to crochet a hat depends on several factors, including your skill level, the complexity of the pattern, the type of yarn, and the size of the hat.
On average:
- Beginner projects (simple beanies with basic stitches): 2 to 4 hours
- Intermediate projects (hats with more intricate stitches or color changes): 4 to 6 hours
- Advanced projects (hats with complex patterns, cables, or lace): 6+ hours
If you’re using bulky yarn and a large hook, you can finish a basic hat even faster, sometimes in under 2 hours.
However, finer yarn and detailed patterns will take longer.
What Is The Best Stitch For A Crochet Hat?
The best stitch for a crochet hat depends on the style and look you want to achieve.
Popular Stitches
Here are a few popular stitches commonly used for different types of crochet hats:
- Single Crochet (SC): This is a basic, tight stitch that’s great for creating a dense, warm fabric. It’s perfect for beanies or snug-fitting hats that need to retain heat.
- Half Double Crochet (HDC): A bit taller than the single crochet, HDC is ideal for hats because it works up quickly and provides a nice balance between structure and flexibility. It’s often used for beanies and slouchy hats.
- Double Crochet (DC): This stitch is taller and creates a looser, more breathable fabric. It’s great for slouchy hats or lightweight hats that don’t need to be too warm.
- Back Loop Only (BLO) Ribbing: Often used for the brim of a hat, this technique creates a stretchy ribbed effect, which helps the hat fit snugly around the head.
- Puff or Bobble Stitch: If you want a textured hat, the puff or bobble stitch can add fun, raised patterns, perfect for decorative hats or cozy winter wear.
For most hats, half double crochet (HDC) is considered the best all-around stitch because it’s quick to work, creates a soft texture, and provides a good mix of warmth and flexibility.
Why Is The Crochet Ribbing Stitch Good For Beginners?
The crochet ribbing stitch is great for beginners because it is simple to learn yet offers a lot of versatility.
It typically involves working basic stitches, such as single crochet (SC) or half double crochet (HDC), in the back loop only (BLO).
This technique creates a stretchy, textured fabric that looks sophisticated but is easy to execute.
Here’s why it’s ideal for beginners:
- Easy to learn: It uses basic stitches that most beginners are already familiar with.
- Visually interesting: The ribbed effect adds texture and dimension to your project, making it look more advanced than it is.
- Great for many projects: Ribbing is commonly used for hat brims, cuffs, or even scarves, so beginners can quickly apply this skill to a variety of projects.
- Stretchy and forgiving: The stretchiness of ribbing makes it perfect for garments that need a bit of flexibility, like beanies, and helps accommodate slight imperfections in stitch tension.
Overall, it’s a beginner-friendly stitch that can elevate the look of your crochet projects while still being easy to master.
How Can I Crochet A Beanie in 1.5 Hours?
To crochet a beanie in just 1.5 hours, you can use a few techniques to speed up the process while still creating a beautiful, functional hat.
Here are the steps and tips to help you make a quick beanie:
1. Use Bulky or Super Bulky Yarn
The thicker the yarn, the fewer stitches and rounds you need to complete the beanie. Bulky (category 5) or super bulky (category 6) yarns work up quickly and create a thick, cozy hat.
- Recommended yarn: Lion Brand Wool-Ease Thick & Quick or Bernat Softee Chunky.
2. Choose a Large Hook
Using a large crochet hook (size 8 mm or larger) will help you create larger stitches, meaning the beanie will come together faster. An 8 mm (US L-11) or 9 mm hook is ideal for working with bulky yarn.
3. Opt for Simple Stitches
Stick to basic stitches like half double crochet (HDC) or double crochet (DC), as these are quick and easy to work. These stitches are taller than single crochet, so you’ll need fewer rounds to complete the hat.
4. Work in the Round
A top-down, in-the-round construction (no seaming required) is the fastest method for making a beanie. You start with a magic ring or chain 4, then join to form a circle. From there, you can increase in each round until the crown is wide enough, then work evenly down the sides.
5. Use a Basic Beanie Pattern
Follow a simple beanie pattern with minimal shaping and embellishments.
6. Avoid Extras
Skip additional design elements like complex patterns, color changes, or decorative stitching. Keeping it simple with a single color and basic texture will save time.
7. Stay Focused
Minimize distractions and work consistently. If you’re focused and using a bulky yarn with a simple pattern, you should be able to finish your beanie within 1.5 hours.
By following these tips—choosing the right yarn, hook, and pattern—you can crochet a cozy, stylish beanie in a short amount of time!
Explore More Crochet Projects
Once you’ve mastered the basics of crochet, exploring new projects is an exciting way to expand your skills and creativity.
From cozy scarves and blankets to intricate lace shawls and textured pillows, the possibilities are endless.
You can experiment with different stitches, yarns, and patterns to create unique, personalized items.
Try out new techniques
Crochet also offers opportunities to try new techniques like colorwork, amigurumi, or cables, keeping your projects fresh and challenging.
However, each new project helps you build confidence and opens the door to even more creative possibilities in the world of crochet.
Free Crochet Hat Patterns
Check out these easy crochet hat patterns, including bucket hats and sun hats, which you can make below! (Many are made with worsted weight yarn)
- Free Cat Hat Crochet Pattern (5 Sizes for Beginners)
- Striped Bucket Hat Crochet Pattern
- Sun Hat Crochet Pattern
- Striped Unisex Bucket Hat Free Crochet Pattern
- Granny Square Bucket Hat Crochet Pattern
- Crochet Bucket Hat Pattern (Raffia)
- Crochet Summer Hat: Easy Crochet Hat Pattern
- 27 Free Crochet Sun Hat Patterns For The Summer
- 43 Free Crochet Hat Patterns For Men
Free Crochet Patterns
Check out more free crochet patterns that are perfect for new crocheters below…
- How To Crochet The Linen Stitch ( Video Tutorial + Pattern)
- Crochet Dishcloth Pattern Set (Quick Designs For Beginners)
- Crochet Face Scrubbies Pattern
- 30 Crochet Sweaters To Make For Fall (Free Patterns)
- How To Crochet A Headband (Easy For Beginners)
- How To Crochet A Blanket + Free Beginner Pattern
- Chunky Crochet Blanket – Super Easy Free Pattern!
- Skinny Scarf Crochet Pattern (Beginner Friendly!)
Crochet Lessons
If you are a new maker and need help with the crochet basics, check out the crochet lessons here – Crochet Lessons {With Video Tutorials}.
There, you will find tutorial posts for the basic crochet stitches and all the crochet techniques a newbie needs to know.
Including how to create foundation chain stitches (ch), single crochet, double crochet, and all the crochet abbreviations ( in UK and US terms) a maker needs to know.
And if you need more video tutorials, check out my YouTube channel here – Handy Little Me – YouTube
Could you share your work with us?
I love seeing your finished projects on social media.
If you enjoyed making the crocheted beanie pattern, I’d love to see yours on Instagram, be sure to tag me @handylittleme.
If you are on Facebook, stop over to the Handylittleme Facebook group and share a photo.
I’d love to see your work.
Happy Crocheting!