Lace Tee Knitting Pattern (Erato | Muses Collection)
THIS ARTICLE CONTAINS AFFILIATE LINKS THAT SUPPORT HANDY LITTLE ME CONTENT AND FREE PATTERNS.In this post, you will see the Lace Tee Knitting Pattern (Erato Tee).
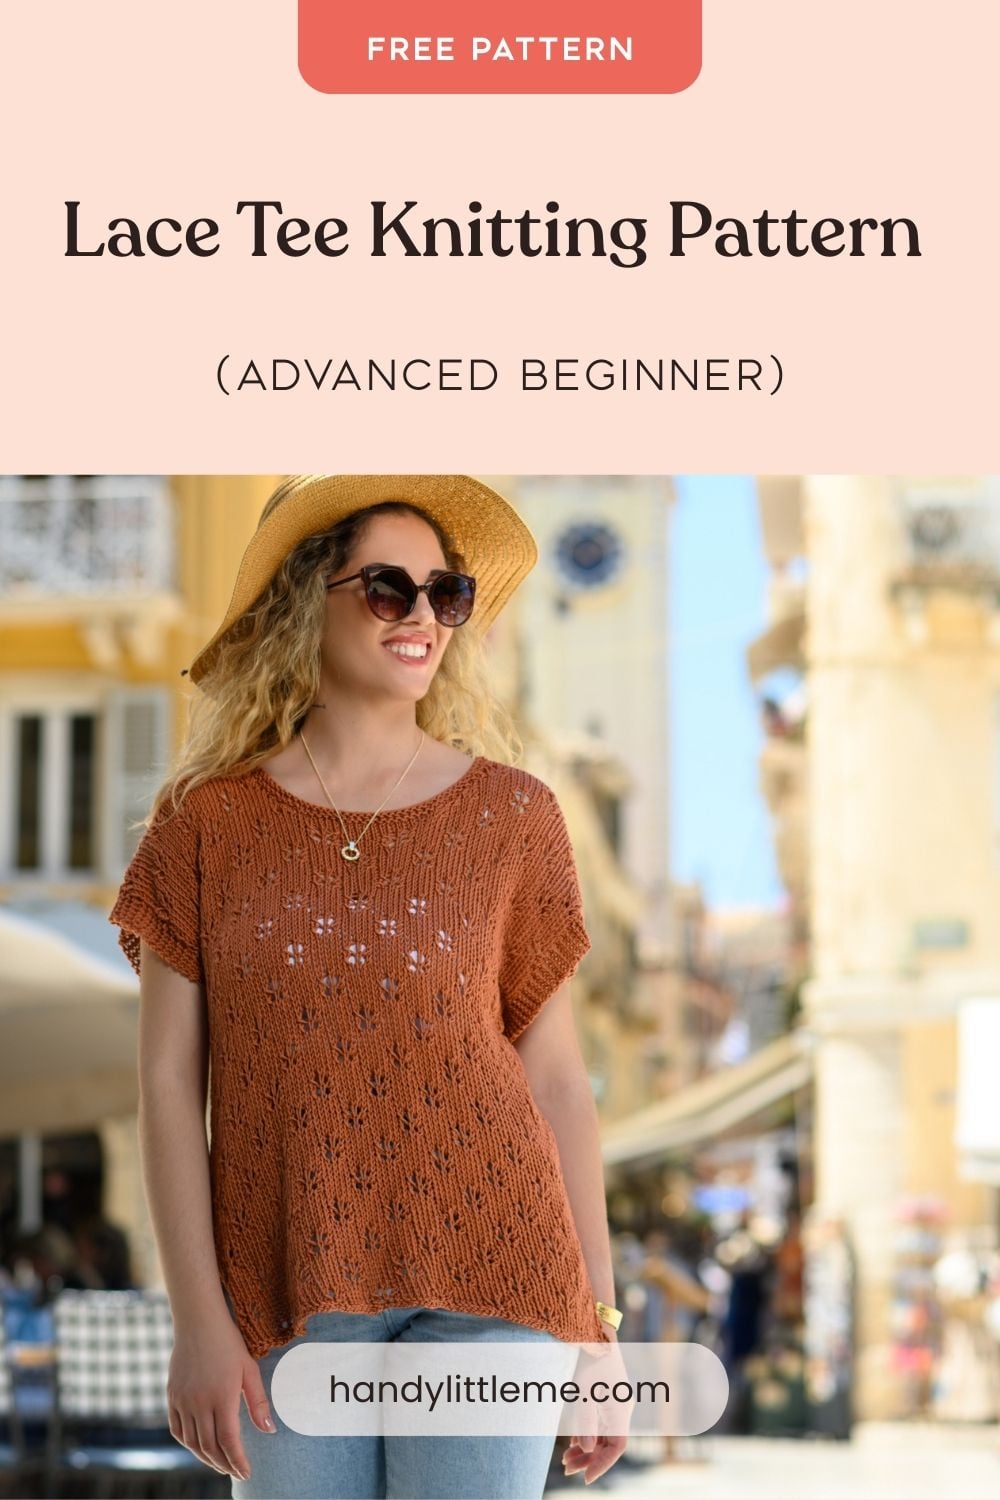
This lightweight knitted tee features a delicate lace panel that adds texture and interest to a simple, wearable shape.
The airy design makes it perfect for warmer weather, whether worn on its own or layered over a camisole.
The Erato Tee is part of the Muses Collection, a series of timeless knit designs inspired by the ancient Greek Muses.
Please scroll down to view the free pattern online or grab the inexpensive, ad-free PDF pattern in my shop here.

Before You Get Started
- Skill Level – Easy (Advanced beginner knitters)
- This tee is worked flat in separate pieces and then seamed together to create the finished garment.
- The design features a central lace panel that creates an elegant, openwork texture, while the surrounding fabric keeps the structure simple and wearable.
- The lace pattern is created using yarn overs and decreases, forming a light and breathable fabric.
- This project is suitable for advanced beginners and intermediate knitters who are comfortable with basic stitches and following a stitch pattern.
- If you are new to lace knitting, you may find it helpful to practice the stitch pattern on a small swatch before beginning.
- You can see a tutorial for the stitch pattern here: How To Knit An Easy Lace Stitch Pattern

Materials
Yarn
- The Pima Cotton from We Are Knitters in Canyon Rose (This cotton is 100% Pima Cotton / 100g/3.05oz/232 yds/212m.
- This is an Aran/Worsted/10 Ply yarn.
For the following sizes, you will need;
- Small – 3 – (300g/696yds/636m)
- Medium – 4 – (400g/928yds/848m)
- Large – 5 – (500g/1,160yds/1,060m)
- XL – 5.5 – (550g/1,276yds/1,166m)
- XXL – 6 – (600g/1,392yds/1,272m)
- XXXL – 6.5 – (650g/1,508yds/1,378m)
Needles
- 5.5 mm (US 9) knitting needles.
- 5.5 mm (US 9) 24″ circular knitting needles for the neck.
- The top is worked back and forth on the needles – knit flat.
Notions
- Scissors
- Darning needle/yarn needle
- Tape measure
- Stitch holder
Print + Stitch
The Muses Collection
The tee belongs to the Muses Collection, a range of classic knit designs inspired by the ancient Greek Muses.
Size Information
This top can be made in the following sizes: S (M, L, XL, XXL, XXXL)
Bust Size (inches) – 38 (42, 46, 51, 57, 63)
Waist Size (inches) – 34 (38, 42, 47, 53, 59)
The pattern is written for all sizes, starting with the smallest size, with changes for different sizes listed in all necessary places.
To follow patterns more easily, circle or highlight all numbers pertaining to your size before beginning.
Gauge
16 sts/22 rows in 4 inches/10 cm in stitch pattern.

Abbreviations
- Beg – Beginning
- CO – Cast on
- Cont – Continue
- Dec – Decrease (cast off)
- K – Knit
- K2tog – Knit the next two stitches together (decrease)
- Garter stitch – Knit every row.
- SM – Slip marker
- Sl – Slip
- SSK – Slip, slip, knit (decrease)
- St(s) – Stitch(es)
- Patt – Pattern (work in the stitch pattern)
- PM – Place marker
- P – Purl
- Rem – Remain(ing)
- Rep – Repeat
- RS – Right side
- WS – Wrong side
- WYIF – With yarn in front
- YO – Yarn over
Chart
- Multiple of 10 sts plus 5.
- Repeat rows 1-12.

Video Tutorial
If you would like to learn how to knit the lace stitch used in this pattern, you can watch the tutorial below.
Pattern Instructions
Worked flat knitting back and forth on two needles:
Back
(This stitch pattern is worked in multiples of 10 sts + 5)
Cast on 85 (95, 115, 125, 135, 145) sts.
Set Up – Work 2 rows in garter stitch.
- Rows 1 and 3 (RS): *K2tog, YO, K1, YO, SSK, K5; rep from * to last 5 sts. K2tog, YO, K1, YO, SSK.
- Rows 2 and 4 (WS): P2, WYIF sl 1, P2, *P7, WYIF, sl 1, P2; rep from * to end.
- Row 5: Knit
- Row 6: Purl
- Rows 7 and 9: *K5, K2tog, YO, K1, YO, SSK; rep from * to last 5 sts, K5.
- Rows 8 and 10: P5, *P2, WYIF sl 1, P7; rep from * to end.
- Row 11: Knit
- Row 12: Purl
Cont to repeat rows 1 – 12 until your piece measures = 32 (33, 34, 35, 36, 37) cm / 12.5 (13, 13.3, 13.7, 14, 14.5) inches.
Armholes
Row 1 (RS): Cast on 6 sts at the beg of the row, work in patt to end, and cast on 6 sts. 97 (107, 127, 137, 147, 157) sts.
Rows 2-4: Work in patt.
Cont to work 6 edge sts in garter stitch (move the markers to here) for the sleeve edges.
When the piece measures 55 (57, 59, 61, 63, 65) cm / 21.6 (22.4, 23.2, 24, 24.8, 25.6) inches, cast off the center 29 (29, 33, 33, 33, 33) sts for the neck and finish each shoulder separately.
The total number of sts rem = 68 (78, 94, 104, 114, 124) sts.
Each shoulder = 34 (39, 47, 52, 57, 62) sts.
Cont in pattern as before and cast off 1st for the neck at the beg of the next two rows from neck – 32 (37, 45, 50, 55, 60) sts.
Loosely cast off on the RS.
Repeat on the other shoulder.

Front
Cast on and work as on the back piece until the piece measures 44 (46, 48, 50, 52, 54) cm/17.3 (18.1, 18.8, 19.6, 20.4, 21.2) inches.
Next, place the center 17 (17, 21, 21, 21, 21) sts onto a stitch holder and finish each shoulder separately.
The total number of sts rem = 80 (90, 106, 116, 126, 136) sts.
Each shoulder = 40 (45, 53, 58, 63, 68) sts
Cont in the pattern as before and cast off for neck at beg of every row from the neck as follows…
Cast off 2 sts, 2 times, and 1st 4 times = 32 (37, 45, 50, 55, 60) sts rem on the shoulder.
Work until the piece measures 54 (56, 58, 60, 62, 64) cm/21.2 (22, 22.8, 23.6, 24.4, 25.1) inches and loosely cast off on the RS.

Making Up
Sew the shoulder seams inside the cast-off edge, then sew the underarm and side seams together using the mattress stitch or any seaming method of your choice.
If you wish, you can leave a 10 cm cm/4-inch vent on either side of the seam near the bottom.
Weave in any loose ends.
Neck Edge
Pick up and knit from RS around 94 – 114 sts around the neck (including the sts on the stitch holder) on 24″ circular needles (size 5.5 mm/US 9).
Join in the round and work as follows…
- Round 1 – Purl
- Round 2 – Knit
- Round 3 – Purl
- Round 4 – Loosely cast off.
Finishing and Blocking
You may wish to block your tee; you can do that as follows:
- Lay the item out on blocking mats, lightly stretch it into place, and pin it with blocking pins.
- Spray with cold water.
- Allow to dry completely.
- Blocking tutorial – Blocking Knits.
Share Your Make
I love seeing your finished projects on social media.
If you enjoyed this knitted lace top pattern, I’d love to see yours on Instagram, tag me @handylittleme or #handylittleme to be featured.
If you are on Facebook, check out the Handy Little Me Facebook group and share a photo,
I’d love to see your work.
Happy knitting!
FAQ
Is this tee beginner-friendly?
This pattern is suitable for advanced beginners who are comfortable with yarn overs and basic decreases.
What yarn works best for this pattern?
A yarn with good drape works best for lace knitting.
Cotton, bamboo, linen blends, or lightweight wool are all great choices.
Can I make the tee longer or shorter?
Yes. You can easily adjust the length by working more or fewer rows before shaping the armholes.
Do I need to block the finished garment?
Yes. Blocking is recommended to open up the lace stitches and give the tee its final shape.
Can I substitute the lace panel stitch?
Yes. You can experiment with other lace stitch patterns if you would like to customize the design.
What Is The Dandelion Fluff Stitch?
The dandelion fluff stitch is a light and airy lace stitch that creates a soft, textured fabric.
Made with yarn overs and decreases, it forms open stitches that give a delicate, floating effect, perfect for lightweight tops, shawls, and accessories.
More Free Knitting Patterns
Check out more knitting patterns and the stitch pattern tutorials you need to try out!
- Diamond Leaf Tank Top Knitting Pattern (Euterpe | Muses Collection)
- Ripple Stitch Tee Knitting Pattern (Calliope | Muses Collection)
- How To Knit The Ripple Stitch (Tutorial)
- Slip Stitch Rib Bag Knitting Pattern (Muses Collection)
- How To Knit Slip Stitch Rib (Tutorial)
- The Polyhymnia Cardigan Knitting Pattern
- Clio Tee Knitting Pattern With A Feather And Fan Panel
- Thalia Garter Stitch Tank Top Knitting Pattern
- How To Knit The Feather And Fan Stitch (Tutorial)
- Feather and Fan Wrap Knitting Pattern (Melpomene | Muses Collection)
- How To Knit The Mesh Stitch (Tutorial)
- Lace Mesh Top Knitting Pattern (Urania | Muses Collection)
- How To Knit A Shawl For Beginners (Step-By-Step Tutorial)
- Japanese Knot Bag Knitting Pattern
- 12 Summer Knits (The Muses Collection)
Hi
I don’t understand what you mean here: Cast off 2 sts, 2 times, and 1st 4 times
How does that differ from just cast off 8?
Thanks
Hi Karen,
Great question — I’m happy to clarify!
The instruction “Cast off 2 sts, 2 times, and 1 st 4 times” means you should shape the edge gradually over several rows, rather than casting off all 8 stitches at once.
Here’s how it works:
On the next row, cast off 2 stitches
On the following row, cast off 2 stitches again (that’s 2 times)
Then on the next four rows, cast off 1 stitch each row (4 times)
This method creates a more gentle slope, usually for shaping areas like armholes or necklines, rather than a sharp, straight edge you’d get from casting off all 8 stitches at once.
I hope that helps,
Louise
Hi
This is continuing from the previous comment about the cast offs .. so is that always cast off at the neck edge? In which case is it cast off at the beginning of alternate rows, or at the beginning of one row and the end of the next?
Hi Karen,
Great question! When the pattern says to cast off at the neck edge, it means you’ll be shaping the neckline by casting off stitches only at the beginning of the neck-edge rows.
So yes, it would be at the beginning of alternate rows, not at both ends of the same row.
For example, if you’re working flat and shaping the left side of the neck, you’d cast off at the beginning of the right side (RS) rows.
For the right side of the neck, you’d cast off at the beginning of the wrong side (WS) rows.
This helps keep the shaping consistent and the neckline symmetrical.
Happy knitting!
Thanks for reply
Is the back longer than the front? In the smallest size, the instructions say cast off for shoulder/neck at the back when it measures 55cm, but the front says work until 54cm
Hello Karen,
Yes—the back is intentionally ~1 cm longer in the smallest size (55 cm back vs 54 cm front). That tiny difference helps the fit once the front neckline is shaped and after blocking/seaming—it won’t look mismatched when worn.
Hi Louise
I’m still doing this pattern!
When you increase for the armholes, on the first cast on don’t you end up having to knit the cast ons at the start of the RHS but then at the end of that row, the cast on stitches don’t get knitted until the purl row? So one side will have one more row than the other side?
Hi Karen,
Great question—and you’ve spotted a quirk that trips lots of knitters.
When you cast on at the start of a row (for the armhole), those new stitches aren’t worked until you come back on the next row.
On that first pass, it can look like the “RHS” got an extra row compared to the other side.
Then, on the following row—when you turn and cast on at the start again—the other edge has the same “one-row-later” effect.
After those two rows, the armhole edges are balanced in length.
In other words, it evens out over the pair of rows, and your seaming/fit won’t be affected.
Focus on measured length along the armhole edge rather than raw row counts—blocking will smooth out any tiny visual difference.
I hope that helps,
Louise
There appears to be some missing measurements for the larger sizes in the Armholes section just before it instructs to “cast off the center…” It reads as follows: When the piece measures 55 (57, 59, 61, 63, 65) cm / 21.6 (22.4, 23.2, cast off the center 29 (29, 33, 33, 33, 33) sts for the neck and finish each shoulder separately. Thanks for your help.
Hi Judy,
Thank you for your message, and for spotting that.
You’re right — it looks like some of the inch measurements are missing from that line.
It should read:
When the piece measures 55 (57, 59, 61, 63, 65) cm / 21.6 (22.4, 23.2, 24, 24.8, 25.6) inches, cast off the center 29 (29, 33, 33, 33, 33) sts for the neck and finish each shoulder separately.
Thank you so much for letting me know — I’ll get that corrected on the pattern page.
Best wishes,
Louise