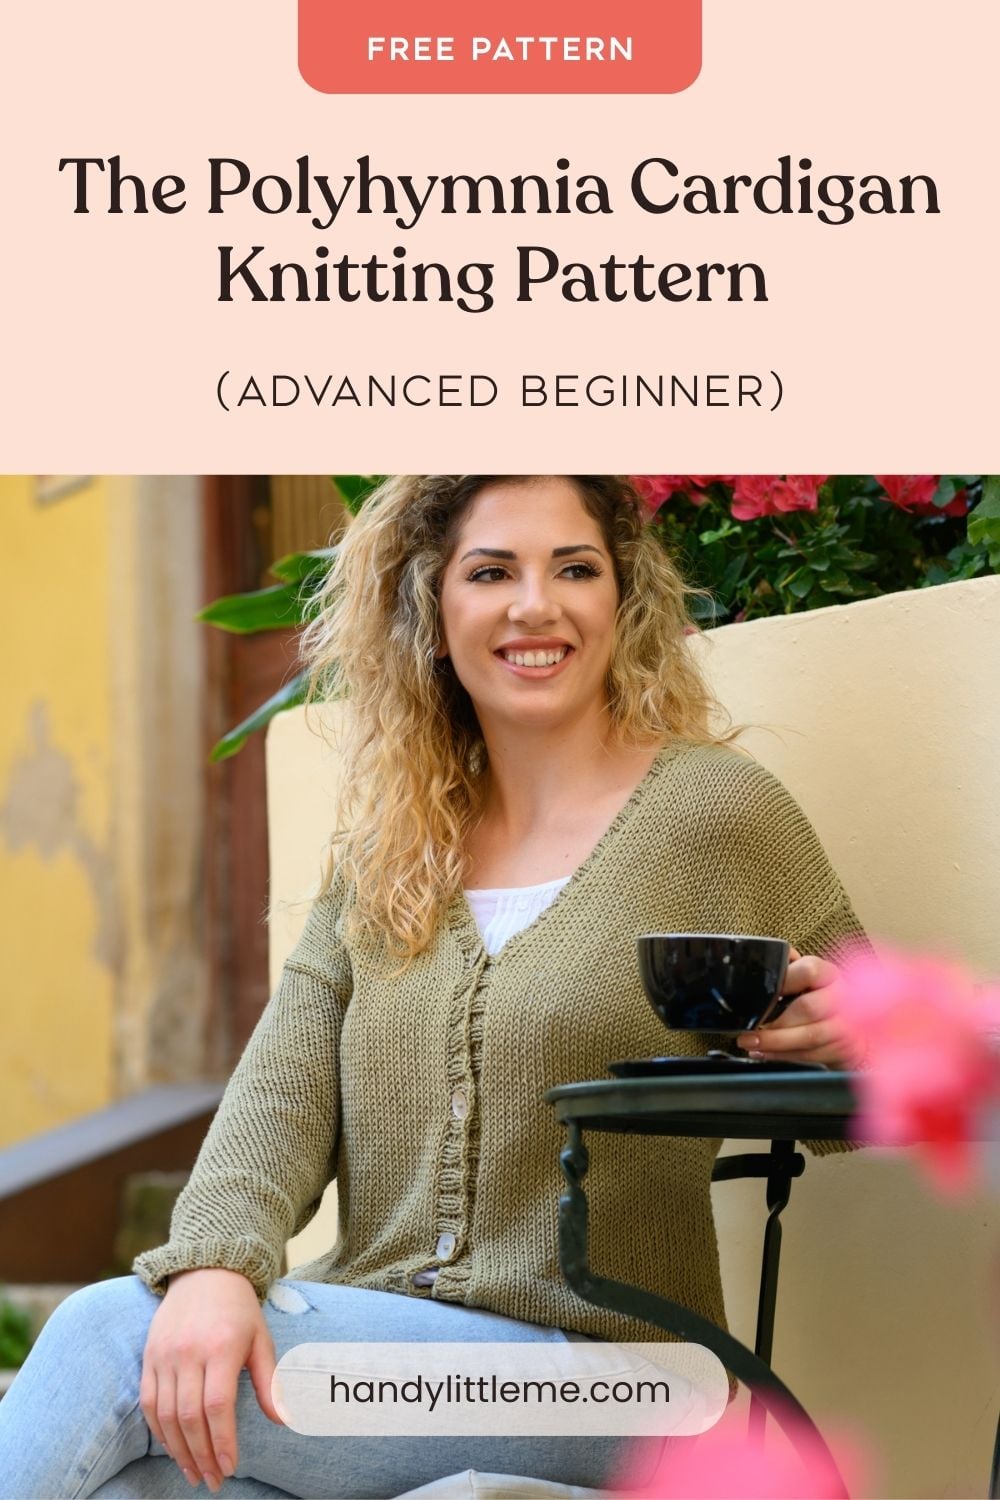
The Polyhymnia Cardigan Knitting Pattern
THIS ARTICLE CONTAINS AFFILIATE LINKS THAT SUPPORT HANDY LITTLE ME CONTENT AND FREE PATTERNS.If you’re looking for a light layer to knit for spring and summer, the Polyhymnia Cardigan is a lovely project to cast on.
This simple cardigan is part of my Muses collection and is designed in soft cotton for an easy, comfortable fit you can wear on warmer days.
It’s a great garment pattern for advanced beginners who feel ready to move beyond scarves and hats and start knitting their first cardigan.
Please scroll down to view the free pattern online or grab the inexpensive, ad-free PDF pattern in my shop here.

Before You Get Started
Before you begin, here are a few helpful notes to make knitting your cardigan easier:
- Skill Level – Easy for advanced beginner knitters.
- This cardigan is made in 5 pieces: 1 back, 2 front panels, and 2 sleeves.
- The front bands are worked using circular needles because of the large number of stitches, but you’ll still be working back and forth – not in the round.
- The pattern is written with all sizes included, so it helps to highlight or circle your size before you start.
- Check your gauge before starting so your finished cardigan has the right fit. The listed gauge is 16 sts and 20 rows = 4 x 4 inches / 10 x 10 cm in stocking stitch on 5.5 mm needles.
Materials
Yarn
- The Pima Cotton from We Are Knitters (This cotton is 100% Pima Cotton / 10g/3.05oz/232 yds/212m).
- This is an Aran/Worsted/10 Ply yarn.
- For the following sizes, you will need;
- Small – 4 – (400g/928yds/848m).
- Medium – 5 – (500g/1,160yds/1,060m).
- Large – 6 – (600g/1,392yds/1,272m).
- XL – 7 – (700g/1,624yds/1,484m).
- XXL – 8 – (800g/1,856yds/1,696m).
Needles
- 4.5 mm (US 7) knitting needles.
- 5.5 mm (US 9) knitting needles.
- 4.5 mm (US 7) circular knitting needles with a 40-inch or longer cable for the front bands.
Notions
- Scissors
- Darning needle/yarn needle
- Tape measure
- Stitch holder
- Stitch markers
Print + Stitch
The Muses Collection
The cardigan belongs to the Muses Collection, a range of classic knit designs inspired by the ancient Greek Muses.
Size Information
The sizes are for the following: S / M / L / XL / XXL
Measurements are given in inches (“) and in centimeters (cm).
Finished Bust
- S – 32 – 34” / 76-81 cm / Actual size – 39.3″/100 cm
- M – 36 – 38” / 86-91 cm / Actual size – 43.3″/110 cm
- L – 42 – 44” / 96-101 cm / Actual size – 47.2″/120 cm
- XL – 50 – 52” / 132 cm / Actual size – 51.1″/130 cm
- XXL – 60 – 62” / 155 cm / Actual size – 55.1″/140 cm
Finished Back Length
- S – 22.4″/57 cm
- M – 22.8″/58 cm
- L – 23.2″/59 cm
- XL – 23.6″/60 cm
- XXL – 24″/61 cm
Sleeve seam
18″/45 cm
Gauge
10 x 10 cm /4 x 4 inches = 16 sts and 20 rows in stocking stitch using 5.5 mm (US 9) needles.

Abbreviations
- Beg – Beginning
- CO – Cast on
- Dec – decrease
- Foll – following
- Inc – Increase
- K – Knit
- K2tog – Knit two stitches together
- P – Purl
- PM – Place marker
- Rib – To work in ribbing (2×2 ribbing)
- Rem – Remaining
- Rep – Repeat
- RS – Right side
- St(s) – Stitch (es)
- St St – Stocking stitch
- WS – Wrong side
- YO – Yarn over (also known as yarn forward)
- 2×2 Ribbing – Knit two stitches, Purl two stitches.

Pattern Instructions
Back Piece
- Using 4.5 mm (US 7) needles, cast on 78 (86, 94, 102, 110) sts
- Work in 2×2 ribbing until the piece measures 1″/3 cm from the CO edge, ending after a WS row and inc 1 st at both ends of the last row. 80 (88, 96, 104, 112) sts.
- Change to 5.5 mm (US 9) needles and start working in st st, beg with a K row.
- Cont straight in st st until work measures – 57 (58, 59, 60, 61) cm, 22.4 (22.8, 23.2, 23.6, 24) inches, ending after a WS row.
Shape the shoulders
- Cast off 27 (30, 33, 36, 39) sts at the beg of the next two rows.
- Leave the rem 26 (28, 30, 32, 34) sts on a stitch holder for the back neck.
Right Front
- Using 4.5 mm (US 7) needles, cast on 38 (42, 46, 50, 54) sts.
- Work in 2×2 ribbing until the piece measures 1″/3 cm from the CO edge (same as for the back), ending after a WS row.
- Change to 5.5 mm (US 9) needles and start working in st st, beg with a K row.
- Cont straight in st st until work measures 15″/38 cm, ending after a WS row. (For the Left Front work one row less here).
Shape Front Slope
- Cont in st st, dec one st at the beg of next row and at the same edge of every foll 3rd row until 27 (30, 33, 36, 39) sts remain.
- Cont straight in st st until Front matches Back to shoulder, ending at side seam edge.
- Cast off the rem 27 (30, 33, 36, 39) sts.
Left Front
Work as for Right Front, noting bracketed exception.
Sleeves
- Using 4.5 mm (US 7) needles, cast on 42 (46, 50, 54, 58) sts.
- Work in 2×2 ribbing until the piece measures 1″/3 cm from the CO edge (same as for the back), ending after a WS row and inc one st at both ends of the last row. 44 (48, 52, 56, 60) sts.
- Change to 5.5 mm (US 9) needles and start working in st st, beg with a K row.
- Inc one st at both ends of every 5th row until there are 76 (80, 84, 88, 92) sts, working extra sts into st st.
- Cont straight in st st until work measures 18″/45 cm, ending after a WS row.
- Cast off.

Blocking
You may wish to block your pieces before seaming.
If you want to learn more about blocking, you can view this blog post here – Blocking Knits
Front Band/Borders
- Join Shoulder seams.
- Using a 4.5 mm (US 7) circular needle and with the RS facing, pick up and knit 72 sts along the right front opening edge, 38 (39, 40, 41, 42) sts along the right front neck slope to shoulder, K across 26 (28, 30, 32, 34) sts left on back neck holder, pick up and knit 38 (39, 40, 41, 42) sts along left front neck slope and 72 sts along left front opening edge. 246 (250, 254, 258, 262) sts.
- Starting with a WS row, work one row in 2×2 ribbing.
- Next row (RS): Rib 4, K2tog, YO, (rib 20, K2tog, YO) 3 times, rib to end.
- Cont in rib until the border measures 1″/3 cm.
- Cast off in rib.
Making Up
- Mark the point along the side seam edges of the back and front 24 (25, 26, 27, 28) cm, 9.4 (9.8, 10.2, 10.6, 11) inches, on either side of the shoulder seams, and sew sleeves to the body between these points.
- Sew side and sleeve seams.
- Attach buttons to correspond with buttonholes on the button band.
Share Your Make
I love seeing your finished projects on social media.
If you enjoyed this cardigan pattern, I’d love to see yours on Instagram, tag me @handylittleme or #handylittleme to be featured.
If you are on Facebook, check out the Handylittleme Facebook group and share a photo,
I’d love to see your work.
Happy knitting!

FAQ
Is a cardigan a good project for beginners?
A cardigan can be a good project for beginners, but it depends on the pattern.
If you already know how to cast on, knit, purl, shape simple pieces, and seam your work, a beginner-friendly or advanced beginner cardigan can be a great first garment.
The Polyhymnia Cardigan is better suited to knitters who are confident with the basics and ready to try a simple garment pattern.
Can a beginner knit a cardigan?
Yes, many beginners can knit a cardigan if they choose the right pattern.
The easiest cardigan patterns are usually made in simple shapes with basic stitches and minimal shaping.
If this is your first garment, take your time, check your gauge, and read through the whole pattern before you begin.
What is the easiest cardigan to knit?
The easiest cardigan to knit is usually one that:
- uses basic knit and purl stitches
- is worked in separate flat pieces
- has simple shaping
- avoids complicated stitch patterns
- includes clear size and finishing instructions
Cardigans made from rectangles or simple panels are often the easiest place to start.
Is knitting a cardigan hard?
Knitting a cardigan is not necessarily hard, but it can feel like a big project if you are new to garment knitting.
The main things that make a cardigan more challenging are shaping, counting rows, seaming, and making sure the finished size fits well.
Taking it one section at a time makes it much more manageable.
How long does it take to knit a cardigan?
That depends on the pattern, the yarn weight, and how often you knit.
A lightweight cotton cardigan may take longer than a chunky winter cardigan because the yarn is finer and the fabric grows more slowly.
For most knitters, a cardigan is a project to enjoy over time rather than finish in a weekend.
Is cotton good for a cardigan?
Yes, cotton can be a great choice for a cardigan, especially for spring and summer garments.
It is breathable, soft, and comfortable to wear in warmer weather.
Cotton is especially nice when you want a cardigan that feels light rather than heavy or woolly.
Is cotton better than wool for a cardigan?
It depends on the look and feel you want.
Cotton is great for:
- spring and summer cardigans
- lightweight layering pieces
- breathable everyday wear
- knitters who prefer plant fibres
Wool is great for:
- warm fall and winter cardigans
- stretchy, forgiving fabric
- garments that need more bounce and elasticity
For the Polyhymnia Cardigan, cotton is a lovely choice because it gives the cardigan a soft, breathable finish that works well in warmer weather.
What is the best yarn for a summer cardigan?
Cotton is one of the best yarn choices for a summer cardigan because it is breathable and light.
Cotton blends can also work beautifully, especially if you want a little more drape or softness.
Look for a yarn that gives your cardigan structure without making it feel too heavy.
Should I use cotton to knit my first cardigan?
Cotton can work well for a first cardigan, but it helps to know that it has less stretch than wool.
That means you need to pay close attention to gauge and tension.
If you want crisp stitch definition and a breathable fabric, cotton is a great option.
If you want a yarn that feels more forgiving while learning garment construction, wool can sometimes be easier to work with.
What should I know before knitting my first cardigan?
Before you begin your first cardigan, it helps to:
- check your gauge
- choose the right size
- read through the pattern first
- keep notes as you knit
- use stitch markers
- measure your pieces as you go
A little preparation makes the whole project much easier and more enjoyable.
Do I need circular needles to knit a cardigan?
Not always. Many cardigan patterns are worked flat on straight needles or circular needles used for working back and forth.
For larger pieces, circular needles are often more comfortable because they hold more stitches easily.
Why is my knitted cardigan too big or too small?
This usually happens because the gauge does not match the pattern.
Even a small difference in stitch count can change the finished fit of a garment.
Always knit a gauge swatch before starting, especially when making a cardigan.

More Free Knitting Patterns
Check out more knitting patterns and the stitch pattern tutorials you need to try out!
- Diamond Leaf Tank Top Knitting Pattern (Euterpe | Muses Collection)
- Ripple Stitch Tee Knitting Pattern (Calliope | Muses Collection)
- How To Knit The Ripple Stitch (Tutorial)
- Slip Stitch Rib Bag Knitting Pattern (Muses Collection)
- How To Knit Slip Stitch Rib (Tutorial)
- Clio Tee Knitting Pattern With A Feather And Fan Panel
- Thalia Garter Stitch Tank Top Knitting Pattern
- How To Knit The Feather And Fan Stitch (Tutorial)
- Feather and Fan Wrap Knitting Pattern (Melpomene | Muses Collection)
- How To Knit An Easy Lace Stitch Pattern (Tutorial)
- Lace Tee Knitting Pattern (Erato | Muses Collection)
- How To Knit The Mesh Stitch (Tutorial)
- Lace Mesh Top Knitting Pattern (Urania | Muses Collection)
- How To Knit A Shawl For Beginners (Step-By-Step Tutorial)
- Japanese Knot Bag Knitting Pattern
- 12 Summer Knits (The Muses Collection)