Knitted Cupcake Pattern Free (No Calorie Cupakes!)
THIS ARTICLE CONTAINS AFFILIATE LINKS THAT SUPPORT HANDY LITTLE ME CONTENT AND FREE PATTERNS.In this post, you will see a knitted cupcake pattern (free no calorie cupcakes!).
I like baking cupcakes sometimes, eating them, and decorating them…. but this can be so dangerous to your waistline!
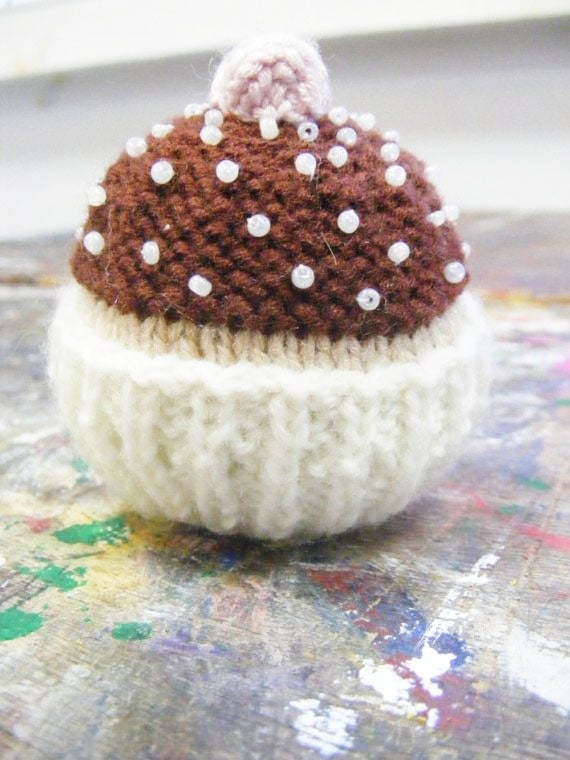
Why not turn the love into a calorie-free, non-edible version by knitting little cupcakes with different colored icing and adding beads/sequins for sprinkled decoration?
The cupcakes are knit flat with straight knitting needles and then assembled together, with the addition of beaded or stitched sprinkles.
Scroll down to view the free pattern and grab your free printable PDF.

Knit A Cupcake
Making this free pattern is a great way to use any yarn scraps in your yarn collection.
These cute cupcakes are fun decorative items that will look wonderful on your bookshelf.
Moreover, you can be creative with your color combination picks; you can choose to follow the colors of the tasty treat with a light brown main cupcake case base and cream or frosted pink icing, or you can pick your own palette.
Plus, they are fantastic gifts for any of your crafty friends.
Related Post: 57 Stash Busting Knitting Patterns

Cupcake Pattern
Skill Level – Easy
Notes
This is an easy pattern for those of you who are at the advanced beginner level, and the techniques you will need to know are knit, purl, and k2tog.
Using mainly knit and purl stitches will also introduce you to decreasing and shaping.
It’s knit flat on 3.5 mm needles.
The supplies you need…
Yarn
- A small amount of the following;
- Pink (Shade A)
- Cream (Shade B)
- Light brown (Shade C)
- Light pink (Shade D)
- All DK yarn or 4 ply wool.
- You can choose your colors and use beads to look like sprinkles!
Needles
- 3.5 mm (US 4) needle size
Notions
- Tape measure
- Scissors
- Darning needle/yarn needle/tapestry needle
- Sewing needle
Other Materials
- Sewing thread
- Beads

Abbreviations
- Approx – Approximately
- Beg – Begin(ning)
- Cont – Continue(ing)
- Inc – Increase (either KFB or M1)
- K – Knit
- K2tog – Knit the next 2 stitches together
- KFB – Knit into the front and back of the stitch (to increase by one stitch).
- P – Purl
- M1 – Make 1 stitch
- Rem – Remaining
- Rep – Repeat
- St(s) – Stitch(es)
Free Knitting Pattern
- Pink (Shade A)
- Cream (Shade B)
- Light brown (Shade C)
- Light pink (Shade D)
Using shade C, cast on 10 stitches.
- Row 1: (k1, Inc 1) rep to last st, K1. (19 stitches)
- Row 2: P
- Row 3: (k2, Inc1) to last st, K1. (28 stitches)
- Row 4: P
- Row 5: (K2, Inc1) to last two stitches K2 (41 stitches)
- Row 6: P
- Row 7: K1 (K3, Inc 1) to last stitch K1 (54 stitches)
- Row 8: P
- Row 9: K
- Row 10: P
- Row 11: K
- Row 12: P
- Row 13: K4 (K1, Inc 1, k6) rep to last 7sts, K7 (61 stitches)
- Row 14: P
- Row 15: K
- Row 16: P
- Row 17: K4 (K1, Inc 1, K7) rep to last 6 sts, K6 (68 stitches)
- Row 18: P
- Row 19: K4 (K1, Inc 1, K4) rep to last 4 sts, K4 (80 stitches)
- Row 20: P
- Row 21: Change to Shade A. K row
- Row 22: K
- Row 23: K
- Row 24: K
- Row 25: K2, (K2tog 5 times, K10) Rep to the end of the row, K3.
- Row 26: K
- Row 27: *K1, K2tog – *Rep to the end of the row.
- Row28: K
- Row 29: K2 tog to end.
- Row 30: K2 tog to end.
- Row 31: Break yarn and thread through stitches, draw tight & fasten off
Cherry
Using shade D, cast on 4 stitches.
- Row 1: P
- Row 2: P
- Row 3: K
- Row 4: P
- Row 5: K
- Row 6: P
- Row 7: P
- K2tog to end
Break yarn and thread through stitches, draw tight & fasten off.
Case
Using shade B, cast on 9 stitches.
Rows 1–78: Knit all rows in Garter Stitch
Cast off.
Pick up 29 stitches evenly along one of the long sides.
- Row 1: P
- Row 2: K4 (K2tog x 4, K3) twice, K4
- Row 3: P
- Row 4: K1 (K2 tog, K2) to end.
- Row 5: P
- Row 6: K2 tog to end.
- Row 7: Break yarn and thread through stitches, draw tight & fasten off.
- Sew the bottom and side together to form a cupcake case.
Making Up
- Sew together cupcake edges, leaving a gap to stuff.
- Stuff with stuffing and sew up the gap.
- Sew in any loose ends.
- Sew a running stitch around the edge of the cherry and pull it tight to give it a ball shape.
- Fasten off and attach to the top of the cake.
- Sew on small round beads to look like sprinkles!
- Or add French knots with embroidery thread.

Could you share your work with us?
I love seeing your finished projects on social media.
If you enjoyed making the knitted cupcake, I’d love to see yours on Instagram, be sure to tag me @handylittleme.
If you are on Facebook, stop over to the Handylittleme Facebook Group and share a photo.
Or come over to the Handylittleme Facebook page to catch up on the latest patterns.
You can also find us on Pinterest and Ravelry.
I’d love to see your work.
Happy Knitting!

What Is The Best Yarn For Knitted Cupcakes?
When knitting cupcakes, you’ll want a yarn that allows for a realistic and visually appealing texture.
A soft, worsted weight, aran weight yarn, or DK weight yarn in various colors can work well for this project.
Cotton or acrylic yarn provide a good stitch definition and are easy to care for, making them practical choices for decorative items like knitted cupcakes.
Variegated yarns can also add a playful touch to your knitted cupcakes.
- Learn everything about yarn weights here – Yarn Weight Guide {+ Conversion Chart}
- Learn everything about yarn fibers here – Yarn Types Explained: A Guide To Different Fibers
Knitting Lessons
If you are a new knitter and need help with the knitting basics, check out the knitting lessons here – Knitting Lessons (With Video Tutorials).
There, you will find step-by-step tutorials for all the different knitting techniques a newbie needs to know.
Including how to cast on, how to knit the basic knit stitches, how to knit the knit stitch, the stockinette stitch, the rib stitch, the garter stitch, the mattress stitch, short rows, and a list of knitting abbreviations, and more.
For more easy projects, check out this pattern category, there you will find a range of knitting patterns – Beginner Knitters.
And if you need more video tutorials, check out my YouTube channel here. – Handy Little Me – YouTube.
Resources and tutorials you may find helpful in following this pattern:
This cute free knitted cupcake pattern is great for any advanced beginner knitters.
- You should be comfortable casting on (how to cast on knitting) and casting off (how to cast off knitting for total beginners (step by step)), as well as knitting in garter stitch (how to knit garter stitch).
- You should be comfortable working the purl stitch (how to knit the purl stitch (for beginners + a video tutorial)).
- How to knit two stitches together (K2tog)
- You should also be comfortable reading knitting patterns (how to read knitting patterns for beginners).
- How to increase stitches (how to increase stitches in knitting)
- And understanding knitting abbreviations and terms (US and UK).
More Free Knitting Patterns
- Cupcake Tea Cosy Knitting Pattern
- Knitted Tea Cosy Pattern | Ice Cream Swirl
- Dishcloth Knitting Patterns (To Practice Basic Knitting Stitches) (It’s A Free Download)
- Bunny Softie Pattern (Easy To Knit)
- Stuffed Bunny Pattern {Free Knitted Toy Pattern}
- How To Knit A Baby Hat (Straight Needles)
- Baby Slippers Knitting Pattern (0-3 months)
- Easy Baby Sweater Knitting Pattern For Beginners (0-3 months, 3-6 months, and 6-9 months.)
- Baby Beanie Hat Pattern (6-12 months)
- Kids Beanie Hat Pattern (1-3 years)


