Granny Square Bag Pattern
THIS ARTICLE CONTAINS AFFILIATE LINKS THAT SUPPORT HANDY LITTLE ME CONTENT AND FREE PATTERNS.Crochet a stylish and functional accessory with this beginner-friendly granny square bag pattern.
Made with classic motifs and modern flair, this bag is the perfect blend of vintage charm and everyday practicality.
Whether you’re heading to the market, beach, or simply want a cute crochet project, this bag showcases how timeless and trendy granny squares can be.
Please scroll down to view the free crochet pattern online or grab the inexpensive, ad-free PDF in my shop here.

Before You Get Started
Here are a few helpful things to know before you begin your granny square bag:
- This is an easy-level pattern using basic granny square construction.
- The bag is made with 12 joined squares, plus simple panels for structure and bamboo handles.
- You can substitute raffia yarn with worsted cotton or acrylic for a more relaxed texture.
- Ideal for adventurous beginners or seasoned crocheters wanting a fun and fast finish.
What You Need
Yarn
- 1 x Wool and The Gang – Ra Ra Raffia in the color Lilac.
- 1 x Wool and The Gang – Ra Ra Raffia in the color Ivory White.
- This raffia is 100% paper.
- 100 gram = 250 m / 273 yards Double knitting/light worsted.
- Yarn weight – Worsted weight/Aran/10 Ply.
Hook
Notions
- Scissors
- Yarn needle
- Tape measure
- 2 x Bamboo bag handles
How Many Granny Squares Do You Need For A Bag?
Most granny square bags require 12 to 14 squares, depending on their size and layout.
For this tote bag:
- 12 squares are used (6 per side)
- Each square is approx. 4”–5”, depending on your tension
- You’ll also create side and bottom panels for depth and structure
Tip: Choose larger squares for faster assembly or smaller ones for intricate detail.
What Yarn To Use For A Granny Square Bag?
Choosing the right yarn ensures durability and style. Here are great options:
- Worsted Acrylic: Budget-friendly, washable, durable.
- Cotton: Strong, structured, breathable — perfect for summer totes.
- Wool Blends: Great for a cozy, luxe feel in fall/winter.
- Raffia (like Ra Ra Raffia): Lightweight, crisp, ideal for beachy bags.
- Bamboo: Silky and soft, best for drapey, elegant textures.
- Variegated/Self-Striping: Create effortless color changes with no yarn swapping.
Choose yarn based on your desired look — matte and sturdy or soft and drapey.
Are Granny Squares Back In Style?
Yes — granny squares are hotter than ever!
Once seen as retro, they’re now a crochet fashion staple.
From runways to Pinterest boards, designers are reimagining the granny square in fresh, modern ways.
Why they’re trending:
- Bold color combinations
- Vintage charm meets DIY energy
- Versatility in garments, bags, and accessories
Whether you’re new to crochet or returning to your hooks, this bag is a stylish way to celebrate tradition with a twist.

Granny Square Bag Pattern Instructions
Grab the ad-free printable PDF pattern in my shop here.
Pattern Notes
Skill Level: Easy / Advanced Beginner
Gauge: 14 dc + 6 rows = 4” square
Finished Size:
- Width: 16”
- Height: 10”
- Girth: 4”
Abbreviations
This granny square bag pattern is written in US crochet terms.
You can grab a free list of US and UK crochet terms here.
- ch – chain
- ch-sp – chain space
- dc – double crochet
- sc – single crochet
- sl-st – slip stitch
- RS – right side
- Rep – repeat
- WS – wrong side
Make 12 Granny Squares
With the US H8/5 mm Crochet hook…
Make 12 Squares
With the first color, ch 4, sl-st in the first ch to form a ring.
Round 1: Ch 3, 2 dc in the ring, (ch 3, 3 dc in ring) 3 times, ch 3, join with a sl-st in top of first ch 3, fasten off.
Round 2: Join 2nd color in any corner 3 ch-sp, ch 3, 2 dc in same sp, ch 3, 3 dc in same sp, ch 3, (3 dc, ch 3, 3 dc in next sp, ch 3) 3 times, then join with a sl-st in top of first ch 3, fasten off.
Round 3: Join 3rd color in any corner 3 ch-sp, ch 3, 2 dc in same sp, ch 3, 3 dc in same sp, ch 3, (3 dc in next space between 3 dc groups, ch 3, 3 dc, ch 3, 3 dc in next 3 ch-sp) 3 times, 3 dc in next sp between 3-dc groups, ch 3, join with a sl-st in top of first ch 3, fasten off with a sl st.
Join The Squares Together
- Weave in the loose ends from the colors of the granny squares before you begin.
- With the wrong side facing you, sew the squares together through the top loops only.
- This will show a neat seam on the right side of the work.
- Weave in any loose ends.
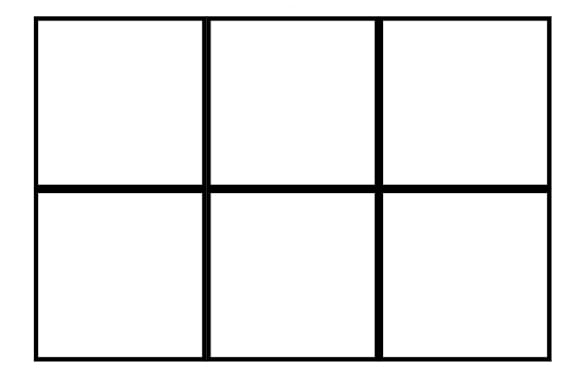
Make two panels of 6 squares each (see square bag layout/diagram below).

The First Border
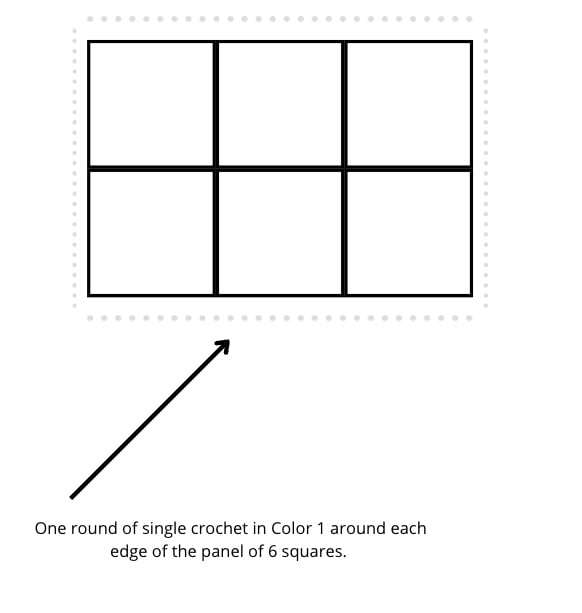
- When you have your two bag panels of 6 granny squares each, you will then single crochet a border around all of them in Color 2 (Lilac).
- sc into each stitch working 2 sc in each corner space.

The Second Border
- When you have completed the first border in Color 2 – you will then complete another border in Color 1.
- sc into each stitch working 2 sc in each corner space.

The Side Panels x 2
- With Color 1 (Ivory White) ch 37,
- Row 1: sc into the 1st ch from hook, sc to the end of the row, ch 3, turn,
- Row 2: Work 1 dc into the next ch, work in dc to the end of the row, ch 3, turn,
- Rows 3-6: Continue to rep row 2 for 4 more rows (at the end of Row 6, ch 1, turn,)
- Row 7: sc to the end of the row.
- Fasten off.

The Bottom Panel x 1
- With Color 1 (Ivory White) ch 57,
- Row 1: sc into the 1st ch from hook, sc to the end of the row, ch 3, turn,
- Row 2: Work 1 dc into the next ch, work in dc to the end of the row, ch 3, turn,
- Rows 3-6: Continue to rep row 2 for 4 more rows (at the end of Row 6, ch 1, turn,)
- Row 7: sc to the end of the row.
- Fasten off.

Finishing/Making Up
- Join the side panels and bottom panel seams using the mattress stitch.
- Seam with the right sides facing you.
- Seam the edges of one panel first to the side panels and bottom panel (as you can see in the diagram below), and then to the second panel.

Bag Handles
- With the right side of the bag panel facing you, select the center 16 stitches at the top of the bag and insert your hook, with Color 2 – Lilac, single crochet along those 16 sts.
- Work 5 more rows of sc.
- Fasten off, leaving a length of around 16 inches for seaming.
- Place the handle into the flap and fold it over.
- Thread a darning needle with the tail end of Color 2 and start to seam along the edge, in and out through the corresponding holes.
- Stitch through the first hole and the second hole a couple of times to strengthen the edge stitches.
- Make sure you are seaming into the bag border so that the handle will be secure. (see photos for reference on page 12)
- When you reach the end, push your needle in and out of the end stitch and the next stitch a couple of times to make it secure before fastening off and weaving in the loose ends.
- Repeat on the other side for the other bag handle.

FAQs + Extra Tips
→ Can I line the bag?
Yes! Add a simple fabric lining to secure small items and strengthen the shape.
→ Can I use scrap yarn?
Absolutely. Great for stash-busting — just make sure yarns are a similar weight.
→ What’s the best handle alternative?
Use crocheted handles, thrifted bag handles, or macrame cords.
→ Can I sell what I make?
Yes, feel free to sell finished items. Just don’t sell or repost the pattern or my photos.
Share Your Work!
Did you make this granny square bag pattern? I’d love to see it!
Tag @handylittleme or use #handylittleme on Instagram.
Join our Facebook Group and share your project.
Follow on Pinterest, YouTube, and Ravelry for more patterns!
You may also like…
- 41+ Free Crochet Market Bag Patterns (Best For Beginners)
- Granny Square Pattern: Crochet The Perfect Square (Free Printable)
- Granny Square Market Bag
- 6 Free Crochet Gift Bag Patterns For Christmas!
- Crochet Bag Patterns
- Crochet Sunflowers Granny Square
- Crochet Puff Stitch (A How-To Tutorial For Beginners)
- Basic Granny Square Pattern
- 40 Free Granny Square Crochet Patterns (Easy Ideas)
- Granny Square Top Crochet Pattern (Free + Easy)
- Crochet Fringe Clutch Pattern
- Fringe Crossbody Bag Pattern {Crochet}
- Crochet Clutch Pattern (Beginner Friendly!)
- 19 Free Crochet Beach Bags (Summer Perfect Patterns)
- Crochet Circle Bag Pattern {With Fringe}
- Crochet Bag Pattern For Beginners
- Raffia Crochet Bag Pattern (Step By Step)


