Crochet Tote Bag Pattern (Free Printable)
THIS ARTICLE CONTAINS AFFILIATE LINKS THAT SUPPORT HANDY LITTLE ME CONTENT AND FREE PATTERNS.In this post, you will see a crochet tote bag pattern.
This crochet project is not only a summer staple you can use repeatedly but also an easy crochet pattern you can make in your favorite color.
Using only double crochet stitches throughout the pattern, this is an easy one to follow.
Please scroll down to view the free pattern and printable or purchase the inexpensive ad-free PDF in my shop here.

Crochet Something Fun For Summer!
Summer is the perfect time to crochet something beautiful for yourself or as a handmade gift.
From lightweight garments like beach cover-ups, dresses, shawls, and blouses, to essential accessories like bucket hats, headbands, and market bags, there’s no shortage of creative crochet projects for sunny days.
Whether you’re a beginner looking for simple crochet stitches or a more advanced maker wanting to try out intermediate patterns, there’s something for every skill level.
Crochet Bags Are Perfect For Sunny Days
Crochet bags are some of the best summer projects—they’re quick, fun, and totally functional.
This easy tote bag is the perfect size to carry on a beach day, to the farmers market, or even for a casual night out.
You’ll find an abundance of free crochet bag patterns online, ranging from simple designs using basic stitches like single crochet, double crochet, and half double crochet, to more textured options featuring granny squares or unique stitch combinations.
Related Post: Crochet Lessons {With Video Tutorials}

Why You’ll Love Crochet Tote Bags
A crocheted tote bag isn’t just cute—it’s a durable and functional bag that holds your everyday essentials with ease.
The crochet fabric creates a sturdy, breathable structure that’s perfect for summer.
Make one in your favorite color to match your wardrobe, or create a few in different shades to switch up your look!
These bags make great gifts and are excellent for:
- Work or school
- The beach
- Grocery store runs
- Travel days

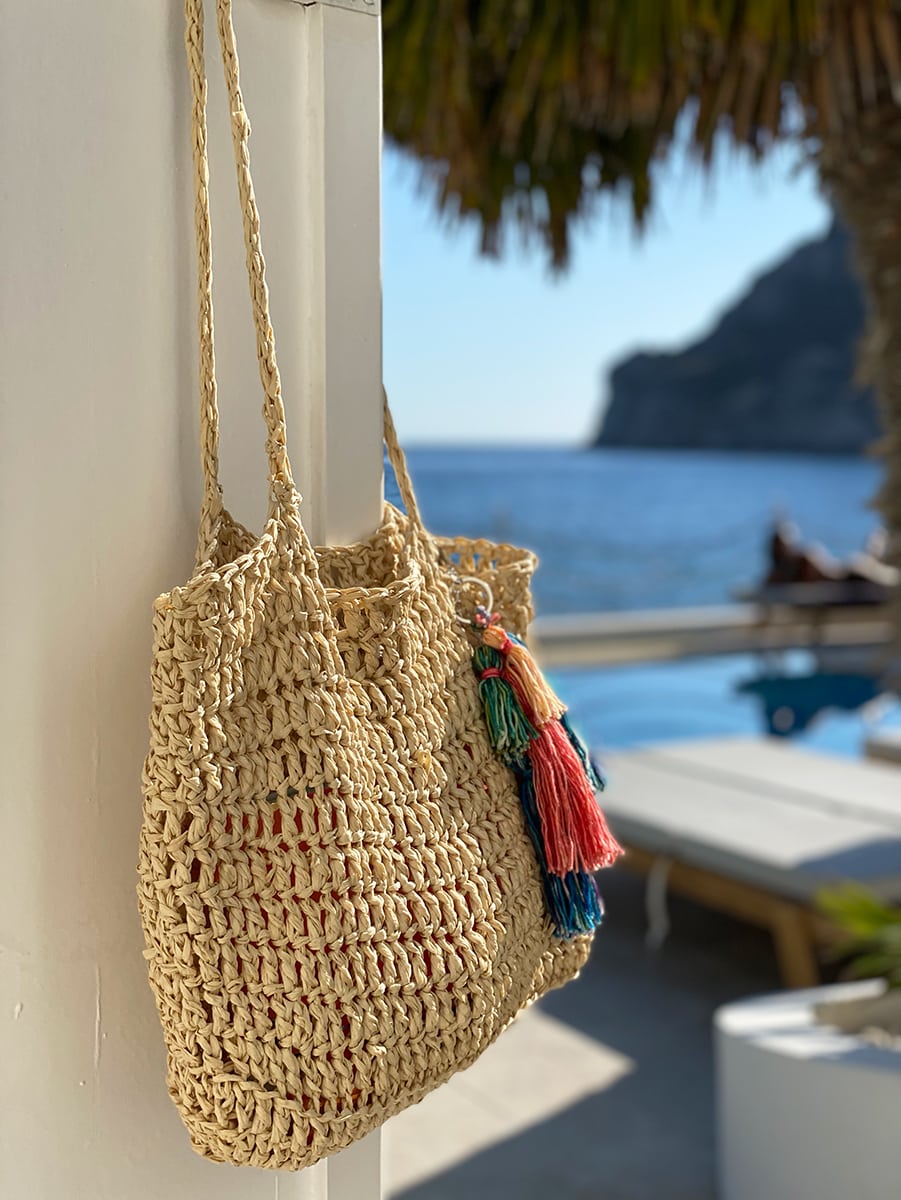
Crocheting With Raffia
For this pattern, I used King Cole Raffia in a natural color, worked with two strands held together for extra strength.
If you’ve never tried crocheting with raffia, it’s surprisingly easy to work with and creates a beautiful, rustic finish.
You can also experiment with raffia alternatives like Ra-Ra Raffia from Wool and the Gang, or explore the gorgeous color options from King Cole—think earthy browns, olive greens, and vibrant reds.
However, you can use raffia alternatives, as there are many around, like Ra Ra Raffia from Wool and the Gang.
There are also other gorgeous color choices from King Cole Raffia, including browns, greens, and reds.

Tote Bag Crochet Pattern
You can grab the free printable below or support my work by purchasing the ad-free PDF in my shop here.
Notes
Skill Level – Easy (Advanced Beginner)
- For the base – Do not turn at the end of the round, but continue working in a spiral, with the right side (RS) always facing.
- Keep count of the sts by placing a marker (PM) on the last st of each round.
- There are no turning chains in this pattern.
- The bag is worked using two strands of raffia held together.
Copyright Info
- Please do not copy, sell, redistribute, or republish this pattern.
- If you wish to share this pattern, link to the pattern page only.
- You may sell items produced using this pattern.
- Do NOT use the copyrighted photos for your product listing.
- For the copyright T&C, please read my Terms of Use.
Size Information
Gauge
- 9 stitches, 5 rows to 10cm/4″ in double crochet.
Measurements / Size
- Base length = 15 inches
- Base width = 5.5 inches
- Height = 10 inches
- Bag handles = 28 inches
The supplies you need
Yarn
- 4 x King Cole Raffia – in the color Natural – (1456) 50g/114m/124y
- Alternative raffia yarn – Ra Ra Raffia from Wool and The Gang
Crochet Hook
Notions
- Scissors
- Yarn needle
- Tape measure
- Closed stitch markers
Tassels
- Make 3-6+ tassels from leftover yarns.
- The tassels will be tied together on a keyring to hang from one handle on the bag. (See photos)
- You can view a tutorial showing you how to make tassels here. – How To Make Tassels {Photo + Video Tutorial}

Abbreviations
This pattern is written in US crochet terms.
- CH – Chain
- Cont – Continue
- DC – Double crochet
- Patt – Pattern
- PM – Place marker
- Rep – Repeat
- RS – Right side
- SS – Slip stitch
- St(s) – Stitch(es)
- WS – Wrong side
Pattern Instructions
See notes before you start.
The bag is worked with two strands of raffia together.
The Base Of The Bag
- ch 30
- Round 1: dc into the second ch from the hook, dc into every ch until the end. dc twice more in the final ch (3 dc’s in total in the final ch). Place a closed st marker in the center of the 3 sts. Turn the work and dc into every ch on the other side. dc 3 times in the final st. Mark the center of the 3 sts with a closed st marker.
- Round 2: dc into every st until one st before the marker, 2 dc in next st, remove marker, 3 dc in the next st, 2dc in the next st. Replace the marker in the center st of the 3 st increase. rep to finish the other side of the base.
- Rep round 2 once more.
- Your base should measure 15 inches in length and 5.5 inches in width.
- There should be 6 rounds of double crochet in the finished base.

The Body Of The Bag
- Next Round – dc into all the sts into the back loop only.
*Please note – place a marker to denote which is the beginning/end of the round.
- Continue to work in a spiral – dc all of the sts in every round (in both loops) – until the bag measures = 10 inches (rounds worked- 11)
- You can make the bag taller but you will need more raffia.
- Finish the last st with an ss and cut the yarn, leaving a short length of about 3 inches.
- Secure and weave in the ends.
- Weave in all other loose ends.
The Bag Handles
- The bag handles are worked using two strands of raffia together.
- Join the raffia 9 sts in from the side of the bag, and pull up a loop in each of the next 3 sts to work an I-cord.
- You can watch an I-cord video tutorial here.
- I-cord written instructions: Starting with 3 loops as instructed, *pull up a loop through the second ch from hook and third ch from hook (3 loops on hook), slip these 2 loops onto a knitting or cable needle, 1 ch, (slip 1 loop from needle back onto the hook, 1 ch) twice. Rep from * until I-cord is your desired length.
- The I-cord handles are around 28 inches long / 49 rows worked.
- Miss the next 13 sts, join the end of the I-cord to the next 3 sts (crochet and attach to the bag to match the other strap from the front).
- Rep for the other side of the bag.
- You can see in the image below where closed markers have been placed to make it easier to count out the sts needed for the bag handles.

Tassel Charm
- You may wish to add a tassel charm from leftover yarns in your stash.
- For this, you will need a keyring clip with a ring, so that you can tie the tassels onto the ring.
- The keyring clip can then be clipped to the bag, to one of the handles, or wherever you like.
- Alternatively, you may want to tie a colorful scarf or leave the bag as it is!
Support my work and grab the ad-free printable PDF pattern here
Free Printable
Want to take this pattern on the go or print it out for easy access while you crochet?
It’s perfect for keeping by your side as you work, whether you’re crocheting on the couch, at the beach, or while traveling.
Simply press the print button below to grab your copy and start stitching your new favorite summer bag today!
Crochet Tote Bag Pattern

A crocheted tote bag isn’t just cute—it’s a durable and functional bag that holds your everyday essentials with ease.
The crochet fabric creates a sturdy, breathable structure that’s perfect for summer.
Make one in your favorite color to match your wardrobe, or create a few in different shades to switch up your look!
Materials
- 4 x King Cole Raffia – in the color Natural – (1456) 50g/114m/124y
- Alternative raffia yarn – Ra Ra Raffia from Wool and The Gang
Tools
- Crochet Hook 8 mm (US L/11)
- Scissors
- Yarn needle
- Tape measure
- Closed stitch markers
Instructions
The Base Of The Bag
For the base – Do not turn at the end of the round, but continue working in a spiral, with the right side (RS) always facing.
Keep count of the sts by placing a marker (PM) on the last st of each round.
There are no turning chains in this pattern.
The bag is worked using two strands of raffia held together.
- ch 30
- Round 1: dc into the second ch from the hook, dc into every ch until the end. dc twice more in the final ch (3 dc’s in total in the final ch). Place a closed st marker in the center of the 3 sts. Turn the work and dc into every ch on the other side. dc 3 times in the final st. Mark the center of the 3 sts with a closed st marker.
- Round 2: dc into every st until one st before the marker, 2 dc in next st, remove marker, 3 dc in the next st, 2dc in the next st. Replace the marker in the center st of the 3 st increase. rep to finish the other side of the base.
- Rep round 2 once more.
- Your base should measure 15 inches in length and 5.5 inches in width.
- There should be 6 rounds of double crochet in the finished base.
The Body Of The Bag
- Next Round – dc into all the sts into the back loop only.
*Please note – place a marker to denote which is the beginning/end of the round.
- Continue to work in a spiral – dc all of the sts in every round (in both loops) – until the bag measures = 10 inches (rounds worked- 11)
- You can make the bag taller but you will need more raffia.
- Finish the last st with an ss and cut the yarn, leaving a short length of about 3 inches.
- Secure and weave in the ends.
- Weave in all other loose ends.
The Bag Handles
- The bag handles are worked using two strands of raffia together.
- Join the raffia 9 sts in from the side of the bag, and pull up a loop in each of the next 3 sts to work an I-cord.
- You can watch an I-cord video tutorial here.
- I-cord written instructions: Starting with 3 loops as instructed, *pull up a loop through the second ch from hook and third ch from hook (3 loops on hook), slip these 2 loops onto a knitting or cable needle, 1 ch, (slip 1 loop from needle back onto the hook, 1 ch) twice. Rep from * until I-cord is your desired length.
- The I-cord handles are around 28 inches long / 49 rows worked.
- Miss the next 13 sts, join the end of the I-cord to the next 3 sts (crochet and attach to the bag to match the other strap from the front).
- Rep for the other side of the bag.
- You can see in the image below where closed markers have been placed to make it easier to count out the sts needed for the bag handles.
Tassel Charm
- You may wish to add a tassel charm from leftover yarns in your stash.
- For this, you will need a keyring clip with a ring, so that you can tie the tassels onto the ring.
- The keyring clip can then be clipped to the bag, to one of the handles, or wherever you like.
- Alternatively, you may want to tie a colorful scarf or leave the bag as it is!
Notes
Abbreviations
This pattern is written in US crochet terms.
- CH – Chain
- Cont – Continue
- DC – Double crochet
- Patt – Pattern
- PM – Place marker
- Rep – Repeat
- RS – Right side
- SS – Slip stitch
- St(s) – Stitch(es)
- WS – Wrong side
Recommended Products
As an Amazon Associate and member of other affiliate programs, I earn from qualifying purchases.

Could you share your work with us?
I love seeing your finished projects on social media.
If you enjoyed making the pattern, I’d love to see yours on Instagram, be sure to tag me @handylittleme or #handylittleme.
If you are on Facebook, stop over to the handylittleme Facebook group and share a photo.
I’d love to see your work!
Helpful resources
This pattern is great for advanced beginners.
- You should be comfortable making a slipknot (how to make a slip knot (step by step)) and creating a chain (how to start a crochet chain).
- You should know how to double crochet (how to double crochet (dc) for beginners).
- You should also be comfortable reading crochet patterns (how to read crochet patterns for beginners).
- And understanding of crochet abbreviations and terms (US + UK).
Frequently Asked Crochet Bag Questions
The yarn you are going to use depends on the pattern you are going to recreate and what you will do with your bag.
Market bags and beach bags can be made with cotton yarn for durability.
Raffia is also an excellent material to make your bags from.
All yarn-made items can stretch as the strands of yarn stretch from the tension when we are working on our stitches.
There are some things you can do to avoid the extra stretching like being mindful of your tension.
Choosing the right yarn for our bags – yarn is stretchy but some like wool-acrylic yarns have a higher elasticity which makes them perfect for garments but not for bags.
There are yarns just for crochet bags.
And if you want to make a beach bag raffia is an excellent option.
Blocking your project after you are done can boost your project and help it maintain its shape.
Having sturdy handles will also help your bag from stretching.
Yes! You don’t need to be an intermediate maker to make your own crochet bag.
You can crochet one using only the basic crochet stitches like the single crochet, the double crochet, and the treble crochet stitch.
A crochet market bag or a tote bag will be a good project for new makers.
More Bag Patterns
Check out more free patterns here – Crochet Bag Patterns
Or grab the ad-free bag pattern bundle here
The bundle includes 13 crochet bag patterns.
Including the drawstring crochet bag pattern, the raffia circle crochet bag pattern, and many more.
Free Crochet Patterns
- Free Crochet Easter Eggs Pattern
- 50 Best Crochet Stitches For Blankets And Afghans
- Crochet Round Rug Pattern
- 35 Free Easter Crochet Patterns
- 35 Free Cotton Yarn Crochet Patterns
- Crochet Dishcloth Pattern Set
- Crochet Washcloth Pattern
- Crochet Bag Pattern For Beginners
- 50 Stash Busting Crochet Patterns
- 40 Free Granny Square Crochet Patterns
- Crochet Clutch Pattern (Beginner Friendly!)
- Crochet Beach Cover-Up Pattern
- Crochet Fringe Clutch Pattern
- Fringe Crossbody Bag Pattern {Crochet}
- 19 Free Crochet Beach Bags (Summer Perfect Patterns)
- Crochet Circle Bag Pattern {With Fringe}
- Raffia Crochet Bag Pattern (Step By Step)