Granny Square Crochet Top Pattern (Easy + Free Tutorial)
THIS ARTICLE CONTAINS AFFILIATE LINKS THAT SUPPORT HANDY LITTLE ME CONTENT AND FREE PATTERNS.Discover how to create your own stylish granny square crochet top with this easy-to-follow free pattern!
Perfect for beach trips, festivals, or casual outings, this versatile top can be customized in various sizes, making it ideal for crocheters at every skill level.
Please scroll down to view the free crochet pattern online, or grab the inexpensive ad-free PDF in my shop here.

How To Crochet A Granny Square Top
This granny square crochet top pattern is beginner-friendly, suitable for advanced beginners comfortable with basic crochet stitches.
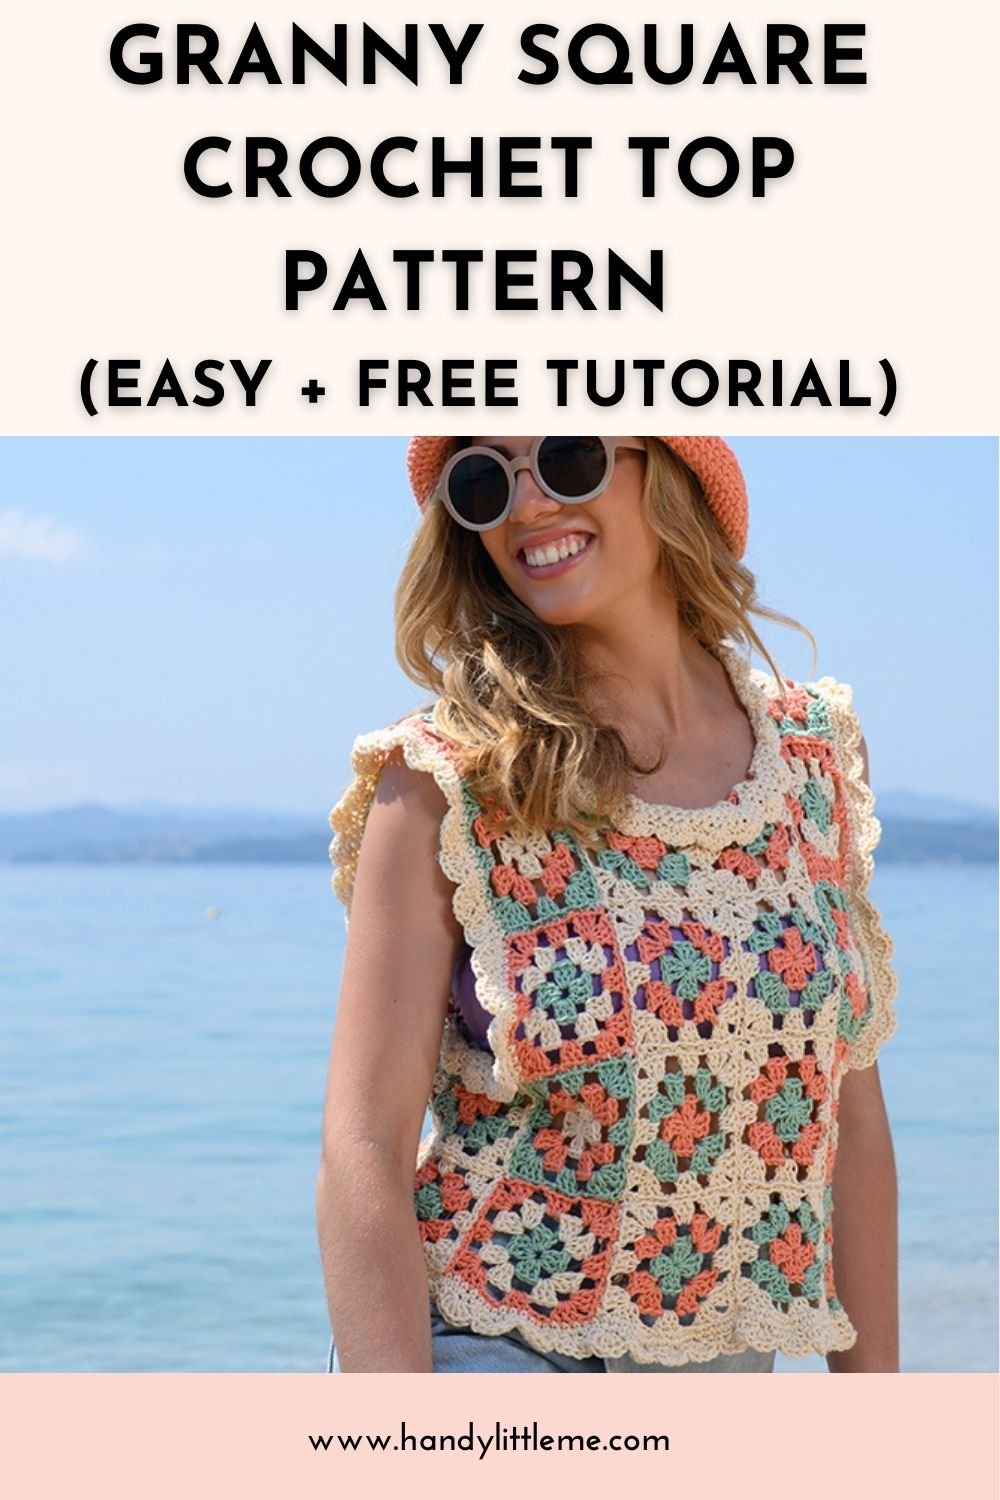
The top consists of classic granny squares, joined seamlessly to create a chic, breezy garment.
The granny squares are crocheted using the double crochet stitch (US terms) with a 5 mm (US H/8) crochet hook.
You’ll crochet two identical panels and seam them together, finishing your top with an elegant crochet shell border around the neckline, armholes, and edges.
Essential stitches and techniques
Granny squares are highly versatile and commonly used in a variety of projects, including blankets, cushion covers, rugs, table runners, and trendy crop tops.
They range from solid granny square designs to classic open-work styles, offering endless creative possibilities.
Below, you’ll find detailed instructions to master the granny square crochet technique required for this top.

Granny Square Crochet Top Pattern
Pattern Notes
Skill Level – Easy (Advanced Beginner)
- This is a simple granny square pattern.
- Cut and join colors as needed for the granny squares.
- You can make your own color combinations for the granny squares or follow my colors on page 4.
- One of the colors you will need more of is for the edging – I used natural (you can see the yarn quantities below).
- There are detailed instructions with diagrams to help you with the basic shape of your tank top.
Copyright Info
- Please do not copy, sell, redistribute, or republish this pattern.
- If you wish to share this pattern, only link to the pattern page.
- You may sell items produced using this pattern.
- Do NOT use copyrighted photos for your product listing.
- For the copyright T&C, please read my Terms of Use.
Size Information
Gauge
9 double crochet sts/2 rows in 4×4 inches using the 5mm (US H/8) crochet hook and the cotton from WAK.
Each granny square is a 4-inch square.
Measurements/Sizes
- XS/S – To fit bust 34 -36 inches.
- M/L – To fit bust 38-40 inches.
- XL/2XL – To fit bust 42-44 inches.
- 3XL/4XL – To fit bust 44-46 inches.
- 5XL – To fit bust 48 inches.

How many granny squares do you need?
You will also need to adjust your yarn quantities for the number of square patterns you must make.
- XS/S – 38 (46 if you add an extra row of length on the front and back panels)
- M/L – 58 (68 if you add an extra row of length on the front and back panel)
- XL/2XL – 68 (80 if you add an extra row of length on the front and back panels)
- 3XL/4XL – 78 (84 if you add an extra row of length on the front and back panel)
- 5XL – 90 (106 – if you add an extra row of length on the front and back panels)

The supplies you need…
Yarn
- 1 (2, 3, 4, 5) x We Are Knitters – The Cotton in the color Salmon Pink
- 2 (3, 4, 5, 6) x We Are Knitters – The Cotton in the color Natural
- 1 (2, 3, 4, 5) x We Are Knitters – The Cotton in the color Mint
- This cotton is 100% Pima Cotton / 10g/3.05oz/232 yds/212m.
- This is a worsted weight yarn (cotton yarn).
- Check the yarn label (How To Read A Yarn Label (Step By Step)) for the yarn weight (Yarn Weight Guide (+ Conversion Chart)) and hook size.
Hook Sizes
Notions

Crochet Abbreviations
This pattern is written in US crochet terms.
You can grab a free list of US and UK crochet terms here.
- ch – chain
- ch-sp – chain space
- sc – single crochet
- dc – double crochet
- sl st – slip stitch
- st – stitch
- RS – right side
- Rep – repeat
- WS – wrong side

Pattern Instructions
Yarn Color Combinations
I used three different colors for my square design…
Square No 1
- Color 1 – Natural
- Color 2 – Salmon Pink
- Color 3 – Mint
Square No 2
- Color 1 – Salmon Pink
- Color 2 – Mint
- Color 3 – Natural
Square No 3
- Color 1 – Mint
- Color 2 – Natural Color
- 3 – Salmon Pink
Square No 4
- Color 1 – Mint
- Color 2 – Salmon Pink
- Color 3 – Natural

Granny Square Pattern
With the first color, ch 4, sl-st in the first chain to form a ring.
Round 1: Ch 3, 2 dc in the ring, (ch 3, 3 dc in ring) 3 times, ch 3, join with a sl-st in top of first ch 3, fasten off.
Round 2: Join 2nd color in any corner 3 ch-sp, ch 3, 2 dc in same sp, ch 3, 3 dc in same sp, ch 3, (3 dc, ch 3, 3 dc in next sp, ch 3) 3 times, then join with a sl-st in top of first ch 3, fasten off.
Round 3: Join 3rd color in any corner 3 ch-sp, ch 3, 2 dc in same sp, ch 3, 3 dc in same sp, ch 3, (3 dc in next space between 3 dc groups, ch 3, 3dc,ch3,3dcinnext3ch-sp)3times, 3dcinnextspbetween3-dc groups, ch 3, join with a sl-st in top of first ch 3, fasten off.
Joining The Squares Together
Arrange your squares how you want them – you can see how I arranged mine in the photo below.

Seaming
The granny squares…
Weave in the loose ends from the colors of the granny squares before you begin.
With the wrong side facing you, only sew the squares together through the top loops.
This will show a neat seam on the right side of the work.
Weave in any loose ends.
Arrange your squares to make your top…
You can see how to arrange your squares for your size in the images below.
The diagrams aim to help you to arrange the squares for seaming.
Extra squares are placed on either side of one panel (the back) – these are the side panel squares, and they will be seamed to the corresponding squares on the next panel (the front).
Joining The Squares For Each Size – Diagrams
You will need to use the diagram below to arrange them into the top shape.
More squares can be added to either side to make the top wider and to each end of each piece if you want a longer length.
You may also want to add another square for the shoulders for sizes XL-5XL.
Joining The Squares Together – XS/Small Size (34-36 inch bust)

Joining The Squares Together – Medium/Large Size (38-40 inch bust)

Joining The Squares Together – XL/2XL Size (42-44 inch bust)

Joining The Squares Together – 3XL/4XL Sizes (44-46 inch bust)

Joining The Squares Together – 5XL Size (48-inch bust)

The Edging
- Starting at the bottom edge of the top…
- With the right side of the work facing you and the yarn color of your choice (I used the natural color).
- Start at the corner of a granny square – sc into every stitch around each edge of the bottom edge of the top, ch 1, rep, and sc into every st again. (You will have 2 rows of single crochet).
- Next – ch 1, sc, skip 1 st, work 5 dc’s into the 3rd st from the hook, Skip 1 st, work 1 sc into the next st, skip 1 st, work 5 dc’s into the next st.
- Rep the sequence of working 1 sc, skip 1 st, work 5 dc’s into the next st, skip 1 st, work 1 sc into the next st.
- Repeat until you get back to where you started at the beginning of the shell border, sl-st into the last st.
- Fasten off securely.
- Weave in any loose ends.
- Repeat for both armholes and the neck.
Video Tutorial
You can see a video tutorial on creating this shell stitch border on my YouTube channel here.
Grab The Ad-Free Printable
PDF Pattern Here
Helpful Resources
This pattern is great for advanced beginners.
- You should be comfortable making a slipknot (how to make a slip knot (step by step)) and creating a chain (how to start a crochet chain).
- You should know how to single crochet (SC).
- You should know how to double crochet (how to double crochet (dc) for beginners).
- You should also be comfortable reading crochet patterns (how to read crochet patterns for beginners).
- And understanding of crochet abbreviations and terms (US + UK).

Make matching accessories…
You may also want to make a matching bucket hat to take with you on vacation!
View those patterns here:

How Many Granny Squares Does It Take To Make A Tank Top?
Firstly, the number of granny squares needed to create a tank top can vary based on several factors.
Specifically, these include the size of the squares, the desired dimensions of the tank top, and the design you are following.
Here are some general guidelines:
Size of Granny Squares: Granny squares come in various sizes, commonly ranging from 4 inches to 8 inches per side. Consequently, the size of the squares you select will directly impact the overall dimensions of your tank top.
Desired Size of Tank Top: Next, consider the intended size of your garment—small, medium, large, or otherwise—as larger sizes naturally require more squares.
Design and Layout: Finally, the specific design and layout of your tank top can significantly influence how many squares you’ll need. For instance, some patterns may utilize larger squares for the front and back panels and smaller ones for the sides. As a general estimate, you might need around 12 to 20 granny squares or more for a simple tank top, depending on the factors outlined above.
For example, if you choose to use 6-inch granny squares for a tank top measuring 18 inches wide and 20 inches long, you would likely require approximately 3 squares across and 4 squares down, totaling 12 squares.
However, please note that this is merely a basic example, and the actual number needed can vary according to your personal design and measurements.
More Crochet Squares
Easy to make with scrap yarn, look at these free crochet patterns, including square variations that you may also be interested in…
- Free Crochet Washcloth Pattern (Easy Granny Squares)
- Granny Square Crochet Bookmark Pattern (Free Printable)
- Granny Square Pattern: Crochet The Perfect Square (Free Printable)
- Carnival Confetti Crochet Granny Square (Free Printable)
- Sunset Square (Stashbuster Granny Square Pattern + Free Printable)
- Ocean Breeze Granny Square (Free Stashbuster Pattern + Printable)
- Berry Patch Granny Square Crochet Pattern (Free Printable)
- Pop Art Granny Square Pattern (Free Printable)
- Retro Bloom Granny Square Crochet Pattern (Free Printable)
- How To Crochet A Granny Square Blanket (Free Pattern)
- 40 Free Granny Square Crochet Patterns (Easy Ideas)
- Crochet Granny Square Coaster Pattern (Free Printable)
Could you share your work with us?
If you enjoyed making the granny square top, I’d love to see yours on social media – Instagram, be sure to tag me @handylittleme or #handylittleme.
If you are on Facebook, stop over to the handylittleme Facebook group and share a photo.
I’d love to see your work.
Happy crocheting!
This is one of the cutest tops with granny squares I have seen.
Thank you!
Catherine