Crochet Easter Basket Pattern (Free PDF)
THIS ARTICLE CONTAINS AFFILIATE LINKS THAT SUPPORT HANDY LITTLE ME CONTENT AND FREE PATTERNS.In this blog post, you will see a crochet Easter basket pattern (free PDF and printable).
Make an Easter bunny basket to store your mini crochet Easter eggs and treats.
The basket can be made easily with a handle or no handle.
You can also turn this handmade basket into a bunny with crocheted ears and a pom pom tail.
It’s going to be perfect for the Easter celebrations.
Scroll down to view the free pattern, and grab your free PDF at the end of this page.

Why Make A Crochet Egg Basket?
This basket pattern is relatively simple and a great advanced beginner crochet project.
Made with a 6 mm (US J/10) hook and cotton yarn, a worsted weight yarn that works with two strands held together, it works up fast.
Fill the mini basket with crochet eggs or mini chocolate eggs and other sweets and Easter treats your friends and family will love.
Crochet eggs require a small amount of yarn, so they’re a great project for making and filling your basket.
Check out the free crochet pattern here – Crochet Easter Eggs

Crochet Easter Basket Pattern Information
Notes
Skill Level – Easy (advanced beginner).
This crochet Easter basket pattern is not only great for your holiday decor, but you can use it for an Easter egg hunt and give it as an Easter gift.
It can also be used for storage in the home after Easter.
Using only single crochet stitches throughout the pattern, this is an easy one to follow.
Make it with a handle, no handle, or turn it into an Easter bunny!
Copyright Info
- Please do not copy, sell, redistribute, or republish this pattern.
- If you wish to share this pattern, please provide a link to the pattern page only.
- You may sell items produced using this pattern.
- Do NOT use copyrighted photos for your product listing.
- Please give pattern credit to Louise Bollanos or tag @handylittleme.

The supplies you need…
Yarn
- 3 x 50g (85m) Rico Creative Cotton Aran – in the color Clay (51). 100% cotton.
- For the inner ears, you will need scraps of pink around 10g (I used the same yarn in the color – Pastel Pink (02).
- I used the same yarn in the color Mouse Grey (28) for the eyes- scraps of grey.
- For the whiskers, and scraps of white, I used the same yarn in the color nature (60).
- This yarn was crocheted with two strands together for the basket and the ears.
- For the bunny tail – white yarn in acrylic or wool around 20g.
Hooks
- Crochet Hook – Size 6 mm (US J/10)
- Crochet Hook – Size 4.5 mm (US 7)
Notions + Other Tools
- Scissors
- Darning needle/yarn needle
- Tape measure
- Stitch marker
- Pom Pom Maker – Clover Large 3 3/8-inch for the pom pom tail.
- For the eyes, use 2 x black beads or brads.
Size Information
- The basket measures – base diameter = 5.5 inches / 14 cm.
- Height – 6 inches / 16 cm.
- Handle = Length – 16 inches / 41 cm. Width – 2.2 inches / 6cm.
- Ears – 4 inches / 10 cm. Width – 2 inches / 5 cm.
Gauge
- 10 stitches, 12 rounds to 10 cm/4″ of single crochet.

Abbreviations
The pattern is written in US crochet terms.
- CH – Chain
- PM – Place marker
- SC – Single crochet
- SS (also known as sl st) – Slip stitch
- RS – Right side
Easter Bunny Basket Pattern Instructions
Notes
- For the base – Do not turn at the end of the round, but continue working in a spiral, with the right side (RS) always facing.
- Keep count of the sts by placing a marker (PM) on the last st of each round.
- There are no turning chains in this pattern.
- To make the basket smaller, stop after 24 sts on round 4 or 36 sts on round 6 and then work round 9.

The Basket
Using the 6 mm (US J/10) hook and working two strands of the yarn together.
The base of the basket
- Make a 4 ch and join with an ss in the first ch to form a ring (magic circle).
- Round 1: (RS) – 1 ch; 8 sc in ring. (8 sts) PM (see notes)
- Round 2: 2 sc in each sc. (16 sts)
- Round 3: *1 sc in next sc, 2 sc in next sc* rep from * to end. (24 sts)
- Round 4: 1 sc in each sc.
- Round 5: *1 sc in next sc, 2 sc in next sc* rep from * to end. (36 sts)
- Round 6: 1 sc in each sc.
- Round 7: *1 sc in each of the next 2 sc, 2 sc in next sc* rep from * to end. (48 sts)
- Round 8: 1 sc in each sc.
- Round 9 – sc all the sts into the back loop only.
The body of the basket
- *Please note – keep the marker to denote which is the beginning/end of the round.
- Continue to work in a spiral – sc all of the sts in every round (in both loops) – until the bag measures = 6 inches / 16 cm.
- You can make the bag as short or as tall as you want.
- Finish the last st with an ss and cut the yarn.
- Secure and weave in the ends.
- Weave in all other loose ends.
The Handle
Using the 6mm (US J/10) hook and working two strands of the yarn together.
The basket handle (optional)
- For a wide handle, Ch 6 (for a thinner handle Ch 3), ch 1, turn,
- Row 1: (RS) – sc into every ch, ch 1, turn,
- Row 2: sc into every st, ch1, turn,
- Cont to sc into every st (repeating row 2) until your handle measures 15 inches / 38 cm.
Notes
- You can make your handle thinner by chaining 3 or 4 instead of 6 and you can also make it shorter or longer depending on your preference.
- You may also decide to not make a handle and use the basket without it.
Making Up – With the handle
- Sew in any loose ends on the basket and the handle.
- With a coordinating colored yarn or the same color, cut a length of around 8 inches and thread your darning needle.
- Fold over the top of your basket by 2 inches.
- Place one end of the handle on one side of the basket on the folded edge.
- Sew an X through the handle edge, which is the height of the basket fold-over section, and secure it.
- Repeat on the other side. (See the photos below for reference)

The Ears
Using the 6 mm (US J/10) hook and working two strands of the yarn together.
The Outer Ears (Make 2)
- With the main color yarn (brown) ch 10.
- R1 – sc into the 2nd ch from the hook, sc into every ch to the end of the row. sc twice more into the last st of the row (this means you will have 3 sts in total in that last st). PM in the center of those 3 sts with a closed st marker. Cont to sc into every st down the other side of the chain. sc 3 times in the last st of that side, then PM with a closed st marker into the center st of the 3 sts you just worked.
- R2 – sc into every st until you reach 1 st before the st marker, 2 sc in the next st, remove marker and work 3 sc into the next st, 2 sc in the next st. Place the marker into the middle st of the three sts you worked to denote the center point. Rep to the other side working the same – 2sc, 3 sc, 2sc at
- those center sts.
- Work sc down the other side, and when you reach the st before the marker, finish with an ss, cut yarn, and secure.
The Inner Ears (Make 2)
- With a coordinating color (pink) ch 5.
- Work Row 1 as above.
- Work rows 2 as above, but only increase once at one end, then work down the other side, finishing with an ss in the st before the marker and cutting the yarn to secure.

The Nose, Eyes + Tail
Using the 4.5 mm (US 7) hook and working a single strand of yarn.
The Nose (Make 1)
- With pink yarn ch 4, join into a magic ring, ch 1.
- sc 8 sts into the ring, ss the last st, and cut the yarn to secure, leaving a long tail of around 10 inches/26 cm.
The Eyes (Make 2)
- With a coordinating color (grey) ch 3, join into a magic ring, ch 1.
- sc 6 times into the ring, ss the last st, and cut the yarn to secure, leaving a long tail of around 8 inches/21 cm.
The Bunny Tail
- Make a large pom pom in white yarn for the bunny tail – do not use cotton; acrylic or wool will be better.
Making Up (as the bunny with no handle)
- Fold over the top of your basket by 2 inches.
- Sew the inner ears onto the front of the outer ears.
- Fold the ears at the bottom and secure them with a couple of stitches.
- Stitch the ears to the basket around 4 inches/10cm apart. (See the photo below for reference)
- Sew the eyes and nose into the place where you want them to go. place the beads or the brads in the center of the eyes and secure them. (See the photo below for reference)
- Sew the pom pom bunny tail onto the back of the basket. (See the photo below for reference)
- Whiskers – stitch whiskers on either side of the nose in white yarn. (See the photo below for reference)

Free Printable
Want to take this fun and festive project on the go?
Grab the free printable, and keep it handy while you crochet your Easter basket.
Perfect for gifting or decorating, this quick and easy pattern is ideal for using up leftover yarn!
Free Crochet Easter Basket Pattern
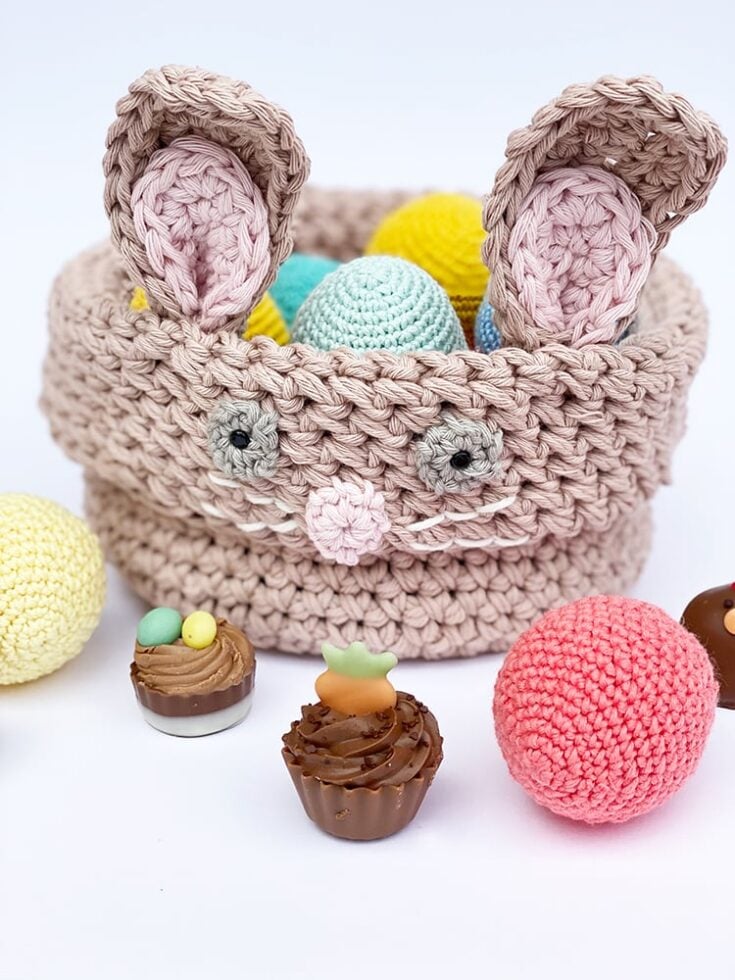
Crochet a sweet bunny Easter basket with this easy step-by-step pattern.
Perfect for beginners, this adorable basket features floppy ears and a cute face—ideal for holding mini eggs, treats, or small gifts.
A fun and festive project for your Easter celebrations!
Materials
- 3 x 50g (85m) Rico Creative Cotton Aran – in the color Clay (51). 100% cotton.
- For the inner ears, you will need scraps of pink around 10g (I used the same yarn in the color – Pastel Pink (02).
- I used the same yarn in the color Mouse Grey (28) for the eyes- scraps of grey.
- For the whiskers, and scraps of white, I used the same yarn in the color nature (60).
- This yarn was crocheted with two strands together for the basket and the ears.
- For the bunny tail – white yarn in acrylic or wool around 20g.
Tools
- Crochet Hook – Size 6 mm (US J/10)
- Crochet Hook – Size 4.5 mm (US 7)
- Scissors
- Darning needle/yarn needle
- Tape measure
- Stitch marker
- Pom Pom Maker – Clover Large 3 3/8-inch for the pom pom tail.
- For the eyes, use 2 x black beads or brads.
Instructions
The Basket
Using the 6 mm (US J/10) hook and working two strands of the yarn together.
The base of the basket
- Make a 4 ch and join with an ss in the first ch to form a ring (magic circle).
- Round 1: (RS) – 1 ch; 8 sc in ring. (8 sts) PM (see notes)
- Round 2: 2 sc in each sc. (16 sts)
- Round 3: *1 sc in next sc, 2 sc in next sc* rep from * to end. (24 sts)
- Round 4: 1 sc in each sc.
- Round 5: *1 sc in next sc, 2 sc in next sc* rep from * to end. (36 sts)
- Round 6: 1 sc in each sc.
- Round 7: *1 sc in each of the next 2 sc, 2 sc in next sc* rep from * to end. (48 sts)
- Round 8: 1 sc in each sc.
- Round 9 – sc all the sts into the back loop only.
The body of the basket
- *Please note – keep the marker to denote which is the beginning/end of the round.
- Continue to work in a spiral – sc all of the sts in every round (in both loops) – until the bag measures = 6 inches / 16 cm.
- You can make the bag as short or as tall as you want.
- Finish the last st with an ss and cut the yarn.
- Secure and weave in the ends.
- Weave in all other loose ends.
The Handle
Using the 6mm (US J/10) hook and working two strands of the yarn together.
The basket handle (optional)
- For a wide handle, Ch 6 (for a thinner handle Ch 3), ch 1, turn,
- Row 1: (RS) – sc into every ch, ch 1, turn,
- Row 2: sc into every st, ch1, turn,
- Cont to sc into every st (repeating row 2) until your handle measures 15 inches / 38 cm.
Notes
- You can make your handle thinner by chaining 3 or 4 instead of 6 and you can also make it shorter or longer depending on your preference.
- You may also decide to not make a handle and use the basket without it.
Making Up – With the handle
- Sew in any loose ends on the basket and the handle.
- With a coordinating colored yarn or the same color, cut a length of around 8 inches and thread your darning needle.
- Fold over the top of your basket by 2 inches.
- Place one end of the handle on one side of the basket on the folded edge.
- Sew an X through the handle edge that is the height of the basket fold-over section and secure it.
- Repeat on the other side. (See the photos below for reference)
The Ears
Using the 6 mm (US J/10) hook and working two strands of the yarn together.
The Outer Ears (Make 2)
- With the main color yarn (brown) ch 10.
- R1 – sc into the 2nd ch from the hook, sc into every ch to the end of the row. sc twice more into the last st of the row (this means you will have 3 sts in total in that last st). PM in the center of those 3 sts with a closed st marker. Cont to sc into every st down the other side of the chain. sc 3 times in the last st of that side, then PM with a closed st marker into the center st of the 3 sts you just worked.
- R2 – sc into every st until you reach 1 st before the st marker, 2 sc in the next st, remove marker and work 3 sc into the next st, 2 sc in the next st. Place the marker into the middle st of the three sts you worked to denote the center point. Rep to the other side working the same – 2sc, 3 sc, 2sc at
- those center sts.
- Work sc down the other side, and when you reach the st before the marker, finish with an ss, cut yarn, and secure.
The Inner Ears (Make 2)
- With a coordinating color (pink) ch 5.
- Work Row 1 as above.
- Work rows 2 as above, but only increase once at one end, then work down the other side, finishing with an ss in the st before the marker and cutting the yarn to secure.
The Nose, Eyes + Tail
Using the 4.5 mm (US 7) hook and working a single strand of yarn.
The Nose (Make 1)
- With pink yarn ch 4, join into a magic ring, ch 1.
- sc 8 sts into the ring, ss the last st, and cut the yarn to secure, leaving a long tail of around 10 inches/26 cm.
The Eyes (Make 2)
- With a coordinating color (grey) ch 3, join into a magic ring, ch 1.
- sc 6 times into the ring, ss the last st, and cut the yarn to secure, leaving a long tail of around 8 inches/21 cm.
The Bunny Tail
- Make a large pom pom in white yarn for the bunny tail – do not use cotton; acrylic or wool will be better.
Making Up (as the bunny with no handle)
- Fold over the top of your basket by 2 inches.
- Sew the inner ears onto the front of the outer ears.
- Fold the ears at the bottom and secure them with a couple of stitches.
- Stitch the ears to the basket around 4 inches/10cm apart. (See the photo below for reference)
- Sew the eyes and nose into the place where you want them to go. place the beads or the brads in the center of the eyes and secure them. (See the photo below for reference)
- Sew the pom pom bunny tail onto the back of the basket. (See the photo below for reference)
- Whiskers – stitch whiskers on either side of the nose in white yarn. (See the photo below for reference)
Notes
Notes
- For the base – Do not turn at the end of the round, but continue working in a spiral, with the right side (RS) always facing.
- Keep count of the sts by placing a marker (PM) on the last st of each round.
- There are no turning chains in this pattern.
- To make the basket smaller, stop after 24 sts on round 4 or 36 sts on round 6 and then work round 9.
Abbreviations
The pattern is written in US crochet terms.
- CH – Chain
- PM – Place marker
- SC – Single crochet
- SS (also known as sl st) – Slip stitch
- RS – Right side
Size Information
- The basket measures – base diameter = 5.5 inches / 14 cm.
- Height – 6 inches / 16 cm.
- Handle = Length – 16 inches / 41 cm. Width – 2.2 inches / 6cm.
- Ears – 4 inches / 10 cm. Width – 2 inches / 5 cm.
Gauge
- 10 stitches, 12 rounds to 10 cm/4″ of single crochet.
Grab the free crochet easter basket patterns pdf
Easter Eggs Crochet Pattern
If you enjoyed this crochet project, you may also want to make some crochet Easter eggs – Crochet Easter Eggs

Could you share your work with us?
I love seeing your finished projects on social media.
If you enjoyed making the Easter eggs, I’d love to see yours on Instagram, be sure to tag me @handylittleme.
If you are on Facebook, stop over to the Handylittleme Facebook Group and share a photo.
Or come over to the Handylittleme Facebook page to catch up on the latest patterns.
You can also find us on Pinterest and Ravelry.
I’d love to see your work.
Happy Crocheting!
More Crochet Easter Patterns
Crafting fun decorations for Easter is a great way to use up your yarn stash.
Using leftover cotton in pastel tones or going bolder with bright colors proves anything goes!
Make chicks, Easter bunnies, Easter eggs, free crochet easter basket patterns, and more to get into the spring mood with lots of free pattern downloads in this post here – 40 Free Easter Crochet Patterns
Related Post: 50 Stash Busting Crochet Patterns (Quick Projects

Crochet Lessons
If you are a beginner crocheter and need help with the crochet basics, check out the crochet lessons here – Crochet Lessons {With Video Tutorials}.
There, you will find tutorial posts for all the crochet techniques a newbie needs to know.
Including how to hold a crochet hook, how to crochet basic stitches, how to create a foundation chain (ch), single crochet stitches (sc), double crochet stitches (dc), treble crochet (tr), how to make a single crochet decrease (sc dec), and all the crochet abbreviations (in UK and US terms) a maker needs to know.
Join The Handy Little Me Facebook Group to connect with more makers.
And if you need more video tutorials, check out my YouTube channel here – Handy Little Me – YouTube
Helpful resources
This Easter basket crochet pattern is great for any advanced beginner.
- You should be comfortable making a slip knot (how to make a slip knot (step by step)) and creating a chain (how to start a crochet chain).
- You should be comfortable working single crochet (how to single crochet (SC)).
- You should also be comfortable reading crochet patterns (how to read crochet patterns for beginners).
- And understanding crochet abbreviations and terms (US + UK).
More Easter Projects
If you are looking for your next Easter project, check out the patterns below
- 23 Free Crochet Chicken Patterns (Easy + Cute Ideas)
- 31 Adorable Free Crochet Bunny Patterns For Easter
- Baby Bunny Hat (Easy + Quick Pattern)
- Easter Bunny Pattern (Floppy Ears + Cuddly!)
- Bunny Softie Pattern (Easy To Knit)
- Easter Bunny Egg Cozy
- Bunny Slippers For Baby (Perfect For Easter!)
- Easter Bunny Hat {Knit Flat}
- Bunny Ears Headband {With Knitted Ears}
- Easter Craft Activities {For Kids}
- Easter Chick Slippers Pattern {+ Loop Stitch Tutorial}
- Bunny Tea Cosy Pattern
- Bunny Ear Hat (Easy Pattern)
- Stuffed Bunny Pattern {With Crochet Overalls}
- Bunny Booties Knitting Pattern