Soap Saver Crochet Pattern (Free Printable)
THIS ARTICLE CONTAINS AFFILIATE LINKS THAT SUPPORT HANDY LITTLE ME CONTENT AND FREE PATTERNS.In this post, you’ll find a soap saver crochet pattern with a beautiful texture—a perfect scrap buster project for using up leftover yarn.
This soap saver bag is part of a matching crochet bathroom set that also includes a crochet shower puff, basket, face scrubbies, and washcloths.
All of these items make thoughtful handmade gifts and are ideal for selling at upcoming craft fairs.

Easy Soap Saver Bag For Beginners
The patterns below are fairly straightforward, and even if you are new to crochet, you will be able to make them.
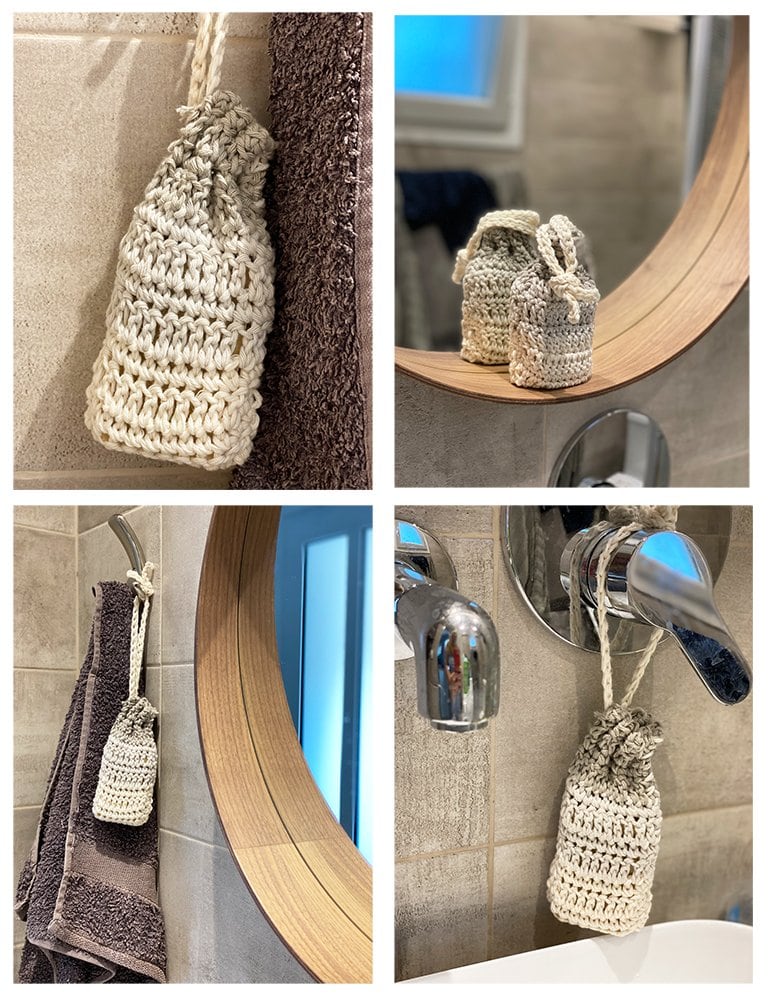
You can choose from two crochet soap-saver designs in this pattern.
One is made with only single crochet, and the other has single and double crochet.
Both patterns use US crochet terms.

What Is The Best Material For A Crochet Soap Saver?
The best material for a crochet soap saver is 100% cotton yarn.
It’s durable, absorbent, and gentle on the skin—plus it holds up well in water and can be machine washed and dried.
Do Crochet Soap Savers Work?
Yes, crochet soap savers work really well!
They help create a rich lather, gently exfoliate the skin, and make it easy to use up every last bit of soap—no more waste!
Can You Use Acrylic Yarn For A Soap Saver?
You can use acrylic yarn for a soap saver, but it’s not ideal.
Acrylic doesn’t absorb water well and can stay soggy, which may lead to mildew.
For best results, stick with 100% cotton or other natural fibers that are absorbent and quick-drying.
Soap Saver Crochet Pattern
Scroll down for the free pattern, or support my work by purchasing the ad-free PDF in my shop here.
Notes
Using cotton yarn, you will create a soap cozy with some texture to give as a small gift to a friend who needs a spa day.
These soap pouches are really eco-friendly and quick projects, plus a great way to use up leftover cotton yarn in your yarn stash.
The written instructions are below.
Copyright Info
- Please do not copy, sell, redistribute or republish this pattern.
- If you wish to share this pattern, link to the pattern page only.
- You may sell items produced using this pattern.
- Do NOT use copyrighted photos for your product listing.
- For the copyright T&C please read my Terms of Use.

Soap Saver Crochet Pattern One – Single Crochet
Skill Level – Basic
Size
- 5″ Length x 3″ wide
- Soap (The size of the soap bar I used is 3″ x 1.5″)
Gauge – 17 stitches, 22 rows to 10cm/4″
The Supplies You Need…
Yarn
- 1 x 50g Ball of Rico Creative Cotton Aran in pearl grey (52) – Yarn A
- 1 x scraps (10g) of Rico Creative Cotton Aran in silver grey (22) – Yarn B
Yarn substitute – Lily Sugar n Cream, Lion Brand 24/7 cotton, hemp yarn, linen yarn.
Hook
Notions
- Tape measure
- Darning needle (or yarn needle)
- Scissors
Other Materials
Soap / 1 bar of soap to guide your measurements.
Abbreviations (US Terms)
- SL-ST – slip stitch
- CH – chain
- SC – single crochet
Pattern Instructions
Yarn A – Pearl Grey
Yarn B – Silver Grey
Soap Sack
- With Yarn A – ch 14, turn,
- Row 1 – sc into 2nd ch from the hook, sc into every ch in the row, turn,
- Row 2 – ch 2, sc into every st to the end of the row, turn,
- Rep row 2 until the piece measures 9.5″.
- For the final row – sc into every st to the end of the row, finish with a sl-st into the last st cut yarn, and secure.
For the drawstring cord >
- With Yarn B – ch 72, cut yarn and secure.
- Weave in ends.
Making up >
- Weave in all loose ends, then sc or stitch the sides together with the right sides of the bag facing.
- Turn the right side out.
- Feed the chain tie through the stitches around the top edge of the soap bag and once the soap is inside, pull closed and tie.

Soap Saver Crochet Pattern Two – Single Crochet + Double Crochet
Skill Level – Basic
Size
- Length = 5.5 inches
- Width = 4 inches
- Soap (The size of the soap bar I used is 3 inches x 2 inches)
Gauge – 14 stitches, 6 rows to 10cm/4″ in the pattern.
The Supplies You Need…
Yarn
- 1 x scraps (30g) of Rico Creative Cotton Aran in pearl grey (52) – Yarn A
- 1 x scraps (20g) of Rico Creative Cotton Aran in silver grey (22) – Yarn B
- 1 x Scraps (30g) of Rico Creative Cotton Aran in nature (60) – Yarn C
Hook
Notions
- Tape measure
- Darning needle (or yarn needle)
- Scissors
Other Materials
Soap / 1 bar of soap to guide your measurements.
Abbreviations (US Terms)
- SL-ST – slip stitch
- CH – chain
- SC – single crochet
- DC – double crochet
Pattern Instructions
Yarn A – Pearl Grey (dark grey)
Yarn B – Silver Grey (light grey)
Yarn C – Nature (white/ecru)
Soap Saver
- With Yarn A – ch 14, turn,
- Row 1: sc into 2nd ch from the hook, sc into every ch, turn,
- Row 2: ch 3, dc into every st to the end of the row, turn,
- Row 3: ch 1, sc into every st to the end of the row, turn,
- Row 4: Rep row 2.
- Row 5: Rep row 3.
- Row 6: Change to Yarn B and rep row 2.
- Row 7: Rep row 3.
- Row 8: Rep row 2.
- Row 9: Rep row 3.
- Row 10: Change to Yarn C and rep row 2.
- Row 11: Rep row 3.
- Row 12: Rep row 2.
- Row 13: Rep row 3.
- Row 14: Rep row 2.
- Row 15: Rep row 3.
- Row 16: Rep row 2.
- Row 17: Rep row 3.
- Row 18: Rep row 2.
- Row 19: Rep row 3.
- Row 20: Change to Yarn B and rep row 2.
- Row 21: Rep row 3.
- Row 22: Rep row 2.
- Row 23: Rep row 3.
- Row 24: Change to Yarn A and rep row 2.
- Row 25: Rep row 3.
- Row 26: Rep row 2.
- Row 27: Rep row 3.
- Finish with a sl st into the last st, cut yarn, and secure.
For the drawstring cord >
- With Yarn C – ch 60, turn,
- ch 1, sc into every ch to the end of the row.
- Finish with a sl-st into the last ch, cut the yarn, and secure.
Making up >
- Weave in all loose ends.
- sc or stitch the sides together, with the right sides facing.
- Turn the right side out.
- Feed the chain tie through the dc stitches around the top edge of the soap bag and knot at the end. (See photos for reference)
- Place the soap inside, and pull closed.
- The soap-saver bag is now ready to be used!

Free Printable
Grab the soap saver crochet pattern as a handy, easy-to-follow printable.
Perfect for keeping by your side while you crochet—whether you’re making one for yourself, a gift, or your next craft fair table!
Soap Saver Crochet Pattern

Learn how to make a soap saver with this easy soap saver crochet pattern!
This beginner-friendly project features a beautiful texture and is the perfect scrap buster project for using up leftover cotton yarn.
Step-by-step instructions will guide you through creating your own reusable soap saver bag, ideal for gently exfoliating skin and saving every last bit of soap.
Part of a matching crochet bathroom set, this handmade item is great for gifting or selling at craft fairs.
Materials
- Pattern one
- 1 x Ball of Rico Creative Cotton Aran in pearl grey (52) – Yarn A
- 1 x scrap of Rico Creative Cotton Aran in silver grey (22) – Yarn B
- Pattern Two
- 1 x scraps (30g) of Rico Creative Cotton Aran in pearl grey (52) – Yarn A
- 1 x scraps (20g) of Rico Creative Cotton Aran in silver grey (22) – Yarn B
- 1 x Scraps (30g) of Rico Creative Cotton Aran in nature (60) – Yarn C
Tools
- Pattern One - Crochet hook – 4 mm (US G/6)
- Pattern Two - 5 mm (US H/8) crochet hook
- Scissors
- Yarn needle
- Tape measure
- Soap (The size of the soap bar I used is 3″ x 1.5″)
Instructions
Pattern One Instructions
Yarn A – Pearl Grey
Yarn B – Silver Grey
Soap Sack
- With Yarn A – ch 14, turn,
- Row 1 – sc into 2nd ch from the hook, sc into every ch in the row, turn,
- Row 2 – ch 2, sc into every st to the end of the row, turn,
- Rep row 2 until the piece measures 9.5″.
- For the final row – sc into every st to the end of the row, finish with a sl-st into the last st cut yarn, and secure.
For the drawstring cord >
- With Yarn B – ch 72, cut yarn and secure.
- Weave in ends.
Making up >
- Weave in all loose ends, then sc or stitch the sides together with the right sides of the bag facing.
- Turn the right side out.
- Feed the chain tie through the stitches around the top edge of the soap bag and once the soap is inside, pull closed and tie.
Pattern Two Instructions
Yarn A – Pearl Grey (dark grey)
Yarn B – Silver Grey (light grey)
Yarn C – Nature (white)
Soap Saver
- With Yarn A – ch 14, turn,
- Row 1: sc into 2nd ch from the hook, sc into every ch, turn,
- Row 2: ch 3, dc into every st to the end of the row, turn,
- Row 3: ch 1, sc into every st to the end of the row, turn,
- Row 4: Rep row 2.
- Row 5: Rep row 3.
- Row 6: Change to Yarn B and rep row 2.
- Row 7: Rep row 3.
- Row 8: Rep row 2.
- Row 9: Rep row 3.
- Row 10: Change to Yarn C and rep row 2.
- Row 11: Rep row 3.
- Row 12: Rep row 2.
- Row 13: Rep row 3.
- Row 14: Rep row 2.
- Row 15: Rep row 3.
- Row 16: Rep row 2.
- Row 17: Rep row 3.
- Row 18: Rep row 2.
- Row 19: Rep row 3.
- Row 20: Change to Yarn B and rep row 2.
- Row 21: Rep row 3.
- Row 22: Rep row 2.
- Row 23: Rep row 3.
- Row 24: Change to Yarn A and rep row 2.
- Row 25: Rep row 3.
- Row 26: Rep row 2.
- Row 27: Rep row 3.
- Finish with a sl st into the last st, cut yarn, and secure.
For the drawstring cord >
- With Yarn C – ch 60, turn,
- ch 1, sc into every ch to the end of the row.
- Finish with a sl-st into the last ch, cut the yarn, and secure.
Making up >
- Weave in all loose ends.
- sc or stitch the sides together, with the right sides facing.
- Turn the right side out.
- Feed the chain tie through the dc stitches around the top edge of the soap bag and knot at the end. (See photos for reference)
- Place the soap inside, and pull closed.
- The soap-saver bag is now ready to be used!
Notes
Size Information
Pattern One
- 5″ Length x 3″ wide
- Soap (The size of the soap bar I used is 3″ x 1.5″)
- Gauge – 17 stitches, 22 rows to 10cm/4″
Pattern Two
- Length = 5.5 inches
- Width = 4 inches
- Soap (The size of the soap bar I used is 3 inches x 2 inches)
- Gauge – 14 stitches, 6 rows to 10cm/4″ in the pattern.
Abbreviations > US Terms
- SL-ST – slip stitch
- CH – chain
- SC – single crochet
- DC – double crochet
Recommended Products
As an Amazon Associate and member of other affiliate programs, I earn from qualifying purchases.
Could you share your work with us…
I love seeing your finished projects on social media.
If you enjoyed making the crocheted soap saver bags, I’d love to see yours on Instagram, be sure to tag me @handylittleme or #handylittleme to be featured.
Happy crocheting!
The Crochet Bathroom Set
This pattern is part of a set of 7 crochet bathroom patterns.
1. Bath Puff Crochet Pattern
2. Crochet Basket Pattern {Easy + Quick!}
3. Crochet Wash Mitt Pattern {The Popcorn Stitch}
4.Crochet Washcloth Pattern {Beginner Friendly!}
5. Crochet Face Scrubbies Pattern
6. Crochet Soap Bag Pattern {Easy + Quick!}
7. Crochet Soap Saver Pattern
You can purchase all seven patterns in the inexpensive ebook here.

Helpful Resources
This pattern is great for beginners.
- You should be comfortable making a slip knot (how to make a slip knot (step by step)) and creating a chain (how to start a crochet chain).
- You should be comfortable working single crochet (how to single crochet (SC)).
- You should be comfortable working double crochet (how to double crochet (dc) for beginners).
- You should also be comfortable reading crochet patterns (how to read crochet patterns for beginners).
- And understanding crochet abbreviations and terms (US + UK).

Soap Savers Are Great For Organic Soaps
Recently, I visited an old traditional family soap-making business in Corfu, Greece, for a tour.
The Patounis Soap Works has used traditional methods to make soap for over a hundred years.
They use locally sourced olive products to create three distinct types of soap: olive oil, green, and olive palm.

Traditional soap that lasts
This long-lasting soap clearly called for a soap saver!
Made with naturally occurring oils, soda, sea salt, and water, the soap is crafted using time-honored methods.
The tour took us through the original vats and the modern equipment used today. Finally, we also saw how the soap is molded, cut, and stored for months before being packaged.

Soap sacks make great gifts
Additionally, if you want to make a gift for a friend or neighbor, or perhaps you make your own soaps to sell, adding a soap sack can be a nice little touch.
Both of these patterns are easy to make from yarn scraps in your stash.
I recommend using organic cotton yarn as this will be durable and great for scrubbing!