Knitted Cat Hat – Free Knitting Pattern
THIS ARTICLE CONTAINS AFFILIATE LINKS THAT SUPPORT HANDY LITTLE ME CONTENT AND FREE PATTERNS.In this post, you will see a knitted cat hat, a free knitting pattern.
The benefit of making a knitted cat hat is that you can make one in a few hours using bulky yarn and (US 11) 8 mm knitting needles.
Even with zero knitting experience, the free pattern and making-up photo tutorial will help you to make your cat hat to enjoy wearing in October.
The full pattern is free below, or you can purchase the ad-free printable PDF here.

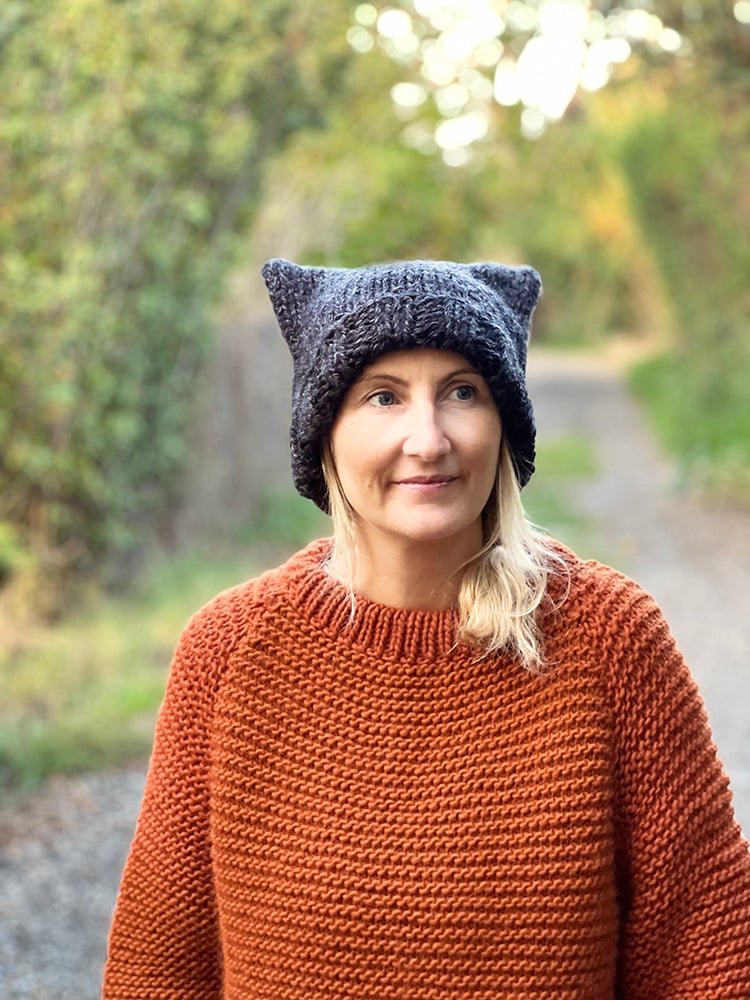
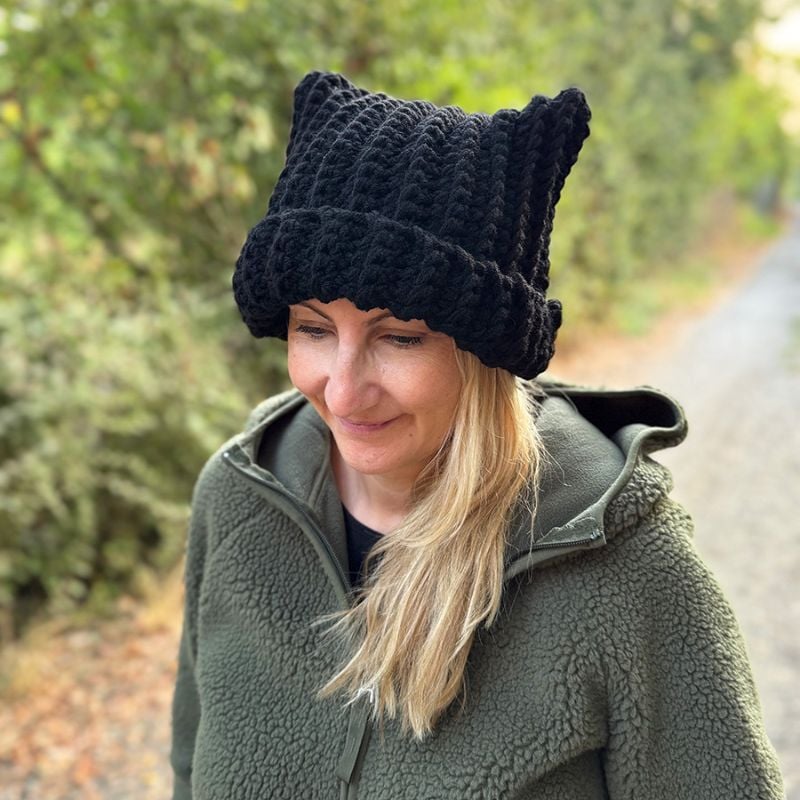
Knit A Simple Cat Ear Beanie
This cat ear beanie is knit as a long rectangle and then seamed into a square.
The cat ears are the two main points of the square that take shape when you wear it.
This adorable cat hat is a must for any cat lover and comes in a range of sizes, from kids to adults.
Kitty Hat Knit In Bulky Yarn
This hat will go with a casual outfit or be a part of a Halloween costume.
Knit with bulky weight yarn (with needle size US 11/8 mm) and knit flat on straight needles (not circular needles).
This is so it is easier for beginners to make in a short time.
If you are knitting for the first time, you might want to check out this guide – How to Knit – A Complete Beginner’s Guide

Cat Hat Knitting Pattern
Skill Level – Basic (Beginner Knitters)
Here is a cat hat pattern for you to try out!
Make a knitted hat (a versatile accessory) to wear in October or to a Halloween party.
This hat is a perfect first project for a beginner, as it uses simple stitches.
Copyright Info
- Please do not copy, sell, redistribute, or republish this pattern.
- If you wish to share this pattern, link to the pattern page only.
- You may sell items produced using this pattern.
- You must credit Louise Bollanos/Handy Little Me as the designer for the pattern.
- Do NOT use copyrighted photos for your product listing.
- For the copyright T&C, please read my Terms of Use.

Measurements/Sizes
This hat can be made in a range of sizes.
- Newborn – 3 months baby – Head circumference = 13-16″ / Finished length = 12″
- 1-3 years – Head circumference = 18-21″ / Finished length = 16″
- 5 to 12 years – Head circumference = 19-22″ /Finished length = 18″
- Teens to medium adults – Head circumference = 22-23″ / Finished length = 20″
- Large adult – Head circumference = 24-25″ / Finished length = 22″
- You may want to adjust the head circumference/finished length depending on the recipient of the hat.
Gauge
- 11 sts and 15 rows = in 4×4 inches/10×10 cm in stocking stitch.
The supplies you need
Yarn
- 1 skein of Lion Brand Heartland Thick and Quick in the color Black Canyon 153.
- Bulky/Chunky/12-ply yarn- 125yd/142g/114m
- Any yarn that is bulky yarn weight (05).
- The Petite Wool from We Are Knitters is a great substitute.
- More yarn substitutes can be found on Yarnsub.
Needles
Notions
- Tape measure
- Darning needle/tapestry needle
- Scissors

Abbreviations
- Beg – Begin(ning)
- CO – Cast on
- Cont – Continue(ing)
- K – Knit
- P – Purl
- Rem – Remaining
- Rep – Repeat
- St(s) – Stitch(es)
- St, St – Stockinette stitch (stocking stitch)
- RS – Right side
- WS – Wrong side
Stitch patterns
2×2 ribbing
- Row 1 (RS) – *K2, P2 – rep from * to the end of the row.
- Row 2 (WS) – *K2, P2 – rep from * to the end of the row.
Stockinette St (Stitch)
- Row 1 (RS) – Knit.
- Row 2 (WS) – Purl.
Print + Stitch
Purchase the ad-free PDF pattern
Want a clean, printable version of this pattern? You can purchase the ad-free PDF in my shop. It’s perfect for printing, saving to your device, and making without distractions.

Pattern Instructions
Time needed: 3 hours and 30 minutes
How To Knit A Cat Ear Beanie
- Cast on.
With the US 11/8 mm knitting needles, cast on 16-20-24-28-32 sts
- Work the ribbing for the brim.
Next, you will knit the ribbing for the brim.
Work in 2×2 ribbing for 4 inches.
- Knit the main body of the hat.
Next, you will work in stockinette stitch…
Row 1 (RS): Knit.
Row 2 (WS): Purl.
Continue to work in st, st (repeating rows 1 and 2) until the piece measures 6-8-10-12-14 inches.
- Work the ribbing for the brim.
Work in 2×2 ribbing for 4 inches.
- Cast off.
Cast off in ribbing.
- Make up the hat – Step 1.
Fold the hat in half with the wrong side together on the inside and the right sides facing you.
- Make up the hat – Step 2.
You will start to seam on one side (and then the other), leaving a 2-inch gap on each side of the ribbed brim unsewn.
- Make up the hat – Step 3.
Turn the hat inside out and seam the 2 inches on each side of the brim using the mattress stitch.
- Make up the hat – Step 4.
Weave in all loose ends and turn the brim up by 2 inches.
You shouldn’t see any seams when you turn over the brim of the finished hat.


More Free Knitting Patterns
You may also like these hat patterns…
- How to knit a hat for complete beginners (+ video tutorial)
- Ribbed Beanie Knitting Pattern {Unisex Mariner’s Hat}
- Witch hat knitting pattern
- 19 free hat knitting patterns to make for fall
Do you crochet?
If you also crochet, you may enjoy this pattern: Free Cat Hat Crochet Pattern (5 Sizes for Beginners)
Could you share your work with us?
If you enjoyed making the knitted cat hat, I’d love to see yours on Instagram; tag me @handylittleme or #handylittleme.
If you are on Facebook, stop over to the handylittleme Facebook group and share a photo.
I’d love to see your work.
Happy knitting!
More Patterns You May Be Interested In…
- 20 Temperature Blanket Patterns (The Ultimate Guide)
- How To Knit A Hat With Circular Needles (Step-By-Step)
- 31 Free Baby Blanket Knitting Patterns (Easy Knit Blankets)
- How To Knit Baby Booties (Step-By-Step)
- Knitted Dog Sweater Pattern (3 Sizes)
- 12 Simple Knitting Stitches For Beginners
- Free Knitted Dishcloth Patterns
- 37+ Patterns To Use Up Your Yarn Stash (Small Projects)
- Free Dog Sweater Knitting Pattern (Straight Needles)
- Super Easy Corner To Corner Baby Blanket Pattern (Knit)
- Easy Baby Sweater Knitting Pattern For Beginners
- How To Knit A Baby Hat (Straight Needles)
- Pumpkin Knitting Pattern (Beginner Friendly!)
- 8 Cable Stitch Knitting Patterns
- Free Knitted Heart Pattern (Easy + Quick Project)
- 20+ Fall Oversized Knits (Sweater Knitting Patterns)
- Pumpkin Patch Outfit Ideas (Cute + Stylish)
Do you have a video or any sort of tutorial showing how to seam the sides of the hat??? Thank you!
Hello Kathleen,
I don’t have a video tutorial for this hat but I do have a video tutorial for a similar hat you can see here – https://www.youtube.com/watch?v=RqEvwXICTds
I hope that helps,
Louise
Hi, loving the pattern. Just to check: the measurement of 12 inches, is that including the 4 inches of ribbing or just the stockinette?? Thank you
Hello Twig,
Yes depending on the size you are making, the finished length measurement will include the ribbing section.
Happy knitting!
Louise
do you have the pattern adapted to worsted weight yarn? My grandson picked out a worsted yarn for this hat. thank you
Hello Deborah,
Thanks for reaching out!
I’m glad to hear your grandson is excited about this hat!
Unfortunately, this pattern is only written for bulky yarn, so there isn’t an official adaptation for worsted weight.
If you’d like, you could try holding the worsted yarn double to get closer to the bulky gauge, but keep in mind it may change the fit a little.
Let me know if you have any other questions—I’m here to help!
Louise
Hello! Loving the way the pattern is working up so far. I am uncertain about the length. It’s 4 inches of ribbing, 12 inches of stockinette, followed by 4 more inches of ribbing for the regular adult size, correct?
Thank you!!
Hi there Ashley! I’m so glad you’re enjoying the pattern so far! 😊
Yes, you’ve got it right—for the regular adult size, the hat is worked with 4 inches of ribbing, then 12 inches of stockinette, followed by another 4 inches of ribbing. That gives the hat its cozy fold-over edge and comfy fit.
Happy knitting—and feel free to share a photo when you’re done, I’d love to see it! 🧶🐾
I had already started the second set of ribbing before I checked back here so I ended up doing 4 in, 8 in, 4 in because I assumed it was 12 inches total with the first ribbing and stockinette section. It did end up working out anyway because my tension is a bit more loose than I expected. I think it turned out okay for my first wearable ever! Thank you!
I would post results but I can’t sort out how, so I’ll post it on Ravelry!
Hi! I know this tutorial is older but I was wondering if this is done with a long tail cast on or a basic cast on? Thanks for the reply if you see this!
Hi Olivia,
I used a long-tail cast on for the hat, but you can absolutely use a basic cast on if you prefer.
The key is making sure the edge has a bit of stretch for the ribbed brim.
Tips:
If using long-tail, leave a generous tail (about 3–4× the hat width) so it doesn’t tighten up.
If you want extra stretch, German twisted (old Norwegian) works beautifully.
Using a basic/knit cast on? Cast on loosely (or go up a needle size just for the cast on), then switch to your working needles.
Either method will work—choose the one you’re most comfortable with! 🧶