Cable Wrap Knitting Pattern (Outlander Claire)
THIS ARTICLE CONTAINS AFFILIATE LINKS THAT SUPPORT HANDY LITTLE ME CONTENT AND FREE PATTERNS.The cable wrap knitting pattern will allow you to create large twisted cables in an intricate design.
I wanted to share with you another free knitting pattern that has been inspired by the TV show Outlander.
Scroll down for the free pattern or you can purchase a printer-friendly ad-free PDF here.

Design Inspired By Outlander Claire
If you have been watching the Outlander TV series, through all of the seasons, Claire has worn an amazing collection of knits.
This cable shawl design was inspired by one of my other designs for cable knit arm warmers.
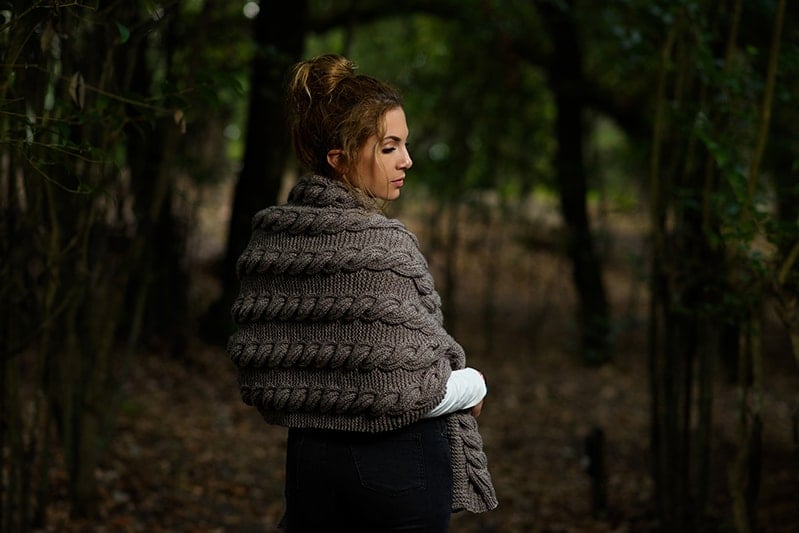
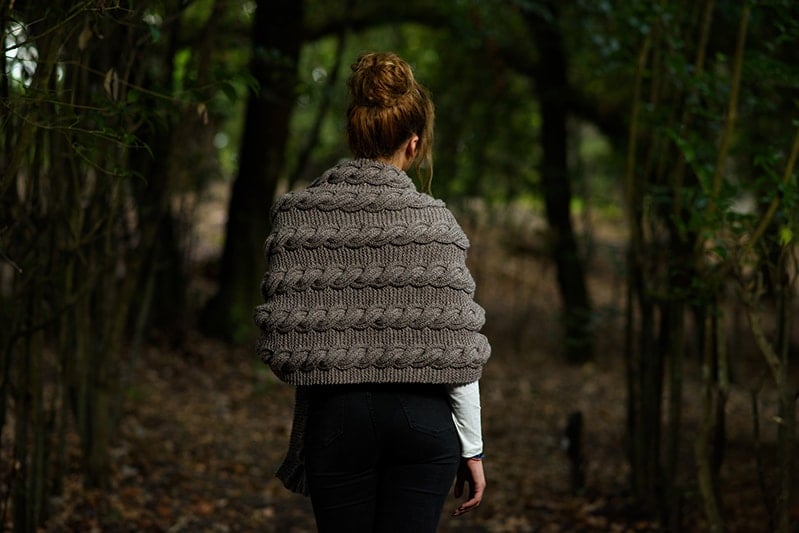
The large cables are seen twisting up through the design, fanning out at the edges.
Claire Fraser is seen wearing cable knit arm warmers often in the series and this shawl is a development from that design.
This pattern is part of my Outlander collection, you can see the other Outlander patterns here. – Outlander Patterns {Beginner + Intermediate}
The Cable Knit Stitch
This pattern is for intermediate knitters, as the cable stitch is a little bit more complicated.
The cable itself is intertwined throughout the wrap, making it a thick warm cover-up.
The pattern may look a little daunting if you are a beginner who is looking to do something more intricate.
Once you get used to working the cables, this design becomes a nice mindless enjoyable knit.

Cable Twists Explained
In the pattern you will see that the cable twists are knit forward – the abbreviation is – C24F.
A tip for remembering which way a cable will twist, either to the front or the back of the work is to think of this;
- The RIGHT way – these stitches are held behind – C24B
- The LEFT way – these stitches are held in the front – C24F
This C24F abbreviation is explained below;
- C24F – (Cable 24 front) – Slip 12 stitches onto a cable needle and hold in front of work, (k2, P2) 3 times from the left needle, then (K2, P2) 3 times from the cable needle.

Resources and tutorials you may find helpful in following this pattern:
This pattern is great for any intermediate knitters.
- How To Cast On Knitting
- How To Cast Off Knitting For Total Beginners (Step by Step)
- How To Knit Garter Stitch
- You should be comfortable working the purl stitch (how to knit the purl stitch (for beginners + a video tutorial)).
- You should be comfortable working cable stitches and using a cable needle (there is a video in this post to show you how to knit this cable).
- You should also be comfortable reading knitting patterns (how to read knitting patterns for beginners).
- And understanding knitting abbreviations and terms (US and UK).
- How to Knit – A Complete Beginner’s Guide
Video Tutorial
There is a video tutorial to show you how to knit C24F (Cable 24 Forward).
You can see this video on my YouTube channel here.

More Outlander Patterns
For more shawl patterns inspired by the Outlander series, please take a look at these posts:
- Outlander Carolina Shawl Pattern
- Claire’s Rent Shawl Knitting Pattern
- Outlander Shawl Pattern (Clare Fraser Shawl)
Visit the Outlander Knitting Pattern Ebooks in my shop below:
- The Ultimate Outlander Knitting Pattern Collection – With 39 Knitting Patterns.
- The Complete Outlander Knitting Pattern Bundle – With 55 Knitting Patterns.
Popular Patterns
- Outlander Brianna Fingerless Gloves Pattern
- Jenny’s Shawl Knitting Pattern (Outlander Knit)
- Beret Knitting Pattern (Beginner Friendly!)
- Outlander Cowl Knitting Pattern (Claire Season 1)
- Journeycake Sontag Shawl Knitting Pattern
- Fraser Tartan Shawl Knitting Pattern
- Outlander Claire’s Cable Knit Wrist Warmers
- Celtic Cable Fingerless Gloves Pattern
- Outlander Capelet Knitting Pattern
- Shrug Knitting Pattern
- Outlander Scarf | Brianna Fraser Pattern
- 30 Free Knitting Patterns For Shrugs And Wraps
Cable Wrap Knitting Pattern
- Get the ad-free, printable PDF pattern HERE.
- Get the Shawls, Wraps + Cowls Ebook here.
- See ALL of the Outlander Pattern Ebooks here.
Notes
The cable shawl knits up in an interesting design, which makes for a relaxing and enjoyable knit.
Copyright Info
- Please do not copy, sell, redistribute, or republish this pattern.
- If you wish to share this pattern, link to the pattern page only.
- You may sell items produced using this pattern.
- Do NOT use copyrighted photos for your product listing.
- For the copyright T&C please read my Terms of Use.
Skill Level – Intermediate
Gauge
10 x 10 cm/4 x 4 inches = 14 sts and 26 rows in garter stitch.
Measurements
- Length = 64 inches/163 cm
- Width = 22 inches/56 cm
*You can keep knitting this cable wrap until you can wear it comfortably, the stitch counts in the pattern are just a guide.

The Supplies You Need…
Yarn
- Classic Alize Lanagold (100g (3.53 oz)/240mt (262 yards) – in the color 650 – Brown x 10 skeins
- Good yarn substitute – Cascade 220.
- See more yarn substitutes here.
- Yarn Weight Guide (+ Conversion Chart) – Medium 04.
- Aran/Worsted/10 Ply.
- You can purchase Alize yarns from YarnStreet or on Etsy.
Needles
- 5.5 mm (US 9) knitting needles – I used my interchangeable circular needles on a 40″/100cm cable as there were many stitches – I did not join in the round to knit.
- Cable Needle – 5.5 mm (US 9)
Notions
- Tape measure
- Darning needle
- Scissors
- Stitch markers
Abbreviations / Knitting Abbreviations And Terms (US And UK) List
- Beg – beginning
- Cont – continue
- C24F – (Cable 24 front) – Slip 12 stitches onto a cable needle and hold in front of work, (K2, P2) 3 times from the left needle, then (K2, P2) 3 times from the cable needle.
- K – knit
- P – purl
- PM – place marker
- SM – slip marker
- St(s) – Stitch(es)
- Rep – repeat

Pattern Instructions
Cast on 186 sts.
- Row 1: (RS) K6, PM, (K2, P2) x 6, PM, K6, PM, (K2, P2) x 6, PM, K6, PM, (K2, P2) x 6, PM, K6, PM, (K2, P2) x 6, PM, K6, PM, (K2, P2) x 6, PM, K6, PM, (K2, P2) x 6, PM, K6.
- Row 2: (WS) *K6, SM, (K2, P2) x 6, rep from * to end of row.
Rep rows 1 (slipping the markers) and 2 for a further 10 rows (For the border length).
Now work in this pattern as follows:
- Row 1: (RS) *K6, SM, (K2, P2) x 6, SM, rep from * to end of the row, SM, K6.
- Row 2: (WS) *K6, SM, (K2, P2) x 6, SM, rep from * to end of the row, SM, K6.
- Row 3: (RS) *K6, SM, (K2, P2) x 6, SM, rep from * to end of the row, SM, K6.
- Row 4: (WS) *K6, SM, (K2, P2) x 6, SM, rep from * to end of the row, SM, K6.
- Row 5: (RS) *K6, SM, (K2, P2) x 6, SM, rep from * to end of the row, SM, K6.
- Row 6: (WS) *K6, SM, (K2, P2) x 6, SM, rep from * to end of the row, SM, K6.
- Row 7: (RS) *K6, SM, C24F, SM, K6, SM, rep from * to end of the row, SM, K6.
- Row 8: (WS) *K6, SM, (K2, P2) x 6, SM, rep from * to end of the row, SM, K6.
Rep rows 1-8 a further 35 times.
For the border length:
- Row 1: (RS) *K6, SM, (K2, P2) x 6, SM, rep from * to end of the row, SM, K6.
- Row 2: (WS) *K6, SM, (K2, P2) x 6, SM, rep from * to end of the row, SM, K6.
Rep rows 1 and 2 for a further 10 rows.
Cast off in pattern.
Sew in all loose ends.
You can view more Outlander Knitting Patterns here.

Just discovered you, yay!😊
Hello Deborah, I’m so happy you visited my site, I hope you will come back often to see what’s new! 🙂
Love these looks. Do you ever do patterns in crochet? Unfortunately I never learned to knit but I would love to make these Outlander patterns. Thanks
Hello Kathlene,
For the moment the patterns are knitting patterns only.
I haven’t translated any into crochet but that is something I may do in the future.
Thanks,
Louise
Just wondering how you get 24 st. From 10 st pattern. K6 P2 k2.
Hello Alice, you knit 6 sts, then you K2, P2 for 24 sts – place a marker, then repeat. I hope that helps! 🙂
Thank you! I had the same question 😊
I’m trying my hand at this pattern. Lovely, by the way! I just finished the starting edge & am TRYING to get the cables to work. Given I’ve never done a 24st cable, I’m worried I’m doing something wrong. They are SO tight I feel like I’m going to break the fibers or my needles trying to get this to come together. SOS. Any advice for this novice would be great.
(Everything else is nice & loose & free.)
Hello Stephanie,
I am so happy you are enjoying the pattern!
The 24 cable stitch can become tight – you need to knit a little looser when doing the cable stitches when you come to the twist.
As there are so many stitches for the cables, I found using a plastic cable needle was better than a metal one.
This was because it was a little bendier and better for any of those difficult cable stitches.
I hope that helps!
Louise 🙂
Thanks! The first row of cables was really the toughest. I just pushed through those & have been doing everything I can to make them looser. Theyre still tighter than I’d like–the details in my twists aren’t as pronounced as yours. Hoping once it’s finished & totally off the needles it can be manipulated further. Or maybe it’ll just get better the further along i get.
I had to find a comparable yarn but went with wool and size 4 but the initial stitches look so loose! Is that from me or from the yarn being too thin?
Hello Brooke,
If you are using a DK/lightweight yarn with a size 4mm (US 6) needle then the stitches should not be loose.
If you are using a thinner yarn weight than DK with that size needle, for example a sport/4ply or fingering/sock yarn then yes it would be loose.
You could knit a few more rows and with cables to see if it gets better as it grows – if you are using the correct weight yarn for your needle size.
I hope that helps!
Louise
I would love to make this shawl but having read through the directions I do not see the cable stitches i.e. c24f?
What am I missing. I am a seasoned knitter and usually have no problem reading a pattern, but this one confuses me.
Thank you
Hello Mary Jane,
If you look at row 7 of the 8-row cable repeat pattern you will see the C24F.
I hope that helps!
Louise
Louise, Thank you so much for the quick response. I really want to make this shawl.
I thought I had read through the pattern but at 72 yrs old I missed it. 😔
I can’t wait to wear it.
Mary Jane
Please just confirm for me (because I feel like I’ve missed something important), but all rows, apart from the cable row, are exactly the same, aren’t they.. so, to be clear, initially I will have 18 rows (2 start up rows, 10 border rows & 6 pattern rows)of the same pattern before I hit the first cable row…. please tell me that’s right? because I LOVE how this looks, but just can’t seem to see it… thank you 😊
Hello Vanessa,
There are two start up rows (where you are adding the markers), and adding the first length before starting the cable pattern rows.
Then you work rows 1-8 in the cable pattern – with row 7 being the cable row.
I hope that helps,
Louise
Should the asterisk in row 7 be in front of C24F? Other wise if you do it as written you’d be K6, SM, and then beginning your repeat with another K6, which seems off compared to the rest of the pattern where the 2×2 ribbing is placed?
Hello James,
Row 7 is correct, if you try it you will see how it develops.
Thanks,
Louise
I’m confused. I don’t see the instruction to C24F anywhere except on row 7 of the pattern. Is that correct? I guess it has been a while since I did any cable knitting.
Hello Cynthia, yes that is correct.