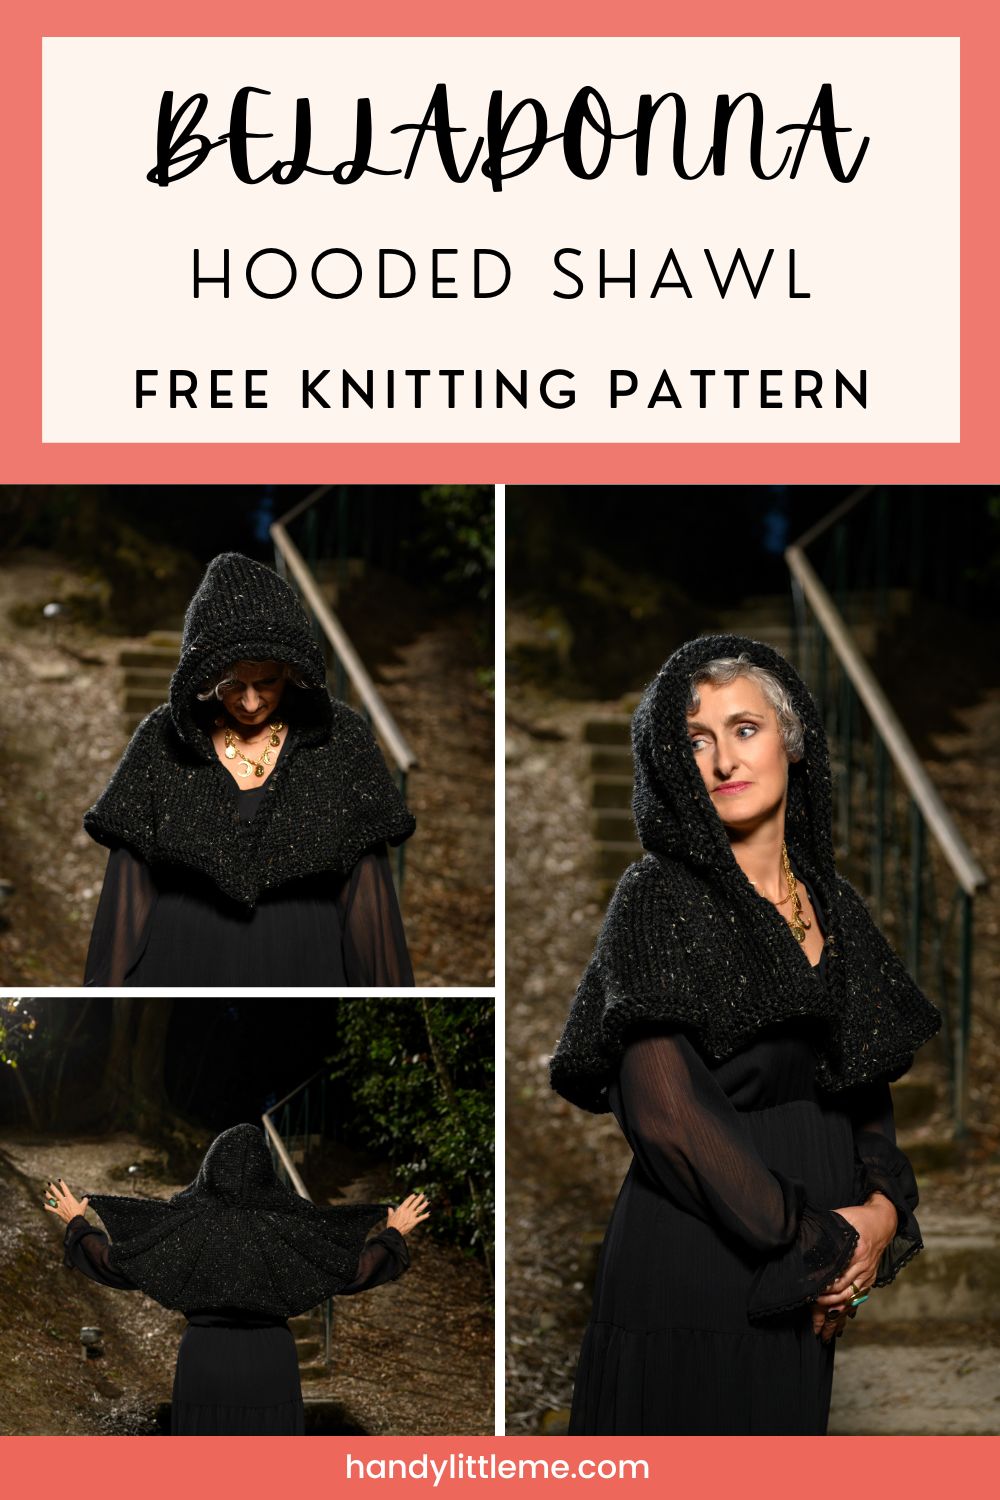
Hooded Shawl Knitting Pattern (The Belladonna)
THIS ARTICLE CONTAINS AFFILIATE LINKS THAT SUPPORT HANDY LITTLE ME CONTENT AND FREE PATTERNS.In this post, you will see the Belladonna hooded shawl knitting pattern.
This project uses three skeins of Lion Brand Wool-Ease Thick and Quick yarn.
Scroll down to view the free knitting pattern, or grab the printer-friendly ad-free PDF in my shop here.

Inspired By The Belladonna Plant
Belladonna, also known as deadly nightshade, is a poisonous plant often linked with witchcraft.
It is said that witches used deadly nightshade in an ointment, and that, when absorbed through the skin, it caused hallucinations and the sensation of flying.
This plant was used as a poison, for astral projection, for youth and beauty spells, and to summon the dead. Spooky!
Hooded Shawl – The Yarn I Used
I knit the hooded shawl with Lion Brand Wool-Ease Thick and Quick yarn.
This is 80% Acrylic/20% Wool, a very soft, warm yarn.
You can substitute with other yarns of the same weight—super bulky/super chunky/14 ply.
Related Post: Yarn Weight Guide (+ Conversion Chart)

Belladonna Hooded Shawl Knitting Pattern
Grab your inexpensive ad-free, PDF printable pattern in my shop here.
Grab the Halloween Bundle here (with 7 Knitting Patterns).
Notes
Skill Level – Easy (advanced beginner)
This hooded shawl is perfect for wearing as a capelet on a special occasion.
Easy to throw on over a dress when you need a little something to complete your outfit in the fall/winter months.
Copyright Info
- Please do not copy, sell, redistribute, or republish this pattern.
- If you wish to share this pattern, link to the pattern page only.
- You may sell items produced using this pattern.
- Do NOT use copyrighted photos for your product listing.
- For the copyright T&C, please read my Terms of Use.

Size Information
One Size/Adult
Measurements
- Length tip to tip (wingspan) = 42 inches/107 cm.
- Width at the widest point = 14 inches/36 cm.
Please note – the length and width of the shawl can be made longer/wider by adding more yarn; for example, add one or two more balls.
Hood Measurements
The hood is to fit an adult and measures 11″/28 cm in depth and 13″/33 cm in height.
Gauge – 9 sts/12 rows in 4 inches/10 cm in stockinette (stocking) stitch.

The Supplies You Need
Yarn
- 3 x Lion Brand Wool-Ease Thick + Quick – 170g/106yd/97m in the color Obsidian.
- Yarn Weight – Super Bulky/Super Chunky/14 Ply.
Needles
- 9 mm (US 13) knitting needles.
- I used my interchangeable circular needles on a 100cm/40″ cable.
- I did not join in the round to knit the shawl.
- The shawl is worked back and forth on the needles – knit flat.
- The long cable was used to accommodate the number of stitches.
Notions
- Tape measure
- Darning needle/yarn needle.
- Scissors
- Stitch markers

Abbreviations
You can grab a free list of US and UK knitting terms here.
- CO – Cast on
- Cont – Continue
- K – Knit
- K2tog – Knit the next two stitches together (decrease)
- SM – Slip marker
- St(s) – Stitch(es)
- St St – Stockinette (stocking) stitch
- PM – Place marker
- Rem – Remaining
- Rep – Repeat
- RS – Right side
- WS – Wrong side
- YO – Yarn over

Pattern Instructions
The Shawl
(You will need 2 balls of Lion Brand Wool-Ease Thick and Quick for the shawl, add more yarn for a wider wingspan and longer length).
CO 13 sts
- Row 1 (RS): K2, (PM, YO, K1) 4 times, PM, K1, (PM, K1, YO) 4 times, PM, K2.
- Row 2 (WS): K2, P to last 2 sts, K2. (Slipping markers)
- Row 3: K2, (SM, YO, K to marker) 4 times, SM, K1, (SM, K to marker, YO) 4 times, SM, K2.
- Row 4: K2, P to last 2 sts, K2. (Slipping markers)
Rep rows 3 and 4 until you have around 170 sts (or your desired length).
Next, work the following for the final few rows…
- Row 1 (WS): Knit
- Row 2 (RS): K2, (SM, YO, K to marker) 4 times, SM, K1, (SM, K to marker, YO) 4 times, SM, K2.
- Row 3: Knit
- Row 4: K2, (SM, YO, K to marker) 4 times, SM, K1, (SM, K to marker, YO) 4 times, SM, K2.
- Cast off.

The Hood
(You will need 1 ball of Lion Brand Wool-Ease Thick and Quick for the hood.)
The hood is worked from the front to the back.
CO 54 sts
- Row 1 (RS): Knit
- Row 2 (WS): Purl
- Row 3: Knit
- Row 4: Knit
- Row 5: Knit
- Row 6: Purl
- Rows 7-11: Knit
- Row 12: Purl
- Row 13: Knit
Continue working in st st until the piece measures 9 inches from the cast-on edge.

Decrease:
- Row 1 (RS): K24, K2tog, K2tog, K2tog, K24. (51sts)
- Row 2 (WS): Purl
- Row 3: K23, K2tog, K1, K2tog, K23. (49sts)
- Row 4: Purl
- Row 5: K20, K2tog, K2tog, K1, K2tog, K2tog, K20. (45sts)
- Row 6: Purl
- Cast off all rem sts, break yarn and leave a tail for seaming up the back of the hood.
- Fold the back of the hood in half and seam up using your darning/yarn needle and the mattress stitch.
- Weave in all loose ends.
Making Up
Lie the shawl flat on a flat surface right side up, and lie the hood on top with the right side touching the right side of the shawl (the inside of the hood facing you).
Seam the hood to the neckline of the shawl, along the edges.
Once they are connected, weave in any loose ends.

Finishing and Blocking
You may wish to block your shawl.
You can do that as follows:
- Make sure all ends are woven in using a tapestry needle or method of choice.
- Gently block by filling a sink or water basin with lukewarm water, and add a small amount of rinse-less wool wash.
- Place the items in the water and gently massage out any air bubbles.
- Drain water, gently squeezing out any excess water from the item, then roll in a towel, and stomp on the towel roll to remove any more excess water.
- Lay the item out on a towel to approx. finished wingspan measurements and allow to dry completely.
Blocking Tutorial
- If you want to learn more about blocking, you can read more here – Blocking Knits – How To Block Knitting Guide

Could you share your work with us…
I love seeing your finished projects on social media.
If you enjoyed making the shawl, I’d love to see yours on Instagram, tag me @handylittleme or #handylittleme to be featured.
I’d love to see your work.
Happy Knitting!
Helpful Resources
This pattern is great for advanced beginner knitters…
- Knitting Lessons
- How to cast on knitting
- How to cast off knitting for total beginners (step by step)
- How to knit garter stitch
- How to knit the purl stitch (for beginners + a video tutorial)
- How to knit stockinette stitch (for beginners)
- How to read knitting patterns for beginners
- How to read a knitting chart
- Knitting abbreviations and terms (US and UK)
- How to knit – a complete beginner’s guide
More Patterns You May Be Interested In…
- How To Knit A Hat For Complete Beginners (+ Video Tutorial)
- 20 Temperature Blanket Patterns (The Ultimate Guide)
- How To Knit A Hat With Circular Needles (Step-By-Step)
- 31 Free Baby Blanket Knitting Patterns (Easy Knit Blankets)
- How To Knit Baby Booties (Step-By-Step)
- Knitted Dog Sweater Pattern (3 Sizes)
- 12 Simple Knitting Stitches For Beginners
- Free Knitted Dishcloth Patterns
- 37+ Patterns To Use Up Your Yarn Stash (Small Projects)
- Free Dog Sweater Knitting Pattern (Straight Needles)
- Super Easy Corner To Corner Baby Blanket Pattern (Knit)
- Easy Baby Sweater Knitting Pattern For Beginners
- How To Knit A Baby Hat (Straight Needles)
- Pumpkin Knitting Pattern (Beginner Friendly!)
- Witch Hat Knitting Pattern
- Free Knitted Heart Pattern (Easy + Quick Project)
- Shawl With Hood Knitting Pattern
- Mabon Asymmetrical Shawl Knitting Pattern
Hi
Just a little confused about the directions for the belladonna shawl. Step three is confusing to me. Would you be so kind to explain. It says yo knit to marker 4 times but there are 8 stitches in the section. Thank you for any help.
Hi Cait! Not confusing at all—happy to help. 😊
In Step 3 you’re following Row 3 of the pattern, which reads:
K2, (SM, YO, K to marker) 4 times, SM, K1, (SM, K to marker, YO) 4 times, SM, K2.
What this means in practice:
“K to marker” = knit every stitch up to the next marker, however many stitches are in that section (it grows each right-side row).
On the first half of the shawl, you YO first, then knit to the next marker. Do that four times (because there are four increase sections on that side).
Slip the next marker, K1 (this is the center stitch).
On the second half, you knit to the marker first, then YO before slipping the marker. Again, do that four times.
Finish with the edge stitches (K2 at each side).
So if you currently see 8 stitches before the next marker, you would: YO, knit 8, slip marker (that’s one of the four repeats on the first half). Later, on the other side, it flips to knit 8, YO, slip marker.
Two tips that help:
Use one color of markers for the four sections on each side and a different color for the center marker, so it’s obvious when you switch from “YO before” to “YO after.”
Keep a row counter for the 2-row rhythm (Row 3 = increase row, Row 4 = purl back), which you’ll repeat for the body.
You’re doing great—once you work a couple of repeats, the flow really clicks. If anything else feels unclear, reply here and I’ll walk through it with you.
Louise:)